DROPS Karisma
DROPS Karisma
100% Wool
from 3.00 $ /50g
Get the yarn to make this pattern from 39.00$.

The yarn cost is calculated from the pattern’s smallest size and the yarn’s cheapest product type. Looking for an even better price? You might find it on the DROPS Deals!

DROPS SS24

Latitude

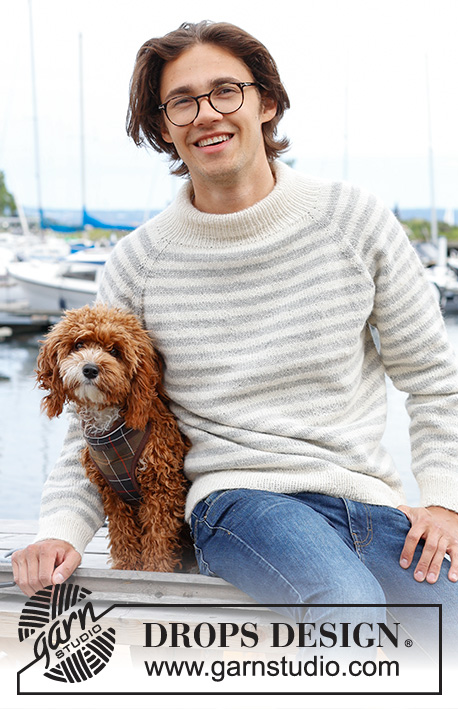
Knitted sweater for men in DROPS Karisma or DROPS Puna. The piece is worked top down with double neck, raglan and stripes. Sizes S - XXXL.

DROPS 233-3
DROPS Design: Pattern u-952
Yarn group B
-------------------------------------------------------

SIZES:
S - M - L - XL - XXL – XXXL

Finished measurements:
Chest measurements: 96-104-112-122-132-146 cm = 37¾"-41"-44"-48"-52"-57⅜"
Full length: 62-64-66-68-70-72 cm = 24⅜"-25¼"-26"-26¾"-27½"-28⅜"
All measurements in charts are in cm.

MATERIALS:
Color/yarn used in picture:
DROPS KARISMA from Garnstudio (belongs to yarn group B)
400-400-450-500-550-600 g color 01, off white
250-300-300-350-350-400 g color 72, light pearl grey

Or use:
DROPS PUNA from Garnstudio (belongs to yarn group B)
350-350-400-450-500-550 g color 01, off white
200-250-250-300-300-350 g color 07, light grey

NEEDLES:
DROPS CIRCULAR NEEDLE SIZE 4 MM = US 6: Length 40 cm = 16" and 80 cm = 32".
DROPS CIRCULAR NEEDLE SIZE 3 MM = US 2.5: Length 40 cm = 16" and 80 cm = 32".
DROPS DOUBLE POINTED NEEDLES SIZE 4 MM = US 6.
DROPS DOUBLE POINTED NEEDLES SIZE 3 MM = US 2.5.
The technique MAGIC LOOP can be used – you then only need circular needle of 80 cm = 32" in each size.

KNITTING GAUGE:
21 stitches in width and 28 rows in height with stockinette stitch = 10 x 10 cm = 4" x 4".
NOTE: Needle size is only a guide. If you get too many stitches on 10 cm = 4", change to a larger needle size. If you get too few stitches on 10 cm = 4", change to a smaller needle size.

-------------------------------------------------------

Alternative Yarn – See how to change yarns here
Yarn Groups A to F – Use the same pattern and change the yarn here
Yarn usage using an alternative yarn – Use our yarn converter here

-------------------------------------------------------

DROPS Karisma
DROPS Karisma
100% Wool
from 3.00 $ /50g
Get the yarn to make this pattern from 39.00$.

The yarn cost is calculated from the pattern’s smallest size and the yarn’s cheapest product type. Looking for an even better price? You might find it on the DROPS Deals!

Pattern instructions

NOTE: This pattern is written in American English. All measurements in charts are in cm. For conversion from inches to cm - click here. There are different terms for crocheting in American and British English. If this pattern includes crochet, click for "crochet terms" here. For this pattern in British English, please click here.
-------------------------------------------------------

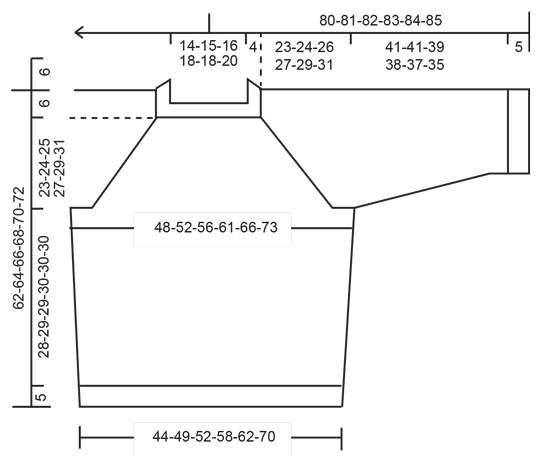
EXPLANATIONS FOR THE PATTERN:
-------------------------------------------------------

RAGLAN:
Increase 1 stitch on each side of 3 stitches (marker-stitch is the middle stitch) in each transition between body and sleeves by making 1 yarn over; the yarn over is knitted twisted on the next round to avoid a hole. The new stitches are worked in stockinette stitch.

STRIPES:
* 4 rounds with color off white, 4 rounds with color light pearl grey / light grey *, work from *-* to finished length.

DECREASE TIP (for sleeves and sides of body):
Decrease 1 stitch on either side of the marker thread as follows: Work until there are 3 stitches left before the marker thread, knit 2 together, knit 2 (marker thread sits between these 2 stitches), slip 1 stitch as if to knit, knit 1 and pass the slipped stitch over the knitted stitch (2 stitches decreased).

-------------------------------------------------------

START THE PIECE HERE:

-------------------------------------------------------

SWEATER – SHORT OVERVIEW OF THE PIECE:
The double neck, yoke and body are worked in the round, on circular needle and top down. The sleeves are worked in the round with double pointed needles/short circular needle.

DOUBLE NECK:
Cast on 108-112-118-124-128-134 stitches with circular needle size 4 MM = US 6 and color off white DROPS Karisma or DROPS Puna. Change to circular needle size 3 MM = US 2.5. Work rib in the round (knit 1, purl 1) for 13 cm = 5⅛" (the neck will later be folded double).

YOKE:
Change to circular needle size 4 MM = US 6. Insert 4 markers as you work as follows: Knit 1 and insert marker-1 in this stitch, knit 27 (sleeve), knit 1 and insert marker-2 in this stitch, knit 25-27-30-33-35-38 (front piece), knit 1 and insert marker-3 in this stitch, knit 27 (sleeve), knit 1 and insert marker-4 in this stitch, knit 25-27-30-33-35-38 (back piece).
Knit 1 round and increase 5-7-5-10-11-18 stitches evenly between markers 2 and 3 (30-34-35-43-46-56 stitches on the front piece) and between markers 4 and 1 (30-34-35-43-46-56 stitches on the back piece) = 118-126-128-144-150-170 stitches. Insert a marker thread between markers 4 and 1; the yoke is measured from here.

Continue with stockinette stitch, increasing for RAGLAN and working STRIPES – read descriptions above.
Increase every 2nd round 10-13-18-17-20-21 times = 198-230-272-280-310-338 stitches. REMEMBER THE KNITTING TENSION!
Continue increases for the raglan, but every other increase is worked only on the body (4 stitches increased). i.e. increase on the body on every 2nd round and on the sleeves on every 4th round. Increase like this 20-20-18-20-20-22 times on the body (10-10-9-10- 10-11 times on the sleeves). You have now increased a total of 30-33-36-37-40-43 times on the body and 20-23-27-27-30-32 times on the sleeves. There are 90-100-107-
117-126-142 stitches for the body between markers 2 and 3 and between markers 4 and 1, and there are 67-73-81-81-87-91 stitches for sleeves between markers 1 and 2 and
between markers 3 and 4.

When all the increases are finished there are 318-350-380-400-430-470 stitches. Continue with stockinette stitch and stripes until the yoke measures 23-24-25-27-29-31 cm = 9"-9½"-9¾"-10⅝"-11⅜"-12¼" from the marker thread.
Now divide for the body and sleeves as follows: Knit 1 (marker-stitch-1 belongs to the back piece), place the next 67-73-81-81-87-91 stitches on a thread for the sleeve, cast on 8-8-8-10-10-10 stitches under the sleeve, work 92-102-109-119-128-144 stitches (front piece), place the next 67-73-81-81-87-91 stitches on a thread for the sleeve, cast on 8-8-8-10-10-10 stitches under the sleeve, work the last 91-101-108-118-127-143 stitches (rest of back piece). Finish the body and sleeves separately. THE PIECE IS MEASURED FROM HERE.

BODY:
= 200-220-234-258-276-308 stitches. Insert 1 marker thread in the middle of the new stitches cast on in each side. Allow the marker thread to follow your work onwards; it is used when decreasing in the sides.
Continue in the round with stockinette stitch and stripes. When the body measures 5 cm = 2" from the division, decrease 1 stitch on each side of both marker threads – read DECREASE TIP. Decrease like this every 5-6-6-6-6-6 cm = 2"-2⅜"-2⅜"-2⅜"-2⅜"-2⅜" a total of 4-4-4-4-4-3 times = 184-204-218-242-260-296 stitches. Continue working until the body measures 28-29-30-30-30-30 cm = 11"-11⅜"-11¾"-11¾"-11¾"-11¾" from the division – finish after at least 2 rounds with color off white (approx. 5 cm = 2" left to finished length); finish the body with color off white. Change to circular needle size 3 MM = US 2.5. Knit 1 round and increase 16-16-20-24-24-24 stitches evenly spaced = 200-220-238-266-284-320 stitches. Work rib (knit 1, purl 1) for 5 cm = 2". Bind off with knit over knit and purl over purl. The sweater measures approx. 62-64-66-68-70-72 cm = 24⅜"-25¼"-26"-26¾"-27½"-28⅜" from the shoulder down.

SLEEVES:
Place the 67-73-81-81-87-91 stitches from the thread on the one side of the piece on short circular needle/double pointed needles size 4 MM = US 6 and knit up 1 stitch in each of the new stitches cast on under the sleeve = 75-81-89-91-97-101 stitches. Insert a marker thread in the middle of the new stitches under the sleeve. Allow the thread to follow your work onwards; it will be used when decreasing under the sleeve.
Continue in the round with stockinette stitch and stripes for 5 cm = 2". Now decrease 1 stitch on each side of the marker thread – remember DECREASE TIP. Decrease like this every 3½-3-2-2-1½-1½ cm = 1¼"-1⅛"-¾"-¾"-½"-½" a total of 10-12-15-15-16-17 times = 55-57-59-61-65-67 stitches. Continue working until the sleeve measures 41-41-40-38-37-35 cm = 16⅛"-16⅛"-15¾"-15"-14½"-13¾" from the division – finish after at least 2 rounds with color off white; finish the sleeve with color off white. Change to double pointed needles size 3 MM = US 2.5, knit 1 round and increase 5-7-5-7-7-5 stitches evenly spaced = 60-64-64-68-72-72 stitches. Work rib (knit 1, purl 1) for 5 cm = 2". Bind off with knit over knit and purl over purl. The sleeve measures approx. 46-46-45-43-42-40 cm = 18"-18"-17¾"-17"-16½"-15¾" from the division.
Work the other sleeve in the same way.

ASSEMBLY:
Fold the neck double to the inside and sew down with a couple of stitches in each transition between body and sleeves.

Diagram

All measurements in charts are in cm.

diagram measurements

Each of our patterns has specific tutorial videos to help you.

Do you have a question? See a list of frequently asked questions (FAQ)

Knitting tension is what determines the final measurements of your work, and is usually measured per 10 x 10 cm. It is provided like so: number of stitches in width x number of rows in height - eg: 19 stitches x 26 rows = 10 x 10 cm.

The knitting tension is very individual; some people knit/crochet loosely while others work tightly. You adjust the knitting tension with the needle size, which is why the suggested needle size only serve as a guide! You need to adjust this (up or down) to ensure that YOUR knitting tension matches the knitting tension provided in the pattern. If you work with a different knitting tension than provided you will have a different yarn consumption, and your work will have different measurements than what the pattern suggests.

The knitting tension also determines which yarns can replace each other. As long as you achieve the same knitting tension you can replace one yarn with another.

See DROPS lesson: How to measure your tension/gauge

See DROPS video: How to make a gauge tension swatch

The required amount of yarn is provided in grams, eg: 450 g. To calculate how many balls you’ll need you first need to know how many grams are in 1 ball (25g, 50g or 100g). This information is available if you click on the individual yarn quality on our pages. Divide the amount required with the amount of each ball. For example, if each ball is 50g (the most common amount), the calculation will be as follows: 450 / 50 = 9 balls.

The important thing when changing from one yarn to another is that the knitting/crochet tension remains the same. This is so that the measurements of the finished piece will be the same as on the sketch provided. It is easier to achieve the same knitting tension using yarns from the same yarn group. It is also possible to work with multiple strands of a thinner yarn to achieve the knitting tension of a thicker one. Please try our yarn converter. We recommend you to always work a test swatch.

Please NOTE: when changing yarn the garment might have a different look and feel to the garment in the photo, due to individual properties and qualities of each yarn.

See DROPS lesson: Can I use a different yarn than the one mentioned in the pattern?

All our yarns are categorised into yarn groups (from A to F) according to thickness and knitting tension – group A contains the thinnest yarns and group F the thickest. This makes it easier for you to find alternative yarns to our patterns, should you wish to switch yarn. All yarns within the same group have a similar knitting tension and can easily replace each other. However, different yarn qualities have different structures and properties which will give the finished work a unique look and feel.

Click here for an overview of the yarns in each yarn group

At the top of all our patterns you’ll find a link to our yarn converter, which is a helpful tool should you wish to use a different yarn than suggested. By filling in the yarn quality you wish to replace, the amount (in your size) and number of strands, the converter will present good alternative yarns with the same knitting tension. Additionally it will tell you how much you’ll require in the new qualities and whether you’ll need to work with multiple strands. Most skeins are 50g (some are 25g or 100g).

If the pattern is worked with multiple colours, every colour will have to be converted separately. Similarly, if the pattern is worked with several strands of different yarns (for example 1 strand Alpaca and 1 strand Kid-Silk) you will have to find alternatives for each, individually.

Click here to see our yarn converter

Since different yarns have different qualities and textures we have chosen to keep the original yarn in our patterns. However, you can easily find options among our available qualities by using our yarn converter, or simply pick a yarn from the same yarn group.

It is possible that some retailers still have discontinued yarns in stock, or that someone has a few skeins at home that they would like to find patterns for.

The yarn converter will provide both alternative yarn as well as required amount in the new quality.

If you think it's hard to decide what size to make, it can be a good idea to measure a garment you own already and like the size of. Then you can pick the size by comparing those measures with the ones available in the pattern's size chart.

You'll find the size chart at the bottom of the pattern.

See DROPS lesson: How to read size chart

The needle size provided in the pattern serves only as a guide, the important thing is to follow the knitting tension. And since knitting tension is very individual, you will have to adjust the needle size to ensure that YOUR tension is the same as in the pattern – maybe you’ll have to adjust 1, or even 2 needle sizes, up or down to achieve the correct tension. For this, we recommend that you work test swatches.

Should you work with a different knitting tension than the one provided, the measurements of the finished garment might deviate from the measurement sketch.

See DROPS lesson: How to measure your tension/gauge

See DROPS video: How to make a gauge tension swatch

Working a garment top-down provides more flexibility and room for personal adjustment. For example it is easier to try the garment on while working, as well as making adjustments to length of yoke and shoulder caps.

The instructions are carefully explaining every step, in the correct order. Diagrams are adjusted to the knitting direction and are worked as usual.

The diagram depicts all rows/rounds, and every stitch seen from the right side. It is read from bottom to top, from right to left. 1 square = 1 stitch.

When working back and forth, every other row is worked from the right side and every other row is worked from the wrong side. When working from the wrong side, the diagram will have to be worked reversed: from left to right, knit stitches are purled, purl stitches are knit etc.

When working in the round every round is worked from the right side and the diagram are worked from right to left on all rounds.

See DROPS lesson: How to read knitting diagrams

The diagram depicts all rows/rounds, and every stitch seen from the right side. It is worked from bottom to top, from right to left.

When working back and forth every other row is worked from the right side: from right to left and every other row is worked from the wrong side: from left to right.

When working in the round, every row in the diagram are worked from the right side, from right to left.

When working a circular diagram you start in the middle and work your way outwards, counter clockwise, row by row.

The rows usually start with a given number of chain stitches (equivalent to the height of the following stitch), this will either be depicted in the diagram or explained in the pattern.

See DROPS lesson: How to read crochet diagrams

Instructions for working several diagrams after each other on the same row/round, will often be written like so: “work A.1, A.2, A.3 a total of 0-0-2-3-4 times". This means you work A.1 once, then A.2 is worked once, and A.3 is repeated (in width) the number of times provided for your size – in this case like so: S = 0 times, M = 0 times, L=2 times, XL= 3 times and XXL = 4 times.

The diagrams are worked as usual: begin with the first row in A.1, then work the first row in A.2 etc.

See DROPS lesson: How to read knitting diagrams

See DROPS lesson: How to read crochet diagrams

The total width of the garment (from wrist-to-wrist) will be larger in the larger sizes, despite the actual sleeves being shorter. The larger sizes have longer sleeve caps and wider shoulders, so there will be a good fit in all sizes.

The measurement sketch/schematic drawing provides information regarding the full length of the garment. If it’s a jumper or a jacket the length is measured from the highest point on the shoulder (usually closest to the neckline), and straight down to the bottom of the garment. It is NOT measured from the tip of shoulder. Similarly, the length of yoke is measured from the highest point on the shoulder and down to where yoke is split into body and sleeves.

See DROPS lesson: How to read a schematic drawing

Diagrams are often repeated on the round or in height. 1 repeat is the diagram the way it appears in the pattern. If it says to work 5 repeats of A.1 in the round, then you work A.1 a total of 5 times after/next to each other in the round. If it says to work 2 repeats of A.1 vertically/in height you work the entire diagram once, then begin again at the start and work the entire diagram one more time.

Chain stitches are slightly narrower than other stitches and to avoid working the cast-on edge too tight, we simply chain more stitches to begin with. The stitch count will be adjusted on the following row to fit the pattern and measurement sketch.

The rib edge is more elastic and will contract slightly compared to, for example, stocking stitch. By increasing before the rib edge, you avoid a visible difference in width between the rib edge and the rest of the body.

It’s very easy to cast off too tightly, and by making yarn overs while casting off (and simultaneously casting these off) you avoid a too tight cast off edge.

See DROPS video: How to bind off with yarn overs (yo)

To achieve an even increase (or decrease) you can increase on, for example: every 3rd and 4th row alternately, like so: work 2 rows and increase on the 3rd row, work 3 rows and increase on the 4th. Repeat this until the increase is complete.

See DROPS lesson: Increase or decrease 1 st on every 3rd and 4th row alternately

Should you prefer to work in the round instead of back and forth, you may of course adjust the pattern. You’ll need to add steeks mid-front (usually 5 stitches), and follow the instructions. When you would normally turn and work from the wrong side, simply work across the steek and continue in the round. At the end you’ll cut the piece open, pick up stitches to work bands, and cover the cut edges.

See DROPS video: How to knit steeks and cut open

Should you prefer to work back and forth instead of in the round, you may of course adjust the pattern so you work the pieces separately and then assemble them at the end. Divide the stitches for the body in 2, add 1 edge stitch in each side (for sewing) and work the front and back pieces separately.

See DROPS lesson: Can I adapt a pattern for circular needles into straight needles?

Pattern repeats can vary slightly in the different sizes, in order to get the correct proportions. If you’re not working the exact same size as the garment in the photo, yours might deviate slightly. This has been carefully developed and adjusted so that the complete impression of the garment is the same in all sizes.

Make sure to follow instructions and diagrams for your size!

If you have found a pattern you like which is available in women’s size it’s not very difficult to convert it to men’s size. The biggest difference will be the length of sleeves and body. Start working on the women size that you think would fit across the chest. The additional length will be worked right before you cast off for the armhole/sleeve cap. If the pattern is worked top-down you can add the length right after the armhole or before the first decrease on sleeve.

Regarding additional yarn amount, this will depend on how much length you add, but it is better with a skein too many than too few.

All yarns will have excess fibres (from production) that might come off as lint or shedding. Brushed yarns (ie hairier yarns) have more of these loose, excess fibres, causing more shedding.

Shedding also depends on what is worn under or over the garment, and whether this pulls at the yarn fibres. It’s therefore not possible to guarantee that there will be no shedding

Below are some tips on how to get the best result when working with hairier yarns:

1. When the garment is finished (before you wash it) shake it vigorously so the looser hairs come off. NOTE: do NOT use a lint roller, brush or any method that pulls at the yarn.

2. Place the garment in a plastic bag and put it in your freezer - the temperature will cause the fibres to become less attached to each other, and excess fibres will come off easier.

3. Leave in the freezer for a few hours before taking it out and shaking it again.

4. Wash the garment according to the instructions on the yarn label.

Pilling is a natural process that happens to even the most exclusive of fibers. It's a natural sign of wear and tear that is hard to avoid, and that is most visible in high friction areas of your garment like a sweater's arms and cuffs.

You can make your garment look as new by removing the pilling, using a fabric comb or a pill/lint remover.

Still can't find the answer you need? Then scroll down and leave your question so one of our experts can try to help you. This will be done normally within 5 to 10 working days.
In the meantime, you can read the questions and answers that others have left to this pattern or join the DROPS Workshop on Facebook to get help from fellow knitters/crocheters!

Post a comment to pattern DROPS 233-3

We would love to hear what you have to say about this pattern!

If you want to leave a question, please make sure you select the correct category in the form below, to speed up the answering process. Required fields are marked *.

Comments / Questions (2)

country flag MARIE-PAULE FINCK wrote:

Bonjour, Dans le paragraphe de l'empiecement, il est ecrit d'augmenter 18 fois mais il n'est pas précisé combien de mailles. Est-ce 8 mailles réparties sur tout le tour ? J'avoue ne pas bien comprendre. Merci pour votre aide que j'attends avec impatience. Cordialement

09.10.2023 - 15:01

DROPS Design answered:

Bonjour Mme Finck, vous devez augmenter comme indiqué sous RAGLAN (autrement dit: 1 m de chaque côté de chaque marqueur soit 8 mailles par tour d'augmentations) 18 fois au total tous les 2 tours: tricotez 1 tour en augmentant comme indiqué ci-dessus, 1 tour sans augmenter et tricotez 18 fois ces 2 tours (36 tours au total). Bon tricot!

09.10.2023 - 16:25

country flag Anna wrote:

Prośba o korektę - w polskim opisie jest błąd: Increase like this 20-20-18-20-20-22 times on the body (10-10-9-10-10-11 times on the sleeves) Dodawać tak samo 15-17-14-17-16-19 razy na tyle i przodzie (5-7-5-7-6-8 razy na rękawach)

06.05.2023 - 22:31

DROPS Design answered:

Dziękuję Anno, wzór został poprawiony i korekta dodana. Pozdrawiamy i dziękujemy za zainteresowanie naszymi wzorami!

07.05.2023 - 19:59