
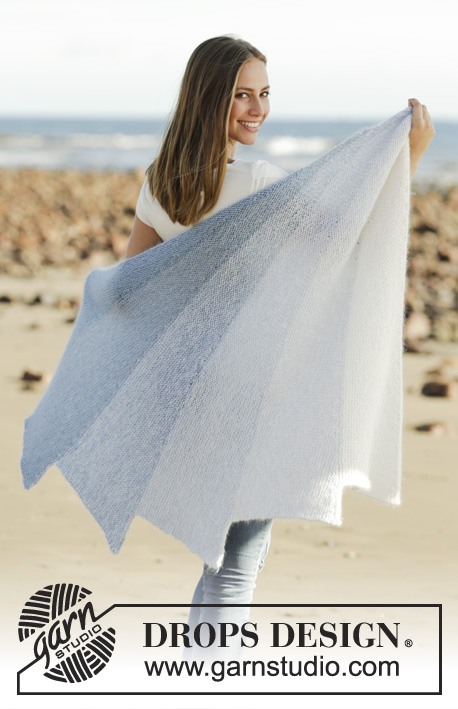
Popular categories
Looking for a yarn?


Comments / Questions (89)
![]() Carla wrote:
Carla wrote:
Moet je met het patroon boven aan beginnen of onderaan beginnen bij A1. of onderaan waar 6 staat
29.03.2020 - 16:18DROPS Design answered:
Dag Carla,
De telpatronen lees je altijd van onder naar boven, dus in dit geval waar 6 staat. Bij de veel gestelde vragen vind je meer info over hoe je een telpatroon moet lezen.
29.04.2020 - 10:17
![]() Kia wrote:
Kia wrote:
This is a beautiful project! What is the knitting gauge?
27.12.2019 - 22:10DROPS Design answered:
Dear Kia, the gauge is given where we state the needle sizes. We used different needles for the project with gauges: DROPS DOUBLE POINTED NEEDLES AND CIRCULAR NEEDLE (40 + 80 cm) SIZE 3 MM – or the size needed to get 24 stitches and 32 rows stocking stitch on 10 cm in width and 10 cm in height. DROPS DOUBLE POINTED NEEDLES AND CIRCULAR NEEDLE (40 + 80 cm) SIZE 2.5 MM – for the ridge edges. Happy Crafting!
28.12.2019 - 07:19
![]() Evelyne wrote:
Evelyne wrote:
Bonjour je suis arrivée où il faut séparer le dos du devant mais je ne comprends pas comment en partant de 159 il doit en rester 5 le pull va être très long et en pointe alors que sur le modèle il est plus large et arrondi. Merci de m'aider
11.12.2019 - 16:39DROPS Design answered:
Bonjour Evelyne, vous ne tricotez pas le dos et le devant séparément, mais chaque côté (demi-dos+demi-devant) séparément en rabattant et en diminuant comme indiqué aux rangs 1 à 10; vous répétez ensuite ces 10 rangs jusqu'à ce qu'il reste 5 mailles. Bon tricot!
12.12.2019 - 09:10
![]() Susanne wrote:
Susanne wrote:
Zusatz zu meiner Frage: Ich stricke Größe XXXL.
26.11.2019 - 19:34
![]() Susanne wrote:
Susanne wrote:
Liebes DropsTeam, leider komme ich mit der Ärmellänge nicht klar. 27 cm ab der Teilung finde ich etwas wenig. Oder verstehe ich das falsch? Sind die Angaben für den Arm in der Skizze richtig ? Vlg
26.11.2019 - 19:31DROPS Design answered:
Liebe Susanne, die Ärmel sind kleiner in den grösseren Grösse, denn die Passe/Schulter breiter sind; am besten ziehen Sie den Pullover an und so können Sie die Ärmel bis zur gewünschten Länge stricken. Viel Spaß beim stricken!
27.11.2019 - 07:50
![]() Evelyne wrote:
Evelyne wrote:
Bonjour je reviens vers vous car je suis encore perdue je ne comprends pas les diminutions; en effet j'ai mis mes mailles manches en attente j'ai rajouté mes 12 mailles j'ai mis un marqueur entre ces 12 mailles mais dois-je commencer mes diminutions 1 à partir de ce marqueur et ce dès le début ? car il est stipulé que ces mailles sous la manche doivent être tricotées normalement. Merci
13.11.2019 - 23:03DROPS Design answered:
Bonjour Evelyne, vous diminuez en commençant à la fin du tour, quand il reste 3m (pour diminuer 1 m) avant le marqueur du début du tour, puis vous tricotez 2 m ens à l'end, 2 m end (le fil marqueur est entre ces 2 m), glissez 1 m à l'end, 1 m end, passez la m glissée par-dessus la m tricotée. Tricotez comme avant jusqu'à ce qu'il reste 3 m avant l'autre marqueur (2ème manche) et diminuez de la même façon = vous avez diminué 1 m de chaque côté de chaque marqueur = 2 m à chaque marqueur soit 4 m au total puis vous diminuerez 2 m de chaque côté de chaque marqueur (cf diminutions-2) = 4 m à chaque marqueur et 8 m au total. Bon tricot!
14.11.2019 - 10:02
![]() Evelyne wrote:
Evelyne wrote:
Bonjour, j'avoue être un peu perdue, je ne comprends pas les 6 marqueurs on a que deux épaules à quoi servent les deux autres ? et comment doit-on tricoter les mailles en plus ? Merci
26.10.2019 - 16:26DROPS Design answered:
Bonjour Évelyne, on doit avoir 1 marqueur au milieu dos + 1 marqueur au milieu devant (= A.2) + 1 marqueur avant + 1 marqueur après chaque manche (= les manches sont délimitées chacune par 1 fil marqueur). On a ainsi bien besoin de 6 fils marqueurs. Bon tricot!
04.11.2019 - 12:10
![]() Lindis wrote:
Lindis wrote:
Hei. Tillegg til spørsmålet. På bildet der det ut som det ligger en maske over økinga. Ser ut likedan som 1m løs av 2m sammen og trekk løs m over, eller som en liten flette Det kan umulig stemme for det er felling. Økes som i oppskrifta så ser det ikke ut som en maske ligger over.
08.08.2019 - 14:24DROPS Design answered:
Hej igen, du strikker økningerne ifølge RAGLAN øverst i opskriften. Og du strikker fletterne ifølge diagrammerne. God fornøjelse!
09.08.2019 - 10:38
![]() Lindis wrote:
Lindis wrote:
Hei. Jeg lurer på hvordan jeg skal øke forran og bak ser det er to måter? I oppskrifta står det samme type øking, men på bildet er det en annen type økning etter noen cm. Synes den nederste økningen er fin og ønsker å gjøre det likedan. Hvordan strikkes den? Finner ingen ting om det på oppskriften.
08.08.2019 - 13:07DROPS Design answered:
Hej Lindis, du øker på samme måde alle 4 steder, men du øger på forskellige omgange til bol og ermer. RAGLAN: Øk til raglan på hver side av masken med merketråd i midt foran/midt bak og i hver side på hvert erme (dvs på hver side av 1. og 4.merketråd, før 3. og 6.merketråd og etter 2. og 5.merketråd). Øk 1 maske ved å lage 1 kast om pinnen, på neste omgang strikkes kastet vridd slik at det ikke blir hull. De økte maskene strikkes fortløpende inn i mønsteret.
09.08.2019 - 10:35
![]() Susanne Holmberg wrote:
Susanne Holmberg wrote:
Jag stickar st. Xl. När man ska minska i sidan var 3:e cm, ska man på varven emellan göra samma ökning- minskning vart annat varv med lika många maskor på varvet som före och efter dubbelminskningarna?
01.08.2019 - 12:17DROPS Design answered:
Hej Susanne, ja du fortsätter samma ökning och minskning på vart annat varv. Lycka till :)
02.08.2019 - 09:46
|
||||||||||||||||||||||
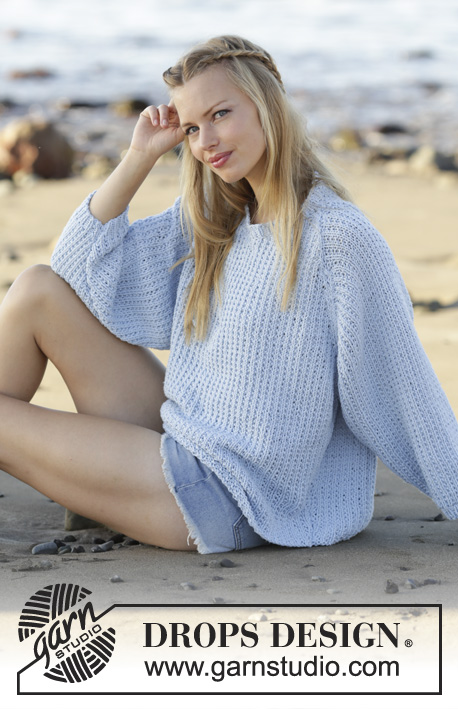
Chevron Delight#chevrondelightsweater |
||||||||||||||||||||||
|
|
||||||||||||||||||||||
Jumper worked top down with raglan and lace pattern in DROPS BabyAlpaca Silk. Sizes S - XXXL.
DROPS 177-6 |
||||||||||||||||||||||
|
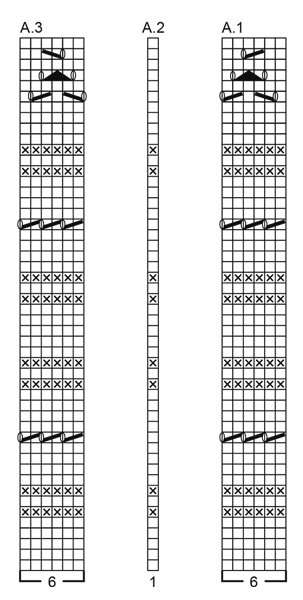
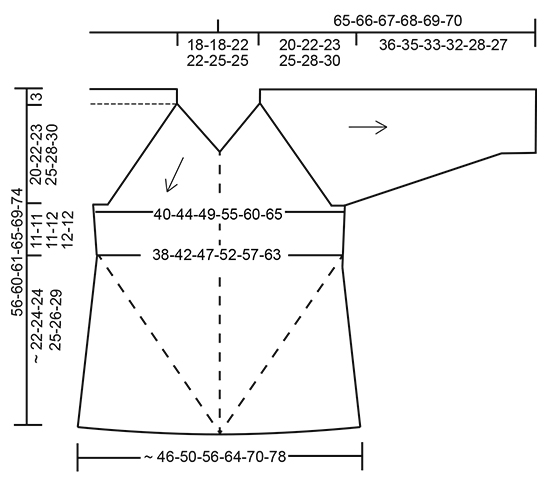
RIDGE/GARTER STITCH (worked in the round): 1 ridge = 2 rounds. Knit 1 round and purl 1 round. PATTERN: See diagrams A.1 to A.3. The diagrams show all the rows in the pattern from the right side. INCREASE TIP: To work out how to increase evenly, count the total number of stitches on the needle (e.g. 124 stitches) and divide by the number of increases to be made (e.g. 12) = 10.3. In this example, increase after approx. every 10th stitch. Increase 1 stitch by making 1 yarn over, on the next round work the yarn overs twisted knit to prevent holes. RAGLAN: Increase to raglan on each side of the stitch with the marker thread mid front/mid back and in each of side of the sleeves (i.e. on each side of the 1st and 4th marker thread, before the 3rd and 6th marker thread and after the 2nd and 5th marker thread). Increase 1 stitch by making 1 yarn over, on the next round the yarn overs are worked twisted knit to prevent holes. The increased stitches are worked into the pattern as you go. NOTE: The increases are different on the body and sleeves as explained in the text. DECREASE TIP-1 (for the sides of the body and mid underarm): Decrease 1 stitch on each side of each marker thread as follows: Work until there are 3 stitches left before the marker, knit 2 together, knit 2 (the marker sits in the middle of these 2 stitches), slip 1 stitch as if to knit, knit 1, pass the slipped stitch over the knitted stitch (= 2 stitches decreased). DECREASE TIP-2 (for the sides of the body): Decrease 2 stitches on each side of each marker as follows: Work until there are 5 stitches left before the marker, * knit 2 together *, repeat from *-* in total 2 times (= 2 stitches decreased), knit 2 (the marker sits in the middle of these 2 stitches), * slip 1 stitch as if to knit, knit 1, pass the slipped stitch over the knitted stitch *, repeat from *-* in total 2 times (= 4 stitches decreased). ---------------------------------------------------------- JUMPER: The piece is worked with circular needle and from the top down. The sleeves are worked with a short circular needle/double pointed needles. YOKE: Cast on 124-124-132-132-148-148 stitches with circular needle size 2.5 mm and BabyAlpaca Silk. Work 3 RIDGES – see description above, AT THE SAME TIME on the 4th round increase 12-12-20-20-24-24 stitches evenly along the round – READ INCREASE TIP = 136-136-152-152-172-172 stitches. Repeat the increase on the 6th round = 148-148-172-172-196-196 stitches on the needle. Change to circular needle size 3 mm and work the next round as follows from the left shoulder back: Work A.1 across the first 30-30-36-36-42-42 stitches (= 5-5-6-6-7-7 repeats of 6 stitches), insert the 1st marker thread in the next stitch and work the stitch A.2 (= mid back), work A.3 across the next 30-30-36-36-42-42 stitches (= 5-5-6-6-7-7 repeats of 6 stitches), insert the 2nd marker thread before the next stitch, work A.1 across the next 12 stitches (= 2 repeats of 6 stitches), work A.2 (= 1 stitch), insert the 3rd marker thread before the next stitch (= 13 stitches on the right sleeve between the 2nd and 3rd marker thread), work A.1 across the next 30-30-36-36-42-42 stitches, insert the 4th marker thread in the next stitch and work this stitch A.2 (= mid front), work A.3 across the next 30-30-36-36-42-42 stitches, insert the 5th marker thread before the next stitch, work A.2 (= 1 stitch), work A.3 across the next 12 stitches, insert the 6th marker thread before the next stitch (= 13 stitches on the left sleeve between the 5th and 6th marker thread). There are now 6 marker threads in the piece. Continue the pattern as follows (A.1-A.3 repeated to finished length). AT THE SAME TIME on the first round after the marker threads have been inserted begin the increases to RAGLAN – see description above. Increase as follows: BODY: Increase every round in total 6-12-10-22-18-30 times, then every 2nd round in total 28-28-30-28-34-32 times (= in total 34-40-40-50-52-62 times). SLEEVE: Increase every round in total 0-3-4-2-0-0 times, every 2nd round in total 29-32-33-37-40-41 times and then every 4th round in total 1-0-0-0-2-3 times (= in total 30-35-37-39-42-44 times). REMEMBER THE KNITTING TENSION! When the increases to raglan are finished the piece measures approx. 20-22-23-25-28-30 cm from the cast-on edge (measured mid front). There are 64-70-76-86-94-104 stitches on each side of the 1st and 4th marker thread (= 129-141-153-173-189-209 stitches on the front and back pieces including the stitches with marker threads) and 73-83-87-91-97-101 stitches on each sleeve = in total 404-448-480-528-572-620 stitches on the needle. The next round is worked as follows: Twisted knit together the first 2 stitches (= 1 stitch decreased), work as before to the 1st marker thread, make 1 yarn over, work the stitch as before (= mid back), make 1 yarn over (= 2 stitches increased), work as before until there are 2 stitches left before the 2nd marker, knit 2 together (= 1 stitch decreased), place the next 73-83-87-91-97-101 stitches (i.e. the stitches between the 2nd and 3rd marker threads) on a thread for the sleeve, cast on 6-6-12-12-12-12 new stitches under the sleeve, insert 1 marker in the middle of the new stitches, twisted knit 2 stitches together (= 1 stitch decreased), work the pattern as before to the 4th marker thread, make 1 yarn over, work the stitch as before (= mid front), make 1 yarn over (= 2 stitches increased), work the pattern as before until there are 2 stitches left before the 5th marker thread, knit 2 together (= 1 stitch decreased), place the next 73-83-87-91-97-101 stitches (i.e. the stitches between the 5th and 6th marker threads) on 1 thread for the sleeve, cast on 6-6-12-12-12-12 new stitches under the sleeve and insert 1 marker in the middle of these new stitches = 270-294-330-370-402-442 stitches on the needle. Cut the strand. THE PIECE IS NOW MEASURED FROM HERE! BODY: Displace the round so that it starts mid-under the sleeve in the right side of the piece when the garment is worn (i.e. move the next stitches across to the right needle without working them first). The markers follow as you work the piece. Continue the pattern as before – NOTE: The new stitches under the sleeve in each side are worked in to the pattern, adjust so that the pattern is symmetrical under the sleeve (i.e. on each side of the marker). AT THE SAME TIME every 2nd round increase 1 stitch on each side of the stitch with the 1st and 4th marker thread in the same way as before and decrease 1 stitch on each side of the marker under the sleeve in each side – READ DECREASE TIP-1 = 4 stitches increased and 4 stitches decreased. When you increase and decrease in this way the number of stitches remains the same. When the piece measures 3 cm from the separation under each sleeve – adjust so that the next round is an increase/decrease round and now decrease 2 stitches on each side of the marker under each sleeve (the increases front and back continue as before) – READ DECREASE TIP-2 = 4 stitches increased and 8 stitches decreased. Decrease and increase like this every 4-4-4-3-3-3 cm in total 3-3-3-4-4-4 times = 258-282-318-354-386-426 stitches. Then work as before with 4 decreases and 4 increases every 2nd round. Continue in this way until the piece measures approx. 46-50-51-55-58-63 cm measured along the middle stitch (i.e. by the 1st and 4th marker thread), but finish so that the next round is an increase/decrease round. The piece now measures approx. 56-60-61-65-69-74 cm measured from the shoulder and down at the longest part. Cut the strand. Place the first 65-71-80-89-97-107 stitches (= half the front piece including the mid-stitch) on 1 thread and the last 64-70-79-88-96-106 stitches (= half the back piece) on the same thread. Now work as follows across the remaining 129-141-159-177-193-213 stitches on the needle (i.e. from after the 4th marker thread up to and including the stitch with the 1st marker thread = left side of the jumper, from mid front to mid back): ROW 1 (= right side): Cast off the first 2 stitches, work the pattern as before until there are 3 stitches left before the marker under the sleeve, decrease 1 stitch on each side of the marker as before (= 2 stitches decreased), work the pattern as before for the rest of the row = 2 stitches decreased at the beginning of the row towards mid front and 2 stitches decreased in the side of the jumper (= in total 4 stitches decreased). ROW 2 (= wrong side): Cast off the first 2 stitches, Work the pattern to the end of the row as before = 2 stitches decreased at the start of the row towards mid back. ROW 3: Cast off the first 2 stitches, work the pattern for the rest of the row as before = 2 stitches decreased at the start of the row towards mid front. ROW 4: Work as for row 2 = 2 stitches decreased at the beginning of the row towards mid back. ROW 5: Work as for row 3 = 2 stitches decreased at the beginning of the row towards mid front. ROW 6: Work as for row 2 = 2 stitches decreased at the beginning of the row towards mid back. ROW 7: Work as for row 1 = 2 stitches decreased at the beginning of the row towards mid front and 2 stitches decreased in the side of the jumper (= in total 4 stitches decreased). ROW 8: Work as for row 2 = 2 stitches decreased at the beginning of the row towards mid back. ROW 9: Work as for row 3 = 2 stitches decreased at the beginning of the row towards mid front. ROW 10: Work as for row 2 = 2 stitches decreased at the beginning of the row towards mid back. Repeat rows 1-10 until there are 5 stitches left on the needle and cast off. Place the stitches from the thread back on the needle and work in the same way (= right side of the jumper, from mid back to mid front). SLEEVE: Place the stitches from the thread in the right side of the piece (when the garment is worn) on a short circular needle size 3 mm, in addition knit up 1 stitch in each of the 6-6-12-12-12-12 stitches cast on under the sleeve = 79-89-99-103-109-113 stitches on the needle. Insert 1 marker in the middle of these new stitches. The marker follows the piece. Continue A.1/A.2 as before, but the stitches which do not fit the pattern under the sleeve are knitted in rounds of knit and purled in rounds of purl. When the piece measures 3 cm decrease 1 stitch on each side of the marker – READ DECREASE TIP-1 (= 2 stitches decreased). Decrease in this way a total of 15-20-25-24-27-26 times in S: Every 6th round, in M: Every 5th round, in L + XL: Every 3rd round and in XXL + XXXL: Alternately every 2nd and 3rd round = 49-49-49-55-55-61 stitches. When the piece measures 34-33-31-30-26-25 cm from the separation (or try the garment on and work to desired length), change to double pointed needles size 2.5 mm. Work 4 RIDGES. Change back to double pointed needles size 3 mm and cast off. The sleeve measures approx. 36-35-33-32-28-27 cm from the separation. Work the other sleeve in the same way, but continue A.2/A.3 as before. RIDGE EDGE AT BOTTOM OF BODY: Knit up stitches for an edge inside 1 stitch along the whole of the bottom edge of the jumper. Knit up approx. 240-260-290-332-364-406 stitches evenly spaced from the right side with circular needle size 2.5 mm. Make sure the edge does not tighten the body! If it does, then knit up more stitches. Work 3 ridges. Change to circular needle size 3 mm and cast off. |
||||||||||||||||||||||
Diagram explanations |
||||||||||||||||||||||
|
||||||||||||||||||||||
 |
||||||||||||||||||||||
 |
||||||||||||||||||||||
Have you finished this pattern?Tag your pictures with #dropspattern #chevrondelightsweater or submit them to the #dropsfan gallery. Do you need help with this pattern?You'll find 27 tutorial videos, a Comments/Questions area and more by visiting the pattern on garnstudio.com. © 1982-2026 DROPS Design A/S. We reserve all rights. This document, including all its sub-sections, has copyrights. Read more about what you can do with our patterns at the bottom of each pattern on our site. |
||||||||||||||||||||||


With over 40 years in knitting and crochet design, DROPS Design offers one of the most extensive collections of free patterns on the internet - translated to 17 languages. As of today we count 325 catalogues and 12298 patterns translated into English (UK/cm). 12298
We work hard to bring you the best knitting and crochet have to offer, inspiration and advice as well as great quality yarns at incredible prices! Would you like to use our patterns for other than personal use? You can read what you are allowed to do in the Copyright text at the bottom of all our patterns. Happy crafting!
Post a comment to pattern DROPS 177-6
We would love to hear what you have to say about this pattern!
If you want to leave a question, please make sure you select the correct category in the form below, to speed up the answering process. Required fields are marked *.