
Popular categories
Looking for a yarn?


Comments / Questions (150)
![]() Janne Holm wrote:
Janne Holm wrote:
Lurer på hvordan jeg skal øke maskene på armene og hvordan jeg skal øke på bakstykke i dette avsnittet. Og hvordan jeg skal strikke i avsnittet som begynner med Fortsett dette mønsteret oppover. Det er avsnitt 3?
17.11.2021 - 10:26
![]() Janne Holm wrote:
Janne Holm wrote:
Kan noen forklare meg hvordan jeg skal strikke disse 2 avsnittene. ?Neste omgang strikkes slik: Strikk glattstrikk over de første 15-16-17-19-20-21 maskene (= halve bakstykke), lag 1 kast om pinnen, strikk 2 masker glattstrikk, strikk A.1 over 21 masker (= erme), strikk 2 masker glattstrikk, lag 1 kast om pinnen, strikk 30-32-34-38-40-42 masker glattstrikk (= forstykke), lag 1 kast om pinnen, strikk 2 masker glattstrikk, strikk A.1 over 21 masker (= erme), strikk 2 masker glattstrikk, lag 1 kas
14.11.2021 - 21:50DROPS Design answered:
Hej Janne. Vilken storlek stickar du? Om du stickar storlek S så stickar du det första talet, storlek M det andra talet osv. Så storlek S = glatstrik 15 m, 1 kast, 2 m glatstrik, A.1 (=21m), osv. Mvh DROPS Design
16.11.2021 - 09:27
![]() Michèle Dubreuil wrote:
Michèle Dubreuil wrote:
Merci pour les informations Vous devriez l ajouter dans vos explications du patron car nous étions plusieurs à se poser la même question . Les explications pour cette partie du patron n étaient pas claires !! J ai pu enfin continuer ! Merci
01.09.2021 - 16:16
![]() Michèle Dubreuil wrote:
Michèle Dubreuil wrote:
Merci de votre réponse . Je demeure avec une question. Que fait on des 2 mailles qui servaient à tricoter A2 et A6 ? Si je tricote 2 m Jersey 3 mailles de A3 , il me reste ces 2 mailles . Même chose pour finir le rang , j ai 2 maille de l ancien A6, 3 mailles de A5 et 2 m Jersey . Dois-je tricoter 5 mailles de A3 et A5 pour compenser les mailles de l ancien A2 et A6 ? Merci
30.08.2021 - 21:07DROPS Design answered:
Bonjour Mme Dubreuil, les mailles de A.2 et de A.6 n'appartenaient pas à proprement parler au point ajouré, elles permettaient seulement de prolonger les jours des raglans après les augmentations, autrement dit, intégrez-les dans le point ajouré comme décrit précédemment. Bon tricot!
31.08.2021 - 08:11
![]() Michèle Dubreuil wrote:
Michèle Dubreuil wrote:
Bonjour , je ne comprend pas comment partir la manche ....j ai repris les 75 mailles de la manche , après avoir monter les 10 mailles ( taille médium ) je fais quoi ? J’ arrive au début du patron mais qui avait A2 ( 2 mailles total de 12 mailles avec A3 ) et à la fin A5 (11 mailles ) + A6 (2 mailles ) et les 10mailles montées . Je ne sais pas comment faire pour coordonner tout ça , au secours !!!! J attends votre réponse
29.08.2021 - 00:42DROPS Design answered:
Bonjour Mme Dubreuil, vous continuez à tricoter les mailles au point fantaisie par le tour suivant celui de l'empiècement en commençant par 2 mailles jersey (= les 2 mailles après le fil marqueur, puis vous tricotez A.3, vous répétez A.4 et terminez par A.5 et 2 mailles jersey. Autrement dit, les 10 mailles montées sous chaque manche vont être tricotées ainsi (5 m de chaque côté du fil marqueur): début du tour: 2 mailles, 3 mailles = les 3 premières mailles de A.3 - fin du tour: les 3 dernières m deA.5 + 2 mailles jersey. Bon tricot!
30.08.2021 - 07:44
![]() Margaret Tawa wrote:
Margaret Tawa wrote:
Exactly how much yards of yarn are required?
01.08.2021 - 19:53DROPS Design answered:
Dear Margaret, the pattern states teh amount of yarn needed: "250-250-300-300-350-400 g colour 13, light jeans blue" So depending of the size you are making, you will need 5-8 balls of DROPS Sky yarn. Happy Knitting!
02.08.2021 - 01:17
![]() Elise wrote:
Elise wrote:
JEg forstår ikke hullmønsteret. Det står i beskrivelsen om et kast mellom to rette, men i oppskriften ser det ut som det er to kast rett etter hverandre flere steder. Det er også vanskelig å se hvor mange masker man skal strikke mellom kastene og sammenflettingene. Kan du for eksempel beskrive første pinne i A1 med ord?
06.05.2021 - 09:53DROPS Design answered:
Hei Elise, Første pinnen i A.1: 1 kast,1 rett, 1 kast, 2 rett, (ta 1 maske løs av pinnen, 1 rett, løft løse masken over), 1 vrang, 2 rett sammen, 2 rett, 1 kast, 1 rett, 1 kast, 2 rett, (ta 1 maske løs av pinnen, 1 rett, løft løse masken over), 1 vrang, 2 rett sammen, 2 rett, 1 kast 1 rett, 1 kast. God fornøyelse!
07.05.2021 - 07:51
![]() Raffaella wrote:
Raffaella wrote:
Buongiorno, dopo il. Primo giro di A1 si dice di aumentare di 4 maglie complessive sul davanti e dietro ogni 2 giri: si intende un giro si è uno no? O un giro si aumento e due no? Grazie mille per l'aiuto. Modello bellissimo!
24.04.2021 - 20:03DROPS Design answered:
Buonasera Raffaella, ogni 2 giri si intende 1 giro con aumenti e uno senza. Buon lavoro!
24.04.2021 - 22:20
![]() Martine wrote:
Martine wrote:
Bonsoir, Je ne vois pas la réponse à la question posée par : Danielle 28.07.2019 - 22:48: "Quand A-1 a été tricoté 1 fois = 238 mailles Mais après je retricote le schéma A-1 au complet une autre fois où je recommence où il y a une barre du côté droite du schéma...pour faire les 20 rangs? Merci." Pouvez-vous me la faire parvenir car je suis arrivée au même niveau et je me demande la même chose ! Par avance merci.
18.04.2021 - 18:56DROPS Design answered:
Bonjour Martine, tricotez simplement A.1 comme avant = commencez et augmentez de chaque côté comme avant, et, à chaque fois que vous aurez augmentez 10 fois (= 20 tours), vous aurez suffisamment de mailles pour tricoter 1 motif en plus du point ajouré entre les augmentations, tout comme le montre A.1. Bon tricot!
19.04.2021 - 08:40
![]() MARIANNE BOIDIN wrote:
MARIANNE BOIDIN wrote:
J'essaye de comprendre le shéma en regardant le A3 A4 et A5 je tricote la taille M, ce qui est en dessous du tiré taille M je ne tricotte pas. Je ne comprends pas très bien. Pouvez vous m'éclairer s'il vous plait.
26.02.2021 - 15:33DROPS Design answered:
Bonjour Mme Boidin, vous continuez maintenant à tricoter ces mailles en suivant les diagrammes A.3 à A.5 en commençant par le rang avec la flèche, ce rang doit normalement suivre le précédent, autrement dit après que toutes les augmentations ont été faites. Bon tricot!
26.02.2021 - 16:22
|
|||||||||||||||||||||||||
Blue Nostalgia#bluenostalgiasweater |
|||||||||||||||||||||||||
 |
 |
||||||||||||||||||||||||
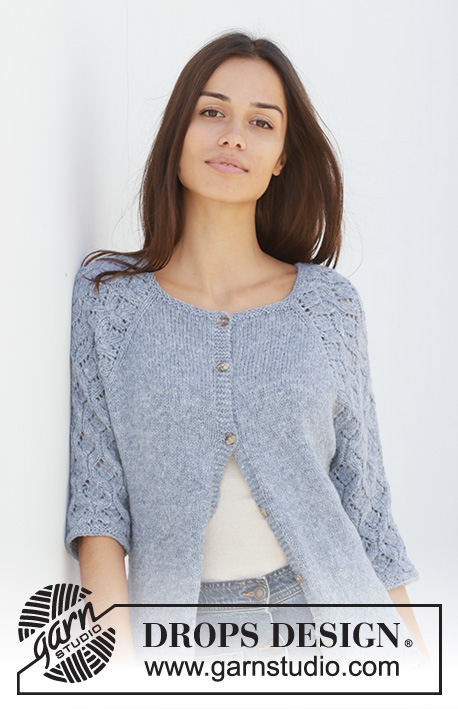
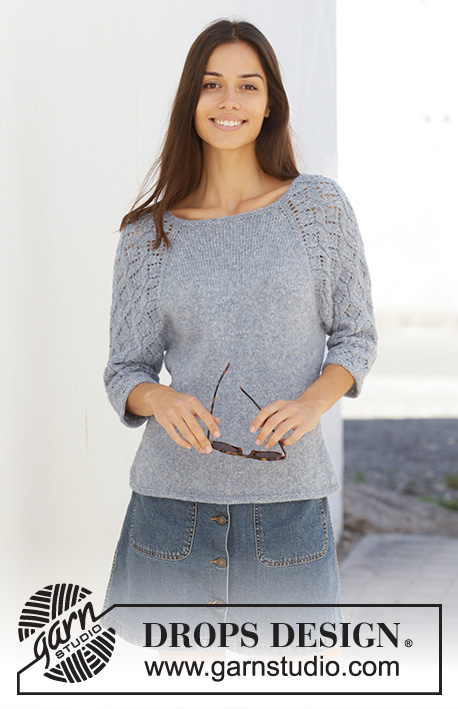
Knitted jumper with raglan in DROPS Sky. The piece is worked top down with lace pattern on sleeves. Sizes S – XXXL.
DROPS 199-3 |
|||||||||||||||||||||||||
|
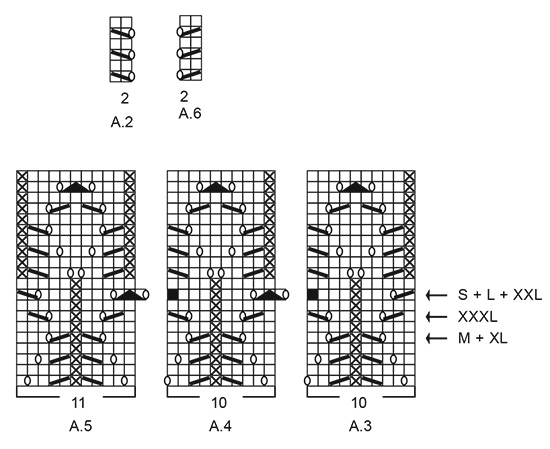
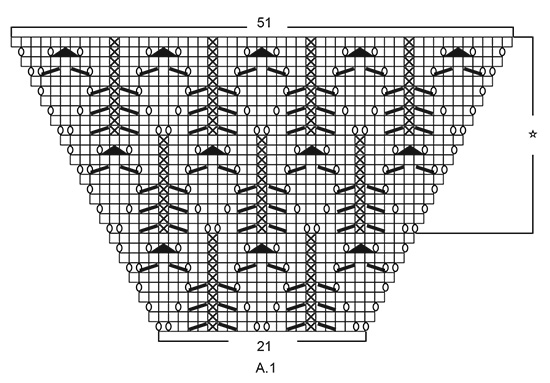
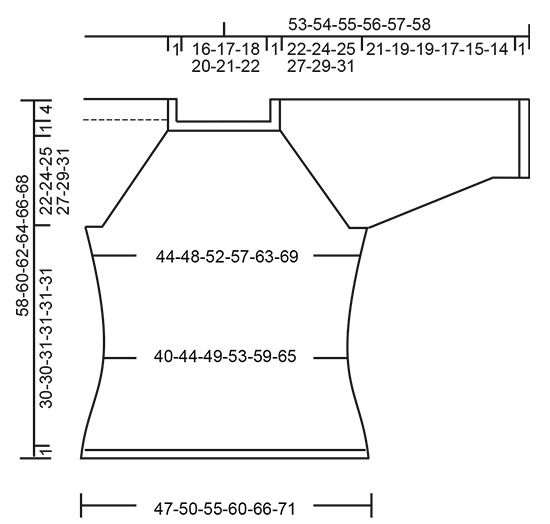
------------------------------------------------------- EXPLANATIONS FOR THE PATTERN: ------------------------------------------------------- RIDGE/GARTER STITCH (worked in the round): 1 ridge in height = 2 rounds; knit 1 round and purl 1 round. INCREASE TIP-1 (evenly spaced): To work out how to increase evenly, count the total number of stitches on the needle (e.g. 100 stitches), and divide by the number of increases to be made (e.g. 10) = 10. In this example, increase by making 1 yarn over after each 10th stitch. On the next round work the yarn overs twisted to avoid holes. PATTERN: See diagrams A.1 to A.6. Find your size in the diagrams (applies to A.3 to A.5). The diagrams show all rows in the pattern seen from the right side. DECREASE TIP (for sides of body and sleeves): Work until there are 3 stitches left before marker thread, knit 2 together, knit 2 (marker thread sits between these stitches), slip 1 stitch, knit 1 and pass the slipped stitch over the knitted stitch. INCREASE TIP-2 (for sides of body): Work until there are 2 stitches left before marker thread, 1 yarn over, knit 4 (marker thread sits in the middle of these stitches), 1 yarn over. On the next round work the yarn overs twisted to avoid holes. Then work the new stitches in stocking stitch. ------------------------------------------------------- START THE PIECE HERE: ------------------------------------------------------- JUMPER - SHORT OVERVIEW OF THE PIECE: Yoke and body are worked in the round with circular needle from mid back, top down. Sleeves are worked in the round with short circular needle/double pointed needles, top down. YOKE: Cast on 100-106-110-116-120-126 stitches with circular needle size 3.5 mm and Sky. Work 2 RIDGES – read description above. Knit 1 round where you increase 10-8-8-10-10-8 stitches evenly spaced – read INCREASE TIP-1 = 110-114-118-126-130-134 stitches. Change to circular needle size 4 mm. Knit 1 round. The next round is worked as follows: Work stocking stitch over the first 15-16-17-19-20-21 stitches (= half back piece), 1 yarn over, 2 stitches in stocking stitch, work A.1 over 21 stitches (= sleeve), 2 stitches in stocking stitch, 1 yarn over, work 30-32-34-38-40-42 stitches in stocking stitch (= front piece), 1 yarn over, 2 stitches stocking stitch, work A.1 over 21 stitches (= sleeve), 2 stitches in stocking stitch, 1 yarn over, work stocking stitch over the last 15-16-17-19-20-21 stitches (= half back piece). There are now 118-122-126-134-138-142 stitches on the needle. Continue this pattern onwards; i.e. on the sleeves increase on each side as shown in A.1. On the next round knit the yarn overs (= holes) and the increased stitches are worked into the pattern as you go as shown in A.1. On front and back pieces increase with yarn overs before/after the 2 stitches in stocking stitch in each side (there will be 2 stitches stocking stitch between each raglan increase). On the next round knit the yarn overs twisted (= no holes) and the increased stitches are worked in stocking stitch. Increase like this every 2nd round. You increase a total of 8 stitches on each increase-round (= 4 yarn overs + 4 stitches increased in A.1). REMEMBER THE KNITTING TENSION! When A.1 has been worked 1 time in height there are 230-234-238-246-250-254 stitches on the needle. Continue this pattern onwards, i.e. the pattern repeats itself as shown in A.1. Each time you have worked 20 rounds there will be room for 1 more repeat of lace pattern in width on each sleeve. When you have increased a total of 24-27-29-32-34-38 times there are 302-330-350-382-402-438 stitches on the needle and the piece measures 18-20-22-24-25-28 cm from the cast-on edge mid front. Continue with stocking stitch and pattern as before, but without increasing; i.e. the 69-75-79-85-89-97 stitches in A.1 are worked as follows: Work A.2 (= 2 stitches), 2-0-2-0-2-1 stitches in stocking stitch, starting on the round marked with an arrow for your size work A.3 (= 10 stitches), A.4 over the next 40-50-50-60-60-70 stitches (= 4-5-5-6-6-7 reports of 10 stitches), A.5 (= 11 stitches), 2-0-2-0-2-1 stitches in stocking stitch and A.6 (= 2 stitches). Continue until the piece measures approx. 23-25-26-28-30-32 cm from the cast-on edge mid front. The next round is worked as follows: Work 41-45-49-54-59-65 stitches in stocking stitch (= half back piece), place the next 69-75-77-83-83-89 stitches on 1 thread for sleeve, cast on 10-10-12-12-14-14 new stitches on the needle (= in side under sleeve), work 82-90-98-108-118-130 stitches stocking stitch (= front piece), place the next 69-75-77-83-83-89 stitches on 1 thread for sleeve, cast on 10-10-12-12-14-14 new stitches on the needle (= in side under sleeve) and work the remaining 41-45-49-54-59-65 stitches in stocking stitch (= half back piece). Body and sleeves are finished separately. THE PIECE IS NOW MEASURED FROM HERE! BODY: = 184-200-220-240-264-288 stitches. Insert 1 marker thread on each side in the middle of the 10-10-12-12-14-14 stitches cast on under each sleeve. Allow them to follow your work onwards; they will be used a little later when decreasing/increasing. Work stocking stitch. When the piece measures 2 cm from the division decrease 1 stitch on each side of both marker threads - read DECREASE TIP = 4 stitches decreased. Decrease like this every 3 cm a total of 4 times = 168-184-204-224-248-272 stitches. Continue working until the piece measures 14 cm from the division. Now increase 1 stitch on each side of both marker threads – read INCREASE TIP-2 = 4 stitches increased. Increase like this every 2 cm a total of 7 times = 196-212-232-252-276-300 stitches. Continue working until the piece measures 30-30-31-31-31-31 cm from the division. Change to circular needle size 3.5 mm and work 2 ridges. Loosely cast off, but to avoid the cast-off edge being tight you can cast off with needle size 4 mm. The jumper measures approx. 58-60-62-64-66-68 cm from the shoulder down. SLEEVE: Place the 69-75-77-83-83-89 stitches from the thread on the one side of the piece on short circular needle/double pointed needles size 4 mm and knit up 1 stitch in each of the 10-10-12-12-14-14 stitches cast on under the sleeve = 79-85-89-95-97-103 stitches. Insert 1 marker thread in the middle of the 10-10-12-12-14-14 stitches cast on under the sleeve and allow it to follow your work onwards; it will be used a little later when decreasing. Start the round at the marker thread. Start on the correct round in the diagrams so that the pattern continues from the yoke and work as follows: Work 4-2-4-2-3-1 stitches in stocking stitch, A.3 (= 10 stitches), A.4 over the next 50-60-60-70-70-80 stitches (= 5-6-6-7-7-8 repeats of 10 stitches), A.5 (= 11 stitches) and 4-2-4-2-3-1 stitches in stocking stitch. Continue this pattern. When the piece measures 2 cm from the division, decrease 2 stitches mid under sleeve – remember DECREASE TIP. Decrease like this every 3rd-3rd-3rd-2nd-2nd-2nd round a total of 14-15-15-16-15-16 times = 51-55-59-63-67-71 stitches. The stitches which do not fit into the pattern as you decrease are worked in stocking stitch, but make sure that if decreases are in the pattern you also make a yarn over. Continue working until the piece measures 21-19-19-17-15-14 cm from the division (shorter measurements in larger sizes due to longer yoke). Change to double pointed needles size 3.5 mm and work 2 ridges. Loosely cast off, but to avoid the cast-off edge being tight you can cast off with needle size 4 mm. Sleeve measures approx. 22-20-20-18-16-15 cm from the division. Work the other sleeve in the same way. |
|||||||||||||||||||||||||
Diagram explanations |
|||||||||||||||||||||||||
|
|||||||||||||||||||||||||
 |
|||||||||||||||||||||||||
 |
|||||||||||||||||||||||||
 |
|||||||||||||||||||||||||
Have you finished this pattern?Tag your pictures with #dropspattern #bluenostalgiasweater or submit them to the #dropsfan gallery. Do you need help with this pattern?You'll find 27 tutorial videos, a Comments/Questions area and more by visiting the pattern on garnstudio.com. © 1982-2026 DROPS Design A/S. We reserve all rights. This document, including all its sub-sections, has copyrights. Read more about what you can do with our patterns at the bottom of each pattern on our site. |
|||||||||||||||||||||||||


With over 40 years in knitting and crochet design, DROPS Design offers one of the most extensive collections of free patterns on the internet - translated to 17 languages. As of today we count 324 catalogues and 12290 patterns translated into English (UK/cm). 12290
We work hard to bring you the best knitting and crochet have to offer, inspiration and advice as well as great quality yarns at incredible prices! Would you like to use our patterns for other than personal use? You can read what you are allowed to do in the Copyright text at the bottom of all our patterns. Happy crafting!
Post a comment to pattern DROPS 199-3
We would love to hear what you have to say about this pattern!
If you want to leave a question, please make sure you select the correct category in the form below, to speed up the answering process. Required fields are marked *.