
Popular categories
Looking for a yarn?


Comments / Questions (150)
![]() Emmanuelle wrote:
Emmanuelle wrote:
Après 1 motif A1 (51m.) on obtient 230 m. : 32 jersey – 51 A1 – 64 jersey – 51 A1 – 32 jersey. Selon les explications, seules les mailles d’A1 devraient augmenter et,pour avoir 302 m. à la séparation, donner 32 – 87 A1 – 64 – 87 A1 – 32 = 302 m. Pourtant, il est question de « 69 m. pour A1 », ce qui suppose aussi des augmentations dans le jersey (41 – 69 A1 – 82 – 69 A1– 41 = 302 m.), alors que ce n’est pas indiqué. Le modèle manque de clarté.
29.08.2025 - 23:52DROPS Design answered:
Bonjour Emmanuelle, lorsque vous avez terminé A.1, vous continuez à augmenter comme avant jusqu'à ce que vous ayez augmenté 24 fois au total en taille S - vous avez augmenté 15 fois dans A.1, vous continuez encore 9 rangs d'augmentations en tricotant le point ajouré des manches comme avant, et, vous augmentez 24 fois au total soit pour les manches aussi bien que pour le dos/le devant. Bon tricot!
01.09.2025 - 16:11
![]() Cécilia wrote:
Cécilia wrote:
Bonjour, Lorsqu'on à 350 mailles, combien doit on avoir de mailles jersey pour le devant et le dos?
15.08.2025 - 19:05DROPS Design answered:
Bonjour Cécilila, lorsque vous avez 350 m, vous avez augmenté 29 fois pour le raglan, vous avez ainsi: 46 m pour le demi-dos, 2 m raglan, 79 m pour la manche, 2 m raglan, 92 m pour le devant, 2 m raglan, 79 m pour la manche, 2 m raglan et 46 m pour le demi-dos. Bon tricot!
18.08.2025 - 08:06
![]() Carina wrote:
Carina wrote:
Can I add short rows to the back in this pattern. I know how to knit them but don’t know how it will effect this particular one with sleeves.
12.07.2025 - 15:34DROPS Design answered:
Dear Carina, you could add short rows, but you would need to take into account the pattern and you would need to make the necessary adjustments to the pattern yourself, so it might get complicated. Also, this neck is quite low and wide, while short rows are usually worked on higher necks, to help adjust the neck at the top of the back. So they might not be as useful in this specific pattern. Happy knitting!
13.07.2025 - 23:07
![]() Cécilia wrote:
Cécilia wrote:
Bonsoir pourriez- vous me dire, s'il vous plait, si après avoir tricoté A1, il faut continuer à faire les augmentations du raglan? Merci
26.06.2025 - 21:03DROPS Design answered:
Bonjour Cécilia, répétez la partie avec une étoile dans le diagramme, autrement dit, augmentez au début et à la fin de A.1 comme indiqué dans le diagramme (comme avant), et, entre temps, tricotez les mailles en point fantaisie, vous aurez juste plus de mailles que dans le diagramme, mais le point fantaisie se tricote de la même façon. Bon tricot!
27.06.2025 - 08:05
![]() Luisa wrote:
Luisa wrote:
Wie genau geht es weiter wenn ich A.1 einmal in der Höhe gestrickt habe? A.1 wird ab da nur noch von Reihe 11 bis 30 gestrickt, richtig? Und die Raglanzunahmen werden da auch noch weiter gestrickt? Weil dann komme ich nach 24 mal zunehmen nicht auf 302 Maschen (10 Zunahmerunden in A.1 á 8 Maschen würde 230+10×8=310 Maschen bedeuten)
18.06.2025 - 00:13DROPS Design answered:
Liebe Luisa, in die 1. Größe wird man aber nur 24 x zunehmen, dh einmal das ganze Diagram = 15 Mal, dann noch 9 Mal (wie bei der 11. bis 27. R inkl.) dh nicht bis die 30. Reihe A.1 aber nur bis man 24 Mal zugenommen hat. Viel Spaß beim Stricken!
18.06.2025 - 07:45
![]() Mieke wrote:
Mieke wrote:
De overgang van A1 naar A2-A3-A4-A5-A6: ik begrijp niet waarom in de oneven naalden na A2 en voor A6 er 2 rechten (maatL) worden gebreid waardoor de tekening in het patroon niet meer mooi is. Waarom ook niet samenbreien of overhaling doen met een omslag? Je hebt er dan wel 2x naast elkaar, maar dat kan toch? Of zie ik iets over het hoofd?
15.05.2025 - 13:14DROPS Design answered:
Dag Mieke,
Je breit eerst A.2 om het gaatjes patroon van het meerderen voort te zetten zonder te meerderen. Daarna brei je verder in patroon over de mouw en omdat je een iets ander aantal steken hebt dan in andere maten worden deze steken in tricotsteek gebreid. Je breit nog een paar centimeter door in.
16.05.2025 - 19:17
![]() Xisca Martinez wrote:
Xisca Martinez wrote:
Hallo; ik heb het patroon gevolgen 2 keer, steeds kom ik hetzelfde probleem tegen: door het meerderen aan beide kanten van de raglan, worden de mouwen steeds breder dan het patroon A.1 toont (in nummer van steken) waardoor de tekening niet mooi meegroeit met de meerderingen van de mouw; ik heb een foto getrokken zodat het duidelijk is, maar ik kan die niet opsturen. Bedankt voor de verduidelijking.
14.05.2025 - 19:12DROPS Design answered:
Dag Xisca,
De meerderingen van de mouwen zijn al in het telpatroon getekend, dus je hoeft niet extra te meerderen.
16.05.2025 - 19:23
![]() Mieke wrote:
Mieke wrote:
Ik brei deze trui samen met drops glitter. Bijna in elke naald moet ik terug afsteken omdat mijn glitter draad niet mee is gebreid hoewel ik er bijzonder goed op let. Hoe kan ik dit probleem voorkomen?
10.05.2025 - 18:00DROPS Design answered:
Dag Mieke,
Misschien kun je van te voren steeds een stukje het glitterdraad om de breidraad heen draaien?
11.05.2025 - 19:58
![]() Monika Klein wrote:
Monika Klein wrote:
Stricke Größe L, weiter mit den stillgelegten Ärmeln. Beginne Runde mit 6 der neu aufgenommenen Maschen. 4 glatt rechts, habe davon noch 2 rechts. Dann kommen am Ärmel bis zum nächsten Mustersatz von 10 Maschen noch einmal 4 Maschen (2 glatt rechts und 2 von A2) - sind 6 Maschen. Stricke ich die 4 M glatt rechts (von den neu aufgenommenen) und dann A3 - verschiebt sich doch alles oder habe ich einen Denkfehler. Stricke ich so und die ganzen MM würden sich dann verschieben?
28.03.2025 - 14:37DROPS Design answered:
Liebe Frau Klein, die 89 Maschen der Ärmel stricken Sie jetzt mit 4 M glattrechts (die neuen Maschen ab der mittlere), dann die 10 Maschen a.3, dann 60 Maschen A.4 (6 x die 10 M), die 11 Maschen A.5 und 4 M glattrechts, beginnen Sie mit der jeweiligen Reihe/Runde von den Diagrammen damit das Muster forsetzt. Es sind 9 Maschen ab Begin der Runde bis vorigen A.3, dann stricken Sie die ersten 4 Maschen glatt rechts, dann stricken Sie die nächsten 5 M mit der nächsten 5 in A.3 = 1 komplett Rapport in der Höhe, das sollte passen, sonnst arrangieren Sie diese Runde damit das Muster forstetzt- die mittleren Maschen under Ärmel werden glatt rechts gestrickt. Viel Spaß beim Stricken!
28.03.2025 - 15:32
![]() Monika Klein wrote:
Monika Klein wrote:
Stricke Größe L - Komme beim Rumpf auf 224 Maschen, da jeweils von den 79 Maschen der Ärmel nur 77 still gelegt werden, je eine von Anfang und Ende werden ja zum Rumpfteil hinzugenommen. Oder habe ich hier einen Denkfehler? Sollen lt. Anleitung nur 220 Maschen sein.
26.03.2025 - 15:43DROPS Design answered:
Liebe Frau Klein, es sind 79 Maschen für jeden Ärmel aber nur 77 Maschen sind stillegelegt: die erste und die letzte von den 79 Maschen gehören zum Rumfpteil: 49 M (1/2 Rückenteil) + 12 + 98 M (Vorderteil) + 12 + 49 M (Rückenteil)= 220 Maschen. Viel Spaß beim Stricken!
26.03.2025 - 16:08
|
|||||||||||||||||||||||||
Blue Nostalgia#bluenostalgiasweater |
|||||||||||||||||||||||||
 |
 |
||||||||||||||||||||||||
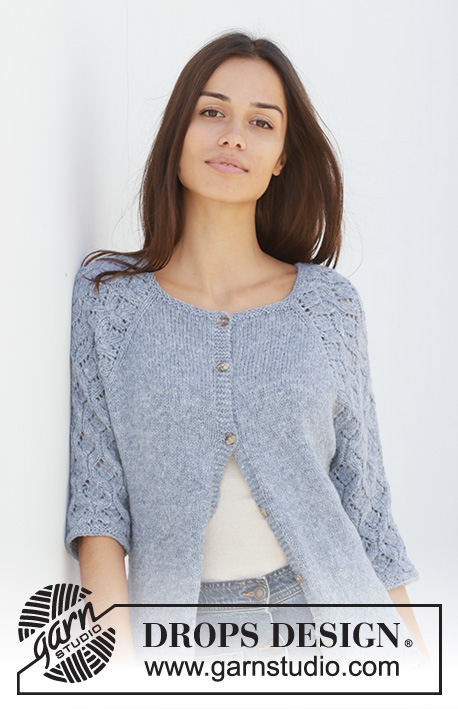
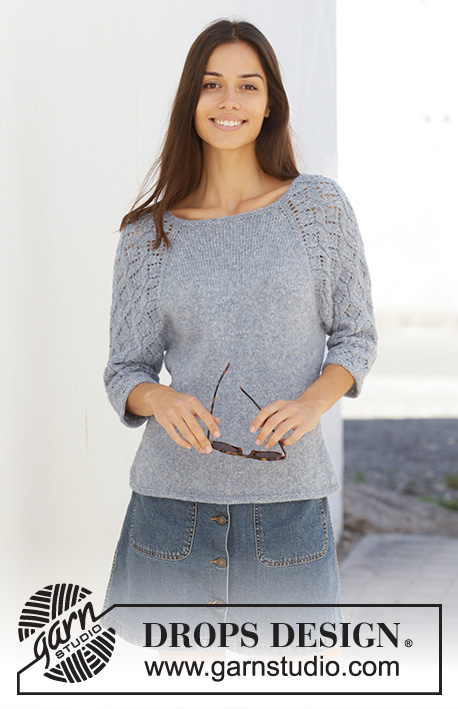
Knitted jumper with raglan in DROPS Sky. The piece is worked top down with lace pattern on sleeves. Sizes S – XXXL.
DROPS 199-3 |
|||||||||||||||||||||||||
|
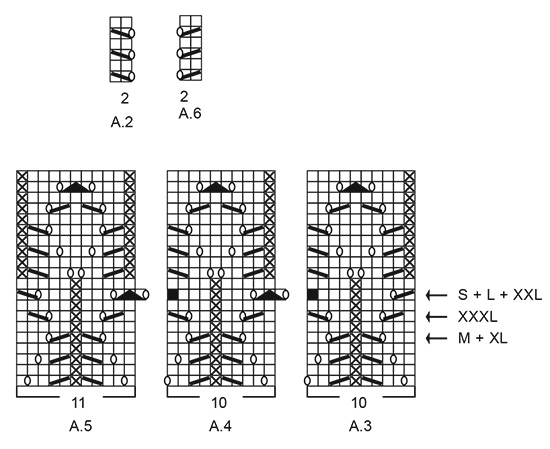
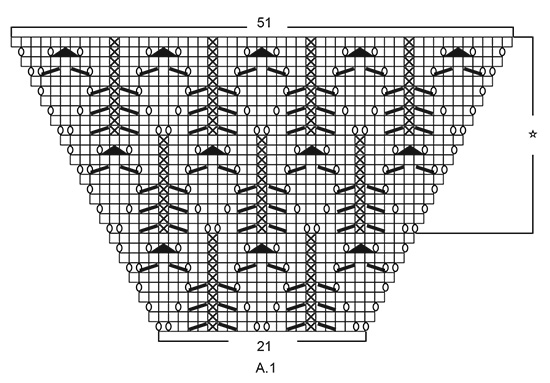
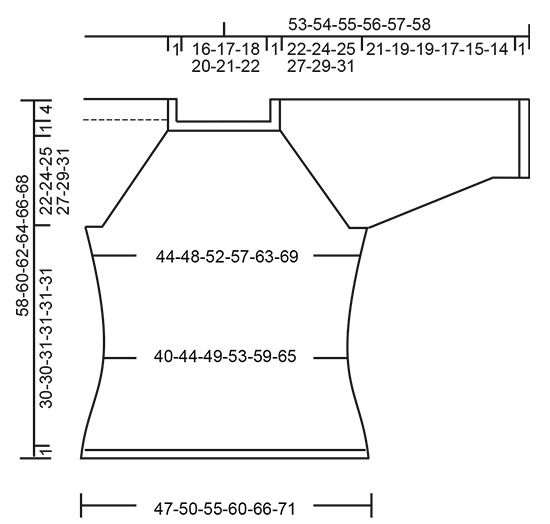
------------------------------------------------------- EXPLANATIONS FOR THE PATTERN: ------------------------------------------------------- RIDGE/GARTER STITCH (worked in the round): 1 ridge in height = 2 rounds; knit 1 round and purl 1 round. INCREASE TIP-1 (evenly spaced): To work out how to increase evenly, count the total number of stitches on the needle (e.g. 100 stitches), and divide by the number of increases to be made (e.g. 10) = 10. In this example, increase by making 1 yarn over after each 10th stitch. On the next round work the yarn overs twisted to avoid holes. PATTERN: See diagrams A.1 to A.6. Find your size in the diagrams (applies to A.3 to A.5). The diagrams show all rows in the pattern seen from the right side. DECREASE TIP (for sides of body and sleeves): Work until there are 3 stitches left before marker thread, knit 2 together, knit 2 (marker thread sits between these stitches), slip 1 stitch, knit 1 and pass the slipped stitch over the knitted stitch. INCREASE TIP-2 (for sides of body): Work until there are 2 stitches left before marker thread, 1 yarn over, knit 4 (marker thread sits in the middle of these stitches), 1 yarn over. On the next round work the yarn overs twisted to avoid holes. Then work the new stitches in stocking stitch. ------------------------------------------------------- START THE PIECE HERE: ------------------------------------------------------- JUMPER - SHORT OVERVIEW OF THE PIECE: Yoke and body are worked in the round with circular needle from mid back, top down. Sleeves are worked in the round with short circular needle/double pointed needles, top down. YOKE: Cast on 100-106-110-116-120-126 stitches with circular needle size 3.5 mm and Sky. Work 2 RIDGES – read description above. Knit 1 round where you increase 10-8-8-10-10-8 stitches evenly spaced – read INCREASE TIP-1 = 110-114-118-126-130-134 stitches. Change to circular needle size 4 mm. Knit 1 round. The next round is worked as follows: Work stocking stitch over the first 15-16-17-19-20-21 stitches (= half back piece), 1 yarn over, 2 stitches in stocking stitch, work A.1 over 21 stitches (= sleeve), 2 stitches in stocking stitch, 1 yarn over, work 30-32-34-38-40-42 stitches in stocking stitch (= front piece), 1 yarn over, 2 stitches stocking stitch, work A.1 over 21 stitches (= sleeve), 2 stitches in stocking stitch, 1 yarn over, work stocking stitch over the last 15-16-17-19-20-21 stitches (= half back piece). There are now 118-122-126-134-138-142 stitches on the needle. Continue this pattern onwards; i.e. on the sleeves increase on each side as shown in A.1. On the next round knit the yarn overs (= holes) and the increased stitches are worked into the pattern as you go as shown in A.1. On front and back pieces increase with yarn overs before/after the 2 stitches in stocking stitch in each side (there will be 2 stitches stocking stitch between each raglan increase). On the next round knit the yarn overs twisted (= no holes) and the increased stitches are worked in stocking stitch. Increase like this every 2nd round. You increase a total of 8 stitches on each increase-round (= 4 yarn overs + 4 stitches increased in A.1). REMEMBER THE KNITTING TENSION! When A.1 has been worked 1 time in height there are 230-234-238-246-250-254 stitches on the needle. Continue this pattern onwards, i.e. the pattern repeats itself as shown in A.1. Each time you have worked 20 rounds there will be room for 1 more repeat of lace pattern in width on each sleeve. When you have increased a total of 24-27-29-32-34-38 times there are 302-330-350-382-402-438 stitches on the needle and the piece measures 18-20-22-24-25-28 cm from the cast-on edge mid front. Continue with stocking stitch and pattern as before, but without increasing; i.e. the 69-75-79-85-89-97 stitches in A.1 are worked as follows: Work A.2 (= 2 stitches), 2-0-2-0-2-1 stitches in stocking stitch, starting on the round marked with an arrow for your size work A.3 (= 10 stitches), A.4 over the next 40-50-50-60-60-70 stitches (= 4-5-5-6-6-7 reports of 10 stitches), A.5 (= 11 stitches), 2-0-2-0-2-1 stitches in stocking stitch and A.6 (= 2 stitches). Continue until the piece measures approx. 23-25-26-28-30-32 cm from the cast-on edge mid front. The next round is worked as follows: Work 41-45-49-54-59-65 stitches in stocking stitch (= half back piece), place the next 69-75-77-83-83-89 stitches on 1 thread for sleeve, cast on 10-10-12-12-14-14 new stitches on the needle (= in side under sleeve), work 82-90-98-108-118-130 stitches stocking stitch (= front piece), place the next 69-75-77-83-83-89 stitches on 1 thread for sleeve, cast on 10-10-12-12-14-14 new stitches on the needle (= in side under sleeve) and work the remaining 41-45-49-54-59-65 stitches in stocking stitch (= half back piece). Body and sleeves are finished separately. THE PIECE IS NOW MEASURED FROM HERE! BODY: = 184-200-220-240-264-288 stitches. Insert 1 marker thread on each side in the middle of the 10-10-12-12-14-14 stitches cast on under each sleeve. Allow them to follow your work onwards; they will be used a little later when decreasing/increasing. Work stocking stitch. When the piece measures 2 cm from the division decrease 1 stitch on each side of both marker threads - read DECREASE TIP = 4 stitches decreased. Decrease like this every 3 cm a total of 4 times = 168-184-204-224-248-272 stitches. Continue working until the piece measures 14 cm from the division. Now increase 1 stitch on each side of both marker threads – read INCREASE TIP-2 = 4 stitches increased. Increase like this every 2 cm a total of 7 times = 196-212-232-252-276-300 stitches. Continue working until the piece measures 30-30-31-31-31-31 cm from the division. Change to circular needle size 3.5 mm and work 2 ridges. Loosely cast off, but to avoid the cast-off edge being tight you can cast off with needle size 4 mm. The jumper measures approx. 58-60-62-64-66-68 cm from the shoulder down. SLEEVE: Place the 69-75-77-83-83-89 stitches from the thread on the one side of the piece on short circular needle/double pointed needles size 4 mm and knit up 1 stitch in each of the 10-10-12-12-14-14 stitches cast on under the sleeve = 79-85-89-95-97-103 stitches. Insert 1 marker thread in the middle of the 10-10-12-12-14-14 stitches cast on under the sleeve and allow it to follow your work onwards; it will be used a little later when decreasing. Start the round at the marker thread. Start on the correct round in the diagrams so that the pattern continues from the yoke and work as follows: Work 4-2-4-2-3-1 stitches in stocking stitch, A.3 (= 10 stitches), A.4 over the next 50-60-60-70-70-80 stitches (= 5-6-6-7-7-8 repeats of 10 stitches), A.5 (= 11 stitches) and 4-2-4-2-3-1 stitches in stocking stitch. Continue this pattern. When the piece measures 2 cm from the division, decrease 2 stitches mid under sleeve – remember DECREASE TIP. Decrease like this every 3rd-3rd-3rd-2nd-2nd-2nd round a total of 14-15-15-16-15-16 times = 51-55-59-63-67-71 stitches. The stitches which do not fit into the pattern as you decrease are worked in stocking stitch, but make sure that if decreases are in the pattern you also make a yarn over. Continue working until the piece measures 21-19-19-17-15-14 cm from the division (shorter measurements in larger sizes due to longer yoke). Change to double pointed needles size 3.5 mm and work 2 ridges. Loosely cast off, but to avoid the cast-off edge being tight you can cast off with needle size 4 mm. Sleeve measures approx. 22-20-20-18-16-15 cm from the division. Work the other sleeve in the same way. |
|||||||||||||||||||||||||
Diagram explanations |
|||||||||||||||||||||||||
|
|||||||||||||||||||||||||
 |
|||||||||||||||||||||||||
 |
|||||||||||||||||||||||||
 |
|||||||||||||||||||||||||
Have you finished this pattern?Tag your pictures with #dropspattern #bluenostalgiasweater or submit them to the #dropsfan gallery. Do you need help with this pattern?You'll find 27 tutorial videos, a Comments/Questions area and more by visiting the pattern on garnstudio.com. © 1982-2026 DROPS Design A/S. We reserve all rights. This document, including all its sub-sections, has copyrights. Read more about what you can do with our patterns at the bottom of each pattern on our site. |
|||||||||||||||||||||||||


With over 40 years in knitting and crochet design, DROPS Design offers one of the most extensive collections of free patterns on the internet - translated to 17 languages. As of today we count 324 catalogues and 12290 patterns translated into English (UK/cm). 12290
We work hard to bring you the best knitting and crochet have to offer, inspiration and advice as well as great quality yarns at incredible prices! Would you like to use our patterns for other than personal use? You can read what you are allowed to do in the Copyright text at the bottom of all our patterns. Happy crafting!
Post a comment to pattern DROPS 199-3
We would love to hear what you have to say about this pattern!
If you want to leave a question, please make sure you select the correct category in the form below, to speed up the answering process. Required fields are marked *.