
Popular categories
Looking for a yarn?


Comments / Questions (155)
![]() Tone Gjerde Larsen wrote:
Tone Gjerde Larsen wrote:
Stolpe venstre. Hvordan strikkes maskene en har plukket opp langs siden med? Er ikke beskrevet slik som høyre stolpe.
28.12.2024 - 03:36DROPS Design answered:
Hei Tone. Under VENSTRE STOLPE står det at man strikker de 12 stolpemaskene samtidig som man strikker de sammen med maskene som ble strikket opp langs forstykket. Se gjerne hjelpevideoen: Hvordan dobbeltstrikke en stolpe uten knappehull Dufinner videoen til høyre / under bildene. mvh DROPS Design
06.01.2025 - 11:20
![]() Lily wrote:
Lily wrote:
Hallo ich habe bei der Aufteilung der maschen irgendwie am letzten anteilungs Punkt nur 7 statt 17 maschen übrig aber die Anzahl meiner maschen stimmt woran liegt es ..? Ich stricke die Größe xl Danke im Voraus Grüße
22.12.2024 - 21:53
![]() Lily wrote:
Lily wrote:
Hallo ich habe bei der Aufteilung der maschen irgendwie am letzten anteilungs Punkt nur 7 statt 17 maschen übrig aber die Anzahl meiner maschen stimmt woran liegt es ..? Ich stricke die Größe xl Danke im Voraus Grüße
22.12.2024 - 21:52DROPS Design answered:
Liebe Lily, meinen Sie am Anfang der Passe? Es sind dann 100 Maschen auf der Nadel, die so aufgeteilt werden: 17 M (Vorderteil), 1 M mit einer Markierung, 14 M (Ärmel), 1 M mit einer Markierung, 34 M (Rückenteil), 1 M mit einer Markierung, 17 M (Vorderteil)=17+1+14+1+34+1+14+1+17=100. Viel Spaß beim Stricken!
02.01.2025 - 10:20
![]() Magda wrote:
Magda wrote:
Im making size S, what is pattern for increasing? is K3, (M1, k6) 12 times, M1, k4 gonna work?
19.12.2024 - 13:05DROPS Design answered:
Dear Magda, are you talking about the increases before rib at the bottom of body? Then this lesson should help you calculating how to increase evenly. Happy knitting!
20.12.2024 - 07:21
![]() Liv wrote:
Liv wrote:
Hei Jeg skal strikke jakken i str XL. Jeg får det ikke til å stemme helt med antall. Når det er økt ette dobbel halskant skal antallet være 100. Men fordeling til raglan blir 96 til sammen. Hva er riktig 😊
06.12.2024 - 16:09DROPS Design answered:
Hei Liv. Kan du ha glemt å telle de 4 maskene som merke skal sitt i? Tell 17 masker (forstykket), sett 1 merke i neste maske, tell 14 masker (erme), sett 1 merke i neste maske, tell 34 masker (bakstykket), sett 1 merke i neste maske, tell 14 masker (erme), sett 1 merke i neste maske, det gjenstår nå 17 masker på pinnen (forstykke) = 17+1+14+1+34+1+14+1+17=100 masker. mvh DROPS Design
09.12.2024 - 12:55
![]() Marián wrote:
Marián wrote:
Buenos días, según entiendo los bordes delanteros se cierran en dos veces después de haber unido el último punto de la pieza al borde por lo que el borde sobresale por arriba, es así? Hay algún vídeo de cómo cerrar los bordes delanteros? Muchas gracias
20.11.2024 - 07:42DROPS Design answered:
Hola Marián, sí, se puede ver en la foto que el borde sobresale ligeramente. Para cerrar los bordes delanteros, disminuye todos los puntos como se indica y después cierra de derecho.
24.11.2024 - 20:22
![]() CANTINI wrote:
CANTINI wrote:
Bonjour, dans l'explication du col doublé, il n'y a pas de bande de boutonnage ?? alors qu'elle apparaît sur l'image ! merci !!
14.11.2024 - 11:07DROPS Design answered:
Bonjour Mme Cantini, la boutonnière au niveau du col est faite lorsque vous tricotez la bordure devant droit - cf aussi cette vidéo. Bon tricot!
15.11.2024 - 08:37
![]() Toni Pidsadnick wrote:
Toni Pidsadnick wrote:
An Etsy seller has your Foggy Autumn cardigan pattern for sale as their own creation. They are listed as "Knitting Pattern World" and list the pattern for $3.76 CAN. I wonder how many other of your patterns they are selling. That is plagiarism - correct? Your firewall is not letting me send the link here, but I can email it if you'd like.
03.11.2024 - 21:56DROPS Design answered:
Dear Mrs Pidsadnick, thanks for noticing, please help use reporting this on Etsy. Thanks in advance for your help.
04.11.2024 - 10:13
![]() Pia Andersen wrote:
Pia Andersen wrote:
Kan man strikke det hele på rundpind ,og derefter klippe op i midten og så strikke forkant?\\r\\nMvh Pia Andersen
13.10.2024 - 10:40DROPS Design answered:
Hej Pia, ja det må du gerne, men det bliver jo en anden type af opskrift og vi kan desværre ikke hjælpe dig videre med det :)
16.10.2024 - 12:09
![]() Denise wrote:
Denise wrote:
Oh oh, je crois que je viens de trouver une vidéo à ce sujet ..
02.10.2024 - 20:50
|
|
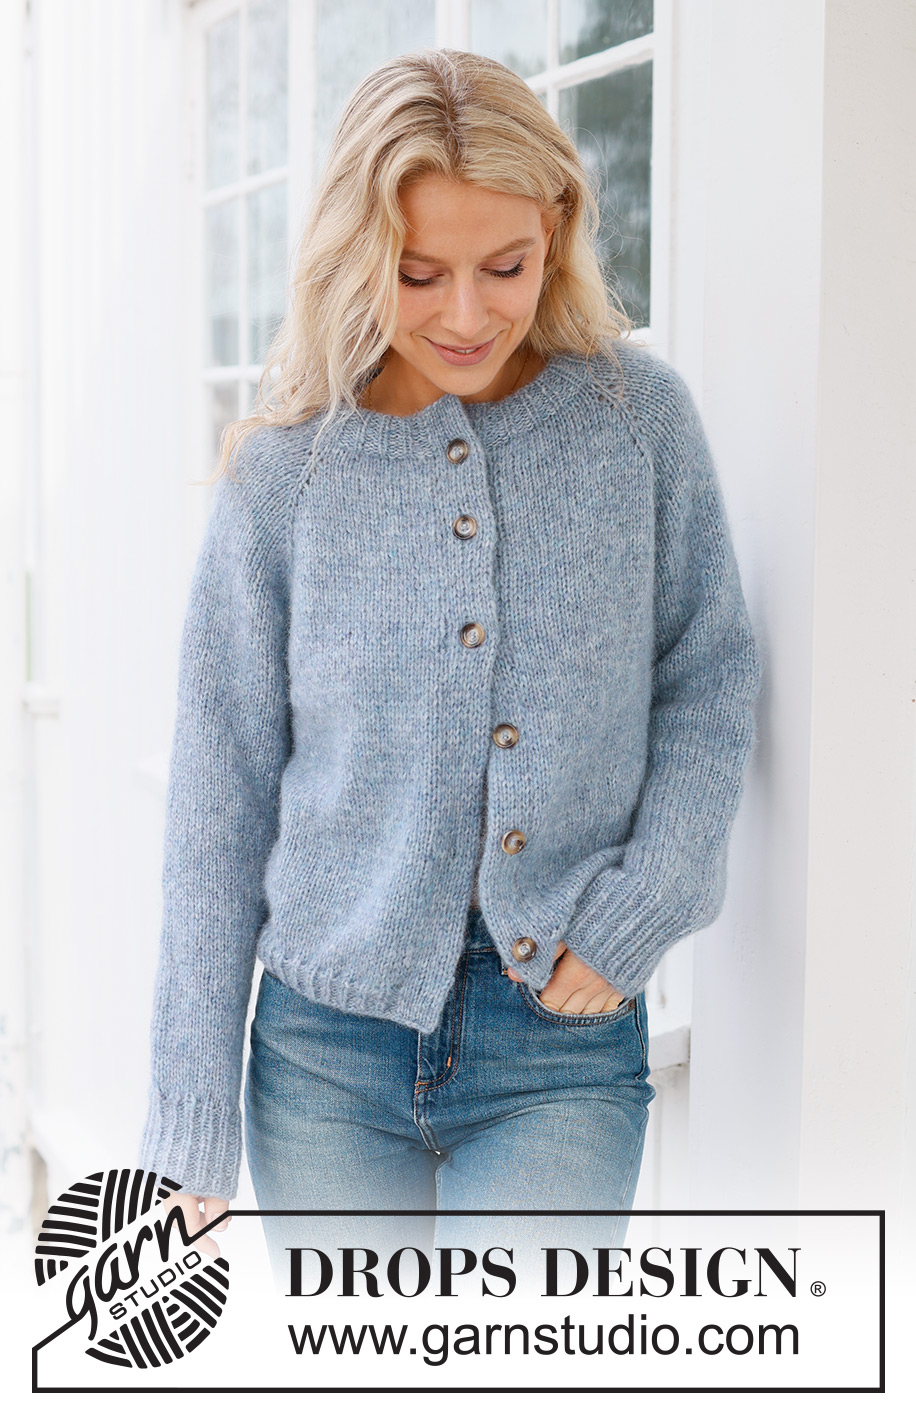
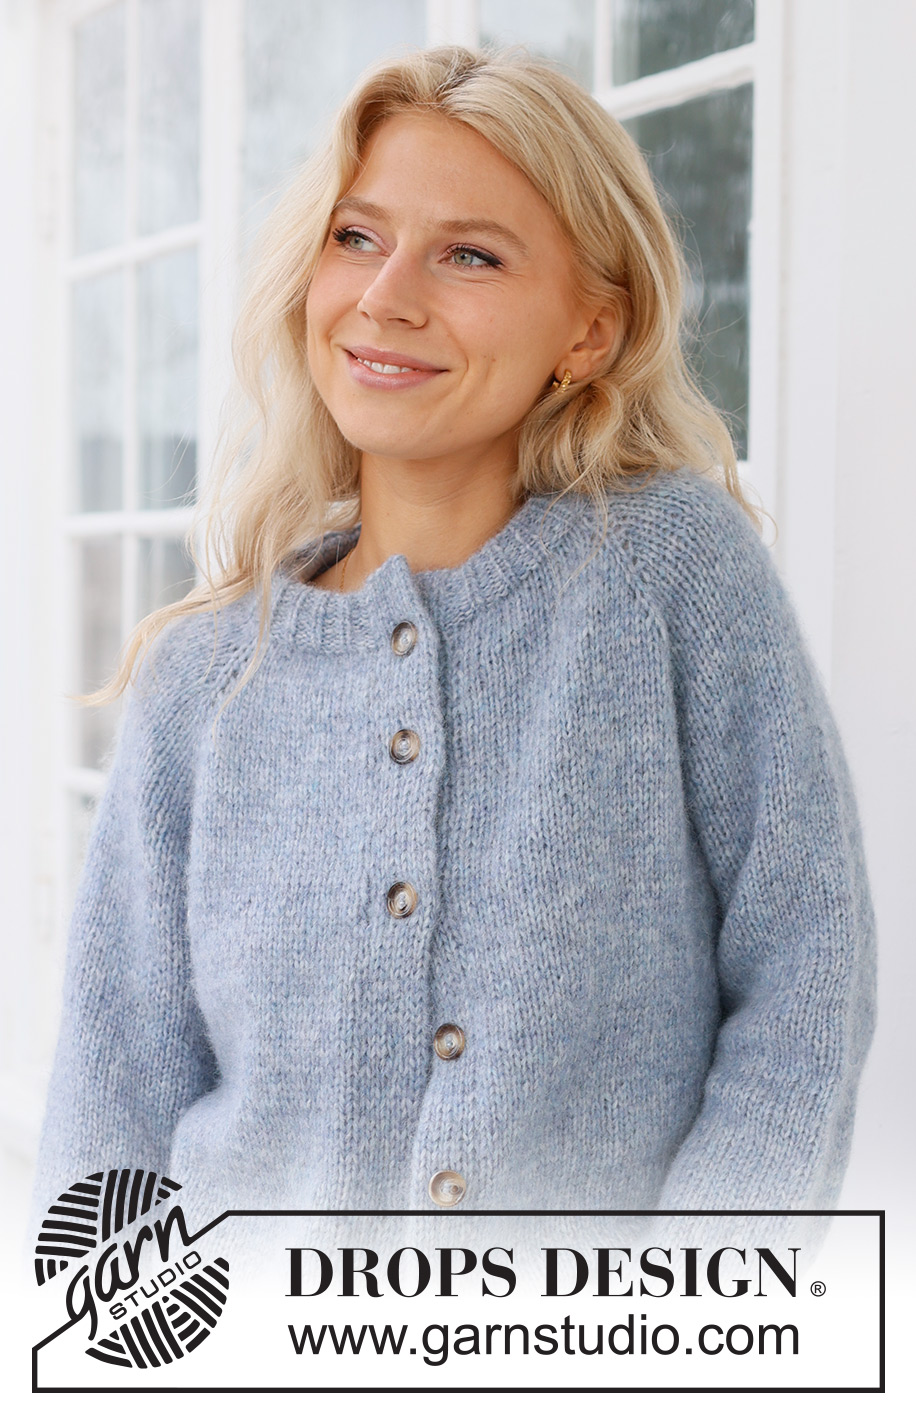
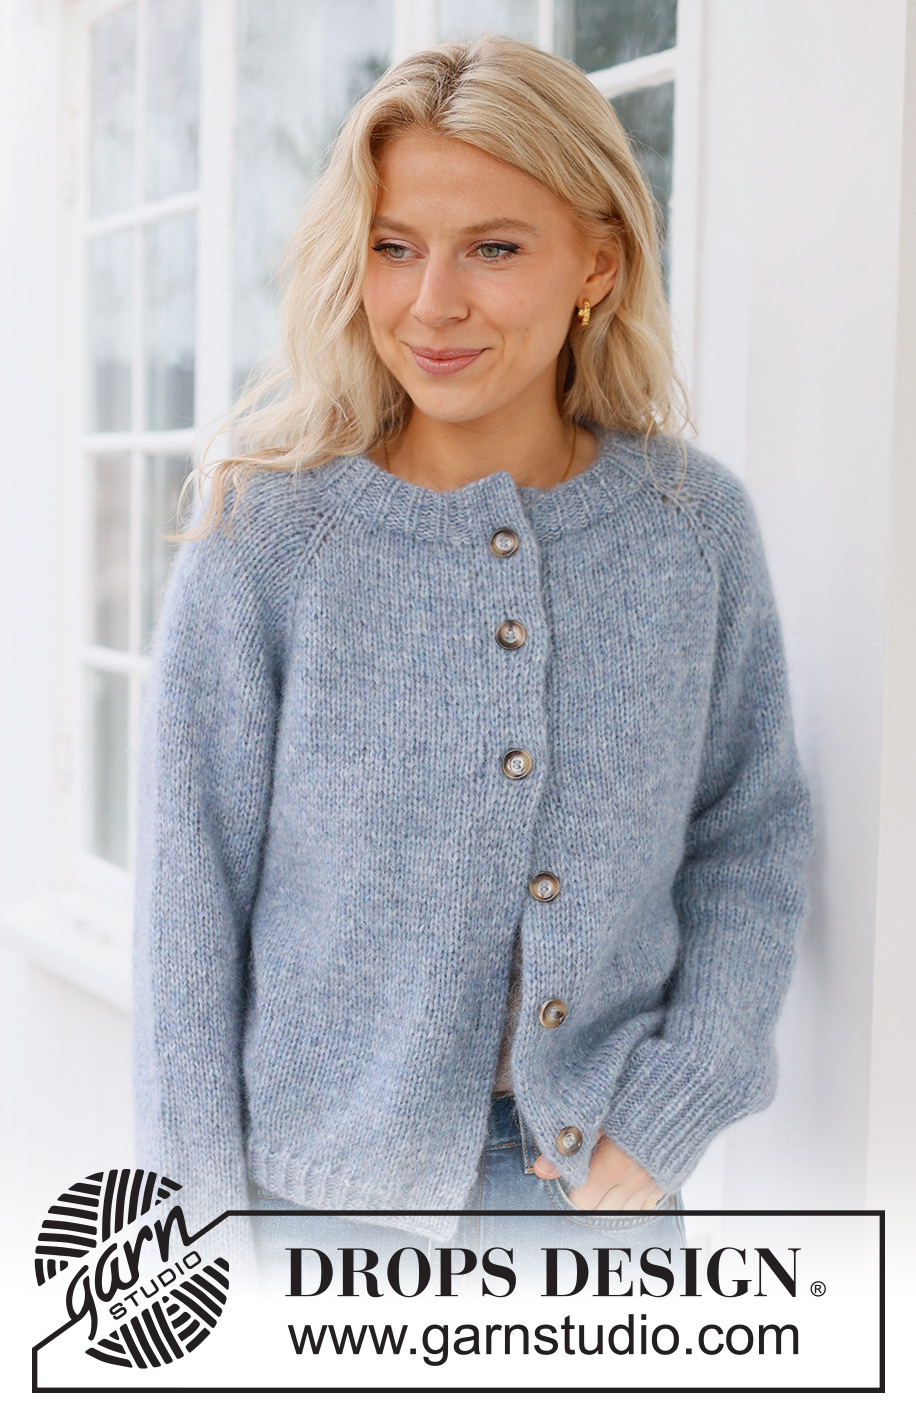
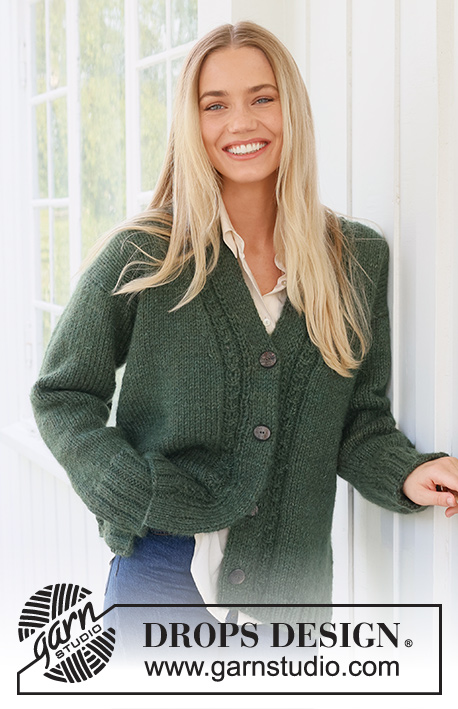
Foggy Autumn Cardigan#foggyautumncardigan |
|
 |
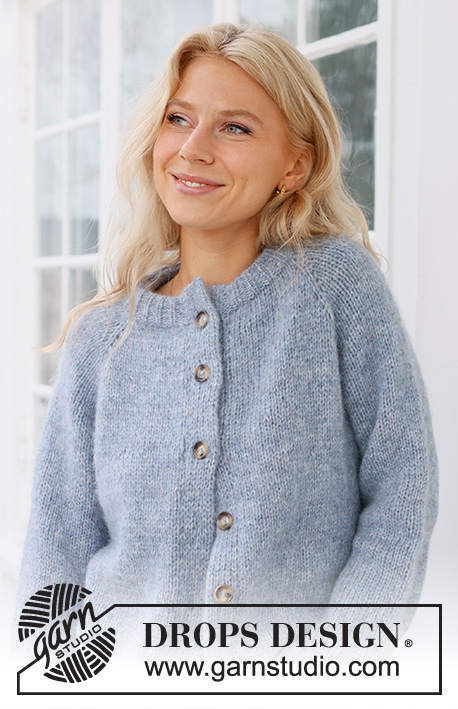 |
Knitted jacket in DROPS Air. The piece is worked top down, with raglan and double bands. Sizes S - XXXL.
DROPS 236-33 |
|
|
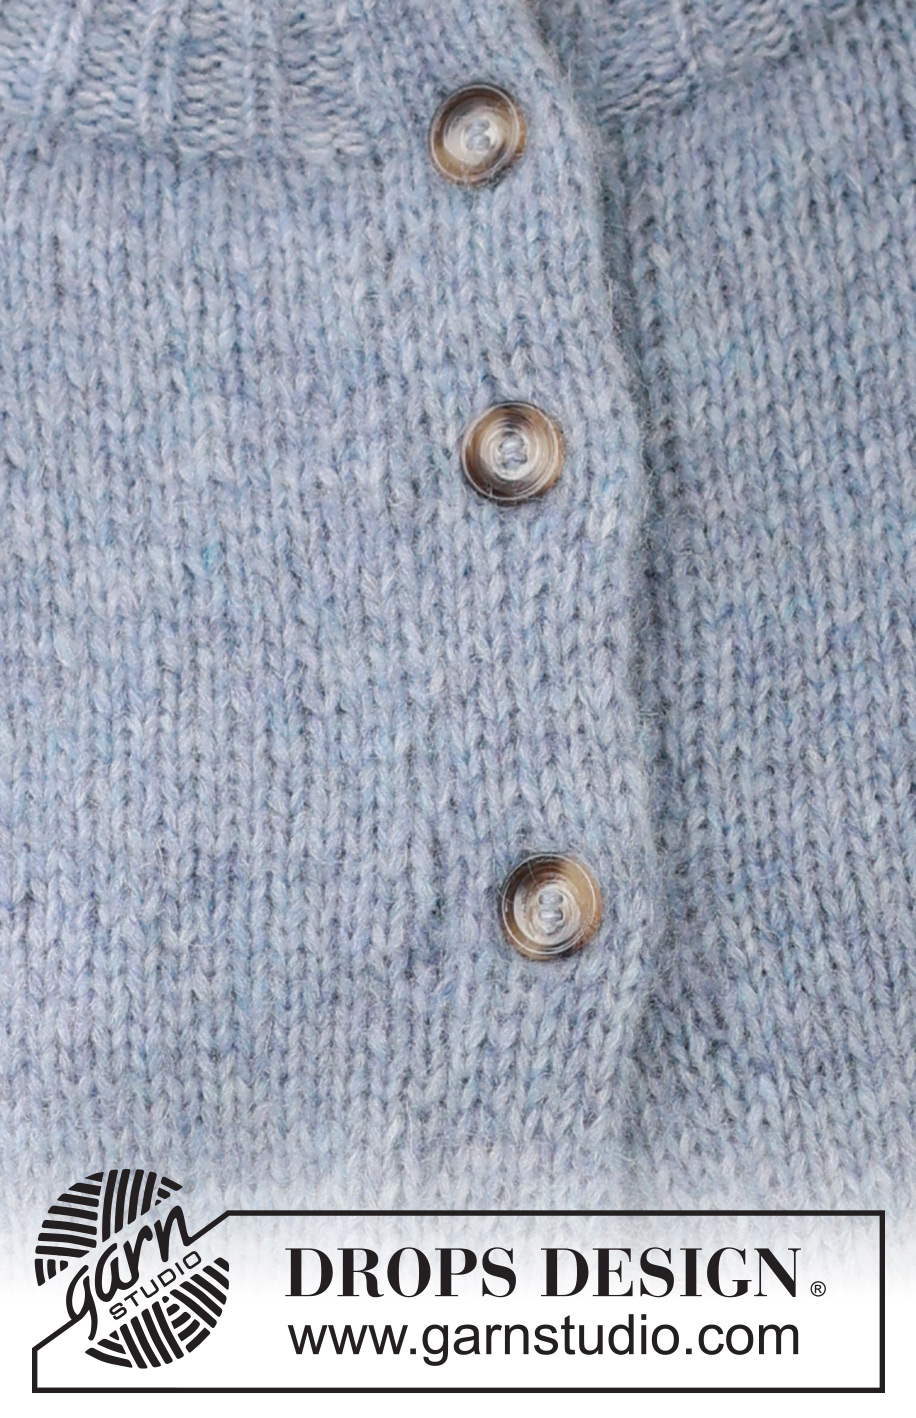
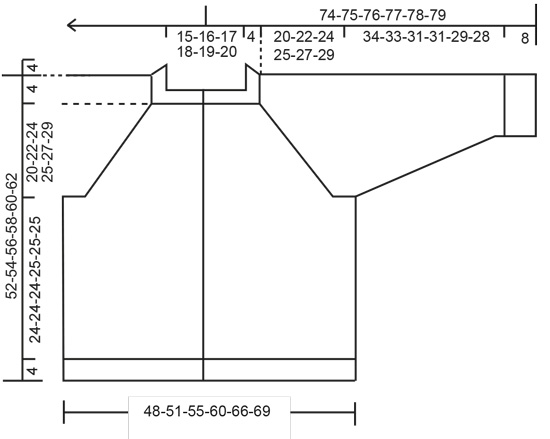
------------------------------------------------------- EXPLANATIONS FOR THE PATTERN: ------------------------------------------------------- RIDGE/GARTER STITCH (worked back and forth): Knit all rows. 1 ridge = knit 2 rows. RAGLAN: All increases are worked from the right side! Increase to raglan on each side of each marker-stitch as follows: Work to the marker-stitch, 1 yarn over, knit the marker-stitch, 1 yarn over (= 8 stitches increased). On the next row (wrong side) work the yarn overs as follows: BEFORE marker-stitch: Purl the yarn over twisted. AFTER marker-stitch: Slip the yarn over onto the right needle as if to knit, place it back onto the left needle the other way round (twisted), purl the yarn over. DECREASE TIP (sleeves): Decrease 1 stitch on either side of the marker as follows: Work until there are 3 stitches left before the marker, knit 2 together, knit 2 (marker sits between these 2 stitches), slip 1 stitch as if to knit, knit 1 and pass the slipped stitch over the knitted stitch (2 stitches decreased). BUTTONHOLES: The buttonholes are worked on the right band: Work the first 6 stitches, turn and work the same stitches back, turn and work these 6 stitches again. Cut the strand. Work 4 rows over the remaining 6 band stitches (first row from the right side) and knit together the last stitch from the right side and the stitch on the edge of the jacket. On the last row from the right side work all the band stitches as before. Work the buttonholes when the band measures: S: 4, 13, 22, 31, 40 and 48 cm. M: 4, 14, 23, 33, 41 and 50 cm. L: 4, 14, 24, 34, 43 and 52 cm. XL: 6, 16, 26, 36, 45 and 54 cm. XXL: 4, 13, 22, 31, 40, 48 and 56 cm. XXXL: 5, 14, 23, 32, 41, 50 and 58 cm. ------------------------------------------------------- START THE PIECE HERE: ------------------------------------------------------- JACKET – SHORT OVERVIEW OF THE PIECE. The neck and yoke are worked back and forth with circular needle, top down. The yoke is divided for body and sleeves and the body continued back and forth with circular needle. The sleeves are worked in the round with double pointed needles. DOUBLE NECK: Cast on 79-82-88-91-94-97 stitches with DROPS Air using 2 circular needles, sizes 4 and 5.5 mm, held together. Pull out the needle size 5.5 mm and work with circular needle size 4 mm (doing this gives you an elastic cast-on edge). Purl 1 row from the wrong side. Work rib from the right side as follows: 1 edge stitch in GARTER STITCH – read description above, * purl 2, knit 1 *, work from *-* until there are 3 stitches left, purl 2, 1 edge stitch in garter stitch. When the rib measures 9 cm, fold the neck double to the inside. On the next row, knit from right side, at the same time work every 2nd stitch together with every 2nd stitch from the cast-on edge. Change to circular needle size 5.5 mm. Insert 1 marker inside the 1 edge stitch; the yoke is measured from this marker! YOKE: Purl 1 row from the wrong side and increase 13-14-16-9-10-13 stitches evenly spaced = 92-96-104-100-104-110 stitches. Insert 4 markers (without working the stitches) as follows: Count 15-16-18-17-18-19 stitches (front piece), insert 1 marker in the next stitch, count 14 stitches (sleeve), insert 1 marker in the next stitch, count 30-32-36-34-36-40 stitches (back piece), insert 1 marker in the next stitch, count 14 stitches (sleeve), insert 1 marker in the next stitch, there are 15-16-18-17-18-19 stitches after the last marker-stitch (front piece). Continue with stocking stitch and 1 edge stitch in garter stitch on each side. On the next row from the right side increase 1 stitch on each side of each marker-stitch – read RAGLAN above. Increase like this, each row from the right side, a total of 17-19-20-24-26-27 times = 228-248-264-292-312-326 stitches. REMEMBER THE KNITTING TENSION! Continue with stocking stitch and 1 edge stitch in garter stitch on each side until the yoke measures 20-22-24-25-27-29 cm. Now divide for the body and sleeves as follows: Work 34-37-39-43-47-49 stitches, place the next 46-50-54-60-62-64 stitches on a thread for the sleeve, cast on 8-8-10-10-12-12 stitches under the sleeve, work 68-74-78-86-94-99 stitches, place the next 46-50-54-60-62-64 stitches on a thread for the sleeve, cast on 8-8-10-10-12-12 stitches under the sleeve, work the last 34-37-39-43-47-50 stitches. BODY: = 152-164-176-192-212-222 stitches. Continue with stocking stitch and 1 edge stitch in garter stitch on each side for a further 24-24-24-25-25-25 cm. Now increase 14-14-17-19-20-22 stitches evenly on the next row from the right side = 166-178-193-211-232-244 stitches. Change to circular needle size 4 mm. Work rib from the wrong side as follows: 1 edge stitch in garter stitch, * knit 2, purl 1 *, work from *-* until there are 3 stitches left, knit 2 and 1 edge stitch in garter stitch. Continue this rib for 4 cm. Cast off. The jacket measures approx. 52-54-56-58-60-62 cm, from the shoulder down. SLEEVES: Place the 46-50-54-60-62-64 stitches from the thread on the one side of the piece on double pointed needles size 5.5 mm and knit up 1 stitch in each of the 8-8-10-10-12-12 stitches cast on under the sleeve = 54-58-64-70-74-76 stitches. Insert a marker in the middle of the new stitches under the sleeve. Work stocking stitch in the round for 2 cm. Now decrease 2 stitches under the sleeve – read DECREASE TIP. Decrease like this every 4½-4-3-2-2-1½ cm a total of 7-8-10-13-14-14 times = 40-42-44-44-46-48 stitches. When the sleeve measures 34-33-31-31-29-28 cm from the division, increase 5-6-7-7-5-6 stitches evenly spaced = 45-48-51-51-51-54 stitches. Change to double pointed needles size 4 mm and work rib (purl 2, knit 1) for 8 cm. Cast off. The sleeve measures approx. 42-41-39-39-37-36 cm from the division. Work the other sleeve in the same way. RIGHT BAND: The band is worked bottom up. Wind out a 90 to 120 cm yarn-end and use it to knit up stitches along the front piece (this means you can continue working without cutting the strand afterwards): Start at the bottom and knit up 1 stitch in each row, inside the 1 edge stitch, with circular needle size 5 mm and DROPS Air. Work from the end of the needle, where the wool-ball is = bottom of the front piece. Cast on 12 stitches from the wrong side, extending the band outwards. Work back and forth over these 12 stitches and work the band together with the front piece as follows: ROW 1 (right side): Slip the first stitch onto the right needle as if to purl, keeping the strand at the front, * knit 1, slip 1 stitch onto the right needle as if to purl, keeping the strand in front *, work from *-* until there is 1 stitch left on the band, slip the last stitch onto the right needle as if to knit, keeping the strand at the back, knit the next stitch and pass the slipped stitch over the knitted stitch, turn. ROW 2 (wrong side): * Slip the first/next stitch onto the right needle as if to purl, keeping the strand in front, knit 1 *, work from *-* over all 12 band-stitches, turn. Repeat rows 1 and 2. NB! If the band becomes too long for the front piece, the band stitches can be worked together with 1 extra stitch from the front piece. Then work every 10th row as follows from the right side: Work until 1 stitch remains of the 12 band stitches, slip the last stitch onto the right needle as if to knit, with the yarn behind the work, knit the next 2 stitches together, pass the slipped stitch over the stitches knitted together, turn. Remember the BUTTONHOLES – read description above. When all the stitches on the front piece are worked together with the band, knit all stitches together 2 and 2, then cast off. LEFT BAND: The band is worked bottom up. Start at the top and knit up 1 stitch down the front piece in each row, working inside the 1 edge stitch, with circular needle size 5 mm and DROPS Air. Cast on 12 stitches at the bottom, extending the band outwards. Work back and forth over these 12 stitches and work the band together with the front piece as follows: ROW 1 (wrong side): Knit 1, * slip 1 stitch onto the right needle as if to purl, keeping the strand in front, knit 1 *, work from *-* until there is 1 stitch left on the band, slip the next 2 stitches onto the right needle as if to purl together, keeping the strand in front, turn. ROW 2 (right side): Knit 2 together, * slip 1 stitch onto the right needle as if to purl, keeping the strand in front, knit 1 *, work from *-* until there is 1 stitch left, slip the last stitch onto the right needle as if to purl, keeping the strand in front, turn. Repeat rows 1 and 2. NB! If the band becomes too long for the front piece, the band stitches can be worked together with 1 extra stitch from the front piece on every 9th and 10th row as follows: slip 3 stitches onto the right needle at the end of the row from the wrong side and knit 3 together from the right side. When all the stitches on the front piece are worked together with the band, work together as follows from the right side: Slip 1 stitch onto the right needle as if to knit, knit 1, pass the slipped stitch over, cast off. ASSEMBLY: Sew the buttons onto the left band. |
|
 |
|
Have you finished this pattern?Tag your pictures with #dropspattern #foggyautumncardigan or submit them to the #dropsfan gallery. Do you need help with this pattern?You'll find 36 tutorial videos, a Comments/Questions area and more by visiting the pattern on garnstudio.com. © 1982-2026 DROPS Design A/S. We reserve all rights. This document, including all its sub-sections, has copyrights. Read more about what you can do with our patterns at the bottom of each pattern on our site. |
|


With over 40 years in knitting and crochet design, DROPS Design offers one of the most extensive collections of free patterns on the internet - translated to 17 languages. As of today we count 324 catalogues and 12290 patterns translated into English (UK/cm). 12290
We work hard to bring you the best knitting and crochet have to offer, inspiration and advice as well as great quality yarns at incredible prices! Would you like to use our patterns for other than personal use? You can read what you are allowed to do in the Copyright text at the bottom of all our patterns. Happy crafting!
Post a comment to pattern DROPS 236-33
We would love to hear what you have to say about this pattern!
If you want to leave a question, please make sure you select the correct category in the form below, to speed up the answering process. Required fields are marked *.