
Popular categories
Looking for a yarn?


Comments / Questions (63)
![]() Lindberg wrote:
Lindberg wrote:
Hej! När jag är på tredje varvet A1 ska jag börja öka till raglan före och efter A1. Samtidigt står det i beskrivningen att jag ska fortsätta mönstret som ovan när jag stickar A1-varven. Betyder det att jag ska fortsätta ökningen * 1 omslag, 1 rätmaska *, sticka *-* totalt 3 gånger också varje varv på rätsidan medan jag stickar A1? Men inte öka för ärm mer gånger?
29.10.2023 - 15:27
![]() Martine wrote:
Martine wrote:
Je ne comprends pas du tout les augmentations. Sur le modèle il est écrit d'augmenter avant/après A1/A2 et aussi avant et après les manches. Or je compte sur un rang 12 augmentations, soit 2 pour le devant, 2 pour la manche droite, 4 pour le dos, 2 pour la manche gauche et 2 pour le côté gauche. Or vous dites que l'on augmente parfois 8 ou parfois seulement 4 . Pouvez-vous m'expliquer s'il vous plaît ? Merci par avance.
17.09.2023 - 13:26DROPS Design answered:
Bonjour Martine, au 1er rang de A.1 vous allez augmenter 4 mailles dans chaque A.1 (en plus des augmentations des raglans), mais ensuite, vous augmenterez seulement pour le raglan, quand A.1 est terminé, vous répétez A.2. Vous augmentez ensuite avant/après A.2 tous les 2 rangs puis tous les 4 rangs, mais à un rythme différent selon votre taille, autrement dit vous augmenterez par ex tous les 2 rangs 8 mailles (dos, devants et manches), puis alternativement tous les 2 rangs 4 mailles (manches seulement quand on doit augmenter tous les 4 rangs pour le dos et les devants mais toujours tous les 2 rangs pour les manches). Bon tricot!
18.09.2023 - 15:43
![]() Inger Marie Toft wrote:
Inger Marie Toft wrote:
Hvordan skal 3. omgang forstå'e. ?? Efter mønster A 1, skal der så strikkes glat til man når om til sidste A1 inden forkant. ?? Altså kun glatstrikning imellem de to mønstre .??
21.08.2023 - 14:45DROPS Design answered:
Hei Inger Marie Du strikker A.1 4 ganger pr rad (2 foran og 2 bak). Første gang du strikker A.1 økes det 4 masker på hver erme, disse maskene strikkes vrang fra vrangen (=glattstrikk). På neste rad fra retten (3.rad / A.1) starter økningene til raglan og det strikkes glattstrikk i begynnelsen av raden (etter de 6 kantmaskene), over 1. erme, på bakstykket, over 2. erme og på slutten av raden (før de 6 kantmaskene). mvh DROPS Design
28.08.2023 - 10:27
![]() Tim wrote:
Tim wrote:
Bij de pas staat: recht OMSLAG, recht OMSLAG, OMSLAG en dat 2x. Dat maakt 6x OMSLAG. En je moet er 4 gedraaid breien om geen gaatje te krijgen. Welke 4 moet je gedraaid breien? Het zijn er 6 niet 4.
14.08.2023 - 22:25DROPS Design answered:
Dag Tim,
Tussen de sterretjes staat: 1 omslag en 1 recht. Dat wat tussen de sterretjes staat herhaal je nog 2 keer, dus dan heb je 3 omslagen in totaal. Dan staat er nog 1 omslag. Hetzelfde is het geval bij de andere mouw, daar heb je ook 4 omslagen.
16.08.2023 - 19:31
![]() M Radius wrote:
M Radius wrote:
Bij de pas staat omslag recht (2x herhalen) omslag. Dat staat er ook voor de andere schouder. Dat is 6x een omslag. Daaronder staat dat je 4 omslagen gedraaid moet breien op de terugweg. Welke 2 dan niet? Is er niet een patroon met gewoon meerderen in plaats van uitzoeken op de weg terug. Als ik ze allemaal als meerderingen maak en niet als gaatje dan kom ik ook niet uit, hou 2 steken over. klopt de tekening?
09.08.2023 - 17:37DROPS Design answered:
Dag M Radius,
Als het goed is heb je op 2 plekken 4 omslagen zitten. Deze brei je alle 4 gedraaid.
14.08.2023 - 14:15
![]() Radhika wrote:
Radhika wrote:
Sorry my mistake I have 6 balls left so maybe that's enough
17.07.2023 - 12:25
![]() Radhika wrote:
Radhika wrote:
Hi, I'm making this cardigan in Drops Brushed Alpaca silk, using 1 strand as per the instructions, in size 'L'. I've almost completed the body section and have used almost 5 balls of yarn (125g). The yarn converter showed that I would need about 150g for the whole cardigan, but since I only have 1 ball (25g) left, and still 2 sleeves to knit I'm wondering if the yarn converter is wrong. Please advise how much yarn do I need for the complete cardigan. Thank you Radhika
16.07.2023 - 15:40DROPS Design answered:
Dear Radhika, the amount is correct. It should be 6 balls of Drops Brushed Alpaca Silk. Check if the gauge in the body is correct. If the gauge doesn't exactly match, you should have a margin in the amount of grams/ balls to account for the differences. Since you need 147gr of Brushed Alpaca Silk, it would be good to have one extra ball just in case. Happy knitting!
17.07.2023 - 11:24
![]() Johanna Dulau wrote:
Johanna Dulau wrote:
Hi, wie viele Reihen hat A1 insgesamt? ich hatte 12 gestrickt (versteht man so von der Beschreibung), ist aber offensichtlich zu viel, Muster sieht total anders aus...) liebe Grüße aus Augsburg
24.05.2023 - 11:36DROPS Design answered:
Liebe Frau Dulau, Diagramme zeigen alle Reihen, dh die Hin- sowie die Rückreihen, so ist A.1 nur 6 Reihen (und A.2 ist auch 6 Reihen). Viel Spaß beim stricken!
24.05.2023 - 13:39
![]() Maj-Britt Vollesen wrote:
Maj-Britt Vollesen wrote:
Jeg opgiver !!! Har nu strikket 1. pind i bærestykket og har 16 m til overs . Kan slet ikke forstå det næste afsnit. Jeg mener denne opskrift kan vinde 1. priser for ugennemskuelighed. Og jeg har altså strikket mange komplicerede strikkearbejder i 40 år. Så for ikke at forkorte mit liv piller jeg op og finder en anden opskrift . ØV
22.05.2023 - 18:30
![]() Kirstie wrote:
Kirstie wrote:
I have just done the yoke row from the right hand side. What does it mean by, work this pattern back on the wrong side. Do I repeat what I have just done on the wrong side?
23.04.2023 - 21:35DROPS Design answered:
Hi Kirstie, You now work row 2 in the diagram from the wrong side (so read the diagram from left to right) with the open squares now purled from the wrong side and the crossed squares knitted from the wrong side. Happy knitting!
24.04.2023 - 06:51
|
|||||||||||||||||||||||||
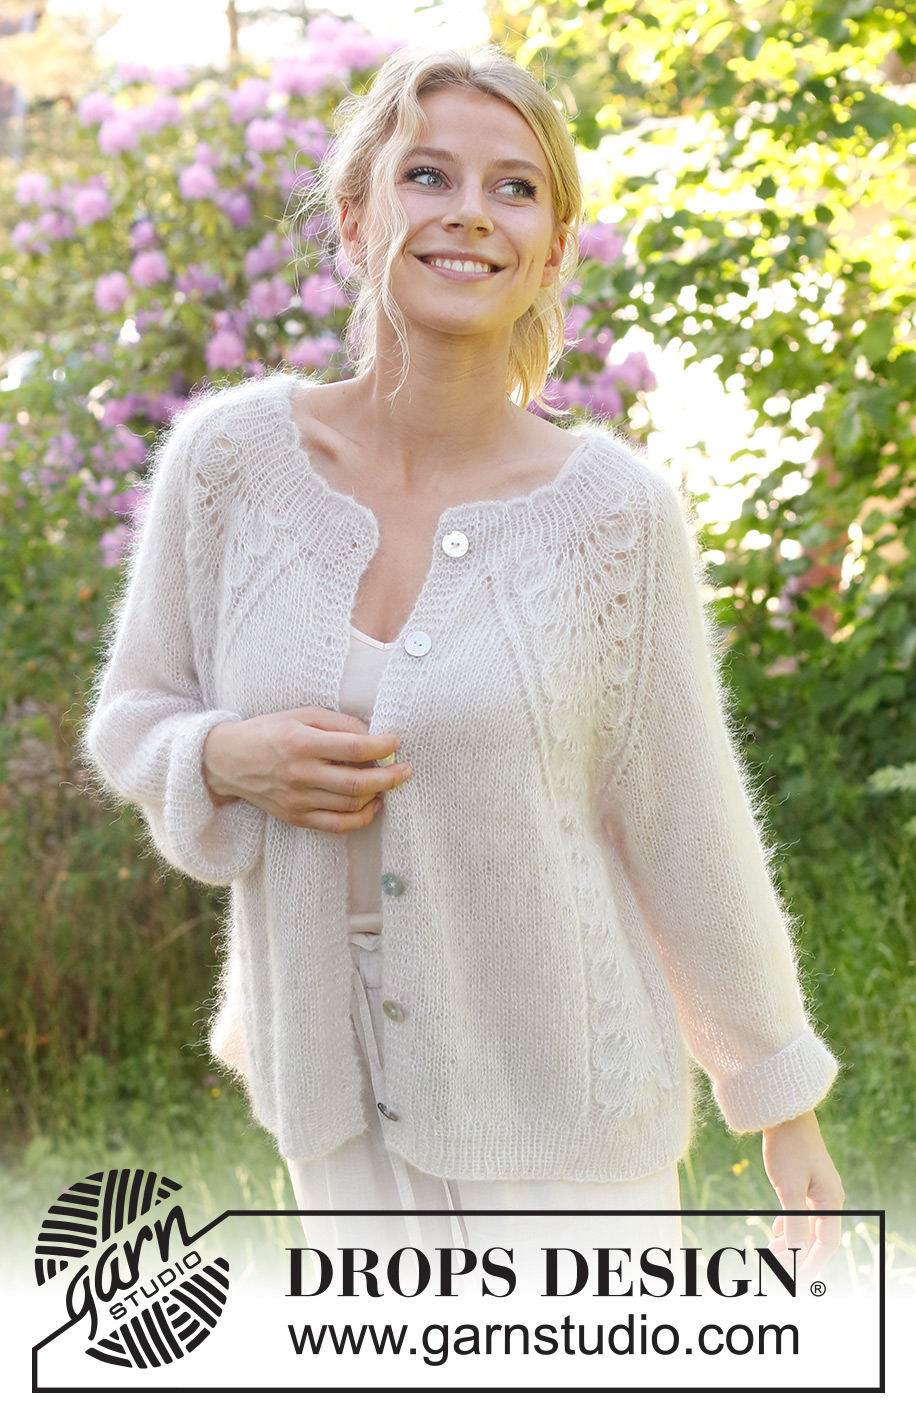
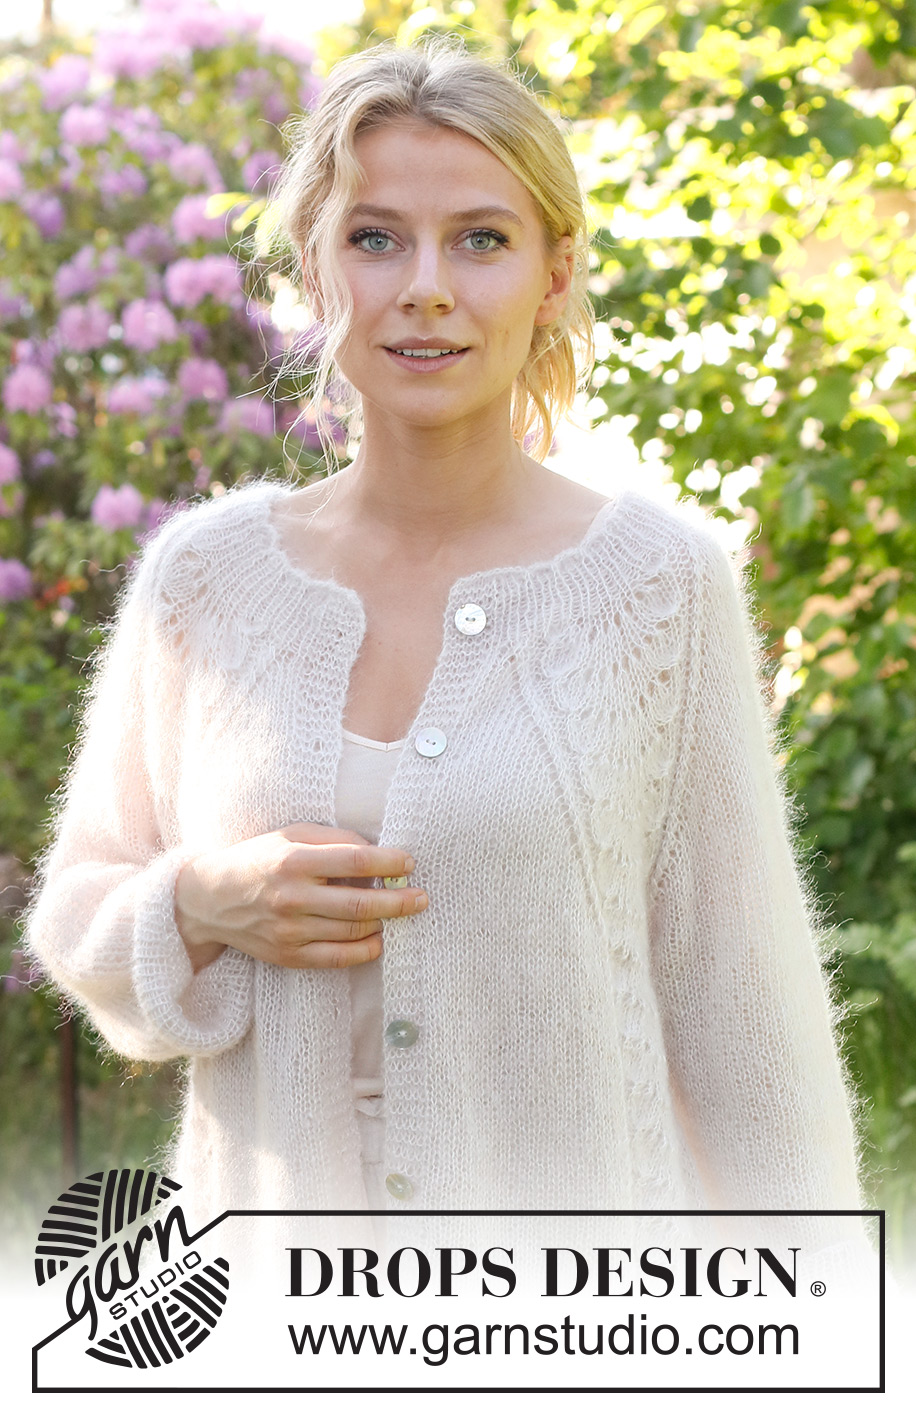
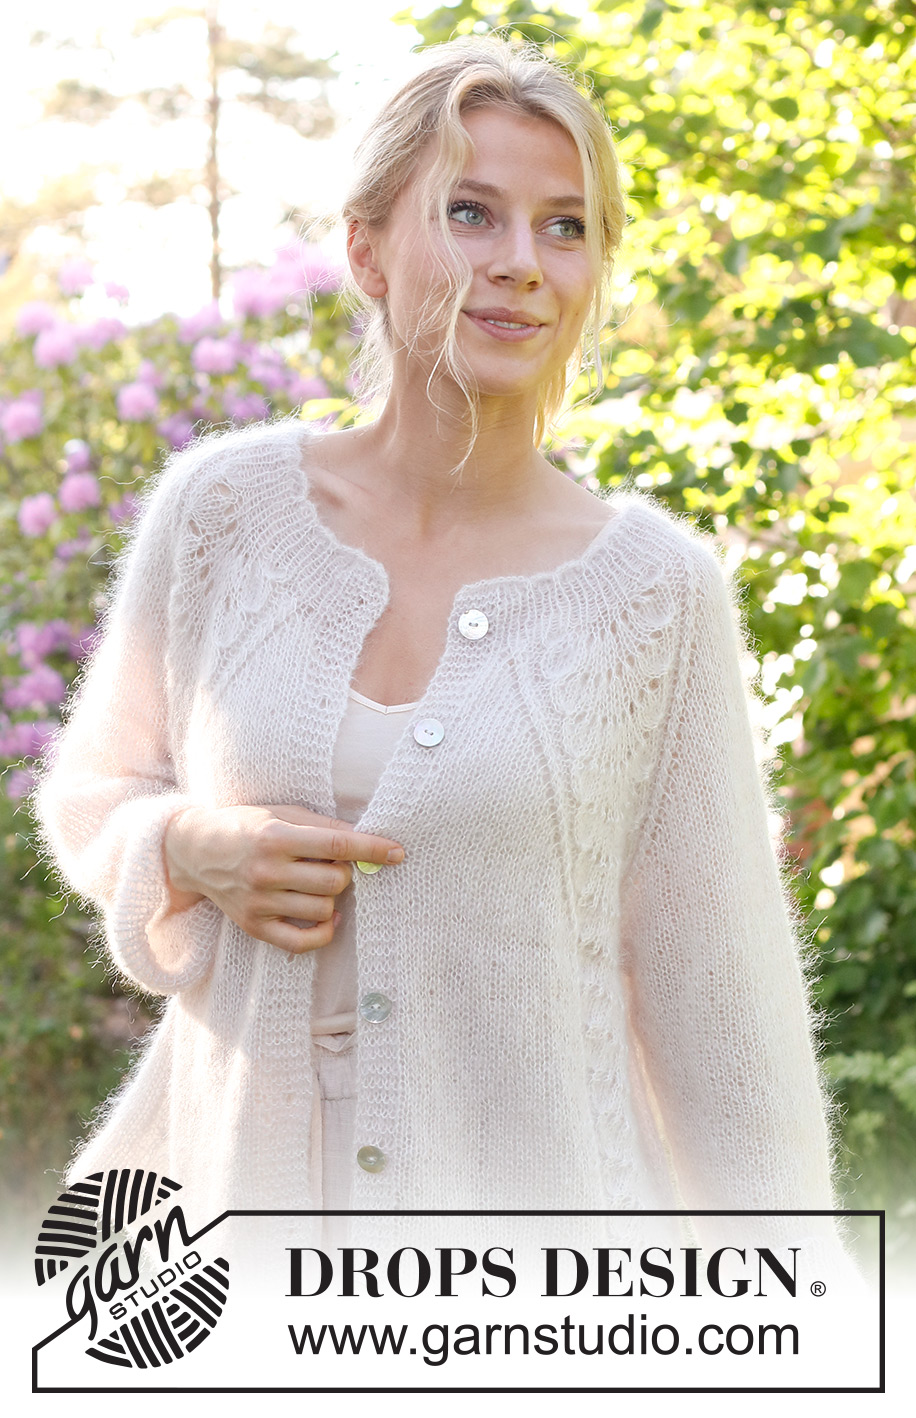
Wave Romance Cardigan#waveromancecardigan |
|||||||||||||||||||||||||
 |
 |
||||||||||||||||||||||||
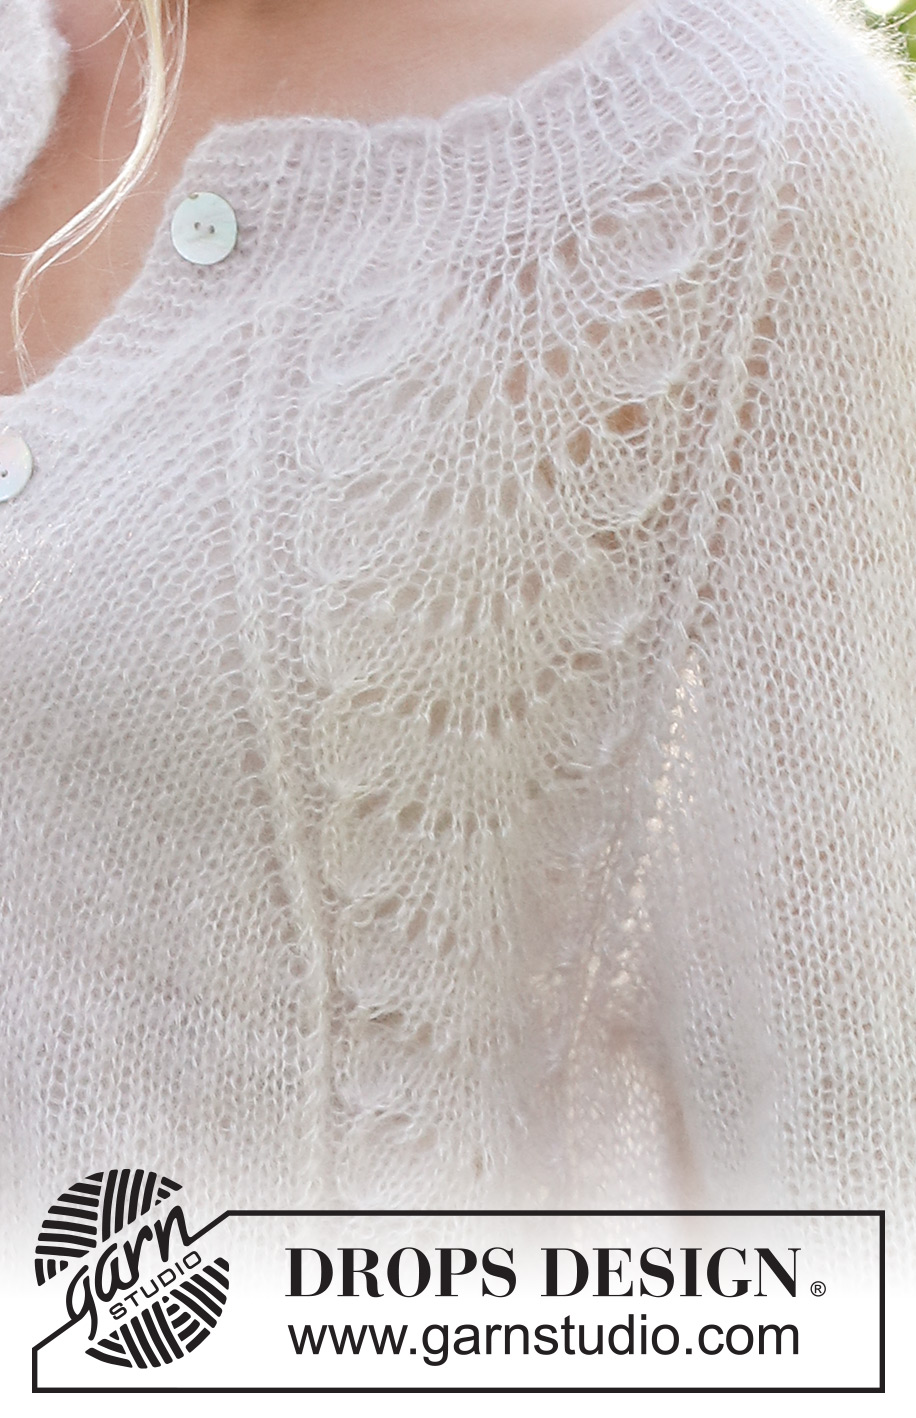
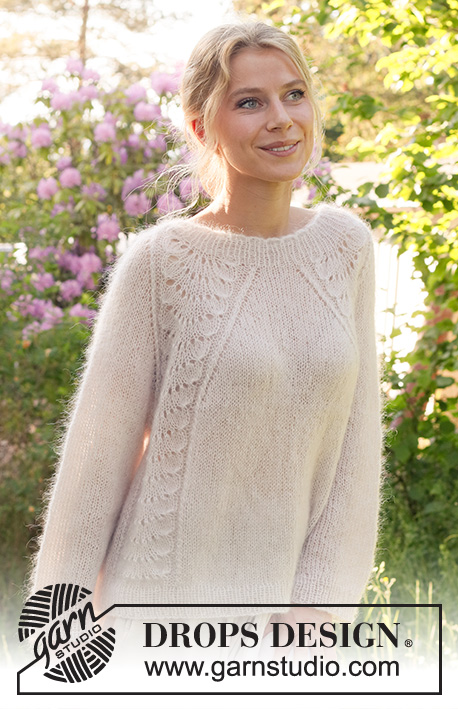
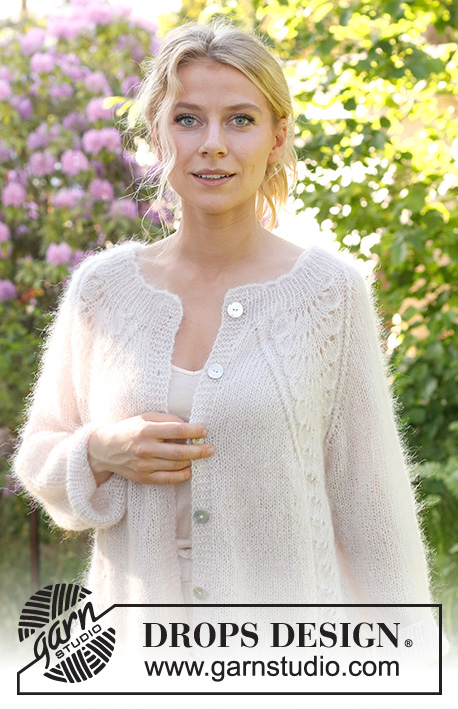
Knitted jacket in 2 strands DROPS Kid-Silk. The piece is worked top down with raglan and wave-pattern. Sizes S - XXXL.
DROPS 232-4 |
|||||||||||||||||||||||||
|
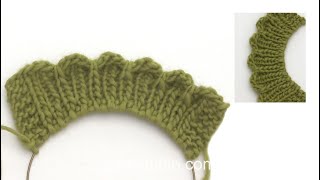
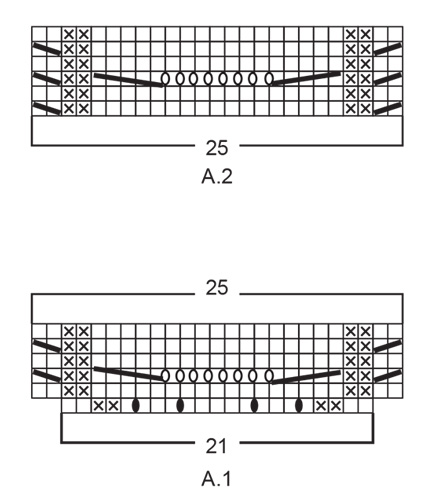
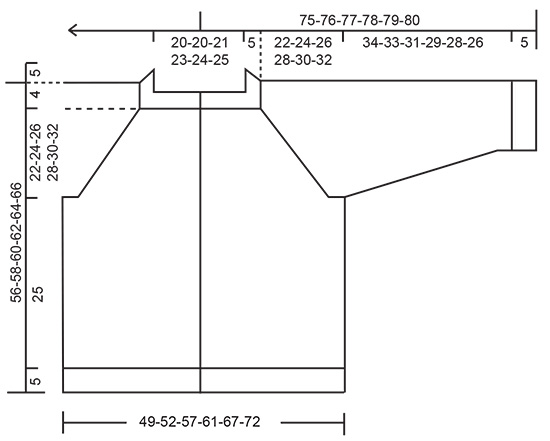
------------------------------------------------------- EXPLANATIONS FOR THE PATTERN: ------------------------------------------------------- RIDGE/GARTER STITCH (worked back and forth): Knit all rows. 1 ridge = knit 2 rows. PATTERN: See diagrams A.1 and A.2. The diagrams show all rows in the pattern from the right side. RAGLAN: All increases are worked from the right side! Increase in each transition between the body and sleeves by increasing before/after A.1/A.2. Increases are different on the body and sleeves, so sometimes you increase 8 stitches other times 4 stitches on the increase-row. Increase 1 stitch by making 1 yarn over. On the next row (wrong side) purl the yarns over twisted to avoid holes. Then work the new stitches in stocking stitch. DECREASE TIP (for sleeves): Work until there are 3 stitches left before the marker, knit 2 together, knit 2 (marker sits between these 2 stitches), slip 1 stitch as if to knit, knit 1 and pass the slipped stitch over the knitted stitch. BUTTONHOLES: Work buttonholes on the right band (when the garment is worn). 1 buttonhole = When there are 3 stitches left on a row from the right side, make 1 yarn over. On the next row (wrong side), knit the yarn over to leave a hole and then knit 2 together. The first buttonhole is worked when the rib on the neck measures 3 cm. Then work the other 5-5-6-6-7-7 buttonholes with approx. 9-10-8½-9-8-8½ cm between each one. ------------------------------------------------------- START THE PIECE HERE: ------------------------------------------------------- JACKET – SHORT OVERVIEW OF THE PIECE: The neck and yoke are worked back and forth with circular needle, from mid-front and top down. The yoke is divided for body and sleeves and the body is continued back and forth. The sleeves are worked in the round with double pointed needles, top down. NECK WITH WAVY EDGE: Cast on 101-101-105-109-113-117 stitches with circular needle size 4 mm and 2 strands DROPS Kid-Silk. Purl 1 row from the wrong side, then work as follows from the right side: 6 band stitches in GARTER STITCH – read description above, * knit 1 purl 1 *, work from *-* until there are 7 stitches left, knit 1 and 6 band stitches in garter stitch. Continue this rib for 3 more rows. Work the next row as follows from the right side: 6 band stitches in garter stitch, knit 1, * purl 1, knit 1, purl 1, take the right needle from the front of work and under the cast on edge, use right needle to lift the outermost stitch from left needle to the right needle, then take the right needle back around under the cast on edge (only the outermost stitch on the right needle is wrapped around the cast on edge), place this stitch back on left needle and knit the stitch (make sure the stitch is not twisted) *, work from *-* until there are 6 stitches left and work 6 band stitches in garter stitch. The neck now has small waves along the cast-on edge. Continue the rib as before with knit 1, purl 1 until the rib measures 5 cm after the waves – remember the BUTTONHOLES on the right band – read description above. AT THE SAME TIME on the last row, increase 6-6-2-2-2-2 stitches evenly spaced = 107-107-107-111-115-119 stitches. When the rib is finished insert a marker after the band at the beginning of the row – the yoke is measured from this marker! YOKE: Change to circular needle size 5 mm. Work as follows from the right side: 6 band stitches in garter stitch, 1-1-1-2-3-4 stitches in stocking stitch, A.1 (front piece), * 1 yarn over, knit 1 *, work from *-* 2 more times, 1 yarn over (sleeve), A.1, 3-3-3-5-7-9 stitches in stocking stitch, A.1 (back piece), * 1 yarn over, knit 1 *, work from *-* 2 more times, 1 yarn over (sleeve), A.1, 1-1-1-2-3-4 stitches in stocking stitch and 6 band stitches in garter stitch (front piece). There are 131-131-131-135-139-143 stitches on the needle. Work this pattern back from the wrong side, but without increasing on the sleeves; the 4 yarn overs from the previous row are purled twisted to avoid holes. REMEMBER THE KNITTING TENSION! OVERVIEW OF THE NEXT SECTION – read the whole section before continuing. Continue the pattern with 6 band stitches in garter stitch on each side. When A.1 has been worked 1 time in height, work A.2 over the 25 stitches in A.1. Then repeat A.2 in height. AT THE SAME TIME on row 3 in A.1 start to increase to RAGLAN as explained below. RAGLAN: Increase for RAGLAN by increasing 1 stitch before/afterA.1/A.2 – read description above. The increases on the front/back pieces and sleeves differ as follows: FRONT/BACK PIECES: Increase every 2nd row (each row from the right side) a total of 10-15-19-22-25-30 times, then every 4th row 6-4-3-3-3-1 times. SLEEVES: Increase every 2nd row (each row from the right side) a total of 21-23-25-29-30-31 times. When all the increases are finished there are 279-299-319-351-371-391 stitches. Continue working without further increases until the piece measures 22-24-26-28-30-32 cm from the marker. Now divide for the body and sleeves: Work the first 48-51-54-58-62-66 stitches (front piece), place the next 49-53-57-65-67-69 stitches on a thread for the sleeve, cast on 6-6-8-8-10-10 stitches (in side under the sleeve), work 85-91-97-105-113-121 stitches (back piece), place the next 49-53-57-65-67-69 stitches on a thread for the sleeve, cast on 6-6-8-8-10-10 stitches (in side under the sleeve), work the last 48-51-54-58-62-66 stitches (front piece). The body and sleeves are finished separately. The piece is now measured from here! BODY: = 193-205-221-237-257-273 stitches. Work A.2, stocking stitch and 6 band stitches in garter stitch on each side as before – the 6-6-8-8-10-10 stitches cast on under each sleeve are worked in stocking stitch. Work until the body measures 25 cm from the division – make sure you have 3 or 5 rows of stocking stitch after a row of yarn overs/decreases in A.2. Knit 1 row from the right side where you increase 18-20-22-24-26-26 stitches evenly spaced (do not increase over the bands) = 211-225-243-261-283-299 stitches. Change to circular needle size 4 mm and work as follows from the wrong side: 6 band stitches in garter stitch, * purl 1, knit 1 *, work from *-* until there are 7 stitches left, purl 1 and 6 band stitches in garter stitch. Continue this rib for 5 cm. Cast off a little loosely. The jacket measures approx. 56-58-60-62-64-66 cm from the shoulder down. SLEEVES: Place the 49-53-57-65-67-69 stitches from the thread on the one side of the piece on short circular needle/double pointed needles size 5 mm and knit up 1 stitch in each of the 6-6-8-8-10-10 stitches cast on under the sleeve = 55-59-65-73-77-79 stitches. Insert a marker in the middle of the 6-6-8-8-10-10 stitches under the sleeve. Allow the marker to follow your work onwards; it will be used when decreasing under the sleeve. Start at the marker and work stocking stitch in the round for 4-4-3-3-2-2 cm. Now decrease 1 stitch on each side of the marker – read DECREASE TIP. Decrease like this every 5-4-3-2-2-1½ cm a total of 6-7-9-12-13-13 times = 43-45-47-49-51-53 stitches. Continue working until the sleeve measures 34-33-31-30-28-26 cm from the division. Knit 1 round where you increase 3 stitches evenly spaced = 46-48-50-52-54-56 stitches. Change to double pointed needles size 4 mm. Work rib (knit 1, purl 1) for 5 cm. Cast off a little loosely. The sleeve measures approx. 39-38-36-35-33-31 cm. Work the other sleeve in the same way. ASSEMBLY: Sew the buttons onto the left band. |
|||||||||||||||||||||||||
Diagram explanations |
|||||||||||||||||||||||||
|
|||||||||||||||||||||||||
 |
|||||||||||||||||||||||||
 |
|||||||||||||||||||||||||
Have you finished this pattern?Tag your pictures with #dropspattern #waveromancecardigan or submit them to the #dropsfan gallery. Do you need help with this pattern?You'll find 34 tutorial videos, a Comments/Questions area and more by visiting the pattern on garnstudio.com. © 1982-2026 DROPS Design A/S. We reserve all rights. This document, including all its sub-sections, has copyrights. Read more about what you can do with our patterns at the bottom of each pattern on our site. |
|||||||||||||||||||||||||


With over 40 years in knitting and crochet design, DROPS Design offers one of the most extensive collections of free patterns on the internet - translated to 17 languages. As of today we count 324 catalogues and 12290 patterns translated into English (UK/cm). 12290
We work hard to bring you the best knitting and crochet have to offer, inspiration and advice as well as great quality yarns at incredible prices! Would you like to use our patterns for other than personal use? You can read what you are allowed to do in the Copyright text at the bottom of all our patterns. Happy crafting!
Post a comment to pattern DROPS 232-4
We would love to hear what you have to say about this pattern!
If you want to leave a question, please make sure you select the correct category in the form below, to speed up the answering process. Required fields are marked *.