
Popular categories
Looking for a yarn?


Comments / Questions (51)
![]() Melanie wrote:
Melanie wrote:
Wieviel Garn Alpaca und Kid Silk bräuchte ich, wenn ich den Pullover einfarbig stricken möchte? Danke.
10.12.2019 - 23:23DROPS Design answered:
Liebe Melanie, leider können wir jeder Anleitung nach jedem individuellen Frage anpassen und einzelne Modelle auf individuellen Wunsch hin umrechnen. Wenn sie Hilfe damit brauchen, wenden Sie sich bitte an dem Laden wo Sie die Wolle gekauft haben, dort hilft man Ihnen gerne weiter. Viel Spaß beim stricken!
11.12.2019 - 08:26
![]() Marina Verhaeghe wrote:
Marina Verhaeghe wrote:
Can the model Maplewood with 2 threads Alpaca knit? I keep coughing that fluffy Kid Silk as I work with them or any other fluffy wool. Witch wool recommand you in that case? Thanks
21.11.2019 - 13:22DROPS Design answered:
Dear Mrs Verhaeghe, since Alpaca and Kid-Silk are same yarn group (= yarn group A), you can work here with 2 strands Alpaca - use our yarn converter to get the right amount of alternative and see even other alternatives. Happy knitting!
21.11.2019 - 14:06
![]() Marina Verhaeghe wrote:
Marina Verhaeghe wrote:
It's about model Maplewood. I have the biggest size knitting. After the increases after the neckline so I have 120 stitches. But then I have to make increases for raglan, I have superiors so 24 x 8 sts (including the first increase) so 24 x 8st = 192 st + 120 st I had that's it 312 st and not 322 sts as the explanation. Is that correct or am I anywhere increases overlooked? That's up to 10 sts. missing , and further explanation therefore is no longer true . Thanks for the explanation about
12.11.2019 - 08:42DROPS Design answered:
Dear Mrs Verhaeghe, didn't you miss the increase in A.2? on 1st row in A.2 you increase 10 sts, so that there are: 120 sts + 10 sts inc in A.2 + (8 sts x 24) = 322 sts + (4 sts x 7) = 350 sts. Happy knitting!
12.11.2019 - 12:31
![]() Beverley wrote:
Beverley wrote:
Hi. I have 450g of Drops 100% alpaca. This states needle size 2.5-3.5mm I really like this jumper pattern but it says size 4 & 5mm needles. Is there a pattern you can recommend for the yarn I have.
31.10.2019 - 12:56DROPS Design answered:
DearBeverly, the pattern suggest bigger needles, because along the Alpaca yarn one strand ofKid Silk yarn is used. You can either add this Kid silk, and knit the sweater or select another one that only uses the Alpaca yarn. Happy Knitting!
31.10.2019 - 23:25
![]() Pilar wrote:
Pilar wrote:
Que degradado mas bonito, espero que el patrón esté disponible pronto. Me encanta!!
15.09.2019 - 20:13
![]() Halina wrote:
Halina wrote:
Sand and earth.
06.09.2019 - 19:05
![]() Majvor wrote:
Majvor wrote:
Jättefin! Längtar efter att få mönster så jag kan sticka den.
27.08.2019 - 14:48
![]() Andrea wrote:
Andrea wrote:
Richtig schön! Sobald ich Cloudscape fertig habe, wird dieser in auf die Nadeln genommen!
22.08.2019 - 09:10
![]() Isabelle wrote:
Isabelle wrote:
Bonjour Je le trouve magnifique !!!!! comment avoir les explications SVP?
20.08.2019 - 16:13
![]() Edyta wrote:
Edyta wrote:
Mein Lieblingsmodell für diesen Winter. Warte schon sehnsüchtig auf die Anleitung 🤗💓
17.08.2019 - 15:31
|
|||||||||||||||||||
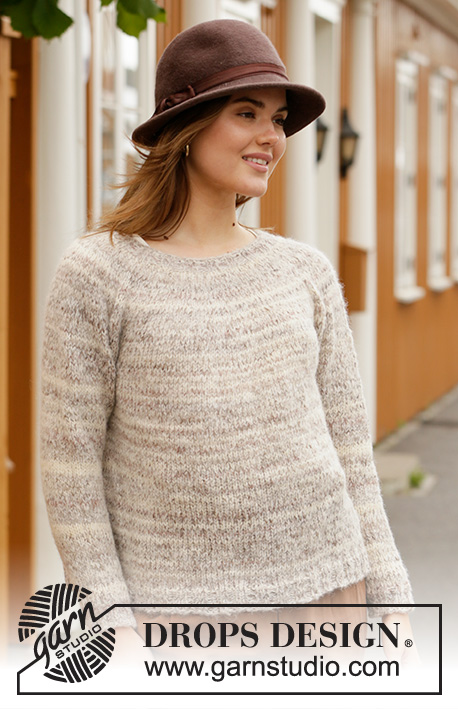
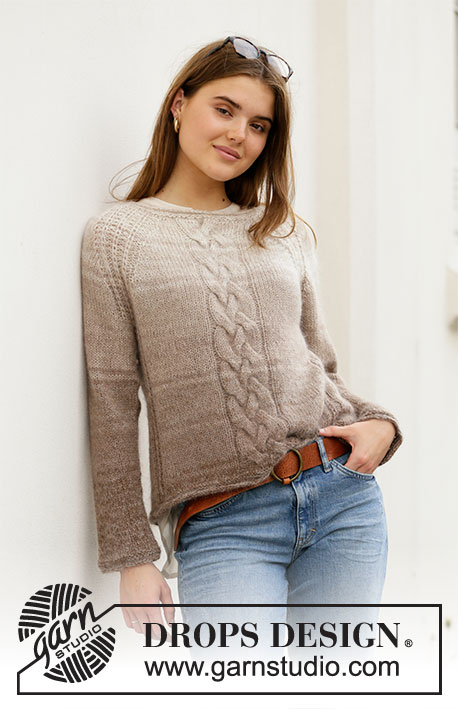
Maple Wood#maplewoodsweater |
|||||||||||||||||||
 |
 |
||||||||||||||||||
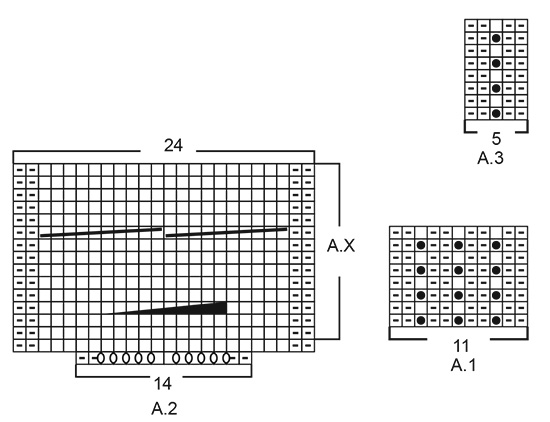
Knitted jumper in DROPS Alpaca and DROPS Kid-Silk. Piece is knitted top down with cable, stripes and false English rib. Size: S - XXXL
DROPS 206-50 |
|||||||||||||||||||
|
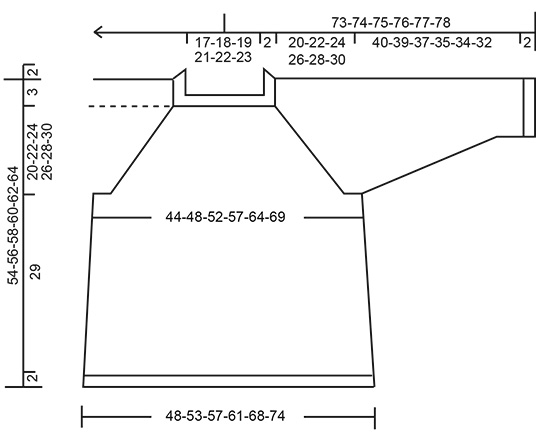
---------------------------------------------------------- EXPLANATION FOR THE PATTERN: ---------------------------------------------------------- GARTER STITCH (worked in the round): 1 ridge vertically = 2 rounds, i.e. knit 1 round and purl 1 round. INCREASE TIP-1 (evenly): To calculate how to increase evenly, use the total number of stitches on row (e.g. 73 stitches) and divide stitches by number of increases to be done (e.g. 15) = 4.9. In this example increase by making 1 yarn over after approx. every 5th stitch. On next round knit yarn overs twisted to avoid holes. STRIPES: NOTE! Work all stripes in 1 strand Alpaca (A) and 1 strand Kid-Silk (KS) = 2 strands. STRIPE 1: 6-6-6½-6½-7-7 cm with off white (A) and light beige (KS). STRIPE 2: 2 rounds with light nougat (A) and off white (KS). STRIPE 3: 2 rounds with off white (A) and light beige (KS). STRIPE 4: 6-6-6½-6½-7-7 cm with light nougat (A) and off white (KS). STRIPE 5: 2 rounds with light nougat (A) and light beige (KS). STRIPE 6: 2 rounds light nougat (A) and off white (KS). STRIPE 7: 6-6-6½-6½-7-7 cm with light nougat (A) and light beige (KS). STRIPE 8: 2 rounds with light nougat (A) and beige (KS). STRIPE 9: 2 rounds with light nougat (A) and light beige (KS). STRIPE 10: 6-6-6½-6½-7-7 cm with light nougat (A) and beige (KS). STRIPE 11: 2 rounds with nougat (A) and light beige (KS). STRIPE 12: 2 rounds with light nougat (A) and beige (KS). STRIPE 13: 6-6-6½-6½-7-7 cm with nougat (A) and light beige (KS). STRIPE 14: 2 rounds with nougat (A) and beige (KS). STRIPE 15: 2 rounds with nougat (A) and light beige (KS). STRIPE 16: 6-6-6½-6½-7-7 cm with nougat (A) and beige (KS). STRIPE 17: 2 rounds with light brown (A) and light beige (KS). STRIPE 18: 2 rounds with nougat (A) and beige (KS). STRIPE 19: Work with light brown (A) and light beige (KS) until finished measurements. PATTERN: See diagrams A.1 to A.3. RAGLAN: Increase 1 stitch in each side of A.1 in every transition between body and sleeves (= 8 stitches increased on round). Increase 1 stitch by making 1 yarn over. On next round knit yarns over twisted to avoid holes. Then work the new stitches in stocking stitch. INCREASE TIP-2 (applies to sides of body): Work until 2 stitches remain before marker thread, 1 yarn over, knit 4 (marker thread is in the middle of these 4 stitches), 1 yarn over. On next round purl yarn overs twisted to avoid holes. Then work the new stitches in stocking stitch. DECREASE TIP (applies to sleeves): Decrease 1 stitch on each side of marker thread as follows: Work until 3 stitches remain before marker thread and knit 2 together, knit 2 (marker thread is between these stitches), slip 1 stitch knitwise, knit 1, pass slipped stitch over stitch worked. ---------------------------------------------------------- START THE PIECE HERE: ---------------------------------------------------------- JUMPER - SHORT OVERVIEW OF THE PIECE: Neck edge and yoke are worked in the round on circular needle, top down. Now divide yoke for body and sleeves. Body is worked in the round on circular needle, top down. Work sleeves in the round on double pointed needles/a short circular needle, top down. NECK EDGE: Cast on 73-77-81-87-91-93 stitches on circular needle size 5 mm with 1 strand off white Alpaca and 1 strand light beige Kid-Silk (= 2 strands). Work first a rolling edge, i.e. knit 3 rounds. Switch to circular needle size 4 mm and work 2 ridges in GARTER STITCH - see explanation above. Switch back to circular needle size 5 mm. Knit 1 round while increasing 15-15-15-17-25-27 stitches evenly - read INCREASE TIP-1 = 88-92-96-104-116-120 stitches. Knit 1 round. Insert 1 marker thread in the middle of the row - NOW MEASURE PIECE FROM HERE! YOKE: Now work STRIPES – read explanation above, and pattern as follows: Work A.1 (= 11 stitches), make 1 yarn over (= increase), work 4 stitches in stocking stitch (= sleeve), make 1 yarn over (= increase), work A.1 (= 11 stitches), make 1 yarn over (= increase), work 2-3-4-6-9-10 stitches in stocking stitch, work A.2 (= 14 stitches that are increased to 24 stitches), work 2-3-4-6-9-10 stitches in stocking stitch (= front piece), make 1 yarn over (= increase), work A.1 (= 11 stitches), make 1 yarn over (= increase), work 4 stitches in stocking stitch (= sleeve), make 1 yarn over (= increase), work A.1 (= 11 stitches), make 1 yarn over (= increase), work in stocking stitch over the remaining 18-20-22-26-32-34 stitches (= back piece), and make 1 yarn over (= increase). First increase for RAGLAN - read explanation above, is now done. REMEMBER THE KNITTING TENSION! Continue pattern in the round (repeat A.1 and A.X vertically), and increase every other round 15-18-21-22-23-24 times in total (including first increase as explained above) = 218-246-274-290-310-322 stitches. Then increase only on front and back piece (= 4 stitches increased) every other round 5-5-3-4-5-7 times = 238-266-286-306-330-350 stitches. Work without increases until piece measures 20-22-24-26-28-30 cm from marker thread. Now divide yoke for body and sleeves, i.e. work last round as follows: Work first 5 stitches (= on back piece) as before, slip the next 46-52-58-60-62-64 stitches on 1 stitch holder for sleeve, cast on 6-6-8-8-10-12 new stitches on needle (= in the side under sleeve), work the next 78-86-90-98-108-116 stitches as before (= front piece), slip the next 46-52-58-60-62-64 stitches on 1 stitch holder for sleeve, cast on 6-6-8-8-10-12 new stitches on needle (in the side under sleeve). and work the remaining 63-71-75-83-93-101 stitches (= on back piece). Cut the yarn. Then finish body and sleeves separately. NOW MEASURE THE PIECE FROM HERE! BODY: = 158-174-186-202-226-246 stitches. Insert 1 marker thread in the middle of each side, in the middle of the 6-6-8-8-10-12 stitches that were cast on under sleeves. There are now 84-92-98-106-118-128 stitches on front piece and 74-82-88-96-108-118 stitches on back piece. Move the marker threads upwards when working; they should be used for increase later in the sides on body. Begin round in the side and begin with front piece. Then work pattern as follows: Work 3-3-4-4-5-6 stitches in stocking stitch (= in the side), work A.3 (= 5 stitches), work in stocking stitch and A.2 over the next 68-76-80-88-98-106 stitches as before, work A.3 (= 5 stitches), work 6-6-8-8-10-12 stitches in stocking stitch (= in the side), work A.3 (= 5 stitches), work in stocking stitch over the next 58-66-70-78-88-96 stitches as before, work A.3 (= 5 stitches), and finish with 3-3-4-4-5-6 stitches in stocking stitch (= in the side). When body measures 5 cm from division in all sizes, increase 1 stitch on each side of both markers - READ INCREASE TIP-2 (= 4 stitches increased). Increase like this every 6 cm 4 times in total in each side = 174-190-202-218-242-262 stitches. Work until body measures approx. 29 cm from division in all sizes - adjust after 6th or 12th round in A.X (approx. 2 cm remain until finished measurements, try the jumper on and work to desired length). Work 1 round while increasing 10-10-10-14-14-14 stitches evenly (do not increase over cable) = 184-200-212-232-256-276 stitches. Switch to circular needle size 4 mm. Work 2 ridges. Switch back to circular needle size 5 mm. Work in 2 rounds stocking stitch over all stitches. Cast off - make sure that the cast-off edge is not too tight. Jumper measures approx. 54-56-58-60-62-64 cm from shoulder and down. SLEEVE: Slip the 46-52-58-60-62-64 stitches from stitch holder in one side of piece on double pointed needles/short circular needle size 5 mm and pick in addition up 1 stitch in each of the 6-6-8-8-10-12 stitches cast on under sleeve = 52-58-66-68-72-76 stitches. Insert 1 marker thread in the middle of the new stitches under sleeve, move the marker thread upwards when working; it should be used for decrease mid under sleeve. Begin round at the marker thread and work stocking stitch and stripes the same way as on body. When sleeve measures 2 cm from division, decrease 1 stitch on each side of marker thread - read DECREASE TIP. Decrease like this every 4½-3½-2½-2-1½-1½ cm 8-10-13-14-15-16 times in total = 36-38-40-40-42-44 stitches. Work until sleeve measures 40-39-37-35-34-32 cm from division (approx. 2 cm remain until finished measurements, try the jumper on and work to desired length)- NOTE: Shorter measurements in the larger sizes because of wider neck and longer yoke. Work 1 round while increasing 6 stitches evenly = 42-44-46-46-48-50 stitches. Switch to double pointed needles size 4 mm. Work 2 ridges. Switch back to double pointed needles size 5 mm. Work 2 rounds in stocking stitch. Cast off - make sure that the cast-off edge is not too tight. Work the other sleeve the same way. |
|||||||||||||||||||
Diagram explanations |
|||||||||||||||||||
|
|||||||||||||||||||
 |
|||||||||||||||||||
 |
|||||||||||||||||||
Have you finished this pattern?Tag your pictures with #dropspattern #maplewoodsweater or submit them to the #dropsfan gallery. Do you need help with this pattern?You'll find 29 tutorial videos, a Comments/Questions area and more by visiting the pattern on garnstudio.com. © 1982-2026 DROPS Design A/S. We reserve all rights. This document, including all its sub-sections, has copyrights. Read more about what you can do with our patterns at the bottom of each pattern on our site. |
|||||||||||||||||||


With over 40 years in knitting and crochet design, DROPS Design offers one of the most extensive collections of free patterns on the internet - translated to 17 languages. As of today we count 324 catalogues and 12290 patterns translated into English (UK/cm). 12290
We work hard to bring you the best knitting and crochet have to offer, inspiration and advice as well as great quality yarns at incredible prices! Would you like to use our patterns for other than personal use? You can read what you are allowed to do in the Copyright text at the bottom of all our patterns. Happy crafting!
Post a comment to pattern DROPS 206-50
We would love to hear what you have to say about this pattern!
If you want to leave a question, please make sure you select the correct category in the form below, to speed up the answering process. Required fields are marked *.