
Popular categories
Looking for a yarn?


Comments / Questions (24)
![]() Patrizia Holneider wrote:
Patrizia Holneider wrote:
Vorrei acquistare on line dal vs.siri la lana per realizzare questo modello in taglia M. Ma quanto ne devo comprare?
14.01.2021 - 19:04DROPS Design answered:
Buonasera Patrizia, per una taglia M le serviranno 300g di Delight. Buon lavoro!
14.01.2021 - 22:01
![]() Margaret De Waard wrote:
Margaret De Waard wrote:
Hartelijk dank voor de super snelle reactie . Kan ik weer fijn verder.
03.11.2020 - 21:16
![]() Margaret De Waard wrote:
Margaret De Waard wrote:
In het patroon is er sprake van meerderen in iedere 2e naald, maar ook meerderen in iedere andere naald. Wat is het verschil?
03.11.2020 - 17:31DROPS Design answered:
Dag Margaret,
Iedere andere naald meerderen en iedere 2e naald meerderen is hetzelfde: de ene naald wel en de andere naald niet. Dit staat inderdaad twee keer achter elkaar op een verschillende manier beschreven, maar het is wel zo dat je de ene keer 2 steken aan elke kant van de markeerdraad meerdert en de andere keer 1 steek aan elke kant van de markeerdraad.
03.11.2020 - 20:00
![]() Hege Haslund wrote:
Hege Haslund wrote:
Haha, finleste oppskriften, og nå forstår jeg det!
25.01.2020 - 12:09DROPS Design answered:
Hej. Så bra att det löste sig! Mvh DROPS Design
29.01.2020 - 08:14
![]() Hege Haslund wrote:
Hege Haslund wrote:
Hei, det står i overskriften til forklaringen på raglanøking at det skal økes to masker på hver side av masken med merketråd. Men når jeg leser selve forklaringen står det at det skal økes en maske på hver side? Og raglan pleier å være med en økning (evt. felling) på hver side av midtmaske?
25.01.2020 - 12:05
![]() Fargeot Chrystel wrote:
Fargeot Chrystel wrote:
Bonjour, je voudrai tricoter ce modèle en taille XS mais aussi bien d\'autres modèles. En France nous sommes nombreuses de petites tailles. Pourriez vous donner les mesures de vos modèles en XS? Merci
03.09.2019 - 21:56DROPS Design answered:
Bonjour Mme Fargeot, Bonjour Mme Fargeot, nous ne sommes malheureusement pas en mesure de pouvoir adapter chacun de nos modèles à chaque demande; merci de bien vouloir contacter votre magasin ou un forum tricot pour toute assistance personnelle. Bon tricot!
04.09.2019 - 09:02
![]() Miriam wrote:
Miriam wrote:
Grazie mille! Gentilissimi e velocissimi!
07.08.2019 - 18:32
![]() Miriam wrote:
Miriam wrote:
Buongiorno DROPS eseguito gli aumenti nello sprone, nel mio caso 124, se ho capito bene devo mett il marcapunto dentro la maglia. Corretto? altrimenti non avrei 40,20,40,20 tra un marcapunto e l'altro ,perciò le 4 maglie x arrivare a 124 sono quelle con il marcapunti (differentemente nelle altre spiegazioni il marcapunto é posizionato tra una e l'altra) Andando avanti con il lavoro allora il marcapunto rimane fisso nella maglia di inizio? sono un pò confusa...chiedo scusa
07.08.2019 - 18:18DROPS Design answered:
Buongiorno Miriam. Sì, è corretto come ha scritto. Il marcapunti viene messo in una maglia, non tra una maglia e l’altra e rimane in quella maglia. Nelle indicazioni per gli aumenti per il raglan, viene spiegato come lavorare la maglia con il marcapunti. Buon lavoro!
07.08.2019 - 18:29
![]() Claudia Carolina wrote:
Claudia Carolina wrote:
Spett.le Drops, grazie di tutto. Ho una domanda: come mai il campione si misura su legaccio se poi il maglione è in m rasata? Grazie mille. Claudia
17.07.2019 - 17:06DROPS Design answered:
Buongiorno Claudia Carolina. Abbiamo corretto il testo: il campione viene lavorato anch'esso a maglia rasata. Buon lavoro!
17.07.2019 - 17:16
![]() Mary Bolas wrote:
Mary Bolas wrote:
You misunderstand Julie Massé. If you place a marker at stitch 98 then knit 20 stitches and place a marker on the next stitch it will be stitch 119 and not stitch 109 as stated in your pattern. The pattern is incorrect.
09.06.2019 - 12:53DROPS Design answered:
Dear Mrs Bolas, that's right, pattern has been edited, thank you. Happy knitting!
11.06.2019 - 11:03
|
|
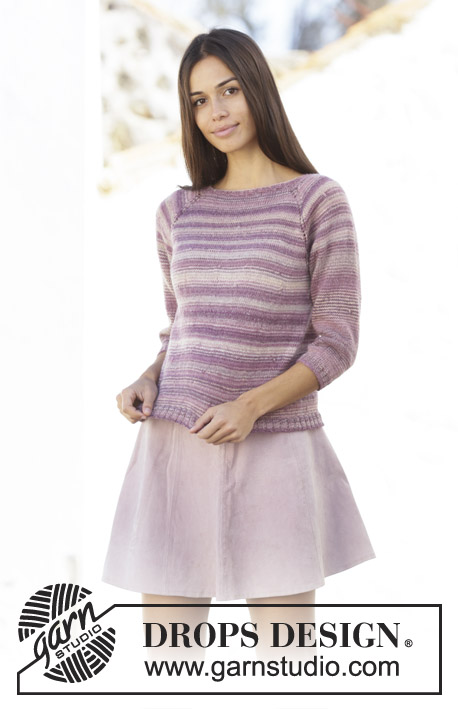
Summer Berries#summerberriessweater |
|
 |
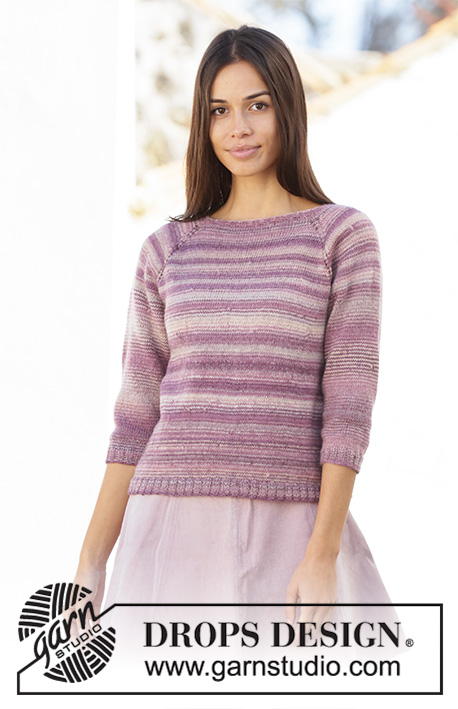 |
Knitted jumper in DROPS Delight. Piece is knitted top down with raglan, ¾ sleeves and A-shape. Size: S - XXXL
DROPS 201-13 |
|
|
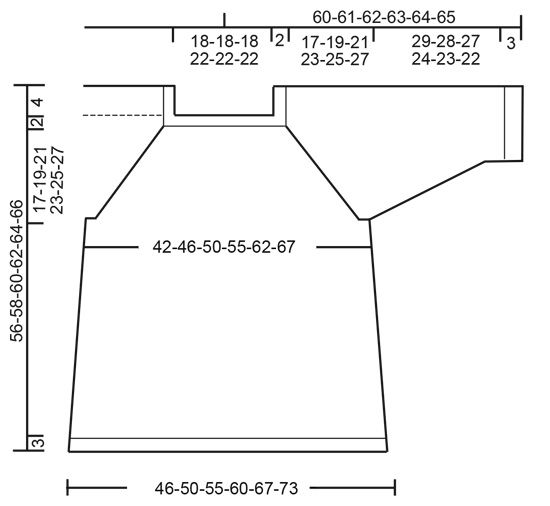
---------------------------------------------------------- EXPLANATION FOR THE PATTERN: ---------------------------------------------------------- STRIPES: To make more stripes on garment work alternately 1 strand from 2 different balls, adjust so that balls start with different colours. * Work 2 rounds with the first ball, work 2 rounds with the other ball (do not tighten yarn when pulling it upwards) *, work from *-*. This way the colour are mixed more and will produce more narrow stripes. INCREASE TIP-1 (evenly): To calculate how to increase evenly, use the total number of stitches on round (e.g. 116 stitches) and divide stitches by number of increases to be done (e.g. 8) = 14.5. In this example increase after alternately approx. every 14th and 15th stitch. Increase 1 stitch by making 1 yarn over, on next round work yarn over twisted to avoid holes. INCREASE TIP-2 (applies to sides of body): Begin 1 stitch before marker, make 1 yarn over, knit 1, 1 yarn over (= 2 stitches increased). Repeat at both markers. On next round knit yarn overs twisted to avoid holes. RAGLAN: Increase for raglan in every transition between sleeves and body. Work the increased stitches in stocking stitch. INCREASE AS FOLLOWS WHEN INCREASING 2 STITCHES ON EACH SIDE OF STITCH WITH MARKER THREAD: Begin before stitch with marker thread, pick up loop before stitch and knit loop twisted, make 1 yarn over, knit 1 (= stitch with marker thread), make 1 yarn over, pick up loop before next stitch and knit loop twisted (= 4 stitches increased). On next round knit the yarn overs to make holes. INCREASE AS FOLLOWS WHEN INCREASING 1 STITCH ON EACH SIDE OF STITCH WITH MARKER THREAD: Begin before stitch with marker thread, make 1 yarn over, knit 1 (= stitch with marker thread), make 1 yarn over (= 2 stitches increased). On next round purl yarn overs to make holes. KNITTING TIP: When increasing for raglan on every 4th round, the holes in raglan line will be further apart than when increasing on every other round. To avoid this work holes on the rounds without increase as follows: Begin 2 stitches before stitch with marker thread, knit 2 together, make 1 yarn over, knit 1 (= stitch with marker thread), make 1 yarn over, slip 1 stitch knitwise, knit 1, pass slipped stitch over stitch worked. On next round knit the yarn overs to make holes. DECREASE TIP (applies to mid under sleeves): Begin 2 stitches before stitch with marker, knit 2 twisted together, knit 1 (stitch with marker), knit 2 together (= 2 stitches decreased). ---------------------------------------------------------- START THE PIECE HERE: ---------------------------------------------------------- JUMPER - SHORT OVERVIEW OF THE PIECE: Worked in the round on circular needle from top down. Work sleeves in the round on double pointed needles. Work entire piece in STRIPES - see explanation above. YOKE: Cast on 116-116-116-136-136-136 stitches on circular needle size 2.5 mm with Delight. Work rib with knit 2/purl 2 - read STRIPES. When piece measures 1.5 cm, work 1 round from right side while increasing 8 stitches evenly in all sizes – read INCREASE TIP! = 124-124-124-144-144-144 stitches. Knit 1 round. Switch to circular needle size 3 mm. Insert 4 marker threads in piece (without working the stitches): Insert first marker thread in 21st-21st-21st-26th-26th-26th stitch, insert second marker thread in 42nd-42nd-42nd-47th-47th-47th stitch, insert third marker thread in 83rd-83rd-83rd-98th-98th-98th stitch and insert fourth marker thread in 104th-104th-104th-119th-119th-119th stitch. There are now 40-40-40-50-50-50 stitches between stitches with marker thread on front piece and back piece and 20 stitches in all sizes on each sleeve. REMEMBER THE KNITTING TENSION! Work stocking stitch over the first 20-20-20-25-25-25 stitches (= half back piece), increase 2 stitches on each side of stitch with marker thread for RAGLAN – see explanation above, work stocking stitch over the next 20 stitches (= sleeve), increase 2 stitches on each side of stitch with marker thread, work stocking stitch over the 40-40-40-50-50-50 stitches (= front piece), increase 2 stitches on each side of stitch with marker thread, work stocking stitch over the 20 stitches (= sleeve), increase 2 stitches on each side of stitch with marker thread, work stocking stitch over the next 20-20-20-25-25-25 stitches (= half back piece). Continue in stocking stitch and increase for raglan in every transition between body and sleeves as follows: Increase 2 stitches on each side of stitch with marker on every other round 6-6-6-8-8-10 times in total (first increase is already done). Then increase 1 stitch on each side of stitch with marker on every other round 8-8-8-9-9-10 times in total. When increases have been done 14-14-14-17-17-20 times in total there are 284-284-284-344-344-384 stitches on round. Continue increase for raglan and increase 1 stitch on each side of stitches with marker threads every other round 0-7-12-4-13-12 times in total and then every 4th round 6-4-3-7-4-5 times in total – READ KNITTING TIP. After last increase for raglan there are 332-372-404-432-480-520 stitches on round and piece measures approx. 19-21-23-25-27-29 cm from cast-on edge. Work next round as follows: Work the first 47-52-56-62-68-73 stitches (= half back piece), slip the next 72-82-90-92-104-114 stitches on 1 stitch holder for sleeve, cast on 7-7-9-9-13-15 new stitches on round (= in the side under sleeve), work the next 94-104-112-124-136-146 stitches as before (= back piece), slip the next 72-82-90-92-104-114 stitches on 1 stitch holder for sleeve, cast on 7-7-9-9-13-15 new stitches on round (= in the side under sleeve) and work the last 47-52-56-62-68-73 stitches. Finish body and sleeves separately. Remove the marker threads in piece. NOW MEASURE PIECE FROM HERE! BODY: = 202-222-242-266-298-322 stitches. Insert 1 marker thread in the middle of the 7-7-9-9-13-15 stitches cast on under each sleeve and move the marker threads upwards when working. Continue in the round in stocking stitch. When piece measures 3 cm, increase 2 stitches in each side - READ INCREASE TIP-2 (= 4 stitches increased). Increase like this every 6-6-6-5-5-4 cm 5-5-5-6-6-7 times in total = 222-242-262-290-322-350 stitches. When piece measures 34 cm, increase 6 stitches evenly on round = 228-248-268-296-328-356 stitches. Switch to circular needle size 2.5 mm and work rib knit 2 and purl 2 until rib measures 3 cm. Switch back to circular needle size 3 mm and cast off by knitting. Jumper measures approx. 56-58-60-62-64-66 cm from shoulder and down. SLEEVE: Slip the 72-82-90-92-104-114 stitches from stitch holder in one side of piece on double pointed needles size 3 mm and pick in addition up 1 new stitch in each of the 7-7-9-9-13-15 stitches cast on under sleeve = 79-89-99-101-117-129 stitches on round. Work in stocking stitch in the round. Insert a marker in the middle stitch under sleeve. When piece measures 3 cm in all sizes, decrease 1 stitch on each side of marker - read DECREASE TIP. Decrease 9-13-17-17-23-28 times in total in S: On every 10th round, in M: On every 6th round, in L and XL: On every 4th round, in XXL: On every round 4 times in total and then every 3rd round 19 times in total and in XXXL: On every round 8 times in total and then every other round 20 times in total = 61-63-65-67-71-73 stitches. Work until sleeve measures 29-28-27-24-23-22 cm from division. Knit 1 round while decreasing 5-3-1-3-3-1 stitch evenly = 56-60-64-64-68-72 stitches. Switch to double pointed needles size 2.5 mm and work rib with knit 2/purl 2 for 3 cm. Switch back to double pointed needles size 3 mm and cast off by knitting. Work the other sleeve the same way. |
|
 |
|
Have you finished this pattern?Tag your pictures with #dropspattern #summerberriessweater or submit them to the #dropsfan gallery. Do you need help with this pattern?You'll find 24 tutorial videos, a Comments/Questions area and more by visiting the pattern on garnstudio.com. © 1982-2026 DROPS Design A/S. We reserve all rights. This document, including all its sub-sections, has copyrights. Read more about what you can do with our patterns at the bottom of each pattern on our site. |
|


With over 40 years in knitting and crochet design, DROPS Design offers one of the most extensive collections of free patterns on the internet - translated to 17 languages. As of today we count 324 catalogues and 12290 patterns translated into English (UK/cm). 12290
We work hard to bring you the best knitting and crochet have to offer, inspiration and advice as well as great quality yarns at incredible prices! Would you like to use our patterns for other than personal use? You can read what you are allowed to do in the Copyright text at the bottom of all our patterns. Happy crafting!
Post a comment to pattern DROPS 201-13
We would love to hear what you have to say about this pattern!
If you want to leave a question, please make sure you select the correct category in the form below, to speed up the answering process. Required fields are marked *.