
Popular categories
Looking for a yarn?


Comments / Questions (65)
![]() Chantal Bidet wrote:
Chantal Bidet wrote:
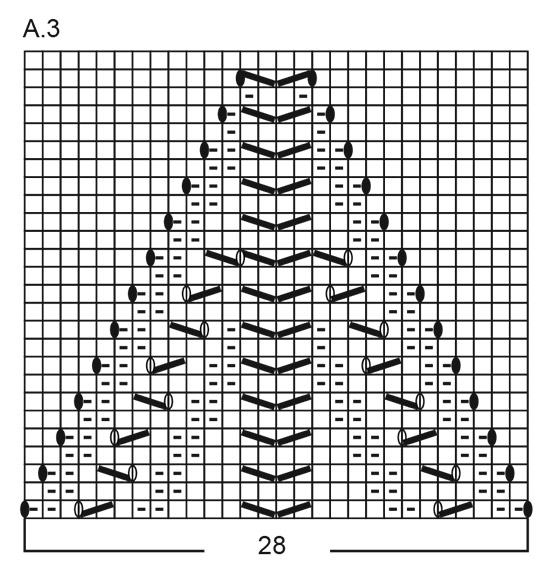
Je viens de comprendre : Il faut diminuer qu au premier rang uniquement Est-ce cela ?
29.04.2025 - 13:16DROPS Design answered:
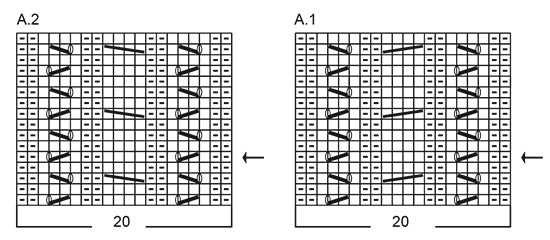
Bonjour Mme Bidet, dans A.3, vous diminuez 2 m au milieu pour que le motif se resserre vers le milieu, et, pour éviter de perdre des mailles, vous augmentez 1 m avant les 2 premières mailles envers et 1 m avant les 2 dernières m envers, ainsi vous devez toujours conserver ces 28 mailles comme le montre le diagramme. Bon tricot!
29.04.2025 - 13:42
![]() Chantal Bidet wrote:
Chantal Bidet wrote:
Je ne fais plus le motif On ne se comprend pas Vous maintenez qu il y a dix mailles après les deux mailles envers au centre alors qu'il n y en a que 8 puisque les mailles envers sont décalées d une maille Dommage qu on ne puisse pas envoyer de photo
29.04.2025 - 12:57DROPS Design answered:
Ah pardon, j'en étais restée au diagramme A.3, n'hésitez pas à bien nous préciser à quel niveau vous en êtes pour que l'on puisse vous répondre au mieux, merci d'avance pour votre compréhension.
29.04.2025 - 13:43
![]() Chantal Bidet wrote:
Chantal Bidet wrote:
Bonjour Expliquez moi comment peut-on avoir 10 m endroit au centre (5 d un côté et 5 de l autre) qu on avait au rang 1 effectivement suite au deux diminutions : 6m-1m - je n en ai que 8 m endroit puisque les mailles envers se décalent - je me trompe ?
28.04.2025 - 20:42DROPS Design answered:
Bonjour Mme Bidet, au 1er rang, vous aviez 12 m endroit au milieu de A.3 et vous avez tricoté ces 12 mailles ainsi: 4 end, 2 m ens à l'end, glissez 1 m, tricotez 1 m et passez la m glissée par-dessus la m tricotée, 4 end = il ne restait plus que 4+1+1+4=10 m endroit. Pour diminuer le motif, on fait 1 jeté avant les 2 premières m envers et 1 jeté après les 2 dernières m envers, (ces jetés se tricotent ensuite en jersey = on augmente le nombre de mailles jersey de part et d'autre de A.3), et on diminue 2 m au milieu du diagramme = le nbe de mailles reste le même. Bon tricot!
29.04.2025 - 09:24
![]() Chantal Bidet wrote:
Chantal Bidet wrote:
Bonjour Expliquez moi en detail le rang 2 avant le rang 3 Avec tous mes remerciements
25.04.2025 - 16:50DROPS Design answered:
Bonjour Mme Bidet, le rang 2 de A.3 se tricote ainsi (de droite à gauche): 1 m end, 2 m env, 4 m end, 2 m env, 10 m end, 2 m env, 4 m end, 2 m env, 1 m end. Bon tricot!
28.04.2025 - 09:57
![]() Chantal Bidet wrote:
Chantal Bidet wrote:
Bonjour Expliquez moi en detail le rang 2 avant le rang 3 Avec tous mes remerciements
25.04.2025 - 16:42
![]() Chantal Bidet wrote:
Chantal Bidet wrote:
Au rang 3 nous avons 4 m endroit après les 2 m envers et non 5 m comme indiqué (3 m et 2 m ensemble) comme on a que 4 m c est 2 m endroit et 2 m ensemble ) le diagramme est faux Votre diagramme est faux
24.04.2025 - 20:24DROPS Design answered:
Bonjour Mme Bidet, le diagramme est correct tel qu'il est, notez bien les jetés (ovales noirs, à tricoter torse au rang suivant) qui vont décaler le motif vers l'intérieur, autrement dit, vous aurez, au 3ème rang: 1 m end, 1 jeté, 2 m env, (1 m end, 1 jeté, 1 dim, 1 m end), 2 m env, (3 m end, 1 dim, 1 dim, 3 m end), 2 m env, 1 m end, 1 jeté, 1 dim, 1 m end, 2 m env, 1 jeté, 1 m end = 28 m. Au 4ème rang, tricotez: 2 m end, 2 m env, 4 m end, 2 m env, 8 m end, 2 m env, 4 m end, 2 m env, 2 m end. Bon tricot!
25.04.2025 - 08:04
![]() Chantal Bidet wrote:
Chantal Bidet wrote:
Le diagramme A3 au rang 2 on a 8 mailles et non 10 puisque au rang 1 on obtient 10 mailles étant donné qu on tricote deux m ensemble et un surget (12m-2m) Je ne comprends absolument pas ce diagramme -
21.04.2025 - 19:19DROPS Design answered:
Bonjour Mme Bidet, le nombre de mailles de A.3 ne change pas: il se tricote toujours sur 28 mailles, le nombre de diminutions compense le nombre de jetés; au 2ème tour, vous allez tricoter ces 28 m ainsi 1 m end, 2 m env, 4 m end, 2 m env, 10 m end, 2 m env, 4 m end, 2 m env, 1 m end. Bon tricot!
23.04.2025 - 08:27
![]() Doris Charron wrote:
Doris Charron wrote:
Est-ce possible d\'avoir le patron du chandail rose : Drops 188-19
15.10.2024 - 20:29DROPS Design answered:
Bonjour Mme Charron, cliquez sur le menu déroulant à côté de l'icône imprimante pour changer de langue ou bien cliquez ici directement pour les explications en français. Bon tricot!
16.10.2024 - 09:17
![]() Andres Francoise wrote:
Andres Francoise wrote:
Peut on avoir le modèle tricoté de bas en haut et sans aiguilles circulaires ,?
15.10.2021 - 02:07DROPS Design answered:
Bonjour Mme Andres, nous ne sommes malheureusement pas en mesure de pouvoir adapter chacun de nos modèles à chaque demande; toutefois, cette leçon pourra vous inspirer pour adapter ce modèle sur aiguilles droites, ou bien retrouvez ici tous nos pulls tricotés de bas en haut si besoin. Bon tricot!
15.10.2021 - 08:03
![]() Gabriela Zulema Silva wrote:
Gabriela Zulema Silva wrote:
Como puedo adquirir el hilo para las prendas
14.04.2021 - 06:14DROPS Design answered:
Hola Gabriela. Puedes comprar los hilos en las tiendas con envíos internacionales: https://www.garnstudio.com/findastore.php?s=w&cid=23
24.04.2021 - 20:21
|
||||||||||||||||||||||||||||
Madrid#madridsweater |
||||||||||||||||||||||||||||
 |
 |
|||||||||||||||||||||||||||
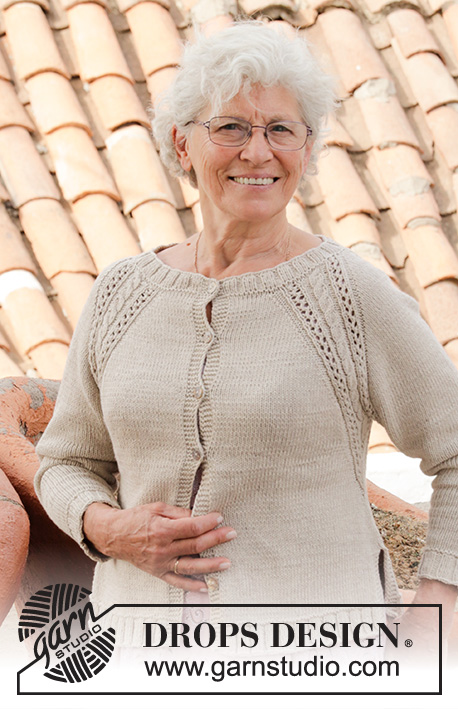
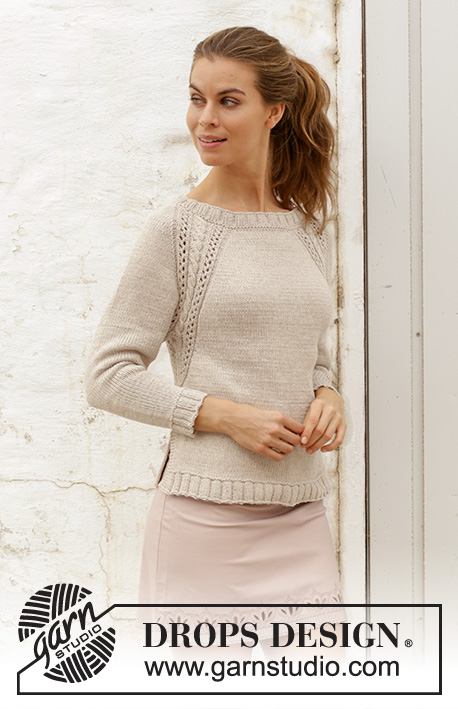
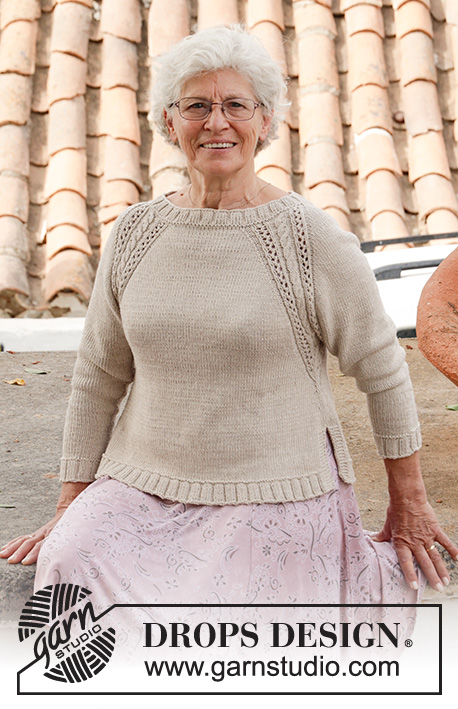
Knitted jumper with raglan, cables, lace pattern and split in sides, worked top down. Sizes S - XXXL. The piece is worked in DROPS Cotton Light.
DROPS 188-19 |
||||||||||||||||||||||||||||
|
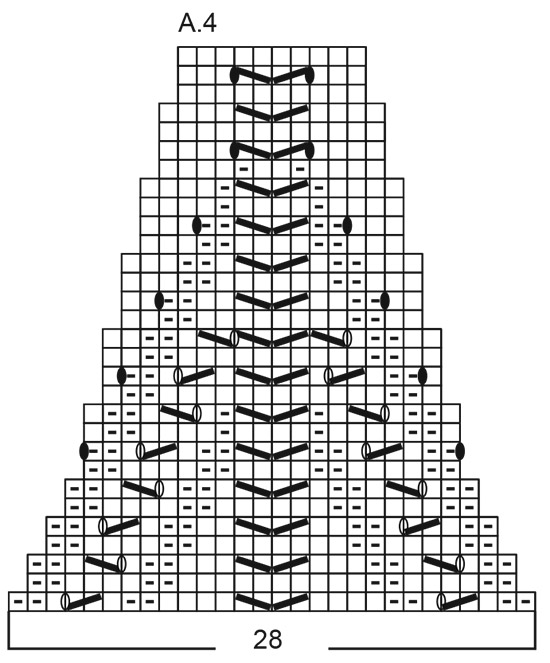
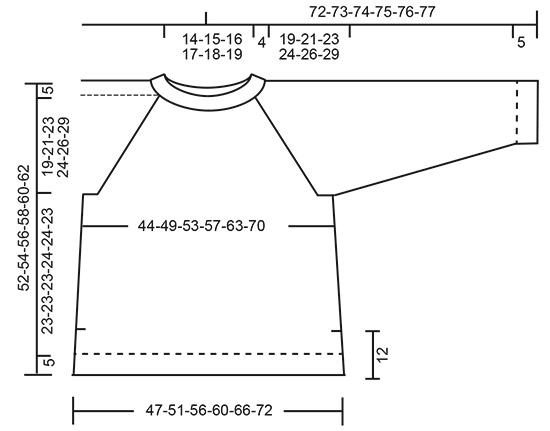
INFORMATION FOR THE PATTERN: RIDGE/GARTER STITCH (worked in the round): 1 ridge = 2 rounds. Knit 1 round and purl 1 round. RIDGE/GARTER STITCH (worked back and forth): 1 ridge = Knit 2 rows. PATTERN: See diagrams A.1 to A.4. The diagrams show all the rows in the pattern seen from the right side. RAGLAN: Increase 1 stitch on each side of each repeat of A.1/A.2 (= 8 stitches increased on the round). Increase 1 stitch by making 1 yarn over. On the next round knit the yarn overs twisted to avoid holes. INCREASE TIP-1 (evenly spaced): To work out how to increase evenly, count the total number of stitches on the needle (e.g. 110 stitches), and divide by the number of increases to be made (e.g. 4) = 27.5. In this example, increase alternately after every 27th and 28th stitch. Increase with a yarn over after the stitch and work the yarn over twisted on the next row to avoid a hole. INCREASE TIP-2 (for sides): All increases are made from the right side! Work until there are 2 stitches left before the marker thread, 1 yarn over, knit 4 (the marker sits in the middle of these 4 stitches), 1 yarn over. On the next round knit the yarn overs twisted to avoid holes. DECREASE TIP (for sleeves): Decrease 1 stitch on each side of the marker thread as follows: Work until there are 2 stitches left before the marker thread, knit 2 stitches together, (marker thread sits here), slip 1 stitch as if to knit, knit 1, pass the slipped stitch over. ---------------------------------------------------------- JUMPER: The piece is worked in the round with circular needle, top down as far as the split at the bottom of the body. Then the front and back pieces are finished separately back and forth. The sleeves are worked in the round with double pointed needles/ short circular needle. NECK: Cast on 110-115-120-125-135-145 stitches with circular needle size 3.5 mm and Cotton Light. Knit 1 round. Then work rib (knit 3 / purl 2) for 4 cm. Work 1 RIDGE – see description above, where on the first round you increase 4-7-10-9-11-17 stitches evenly – read INCREASE TIP-1 (evenly spaced) = 114-122-130-134-146-162 stitches. YOKE: Change to circular needle size 4 mm. Insert a marker here. THE PIECE IS NOW MEASURED FROM HERE! Work pattern as follows: Knit 8-10-12-13-16-20 stitches (= half back piece), make 1 yarn over, A.1 (= 20 stitches), 1 yarn over, knit 1 (= sleeve), 1 yarn over, A.2 (= 20 stitches), 1 yarn over, knit 16-20-24-26-32-40 stitches (= front piece), 1 yarn over, A.1, 1 yarn over, knit 1 (= sleeve), 1 yarn over, A.2, 1 yarn over, knit 8-10-12-13-16-20 stitches (= half back piece). The first increase to RAGLAN – see description above, is now finished. Continue the pattern like this and increase every 2nd round a total of 24-27-30-33-36-39 times = 306-338-370-398-434-474 stitches. REMEMBER THE KNITTING TENSION. When all the increases to raglan are finished, the piece measures 17-19-21-24-26-28 cm. Continue pattern without increasing until the piece measures 19-21-23-24-26-29 cm. The next round is worked as follows: Knit 32-37-42-46-52-59 stitches, work the next 6 stitches in pattern as before, purl 2, knit 2 (= half back piece), place the next 69-75-81-87-93-99 stitches on a thread (= sleeve), cast on 8 new stitches on the needle (= side under sleeve), knit 2, purl 2, work the next 6 stitches in pattern as before, knit 64-74-84-92-104-118 stitches, work the next 6 stitches in pattern as before, purl 2, knit 2 (= front piece), place the next 69-75-81-87-93-99 stitches on a thread (= sleeve), cast on 8 new stitches on the needle (= side under sleeve), knit 2, purl 2, work the next 6 stitches in pattern as before, knit 32-37-42-46-52-59 stitches (= half back piece). THE PIECE IS NOW MEASURED FROM HERE! BODY: = 184-204-224-240-264-292 stitches. Insert 1 marker thread in each side, in the middle of the new stitches cast on. Continue in the round with knit and A.3 (= 28 stitches) over the 8 new stitches cast on under the sleeves + 10 stitches on each side of these (i.e. 14 stitches on each side of the marker thread in each side). When A.3 has been completed in height, the piece measures 9 cm. Continue in the round with knit and on the next round increase 1 stitch on each side of the marker thread in each side – read INCREASE TIP-2 (for sides)! Increase like this every 3 cm a total of 3 times = 196-216-236-252-276-304 stitches. Continue with knit until the piece measures 16-16-16-17-17-16 cm. Now divide the piece into front and back pieces, which are finished separately back and forth. Place the one set of 98-108-118-126-138-152 stitches between the marker threads on a thread for the front piece and work the back piece as follows: BACK PIECE: = 98-108-118-126-138-152 stitches. Work stocking stitch with 5 stitches garter stitch in each side. When the piece measures 23-23-23-24-24-23 cm increase 30-30-30-37-40-41 stitches evenly on row (but not over the stitches in garter stitch) = 128-138-148-163-178-193 stitches. Change to circular needle size 3.5 mm. Work 1 ridge. Work rib from the right side as follows: 5 stitches in garter stitch, (knit 3 / purl2) until there are 8 stitches left on the row, knit 3, 5 stitches in garter stitch. Continue like this until the rib measures 5 cm. Cast off with knit over knit and purl over purl. To avoid the cast-off edge being tight you can make a yarn over after approx. every 5th stitch. The yarn over is cast off as a normal stitch. The piece measures a total of 52-54-56-58-60-62 cm from the shoulder down. FRONT PIECE: = 98-108-118-126-138-152 stitches. Place the other set of stitches back on circular needle size 4 mm and work in the same way as for the back piece. SLEEVE: Place the 69-75-81-87-93-99 stitches from the thread on the one side of the piece onto double pointed needles/short circular needle size 4 mm and, in addition, knit up 1 new stitch in each of the 8 stitches cast on under the sleeve = 77-83-89-95-101-107 stitches. Insert a marker thread in the middle of the new stitches (= 4 new stitches on each side of the marker thread). Work A.4 (= 28 stitches) mid under the sleeve so that there are 14 stitches of A.4 on each side of the marker thread mid under sleeve. The remaining stitches on the round are worked knitted. When the whole of A.4 has been worked in height you have decreased 18 stitches = 59-65-71-77-83-89 stitches. Continue to decrease 2 stitches under the sleeve – read DECREASE TIP! Decrease like this every 10th-7th-6th-5th-4th-3rd round a total of 7-9-11-13-15-17 times = 45-47-49-51-53-55 stitches. Continue with knit until the sleeve measures 37-35-34-33-32-29 cm. Now increase 5-8-6-9-7-10 stitches evenly on round = 50-55-55-60-60-65 stitches. Change to double pointed needles size 3.5 mm. Work 1 ridge. Then work rib (knit 3 / purl 2) until the sleeve measures 42-40-39-38-37-34 cm from the division. Cast off with knit over knit and purl over purl. To avoid the cast-off edge being tight you can make a yarn over after approx. every 5th stitch. The yarn over is cast off as a normal stitch. Work the other sleeve in the same way. |
||||||||||||||||||||||||||||
Diagram explanations |
||||||||||||||||||||||||||||
|
||||||||||||||||||||||||||||
 |
||||||||||||||||||||||||||||
 |
||||||||||||||||||||||||||||
 |
||||||||||||||||||||||||||||
 |
||||||||||||||||||||||||||||
Have you finished this pattern?Tag your pictures with #dropspattern #madridsweater or submit them to the #dropsfan gallery. Do you need help with this pattern?You'll find 33 tutorial videos, a Comments/Questions area and more by visiting the pattern on garnstudio.com. © 1982-2026 DROPS Design A/S. We reserve all rights. This document, including all its sub-sections, has copyrights. Read more about what you can do with our patterns at the bottom of each pattern on our site. |
||||||||||||||||||||||||||||


With over 40 years in knitting and crochet design, DROPS Design offers one of the most extensive collections of free patterns on the internet - translated to 17 languages. As of today we count 324 catalogues and 12290 patterns translated into English (UK/cm). 12290
We work hard to bring you the best knitting and crochet have to offer, inspiration and advice as well as great quality yarns at incredible prices! Would you like to use our patterns for other than personal use? You can read what you are allowed to do in the Copyright text at the bottom of all our patterns. Happy crafting!
Post a comment to pattern DROPS 188-19
We would love to hear what you have to say about this pattern!
If you want to leave a question, please make sure you select the correct category in the form below, to speed up the answering process. Required fields are marked *.