
Popular categories
Looking for a yarn?


Comments / Questions (19)
![]() Paola wrote:
Paola wrote:
Nessuno che possa rispondere in italiano? Maniche: lavorare un piccolo arrotondamento della manica avanti e indietro sui ferri circolari. Ho chiuso le 8 maglie centrali sotto la manica, partendo dalle ultime 4 del giro e chiudendo le prime 4 del giro successivo. Ho continuato a lavorare la riga e arrivo alle maglie chiuse. Come continuo? Se uso i ferri circolari, devo sorpassare le 8 maglie. Se devo andare avanti e indietro, devo smontare dai circolari e usare i ferri dritti ?
20.09.2022 - 21:16DROPS Design answered:
Buonasera Paola, quando intreccia le 8 maglie poi deve proseguire lavorando in piano. Può comunque continuare ad utilizzare i ferri circolari lavorando avanti e indietro. Buon lavoro!
20.09.2022 - 22:05
![]() PAOLA wrote:
PAOLA wrote:
Maniche: lavorare un piccolo arrotondamento della manica avanti e indietro sui ferri circolari. Ho chiuso le 8 maglie centrali sotto la manica, partendo dalle ultime 4 del giro e chiudendo le prime 4 del giro successivo. Ho continuato a lavorare la riga e arrivo alle maglie chiuse. Come continuo? Se uso i ferri circolari, devo sorpassare le 8 maglie. Se devo andare avanti e indietro, devo smontare dai circolari e usare i ferri dritti
17.09.2022 - 13:54DROPS Design answered:
Buonasera Paola, quando intreccia le 8 maglie poi deve proseguire lavorando in piano. Può comunque continuare ad utilizzare i ferri circolari lavorando avanti e indietro. Buon lavoro!
20.09.2022 - 22:06
![]() PAOLA wrote:
PAOLA wrote:
Maniche: lavorare un piccolo arrotondamento della manica avanti e indietro sui ferri circolari. Ho chiuso le 8 maglie centrali sotto la manica, partendo dalle ultime 4 del giro e chiudendo le prime 4 del giro successivo. Ho continuato a lavorare la riga e arrivo alle maglie chiuse. Come continuo? Se uso i ferri circolari, devo sorpassare le 8 maglie. Se devo andare avanti e indietro, devo smontare dai circolari e usare i ferri dritti
10.09.2022 - 17:08DROPS Design answered:
Buonasera Paola, quando intreccia le 8 maglie poi deve proseguire lavorando in piano. Può comunque continuare ad utilizzare i ferri circolari lavorando avanti e indietro. Buon lavoro!
20.09.2022 - 22:06
![]() Patricia wrote:
Patricia wrote:
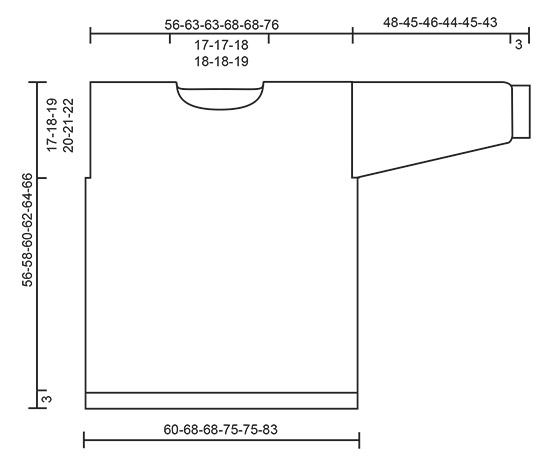
I am interested in knitting this sweater, but from the dimensions shown in the graph for the smallest size (3 + 56 + 17) would be 76 cm. Divide by 2.54 to get 29.9 inches from shoulder to hem. This is way too long. The hem would be at the middle of my knee cap. Are the dimensions incorrect?
22.03.2021 - 18:15DROPS Design answered:
Dear Patricia, according th ethe scematic drawings the FULL LENGTH of the sweater in the smallest size is 56 cm alltohgetherm including the armhole (17 cm), and the the 3 cm ribbing at the bottom. This way you have 36 cm between the ribbing and the lowest point of teh armhole. I hope this helps. Happy Knitting!
22.03.2021 - 23:45
![]() Catherine wrote:
Catherine wrote:
Bonjour, pourquoi les manches du modèle Small sont-elles plus longues que les manches du modèle XXXL? Merci
12.07.2020 - 02:08DROPS Design answered:
Bonjour Catherine, dans les grandes tailles, l'encolure et les épaules sont plus larges, les manches seront donc plus courtes - retrouvez toutes les mesures dans le schéma - comparez-les à un vêtement similaire que vous avez et dont vous aimez la forme et ajustez si besoin. Bon tricot!
13.07.2020 - 09:02
![]() Eileen wrote:
Eileen wrote:
Thank you for clarification. My tension is correct..It would be helpful if instead of just labelling sizes S M L etc you could state the body measurement, or just say something like 'designed to be worn with, for example, 10cm ease'. This would make it easier to judge what the style of the pattern is and whether it is the shape we want. Many other knitwear designers do this.
29.02.2020 - 23:02
![]() Eileen wrote:
Eileen wrote:
After checking my knitting tension and getting the correct stitch and rows, I began knitting this pattern in Size M and it was coming up HUGE - far more oversized than it looks on the female model in the photograph. I have unpicked it, planning to work out reduced dimensions for myself. But I have now looked at the Winter Love pattern for Men, and I think you may have mixed up the instructions and diagrams, as the ones accompanying the Mens' version is smaller than the Womens'.
27.02.2020 - 21:49DROPS Design answered:
Dear Eileen, if your tension is right you should have same measurement as in chart - the man pattern requires less stitches but the shape is also different. The woman version is more "oversized". Happy knitting!
28.02.2020 - 08:08
![]() Caillard Micheline wrote:
Caillard Micheline wrote:
Merci pour votre réponse. Mon problème c’est que Big Merino et Air n’ont pas la même longueur de fil pour 50g l’un 75 m l’autre 150m. Je commande 8 pelotes Big au lieu de 3. Mais cela veut dire que le fil n’est pas épais. Donc il faut plus de mailles ou pas ? Merci
19.08.2019 - 10:44DROPS Design answered:
Bonjour Mme Gaillard, ces fils sont du même groupe car on aura la même tension, le métrage est différent car la texture des deux fils est différente, il vous faudra juste bien vérifier votre échantillon/tension - Votre magasin DROPS pourra vous apporter toute assistance complémentaire individuelle, même par mail ou téléphone. Bon tricot!
19.08.2019 - 11:48
![]() Caillard Micheline wrote:
Caillard Micheline wrote:
Je fais connaître autour de moi votre site et vante toutes ses qualités. Merci d’existe
18.08.2019 - 14:50
![]() Caillard Micheline wrote:
Caillard Micheline wrote:
Puis je réaliser le modèle Winter love en Big mérinos pour ma petite fille qui vient d’entrer à l’opera D’Oslo. Merci
18.08.2019 - 14:48DROPS Design answered:
Bonjour Mme Caillard, félicitations à votre petite fille! Comme Air et Big Merino sont toutes deux du même groupe de fils (= C) vous pouvez tout à fait utiliser Big Merino, pensez à bien vérifier votre échantillon au préalable, utilisez notre convertisseur si besoin, vous trouverez ici plus d'infos sur les alternatives. Bon tricot!
19.08.2019 - 10:29
|
|||||||||||||||||||||||||||||||||||||||||||||||||
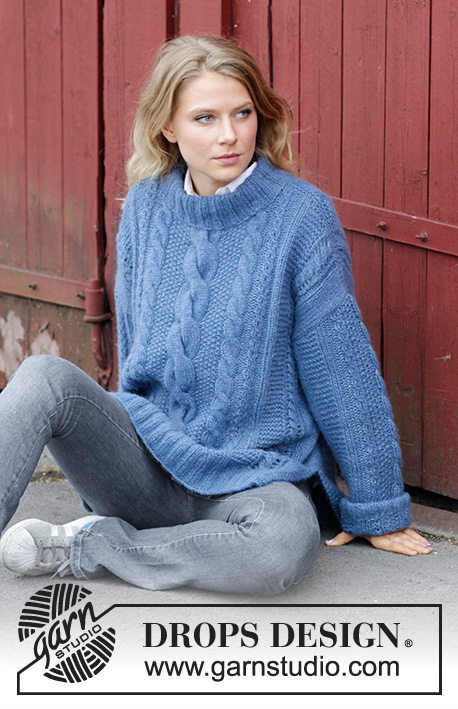
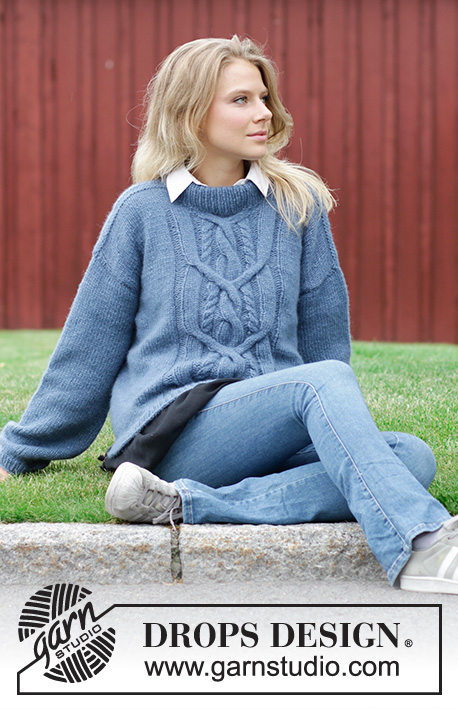
Winter Love#winterlovesweater |
|||||||||||||||||||||||||||||||||||||||||||||||||
 |
 |
||||||||||||||||||||||||||||||||||||||||||||||||
Knitted jumper with cable on front. Sizes S - XXXL. The piece is worked in DROPS Air.
DROPS 184-11 |
|||||||||||||||||||||||||||||||||||||||||||||||||
|
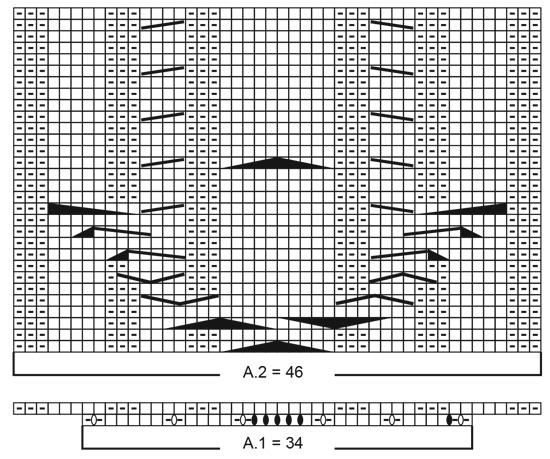
INFORMATION FOR THE PATTERN: RIDGE/GARTER STITCH (worked back and forth): 1 ridge = Knit 2 rows. PATTERN: See diagrams A.1 and A.2. The diagrams show all the rows in the pattern seen from the right side. DECREASE/INCREASE TIP: To work out how to decrease/increase evenly, count the total number of stitches on the needle (e.g. 228 stitches) and divide by the number of decreases/increases to be made (e.g. 36) = 6.3. In this example, knit approx. every 5th and 6th stitch together. If you are increasing evenly, make 1 yarn over after approx. every 6th stitch. On the next round knit the yarn overs twisted to prevent holes. INCREASE TIP (for mid under sleeve): Start 1 stitch before the marker, make 1 yarn over, knit 2 (the marker sits in the middle of these stitches), make 1 yarn over. On the next round, work the yarn overs twisted and work in pattern. CAST-OFF TIP: To avoid a tight cast-off edge, you can cast off with a ½ size larger needle. ---------------------------------------------------------- JUMPER: The piece is worked in the round with circular needle as far as the armholes, then the front and back pieces are worked separately back and forth. The sleeves are worked in the round with double pointed needles/ short circular needle. BODY: Cast on 228-258-258-282-282-312 stitches with circular needle size 4.5 mm and Air. Knit 1 round. Then work rib (= knit 1 / purl 1) for 3 cm. Change to circular needle size 5.5 mm and knit 1 round where you decrease 36-42-42-42-42-48 stitches evenly on round - read DECREASE/INCREASE TIP above = 192-216-216-240-240-264 stitches. Insert 1 marker at the beginning of the round and 1 marker after 96-108-108-120-120-132 stitches (= the sides) and allow the markers to follow your work upwards. Then work as follows: Work 31-37-37-43-43-49 stitches stocking stitch, A.1 (= 34 stitches), work stocking stitch over the remaining 127-145-145-163-163-181 stitches. When A.1 has been completed in height there are 204-228-228-252-252-276 stitches on the last round. REMEMBER THE KNITTING TENSION! Then work as follows: Work 31-37-37-43-43-49 stitches stocking stitch, A.2 (= 46 stitches), work stocking stitch over the remaining 127-145-145-163-163-181 stitches. Continue the pattern in this way, A.2 is repeated in height to finished length. When the piece measures 39-40-41-42-43-44 cm cast off for the armholes as follows: Cast off 5-5-5-9-9-9 stitches in each side for the armholes (= 2-2-2-4-4-4 stitches before/3-3-3-5-5-5 stitches after both markers). Front and back pieces are continued back and forth separately. BACK PIECE: = 91-103-103-111-111-123 stitches (including 1 edge stitch in each side). Continue with stocking stitch as before, with 1 edge stitch in GARTER STITCH - see description above, in each side. When the piece measures 53-55-57-59-61-63 cm cast off the middle 25-25-27-27-27-29 stitches for neck and each shoulder is finished separately. Cast off 1 stitch on the next row from the neck = 32-38-37-41-41-46 stitches left on shoulder. Continue working until the piece measures 55-57-59-61-63-65 cm. Work 1 ridge and cast off - read CAST-OFF TIP. Work the other shoulder in the same way. FRONT PIECE: = 103-115-115-123-123-135 stitches (including 1 edge stitch in each side). Continue the pattern as before, with 1 edge stitch in garter stitch in each side. When the piece measures 50-52-54-55-57-59 cm decrease 12 stitches evenly over A.2 = 91-103-103-111-111-123 stitches. On the next row, place the middle 13-13-15-15-15-17 stitches on 1 thread for neck and each shoulder is finished separately in stocking stitch, edge stitch is worked as before. Cast off for the neck at the beginning of every row from the neck as follows: 2 stitches 2 times and 1 stitch 3 times = 32-38-37-41-41-46 stitches left on the shoulder. Continue working until the piece measures 55-57-59-61-63-65 cm. Work 1 ridge and cast off. Work the other shoulder in the same way. SLEEVE: The sleeve is worked in the round with double pointed needles/short circular needle. Cast on 36-38-40-42-44-46 stitches with double pointed needles size 4.5 mm and Air. Knit 1 round. Then work rib (= knit 1 / purl 1) for 3 cm. Change to double pointed needles size 5.5 mm and knit 1 round where you increase 12-14-12-14-14-14 stitches evenly on round = 48-52-52-56-58-60 stitches. Insert 1 marker at the beginning of the round (= mid under sleeve) and allow the marker to follow your work upwards. Continue by working stocking stitch. When the piece measures 12 cm increase 2 stitches mid under the sleeve - read INCREASE TIP. Increase in this way every 16-14-10-9-7-6 cm a total of 3-3-4-4-5-5 times = 54-58-60-64-68-70 stitches. When the piece measures 46-43-44-42-43-41 cm cast off the middle 8-8-8-10-10-10 stitches (= 4-4-4-5-5-5 stitches on each side of the marker) and work a small sleeve cap back and forth on the circular needle. Work stocking stitch and cast off at the beginning of each row in each side as follows: Cast off 5-5-6-5-6-6 stitches 2 times and cast off the remaining stitches. The sleeve measures approx. 48-45-46-44-45-43 cm. Work one more sleeve in the same way. ASSEMBLY: Sew the shoulder seams inside the cast-off edges so that you get 2 ridges on top of the shoulder. Sew the sleeve seams inside the 1 edge stitch in garter stitch. NECK: Knit up from the right side approx. 78-90 stitches around the neck (including the stitches on the thread at the front) with short circular needle size 4.5 mm. Purl 1 round. Knit 1 round where you adjust the number of stitches to 78-78-84-84-90-90 stitches. Continue by working rib (= knit 1 / purl 1) for 12 cm. Then purl 1 round, cast off. Turn the collar down on the inside so that it is 6 cm high, fasten with small neat stitches on the inside of the jumper. |
|||||||||||||||||||||||||||||||||||||||||||||||||
Diagram explanations |
|||||||||||||||||||||||||||||||||||||||||||||||||
|
|||||||||||||||||||||||||||||||||||||||||||||||||
 |
|||||||||||||||||||||||||||||||||||||||||||||||||
 |
|||||||||||||||||||||||||||||||||||||||||||||||||
Have you finished this pattern?Tag your pictures with #dropspattern #winterlovesweater or submit them to the #dropsfan gallery. Do you need help with this pattern?You'll find 34 tutorial videos, a Comments/Questions area and more by visiting the pattern on garnstudio.com. © 1982-2026 DROPS Design A/S. We reserve all rights. This document, including all its sub-sections, has copyrights. Read more about what you can do with our patterns at the bottom of each pattern on our site. |
|||||||||||||||||||||||||||||||||||||||||||||||||


With over 40 years in knitting and crochet design, DROPS Design offers one of the most extensive collections of free patterns on the internet - translated to 17 languages. As of today we count 324 catalogues and 12290 patterns translated into English (UK/cm). 12290
We work hard to bring you the best knitting and crochet have to offer, inspiration and advice as well as great quality yarns at incredible prices! Would you like to use our patterns for other than personal use? You can read what you are allowed to do in the Copyright text at the bottom of all our patterns. Happy crafting!
Post a comment to pattern DROPS 184-11
We would love to hear what you have to say about this pattern!
If you want to leave a question, please make sure you select the correct category in the form below, to speed up the answering process. Required fields are marked *.