
Popular categories
Looking for a yarn?


Comments / Questions (71)
![]() Jacqueline Hanöfner wrote:
Jacqueline Hanöfner wrote:
Hi Lucy, thanks so much for taking the time to answer me but I m still unsure. Cause there are 3 knit-sts in the A1 pattern Row 33 (not row 35 sorry i counted wrong) that have to be worked - however (if I knitted correctly) there are only 2 knit stitches at the start of the row for me to work with? Thats why I assumed to include the last knit-stitch from the row before? Can you pls clarify?
07.10.2021 - 21:24DROPS Design answered:
Dear Mrs Hanöfner, on row 33 you work at the beg of row (starting with the last stitch on row 32: YO, slip 1 (= the last stitch previous repeeat), K2 tog, psso = 1 st remain, YO, (the last st in repeat will be worked tog with the first 2 sts next repeat). The first yarn over belongs the the previous repeat (and will be a purl stitch), the 2nd yarn over will be purled = 1 st remains, that will be knitted in front and back loop on row 34. Can this help?
08.10.2021 - 07:23
![]() Jac wrote:
Jac wrote:
Hi, I am knitting the berret and am on row 35 on chart A1 and instructions are as follows: 1 YO between 2 sts, then slip 1 st as if to K, K 2 tog, psso (= 2 st dec) and then 1 YO between 2sts. This is all good but the row starts with a knit-sts that isnt there yet (I m knitting in the round using markers to indicate the different sequences)? Should I apply the instructions already on the last sts in the row before? Sorry not sure on how to proceed here. Can you help pls.
06.10.2021 - 16:03DROPS Design answered:
Dear Jac, no, you shouldn't apply the instructions in the row before.. The previous row finishes with k1, then you work 1 YO, e.t.c (as you said). The row start doesn't move, it starts as the others, after the marker stitch. Happy knitting!
06.10.2021 - 23:31
![]() Lucy Richardson wrote:
Lucy Richardson wrote:
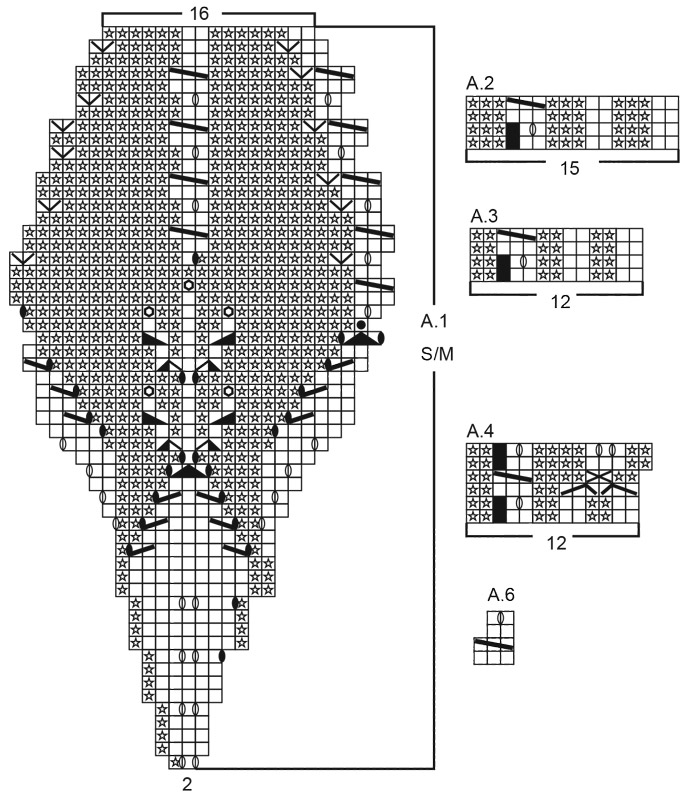
A4, rows 3 & 4. once r3 is knitted, you are left with 10 stitches. Yet row 4 indicates 13 stitches. ???? Stuck on 3. Help
22.07.2020 - 09:27DROPS Design answered:
Dear Mrs Richardson, on row 3 in A.4 you work: slip 2 sts on cable needle in front of piece, P 1, 1 YO, slip first st on cable needle as if to K, K 1, psso (on next round P YO twisted) (= 3 sts), slip 1 st on cable needle behind piece, K 2 tog, 1 YO, P 1 from cable needle (on next round P YO twisted) (= 3 sts), P2, K3, P2 (= 13 sts). Then round 4: P2, slip 1 st on cable needle in front of piece, K 1, 1 YO, K 1 from cable needle (on next round K YO twisted = 1 st inc) ( = 3 sts), P4, K 3, pass first st worked over the last 2 sts so that this st is around the other two sts (= 1 st dec), P2 = 2+3+4+2+2=13 sts. Round 5 = P2, K3, P4, K2, P2. Happy knitting!
29.07.2020 - 09:49
![]() Laura wrote:
Laura wrote:
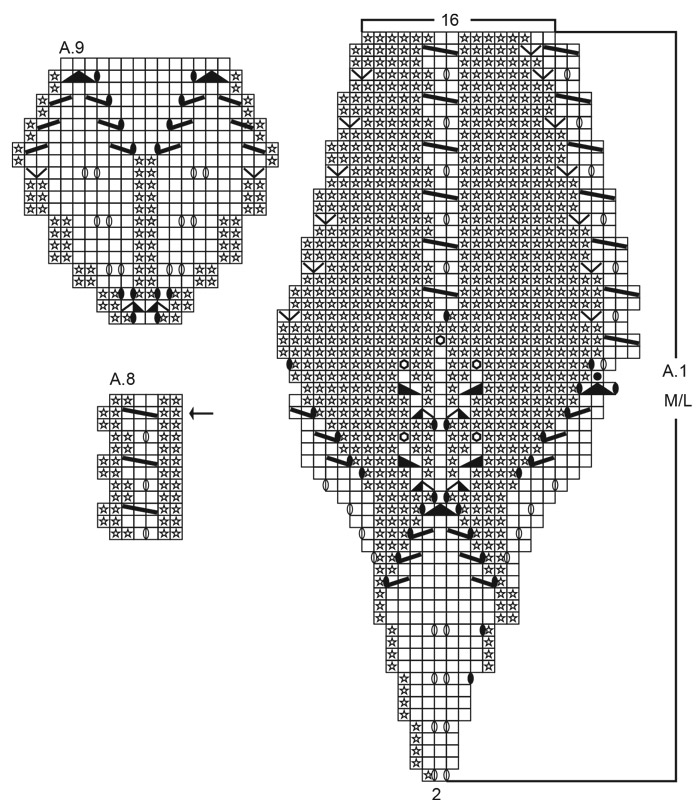
Guten Tag, ich stricke aktuell den rechten Pulswärmer. In der Strickschrift A.9 sind ab Reihe 15 Symbole ( zwei Haken) zu sehen, die in der Symbolliste nicht erklärt sind. Wie sind diese Symbole zu lesen?
09.01.2020 - 23:44DROPS Design answered:
Liebe Laura, ab Reihe 15 in A.9 sehen Sie Abnahmen (=8. + 9. Symbol) und Umschläge (5. Symbol), welches Symbol fehlt Ihnen?
10.01.2020 - 09:44
![]() Jette wrote:
Jette wrote:
Helene det gør du lige hen over hvor garnet vises.
06.10.2019 - 14:49
![]() Jette wrote:
Jette wrote:
Hvad betyder ØKT ved beskrivelse af sort cirkel ?? Der står 1m, men jeg synes jeg får to hvis jeg gør som der står !
06.10.2019 - 14:44DROPS Design answered:
Hei Jette. Det står 1 maske økt, så ja, du får 2 masker med den opprinnelige masken. 1 maske strikkes rett foran og 1 bak i samme maske. God Fornøyelse!
07.10.2019 - 13:18
![]() Helene wrote:
Helene wrote:
Hvor finder jeg Udskriv.....
16.06.2019 - 09:37
![]() Sarita Bosman wrote:
Sarita Bosman wrote:
Can you please send me a video how to knit that row. I have done what you say but i still don't understand. Because where do i get the "slip the yarn over from previous round onto cable needle and keep at front, there wasn't a slip stitch in previous row, the purl next st will be on the twisted stitch, then k twisted st from previous row????? What do i do with stitch on cable needle????
11.04.2019 - 18:48DROPS Design answered:
Dear Mrs Bosman, on previous row you worked 2 yarn overs on each side of the K stitch, on row 25, you will work the 2 yarn overs into the cable: before the middle stitch (K stitch), you slip 1 P on cable needle behind piece, K YO from previous row twisted (= not hole), P 1 from cable needle, then work the middle stitch, and now slip yarn over from previous round on a cable needle in front of piece (= as usual for a cable), purl next stitch and then K the yarn over from cable needle twisted. It's just a simple cable but worked with the yarn overs from previous row. Happy knitting!
12.04.2019 - 08:43
![]() Sarita Bosman wrote:
Sarita Bosman wrote:
Can somebody please help me?
11.04.2019 - 12:07DROPS Design answered:
See answer below :)
11.04.2019 - 12:35
![]() Sarita Bosman wrote:
Sarita Bosman wrote:
A.1 row 25, i understand everything till K1 in middle. Do i make a yo on cable needle and put at front? Then what do i do with that stitch om cable needle?
11.04.2019 - 11:42DROPS Design answered:
Dear Mrs Bosman, you then slip the yarn over from previous round on a cable needle in front of piece, purl next stitch, then k twisted the yarn over from previous round, and continue with P4 etc.. Happy knitting!
11.04.2019 - 12:35
|
|||||||||||||||||||||||||||||||||||||||||||||||||||||||||||||
Hello Sunshine#hellosunshineset |
|||||||||||||||||||||||||||||||||||||||||||||||||||||||||||||
 |
 |
||||||||||||||||||||||||||||||||||||||||||||||||||||||||||||
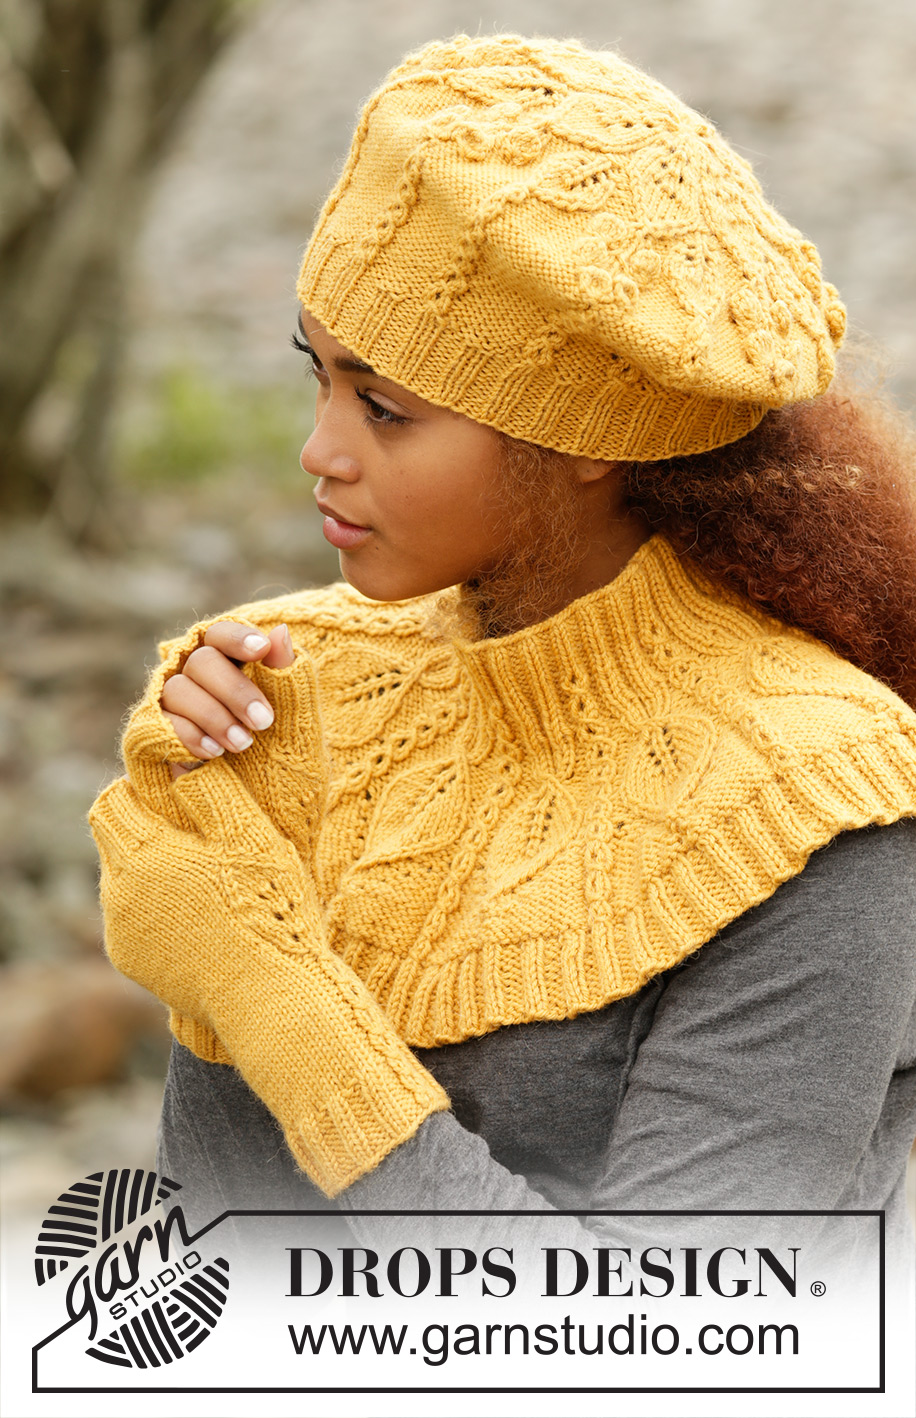
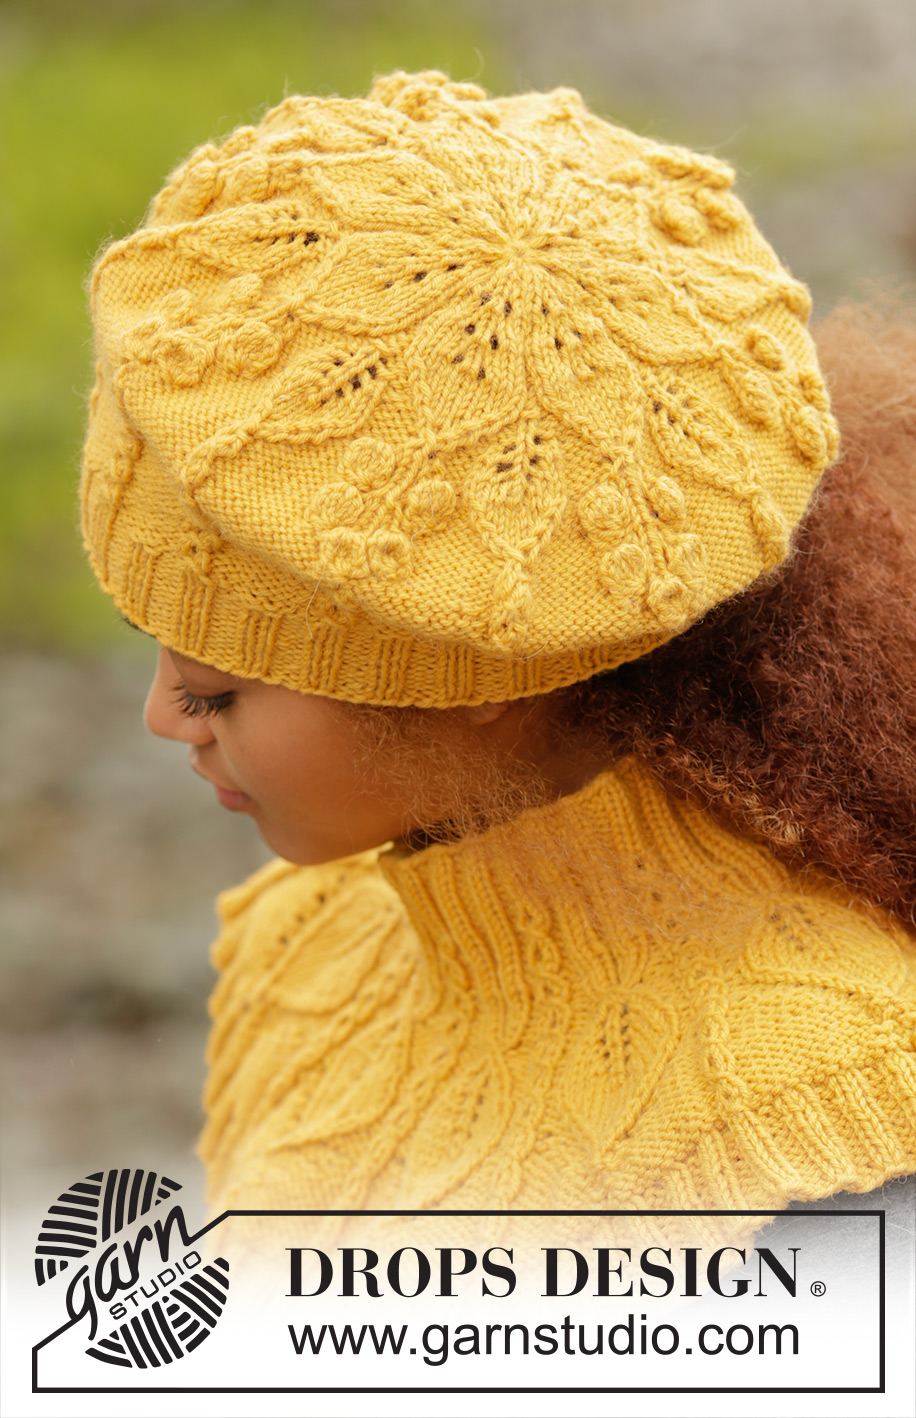
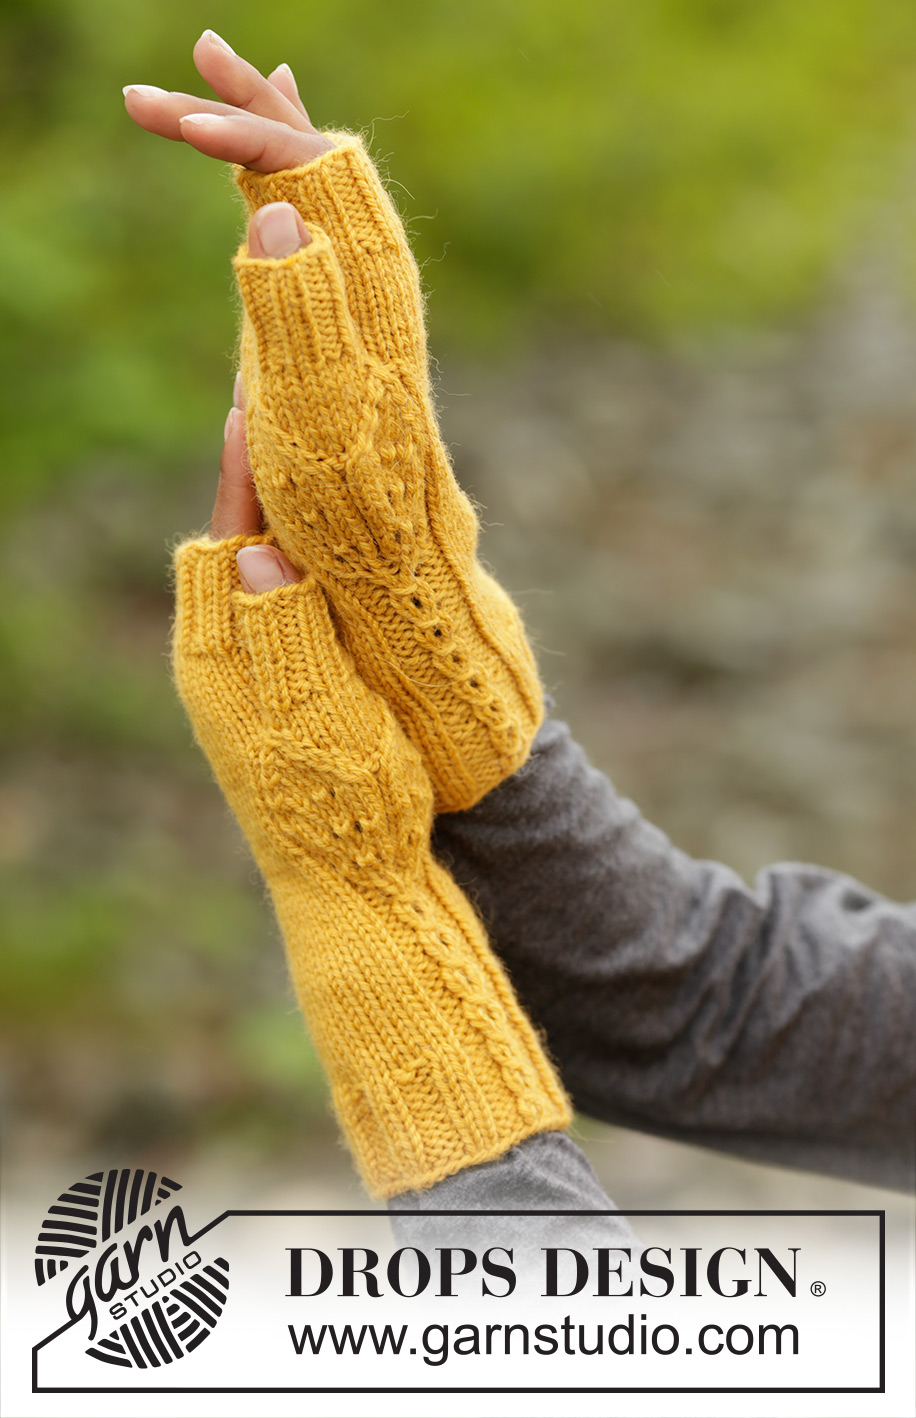
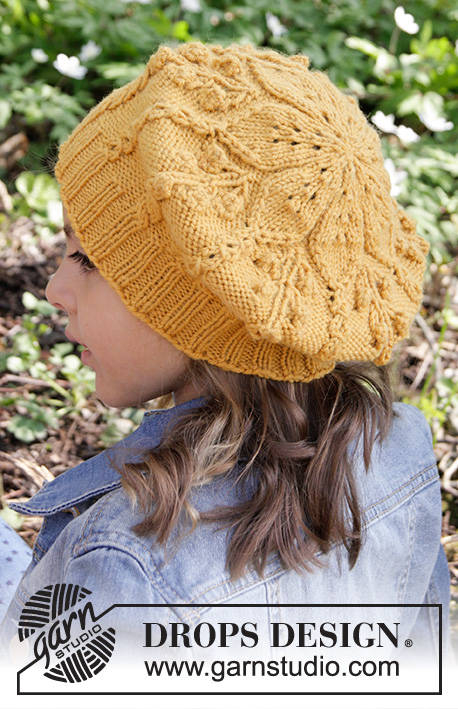
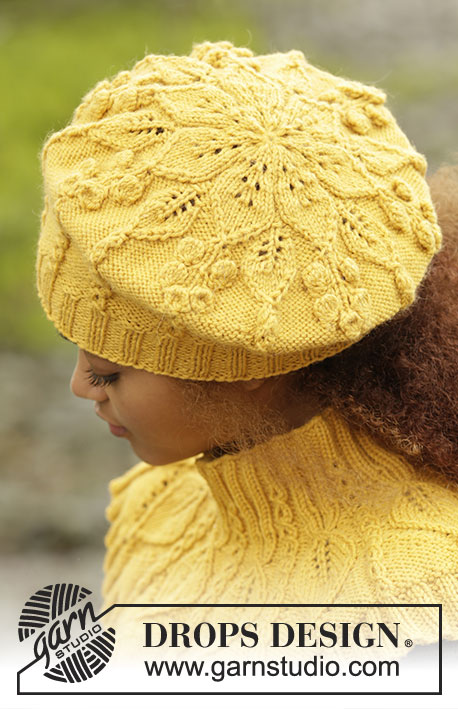
Set consists of: Knitted DROPS beret and neck warmer with leaf pattern worked top down in ”Lima” and DROPS wrist warmers with leaf pattern in “Lima”.
DROPS 173-43 |
|||||||||||||||||||||||||||||||||||||||||||||||||||||||||||||
|
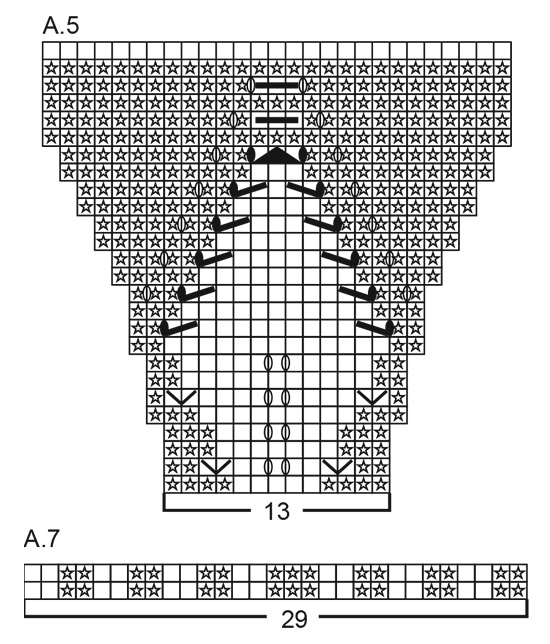
BERET: PATTERN: See diagram A.1 (choose diagram for correct size). MAGIC CIRCLE: To avoid hole in the middle beg with this technique: Hold yarn end in the left hand and make a loop around left index finger (from left to right). Hold the loop with left thumb and index finger. Insert needle through loop, get yarn from ball (i.e. place yarn 1 time over needle from you), pull yarn back through loop, 1 YO (now place yarn from the back and towards you) and pull YO through sts on needle, * insert needle through loop, 1 YO (place yarn from the back and towards you), pull YO through loop, 1 YO (from the back and towards you) and pull YO through outermost st on right needle (i.e. the last st made) *, repeat from *-* until there are 14 sts on needle. Distribute sts on 4 double pointed needles size 3.5 mm as explained in pattern. Then work as explained in pattern – AT THE SAME TIME pull yarn end so that loop is tighten tog and the hole disappears. CAST-OFF TIP: Make 1 YO after approx. every 4th st while casting off (cast off YO as a st) to make the cast-off edge more elastic. ---------------------------------------------------------- BERET: Work in the round on double pointed needles top down, switch to circular needle when needed. Beg with MAGIC CIRCLE - see explanation above and cast on 14 sts with Lima as explained above – NOTE: If you do not want to start with a magic circle cast on 14 sts on double pointed needles size 3.5 mm with Lima (when beret is done baste a yarn up and down through sts around hole at the top and tighten tog). Distribute sts on 4 double pointed needles size 3.5 mm with 4 sts on each of the first 3 needles and 2 sts on last needle. Then work pattern according to diagram A.1 (choose diagram for correct size = 7 repetitions of 2 sts). REMEMBER THE KNITTING TENSION When A.1 has been worked, there are 112 sts on needle in both sizes and piece measures approx. 19-21 cm from the top down. Switch to circular needle size 3 mm and work rib in the round (= K 2/P 2) – adjust to work 2 K over every pattern border and P 2 + K 2 + P 2 between every pattern border. When rib measures 3-4 cm (or desired measurements), cast off with K over K and P over P - READ CAST-OFF TIP. ---------------------------------------------------------- NECK WARMER: PATTERN: See diagrams A.2 to A.7. INCREASE TIP: Inc 1 st in transition between P and K by making 1 YO. On next round P YO twisted to avoid holes. ---------------------------------------------------------- NECK WARMER: Worked in the round on circular needle, top down. Cast on 120-135 sts on circular needle size 3.5 mm with Lima. K 1 round. Then work rib in the round = K 2/P 3. When rib measures 3-4 cm, switch to circular needle size 4 mm. Then work pattern in the round according to diagram A.2 (= 8-9 repetitions of 15 sts) until A.2 has been worked 2 times in total vertically – AT THE SAME TIME on last round dec all 3 P to 2 P (dec 1 st by P 2 tog = 24-27 sts dec) = 96-108 sts on needle. Now work 1 repetition vertically according to diagram A.3 the same way. After A.3 piece measures approx. 7-8 cm. Then work pattern according to diagram A.4 (= 8-9 repetitions of 12 sts). When A.4 has been worked 1 time vertically, there are 128-144 sts on needle (incl YOs in pattern) - NOTE: Finish last round when 2 sts remain on round, insert 1 marker (round beg here now). Work next round as follows: * Work A.5 (= 13 sts), A.6 (= 3 sts) *, repeat from *-* 8-9 times in total. Continue pattern like this and inc as shown in diagram. REMEMBER THE KNITTING TENSION! When A.5 has been worked, there are 232-261 sts on needle. Switch to circular needle size 3.5 mm and work rib in the round according to diagram A.7 (= 8-9 repetitions of 29 sts). AT THE SAME TIME after 2 round rib inc every other 2 P to 3 P - READ INCREASE TIP = 256-288 sts. After the next 2 round inc the remaining 2 P to 3 P = 280-315 sts. When rib measures 3-4 cm, loosely cast off with K over K and P over P. Neck warmer measures approx. 21-23 cm from top and down. ---------------------------------------------------------- WRIST WARMER: PATTERN: See diagrams A.8 and A.9. ---------------------------------------------------------- RIGHT WRIST WARMER: Worked in the round on double pointed needles. Cast on 50-55 sts on double pointed needles size 3 mm with Lima. K 1 round. Work next round as follows: * K 2, P 3 *, repeat from *-* 4-5 times in total, K 2, P 1, work pattern according to diagram A.8 (= 6 sts), P 1, repeat from *-* 4-4 times in total. Continue rib and A.8 like this until piece measures 3 cm. Now dec 3 P to 2 P the entire round = 40-44 sts. Switch to double pointed needles size 3.5 mm, work next round as follows: Work 18-22 sts in stocking st, continue A.8 and finish with 16-20 sts in stocking st. REMEMBER THE KNITTING TENSION When piece measures 8-9 cm (ending after a row like row marked with arrow in diagram), work pattern according to diagram A.9 over A.8 (work the other sts in stocking st). Continue pattern like this and inc and dec as shown in diagram. When A.9 has been worked, there are 48-52 sts on needle and piece measures approx. 15-16 cm. Work 1 round in stocking st and slip AT THE SAME TIME the middle 10 sts in A.9 on a stitch holder for thumb, in addition cast on 2 new sts on needle behind the thumb = 40-44 sts on needle. Continue in the round in stocking st until piece measures 19-20 cm (approx. 3 cm remain until finished measurements – try the wrist warmer on and work to desired measurements). Switch to double pointed needles size 3 mm and K 1 round while at the same time inc 4 sts evenly = 44-48 sts. Then work rib in the round = K 2/P 2 for 3 cm. LOOSELY cast off sts with K over K and P over P. Entire wrist warmer measures approx. 22-23 cm. THUMB: Slip the 10 sts from stitch holder back on double pointed needles size 3.5 mm and pick up 6 new sts behind the thumb = 16 sts. Work 2 rounds in stocking st (make sure to avoid a tight thumb). Then work rib in the round = K 2/P 2 for 3-3½ cm (or desired measurements). Cast off sts with K over K and P over P. LEFT WRIST WARMER: Work as right wrist warmer but reversed, i.e. work first round with rib as follows: * P 3, K 2 *, repeat from *-* 4-4 times in total, P 1, A.8 (= 6 sts), P 1, K 2, repeat from *-* 4-5 times in total. After rib work 16-16 sts in stocking st, A.8 and 18-22 sts in stocking st. |
|||||||||||||||||||||||||||||||||||||||||||||||||||||||||||||
Diagram explanations |
|||||||||||||||||||||||||||||||||||||||||||||||||||||||||||||
|
|||||||||||||||||||||||||||||||||||||||||||||||||||||||||||||
 |
|||||||||||||||||||||||||||||||||||||||||||||||||||||||||||||
 |
|||||||||||||||||||||||||||||||||||||||||||||||||||||||||||||
 |
|||||||||||||||||||||||||||||||||||||||||||||||||||||||||||||
Have you finished this pattern?Tag your pictures with #dropspattern #hellosunshineset or submit them to the #dropsfan gallery. Do you need help with this pattern?You'll find 31 tutorial videos, a Comments/Questions area and more by visiting the pattern on garnstudio.com. © 1982-2026 DROPS Design A/S. We reserve all rights. This document, including all its sub-sections, has copyrights. Read more about what you can do with our patterns at the bottom of each pattern on our site. |
|||||||||||||||||||||||||||||||||||||||||||||||||||||||||||||


With over 40 years in knitting and crochet design, DROPS Design offers one of the most extensive collections of free patterns on the internet - translated to 17 languages. As of today we count 325 catalogues and 12291 patterns translated into English (UK/cm). 12291
We work hard to bring you the best knitting and crochet have to offer, inspiration and advice as well as great quality yarns at incredible prices! Would you like to use our patterns for other than personal use? You can read what you are allowed to do in the Copyright text at the bottom of all our patterns. Happy crafting!
Post a comment to pattern DROPS 173-43
We would love to hear what you have to say about this pattern!
If you want to leave a question, please make sure you select the correct category in the form below, to speed up the answering process. Required fields are marked *.