
Popular categories
Looking for a yarn?


Comments / Questions (71)
![]() Helen wrote:
Helen wrote:
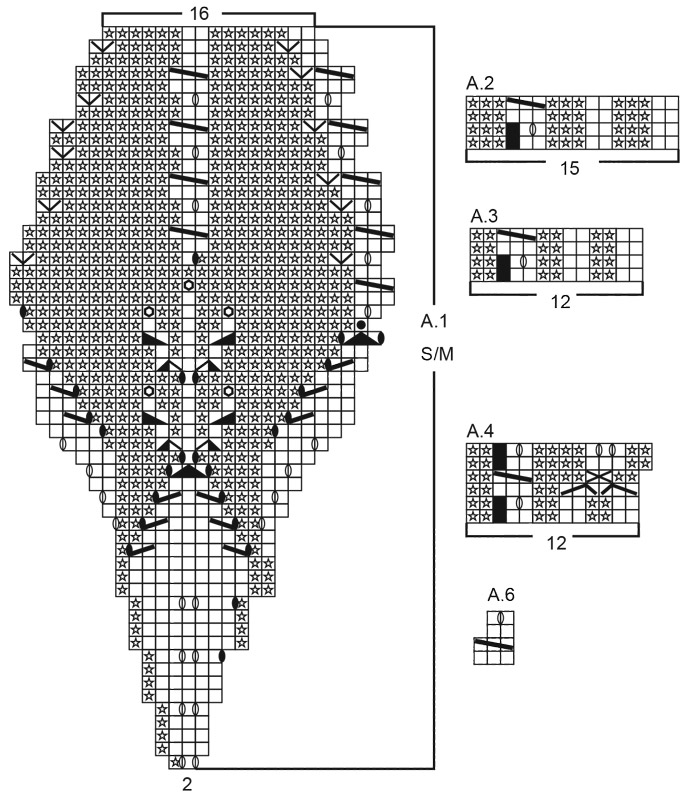
I'm attempting to knit the beret but I'm finding the instructions confusing. How many stitches do I cast on with my magic circle for a smaller sized hat? Is it 112? The A1 graph shows 16 stitches per pattern repeat but the instructions say 14. I'm so confused!
30.11.2024 - 19:04DROPS Design answered:
Hi Helen, You cast on 14 stitches for both sizes (top of beret) according to Magic Circle. The A.1 diagram starts with 2 stitches (diagrams are worked bottom up and from right to left from the right side) which is repeated 7 times in width across the 14 stitches. The increases and decreases for the shape of the beret are included in the diagram. Hope this helps and happy crafting!
03.12.2024 - 06:51
![]() Anne Indsetviken wrote:
Anne Indsetviken wrote:
Hvordan begynner man på lua?
26.09.2024 - 22:43DROPS Design answered:
Hei Anne. Start med MAGISK SIRKEL. Forklaringen står øverst i oppskriften, se gjerne hjelpevideoen: Hvordan legge opp med en sirkel = magic loop. mvh DROPS Design
07.10.2024 - 11:10
![]() Fontaine Patricia wrote:
Fontaine Patricia wrote:
Bonjour je vous remercie beaucoup pour ces précisions je vais donc essayer si j'ai besoin je reviendrais vers vous merci.
27.08.2024 - 18:48
![]() Fontaine Patricia wrote:
Fontaine Patricia wrote:
Bonjour pour le point fantaisie feuilles diagramme A1 pour le 1er rang sur 2 mailles j'ai compris mais pour le 2ème je ne sais pas comment faire avec les jetés et pour le A2 le carré noir ils disent sur le diagramme =pas de mailles, sauter cette case . Merci beaucoup je suis vraiment coincer pour commencer le béret.
23.08.2024 - 18:31DROPS Design answered:
Bonjour Mme Fontaine, au 2ème tour de A.1 tricotez les jetés comme indiqué par le 4ème symbole = à l'endroit pour qu'il forme un trou, ainsi le 2ème tour de A.1 se tricote ainsi: 4 m endroit, 1 m envers. Juste avant le tour avec 1 carré noir, o n'a pas encore tricoté de jeté, on a donc juste 2 mailles endroit jusqu'au 2ème tour inclus de A.2 (que l'on tricote 1 m end, 1 jeté, 1 m end) puis on diminue 1 m au 4ème tour (cf 16ème symbole); au tour suivant, on a de nouveau que 2 m end (et non 3). Bon tricot!
26.08.2024 - 07:32
![]() Fontaine wrote:
Fontaine wrote:
Bonjour je n'arrive pas à commencer pour faire un rond magique et je ne comprend pas le début A1 sur les 2 premières mailles Je vous remercie
18.08.2024 - 11:40DROPS Design answered:
Bonjour Mme Fontaine, cette vidéo devrait vous aider à comprendre comment faire pour monter les mailles ainsi; le 1er rang de A.1 se tricote sur 2 mailles (on augmente 2 m en même temps) ainsi: (1 jeté, 1 m end, 1 jeté, 1 m env), répétez de (à) tout le tour. Bon tricot!
19.08.2024 - 08:18
![]() Bob Anderson wrote:
Bob Anderson wrote:
I would like a written pattern of beret I have trouble following diagram if this is possible
17.08.2024 - 03:58DROPS Design answered:
Dear Bob, we don't make custom patterns. If you have trouble following the diagram you can read the following lesson: https://www.garnstudio.com/lesson.php?id=68&cid=19, and ask us any specific instructions in the charts that seems confusing to you. Happy knitting!
18.08.2024 - 20:37
![]() Elisabeth Johansen wrote:
Elisabeth Johansen wrote:
Jeg strikket 173-21 i 2016 og venninnen min elsket det. Nå vil hun ha nytt så jeg strikker igjen og prøvde meg på 173-43 men ble forvirret, ingenting stemte så jeg fat fram den gamle oppskriften igjen(173-21). Jeg står fast på A3 (rundp. 4) 4. omg. 4 maske inn er det en helt sort rute, skal jeg bare løfte masken av? Og hvis jeg skal strikke siste vrange maske på omg., så må jeg ta en maske av det som har vært 16 m gl.strikk på tidligere omg. Stemmer det?
28.07.2024 - 17:24DROPS Design answered:
Hej Elisabeth, husk at du strikker ifølge diagrammerne fra nederste højre hjørne og opad (nøjagtig som du strikker maskerne). Første pind i A.3 består af 12 masker, den sorte rude bliver først til en maske når du har taget ud med et omslag på 2.pind i diagrammet :)
02.08.2024 - 09:12
![]() Barbara Siegel wrote:
Barbara Siegel wrote:
Angefangen die Basce zu Stricken. Nach dem Muster A1 fehlen ja hier noch einige Muster aber es ist geschrieben dass man nach A1 bereits in das Bündchen Muster übergeht?
23.07.2024 - 06:57DROPS Design answered:
Liebe Barbara, das, was Ihnen als fehlende Muster vorkommt, ist bereits in A.1 enthalten. Sie sehen in der Strickschrift die vier übereinander liegenden Verzopfungen, die Sie auch auf dem Foto erkennen können. Es ist also korrekt, dass Sie einfach A.1 zu Ende stricken und dann zum Rippenmuster übergehen. Viel Spaß beim Weiterstricken!
23.07.2024 - 09:57
![]() Elisabeth Johansen wrote:
Elisabeth Johansen wrote:
Hei! Jeg har strikket dette før når det het 173-21 og den jeg strikket det til elsket det. jeg sliter litt for oppskriften fra 2016 og denne virker veldig forskjellig(173-43. Når jeg strikker baskerlua og følger diagram A.1 str L skal det være 14 eller 16 m? Og begynner jeg nederst på diagrammet?
16.07.2024 - 15:28DROPS Design answered:
Hej Elisabeth. Diagram A.1 i storlek M/L börjar med 2 maskor (diagrammen läses alltid nedifrån och upp, från höger till vänster). Du lägger upp 14 maskor från börjar och stickar då alltså diagram A.1 7 gånger. Mvh DROPS Design
17.07.2024 - 12:01
![]() Laura wrote:
Laura wrote:
Ik ben de halswarmer aan het breien en onzeker over A2, het zwarte vakje. Haal ik deze steek enkel recht af? Ik kom namelijk aan het eind niet uit met het aantal herhalingen.(9x)
06.05.2024 - 00:24DROPS Design answered:
Dag Laura,
Met het zwarte vakje hoef je niets te doen. Dit is geen steek. Als je het telpatroon uit zou knippen, dan zou je dit vlakje eruit moeten knippen en de andere vlakjes tegen elkaar aan schuiven. De eerste naald is dus steeds 2 recht, 3 averecht.
08.05.2024 - 11:23
|
|||||||||||||||||||||||||||||||||||||||||||||||||||||||||||||
Hello Sunshine#hellosunshineset |
|||||||||||||||||||||||||||||||||||||||||||||||||||||||||||||
 |
 |
||||||||||||||||||||||||||||||||||||||||||||||||||||||||||||
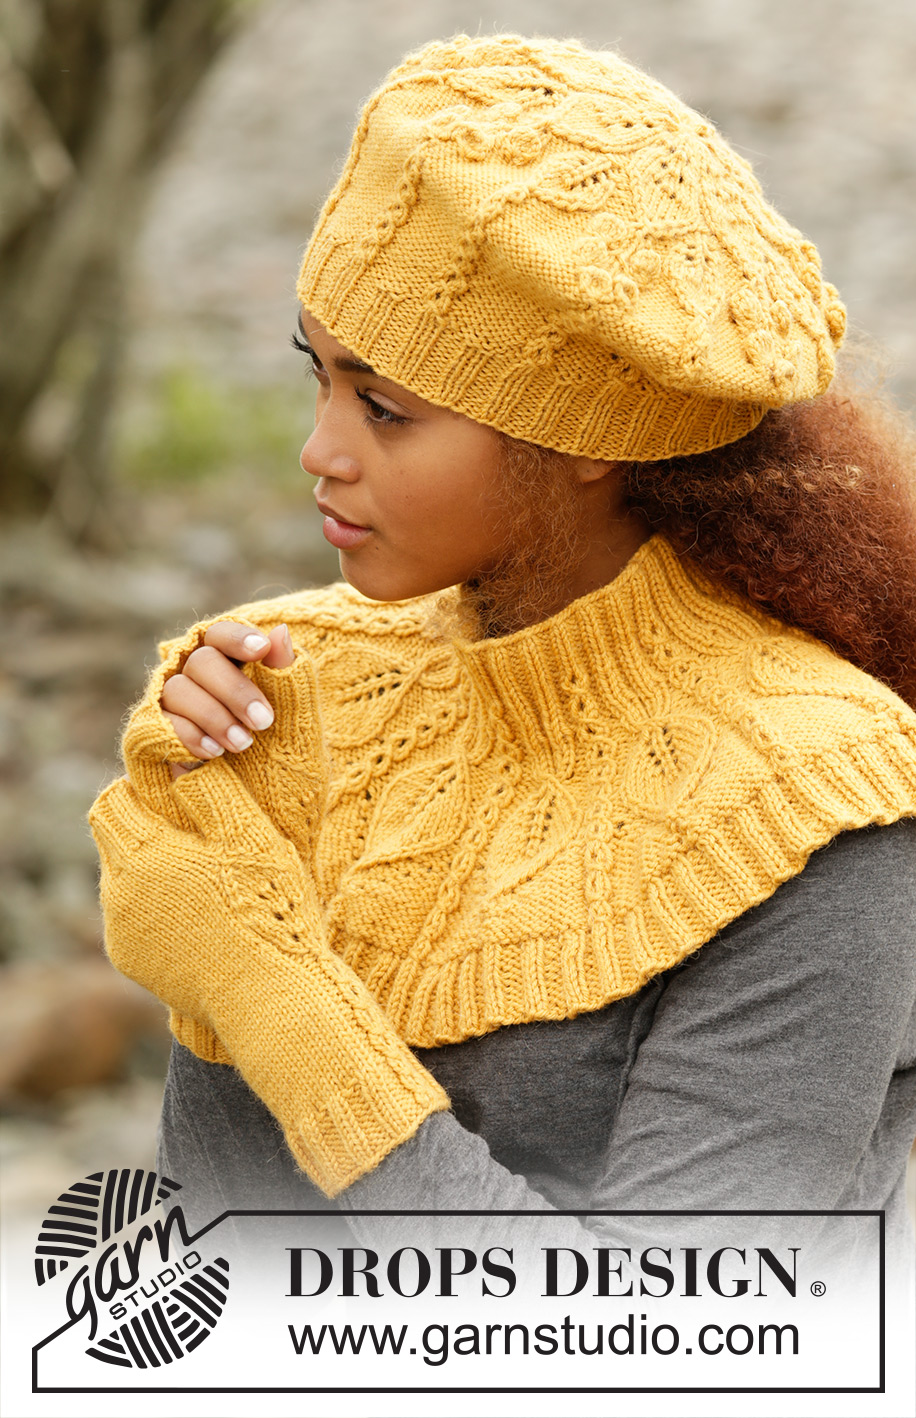
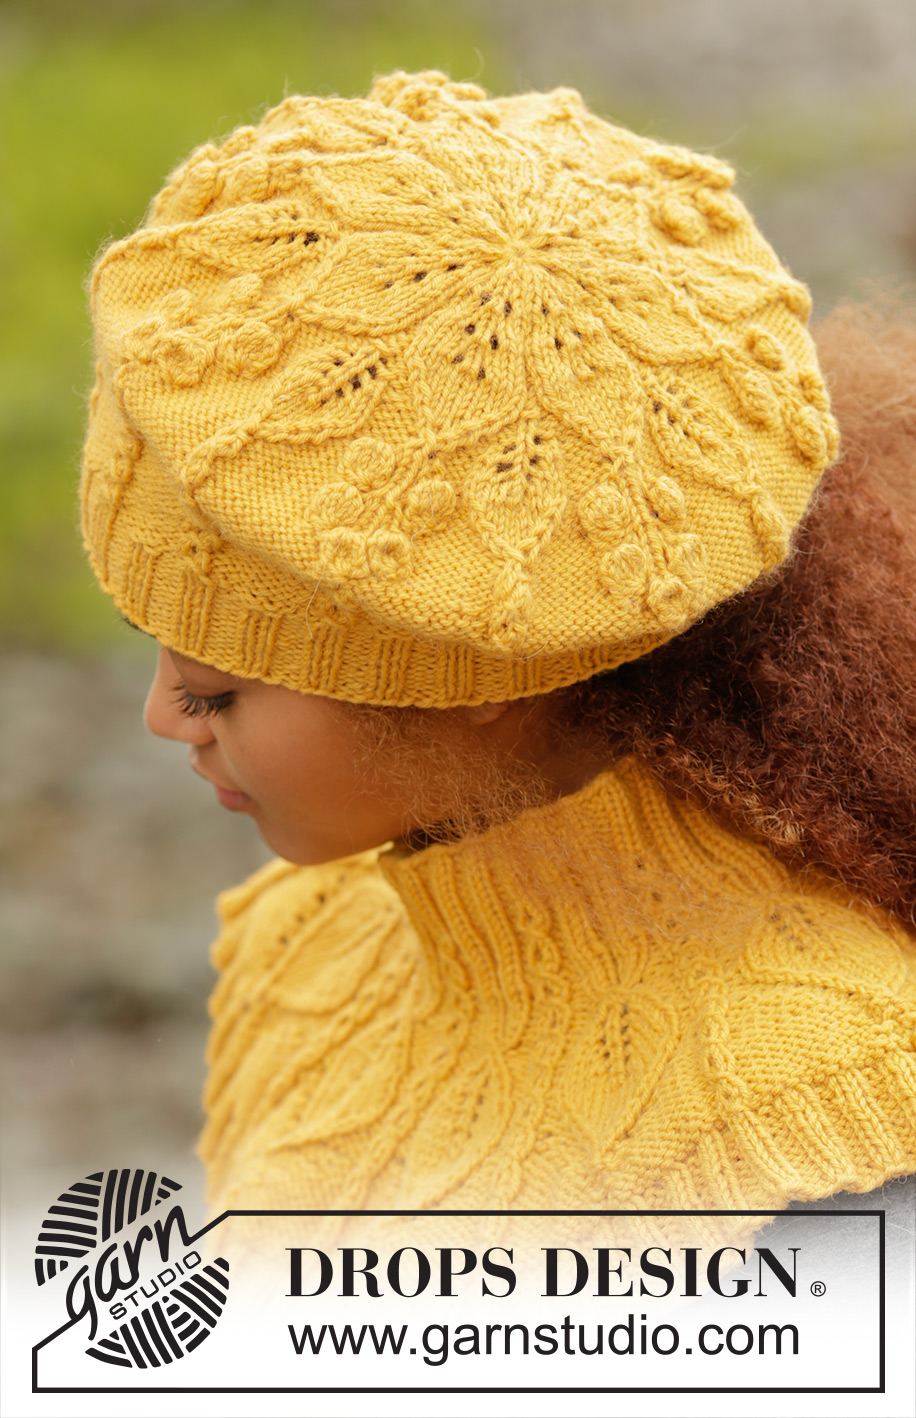
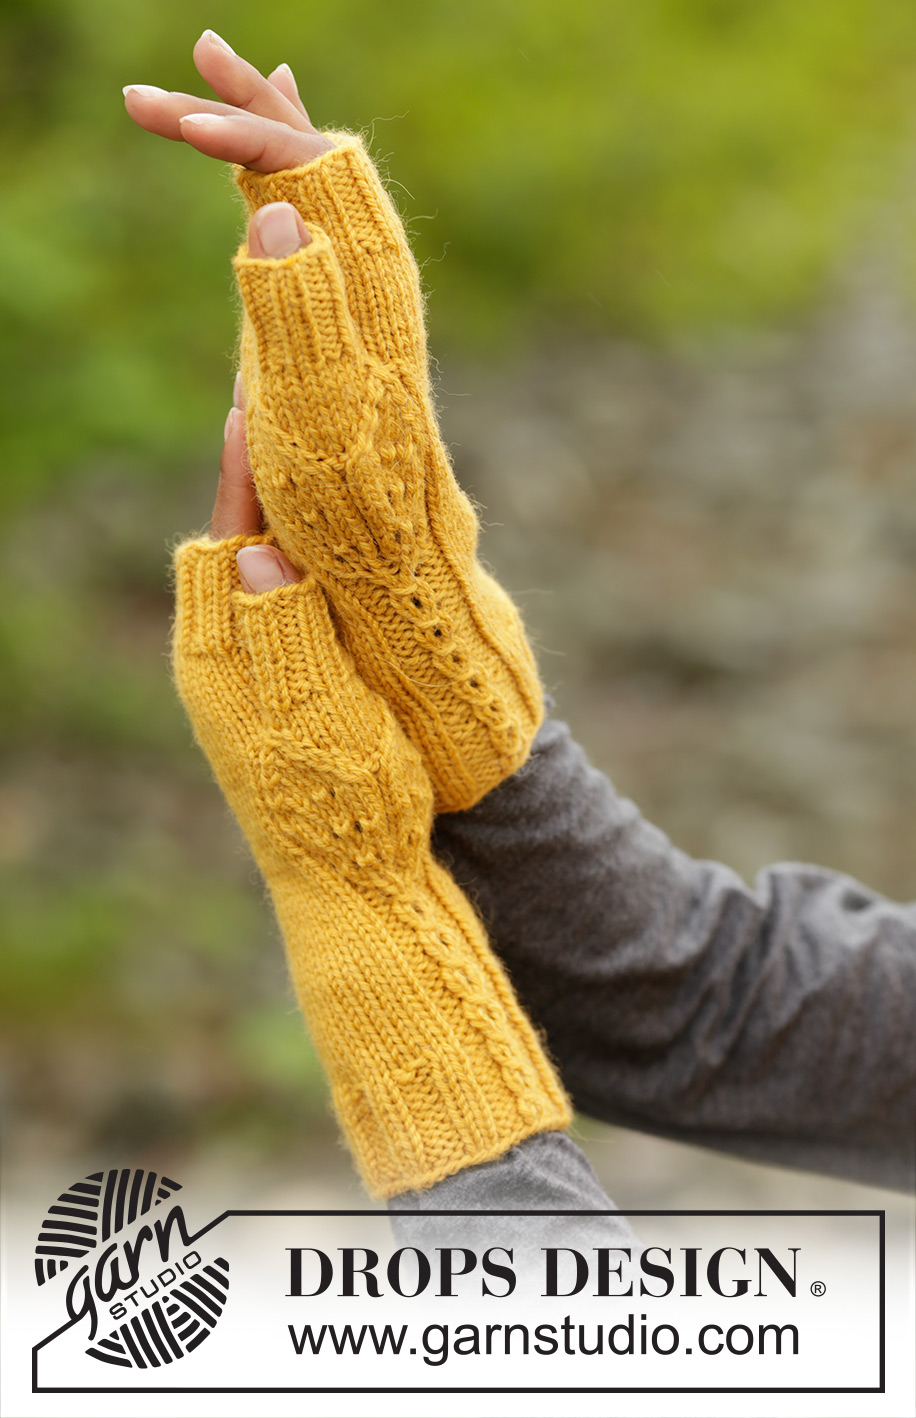
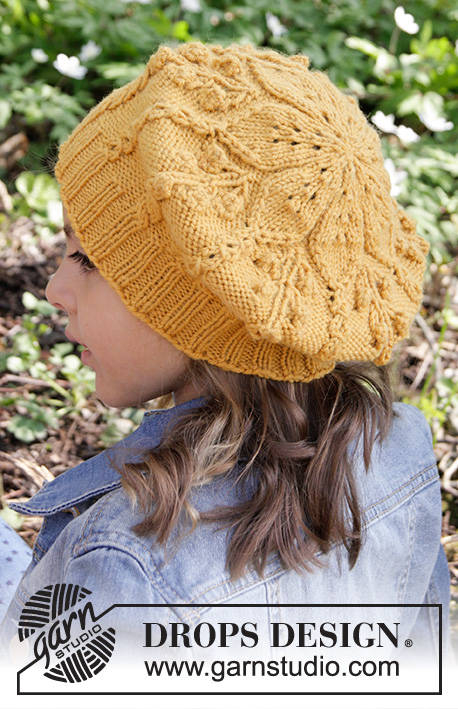
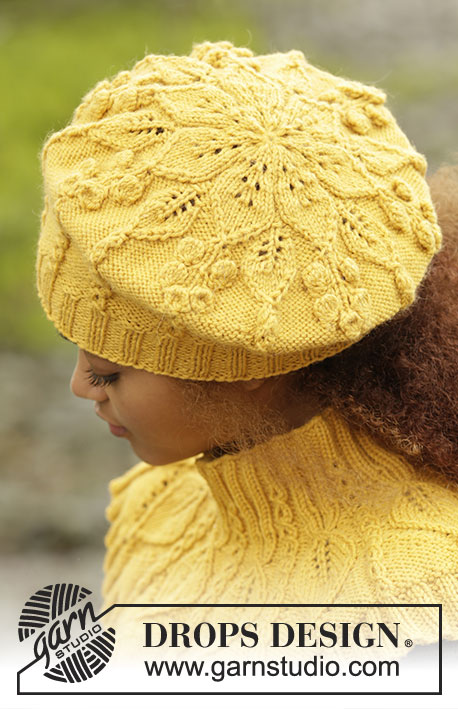
Set consists of: Knitted DROPS beret and neck warmer with leaf pattern worked top down in ”Lima” and DROPS wrist warmers with leaf pattern in “Lima”.
DROPS 173-43 |
|||||||||||||||||||||||||||||||||||||||||||||||||||||||||||||
|
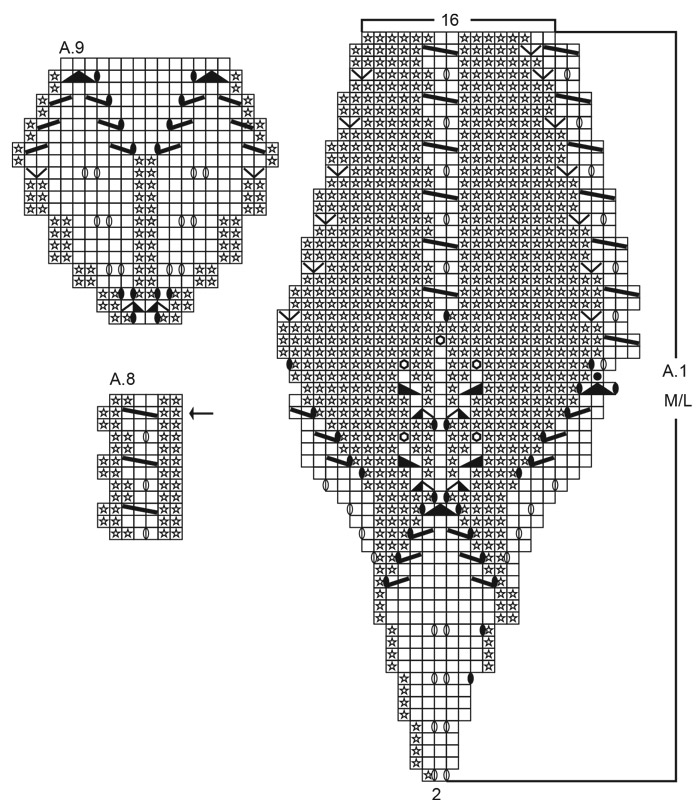
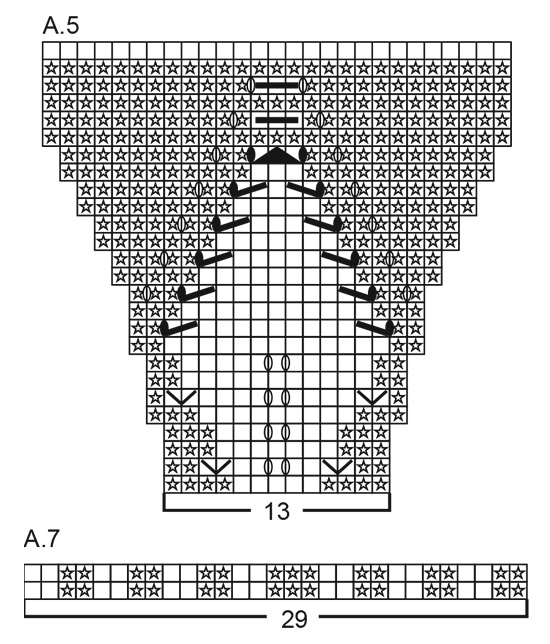
BERET: PATTERN: See diagram A.1 (choose diagram for correct size). MAGIC CIRCLE: To avoid hole in the middle beg with this technique: Hold yarn end in the left hand and make a loop around left index finger (from left to right). Hold the loop with left thumb and index finger. Insert needle through loop, get yarn from ball (i.e. place yarn 1 time over needle from you), pull yarn back through loop, 1 YO (now place yarn from the back and towards you) and pull YO through sts on needle, * insert needle through loop, 1 YO (place yarn from the back and towards you), pull YO through loop, 1 YO (from the back and towards you) and pull YO through outermost st on right needle (i.e. the last st made) *, repeat from *-* until there are 14 sts on needle. Distribute sts on 4 double pointed needles size 3.5 mm as explained in pattern. Then work as explained in pattern – AT THE SAME TIME pull yarn end so that loop is tighten tog and the hole disappears. CAST-OFF TIP: Make 1 YO after approx. every 4th st while casting off (cast off YO as a st) to make the cast-off edge more elastic. ---------------------------------------------------------- BERET: Work in the round on double pointed needles top down, switch to circular needle when needed. Beg with MAGIC CIRCLE - see explanation above and cast on 14 sts with Lima as explained above – NOTE: If you do not want to start with a magic circle cast on 14 sts on double pointed needles size 3.5 mm with Lima (when beret is done baste a yarn up and down through sts around hole at the top and tighten tog). Distribute sts on 4 double pointed needles size 3.5 mm with 4 sts on each of the first 3 needles and 2 sts on last needle. Then work pattern according to diagram A.1 (choose diagram for correct size = 7 repetitions of 2 sts). REMEMBER THE KNITTING TENSION When A.1 has been worked, there are 112 sts on needle in both sizes and piece measures approx. 19-21 cm from the top down. Switch to circular needle size 3 mm and work rib in the round (= K 2/P 2) – adjust to work 2 K over every pattern border and P 2 + K 2 + P 2 between every pattern border. When rib measures 3-4 cm (or desired measurements), cast off with K over K and P over P - READ CAST-OFF TIP. ---------------------------------------------------------- NECK WARMER: PATTERN: See diagrams A.2 to A.7. INCREASE TIP: Inc 1 st in transition between P and K by making 1 YO. On next round P YO twisted to avoid holes. ---------------------------------------------------------- NECK WARMER: Worked in the round on circular needle, top down. Cast on 120-135 sts on circular needle size 3.5 mm with Lima. K 1 round. Then work rib in the round = K 2/P 3. When rib measures 3-4 cm, switch to circular needle size 4 mm. Then work pattern in the round according to diagram A.2 (= 8-9 repetitions of 15 sts) until A.2 has been worked 2 times in total vertically – AT THE SAME TIME on last round dec all 3 P to 2 P (dec 1 st by P 2 tog = 24-27 sts dec) = 96-108 sts on needle. Now work 1 repetition vertically according to diagram A.3 the same way. After A.3 piece measures approx. 7-8 cm. Then work pattern according to diagram A.4 (= 8-9 repetitions of 12 sts). When A.4 has been worked 1 time vertically, there are 128-144 sts on needle (incl YOs in pattern) - NOTE: Finish last round when 2 sts remain on round, insert 1 marker (round beg here now). Work next round as follows: * Work A.5 (= 13 sts), A.6 (= 3 sts) *, repeat from *-* 8-9 times in total. Continue pattern like this and inc as shown in diagram. REMEMBER THE KNITTING TENSION! When A.5 has been worked, there are 232-261 sts on needle. Switch to circular needle size 3.5 mm and work rib in the round according to diagram A.7 (= 8-9 repetitions of 29 sts). AT THE SAME TIME after 2 round rib inc every other 2 P to 3 P - READ INCREASE TIP = 256-288 sts. After the next 2 round inc the remaining 2 P to 3 P = 280-315 sts. When rib measures 3-4 cm, loosely cast off with K over K and P over P. Neck warmer measures approx. 21-23 cm from top and down. ---------------------------------------------------------- WRIST WARMER: PATTERN: See diagrams A.8 and A.9. ---------------------------------------------------------- RIGHT WRIST WARMER: Worked in the round on double pointed needles. Cast on 50-55 sts on double pointed needles size 3 mm with Lima. K 1 round. Work next round as follows: * K 2, P 3 *, repeat from *-* 4-5 times in total, K 2, P 1, work pattern according to diagram A.8 (= 6 sts), P 1, repeat from *-* 4-4 times in total. Continue rib and A.8 like this until piece measures 3 cm. Now dec 3 P to 2 P the entire round = 40-44 sts. Switch to double pointed needles size 3.5 mm, work next round as follows: Work 18-22 sts in stocking st, continue A.8 and finish with 16-20 sts in stocking st. REMEMBER THE KNITTING TENSION When piece measures 8-9 cm (ending after a row like row marked with arrow in diagram), work pattern according to diagram A.9 over A.8 (work the other sts in stocking st). Continue pattern like this and inc and dec as shown in diagram. When A.9 has been worked, there are 48-52 sts on needle and piece measures approx. 15-16 cm. Work 1 round in stocking st and slip AT THE SAME TIME the middle 10 sts in A.9 on a stitch holder for thumb, in addition cast on 2 new sts on needle behind the thumb = 40-44 sts on needle. Continue in the round in stocking st until piece measures 19-20 cm (approx. 3 cm remain until finished measurements – try the wrist warmer on and work to desired measurements). Switch to double pointed needles size 3 mm and K 1 round while at the same time inc 4 sts evenly = 44-48 sts. Then work rib in the round = K 2/P 2 for 3 cm. LOOSELY cast off sts with K over K and P over P. Entire wrist warmer measures approx. 22-23 cm. THUMB: Slip the 10 sts from stitch holder back on double pointed needles size 3.5 mm and pick up 6 new sts behind the thumb = 16 sts. Work 2 rounds in stocking st (make sure to avoid a tight thumb). Then work rib in the round = K 2/P 2 for 3-3½ cm (or desired measurements). Cast off sts with K over K and P over P. LEFT WRIST WARMER: Work as right wrist warmer but reversed, i.e. work first round with rib as follows: * P 3, K 2 *, repeat from *-* 4-4 times in total, P 1, A.8 (= 6 sts), P 1, K 2, repeat from *-* 4-5 times in total. After rib work 16-16 sts in stocking st, A.8 and 18-22 sts in stocking st. |
|||||||||||||||||||||||||||||||||||||||||||||||||||||||||||||
Diagram explanations |
|||||||||||||||||||||||||||||||||||||||||||||||||||||||||||||
|
|||||||||||||||||||||||||||||||||||||||||||||||||||||||||||||
 |
|||||||||||||||||||||||||||||||||||||||||||||||||||||||||||||
 |
|||||||||||||||||||||||||||||||||||||||||||||||||||||||||||||
 |
|||||||||||||||||||||||||||||||||||||||||||||||||||||||||||||
Have you finished this pattern?Tag your pictures with #dropspattern #hellosunshineset or submit them to the #dropsfan gallery. Do you need help with this pattern?You'll find 31 tutorial videos, a Comments/Questions area and more by visiting the pattern on garnstudio.com. © 1982-2026 DROPS Design A/S. We reserve all rights. This document, including all its sub-sections, has copyrights. Read more about what you can do with our patterns at the bottom of each pattern on our site. |
|||||||||||||||||||||||||||||||||||||||||||||||||||||||||||||


With over 40 years in knitting and crochet design, DROPS Design offers one of the most extensive collections of free patterns on the internet - translated to 17 languages. As of today we count 325 catalogues and 12291 patterns translated into English (UK/cm). 12291
We work hard to bring you the best knitting and crochet have to offer, inspiration and advice as well as great quality yarns at incredible prices! Would you like to use our patterns for other than personal use? You can read what you are allowed to do in the Copyright text at the bottom of all our patterns. Happy crafting!
Post a comment to pattern DROPS 173-43
We would love to hear what you have to say about this pattern!
If you want to leave a question, please make sure you select the correct category in the form below, to speed up the answering process. Required fields are marked *.