
Popular categories
Looking for a yarn?


Comments / Questions (71)
![]() Elizabeth-Anne wrote:
Elizabeth-Anne wrote:
Bonjour, Pour les mitaines en S/M? je ne comprends pas le début du motif A9. J'ai terminé A8 au niveau de la flèche, j'ai deux mailles envers, deux endroits entourées, deux mailles envers. Le début du motif A9 deux mailles envers, un jeté, deux mailles endroits, un jeté, deux mailles envers. Est ce bien cela ? Car pour la seconde ligne du motif A9, rien ne tombe comme indiqué, quand je veux la réaliser. Cordialement. Elizabeth-Anne
25.11.2025 - 14:25DROPS Design answered:
Bonjour Elisabeth-Anne, tricotez le 2ème rang de A.9 ainsi: 2 m env, puis tricotez les 4 m suivantes (1 jeté, 2 m end, 1 jeté) ainsi: glissez le jeté sur l'aiguille auxiliaire devant l'ouvrage, tricotez 1 m end et tricotez le jeté torse à l'end, puis glissez 1 m ur l'aiguille auxiliaire derrière l'ouvrage, tricotez le jeté torse à l'end et tricotez la maille en attente à l'endroit, puis 2 m envers. La légende évoque des mailles envers, mais ce sont ici des mailes endroit, je transfère à nos stylistes, merci pour l'info. Bon tricot!
26.11.2025 - 08:22
![]() COUDOR Lydie wrote:
COUDOR Lydie wrote:
Bonjour, mitaine droite taille M/L en cours mais je suis bloquée au rang 2 car les astérisques ne sont pas indiqués pour 2 m end, 1 m env, diagramme 8 de 6 mn, 1 m env à répéter j'imagine 4 ou 5 fois et non 4 fois pour les 2 tailles. S'il vous plaît où sont les astérisques sachant que sur le 55 m, j'ai déjà fait 2 m end, 3 m env 5 fois soit 25 m donc reste 30 m ? Dans l'attente de vous lire, cordialement . Lydie COUDOR
01.11.2025 - 09:20DROPS Design answered:
Bonjour Mme Coudor, tricotez vos 55 m ainsi: 5 fois (2 m end, 3 m env), puis 2 m end, 1 m env, puis les 6 m de A.8, puis 1 m end et tricotez les côtes encore une fois 4 fois comme avant, soit 4 fois (2 m end, 3 m env), vous avez ainsi: 25+2+1+6+1+20=55. Bon tricot!
03.11.2025 - 07:30
![]() Ann wrote:
Ann wrote:
I read instructions better than diagrams, I'm looking to watch a video of hello sunshine on the graph portions. For graph do I start at the top and go down? As I don't see where the bobble fits into the written instructions
31.10.2025 - 17:09DROPS Design answered:
Hi Ann, how to read knitting diagrams you will find HERE. Please contact me if you have additional questions. Happy knitting!
18.11.2025 - 09:16
![]() HACQUARD wrote:
HACQUARD wrote:
Rebonjour. Pour le tour de cou, a la fin de A 5 il reste 27 mailles par dessin, 29 pour commencer les côtes. Est ce qu'il y a des mailles 2mailles de A 6 avant les côtes. Merci de votre réponse.
21.12.2024 - 14:43DROPS Design answered:
Bonjour Mme Hacquard, quand A.5 est terminé, tricotez A.7 sur toutes les mailles du tour autrement dit répétez 8 ou 9 fois (cf taille) les 27 mailles de A.5 + les 2 mailles de A.6 (29x8-9=232-261. Bon tricot!
02.01.2025 - 09:49
![]() HACQUARD wrote:
HACQUARD wrote:
Bonjour Je vous remercie de votre réponse. Là, j'ai un problème avec le tour de cou. Je ne comprends pas combien de fois il faut tricoter les 4rangs du diagramme A6en hauteur. Je vous remercie d'avance.
21.12.2024 - 11:38DROPS Design answered:
Bonjour Mme Hacquard, répétez A.6 en hauteur en même temps que vous continuez A.5, autrement dit, quand A.6 est terminé, reprenez au 1er tour et continuez A.5 en même temps. Bon tricot!
02.01.2025 - 09:43
![]() Hacquard wrote:
Hacquard wrote:
Bonjour. Dans le diagramme A1 au rang 34, j\' ai 10 mailles apres l\'augmentation au lieu de 9 et à la fin de ce meme rang 34 j\' ai 8 mailles envers et sur le diagramme c\'est 9. Il y a bien 26 mailles au rang 33 ?? 27 au rang 34 ??. Je vous remercie de m\'eclairer.
17.12.2024 - 06:28DROPS Design answered:
Bonjour Mme Haquard, il y a bien 26 m au tour 33, et au tour 34, on augmente 1 maille dans la 1ère maille (3ème symbole), on a ainsi 27 mailles au tour 34. Bon tricot!
18.12.2024 - 09:13
![]() HACQUARD wrote:
HACQUARD wrote:
Bonjour. Je vous remercie grandement pour votre réponse. Vos explications sont très claires Merci beaucoup
13.12.2024 - 09:16
![]() HACQUARD wrote:
HACQUARD wrote:
Bonjour. Je vous remercie grandement pour votre réponse. Vos explications sont très claires Merci beaucoup
13.12.2024 - 09:11
![]() Hacquard wrote:
Hacquard wrote:
Bonjour. Tout d'abord merci pour votre réponse à ma précédente question. Aujourd'hui à propos du diagramme A1, au rang 33, j'aimerais que vous me disiez exactement comment on commence à tricoter les 8 premières mailles de ce rang 33 s'il vous plait. Je vous remercie grandement de votre réponse.
10.12.2024 - 14:28DROPS Design answered:
Bonjour Mme Hacquard, au 33ème tour de A.1 (commencez ce tour avec la dernière maille du 32ème tour sur l'aiguille gauche) et tricotez ainsi: 1 jeté (qui sera tricoté torse au tour suivant), glissez 1 m à l'end (la dernière m du tour puis la dernière m end du motif précédent), 2 m ens à l'end, passez la m glissée par-dessus la m tricotée, 1 jeté (tricoté torse au tour suivant), 8 m env, glissez 1 m derrière, 1 m end, tricotez la m à l'env, 1 m env, 1 m end, glissez 1 m devant, 1 m env, tricotez la m à l'end, 8 m env. Bon tricot!
11.12.2024 - 09:38
![]() Hacquard wrote:
Hacquard wrote:
Bonjour. A propos du béret, j'aimerais savoir si au deuxième rang du diagramme A1 il y a bien 28 mailles en tout 4fois 7 - 3 endroit et une envers dans chaque dessin. Je vous remercie de votre réponse.
08.12.2024 - 22:43DROPS Design answered:
Bonjour Mme Hacquard, tout à fait, on répète 7 fois le diagramme, et, au 1er tour on augmente 2 m dans chaque motif, on va ainsi avoir 4 m au 2ème tour x 7 motifs = 28 mailles sur l'aiguille. Bon tricot!
09.12.2024 - 09:25
|
|||||||||||||||||||||||||||||||||||||||||||||||||||||||||||||
Hello Sunshine#hellosunshineset |
|||||||||||||||||||||||||||||||||||||||||||||||||||||||||||||
 |
 |
||||||||||||||||||||||||||||||||||||||||||||||||||||||||||||
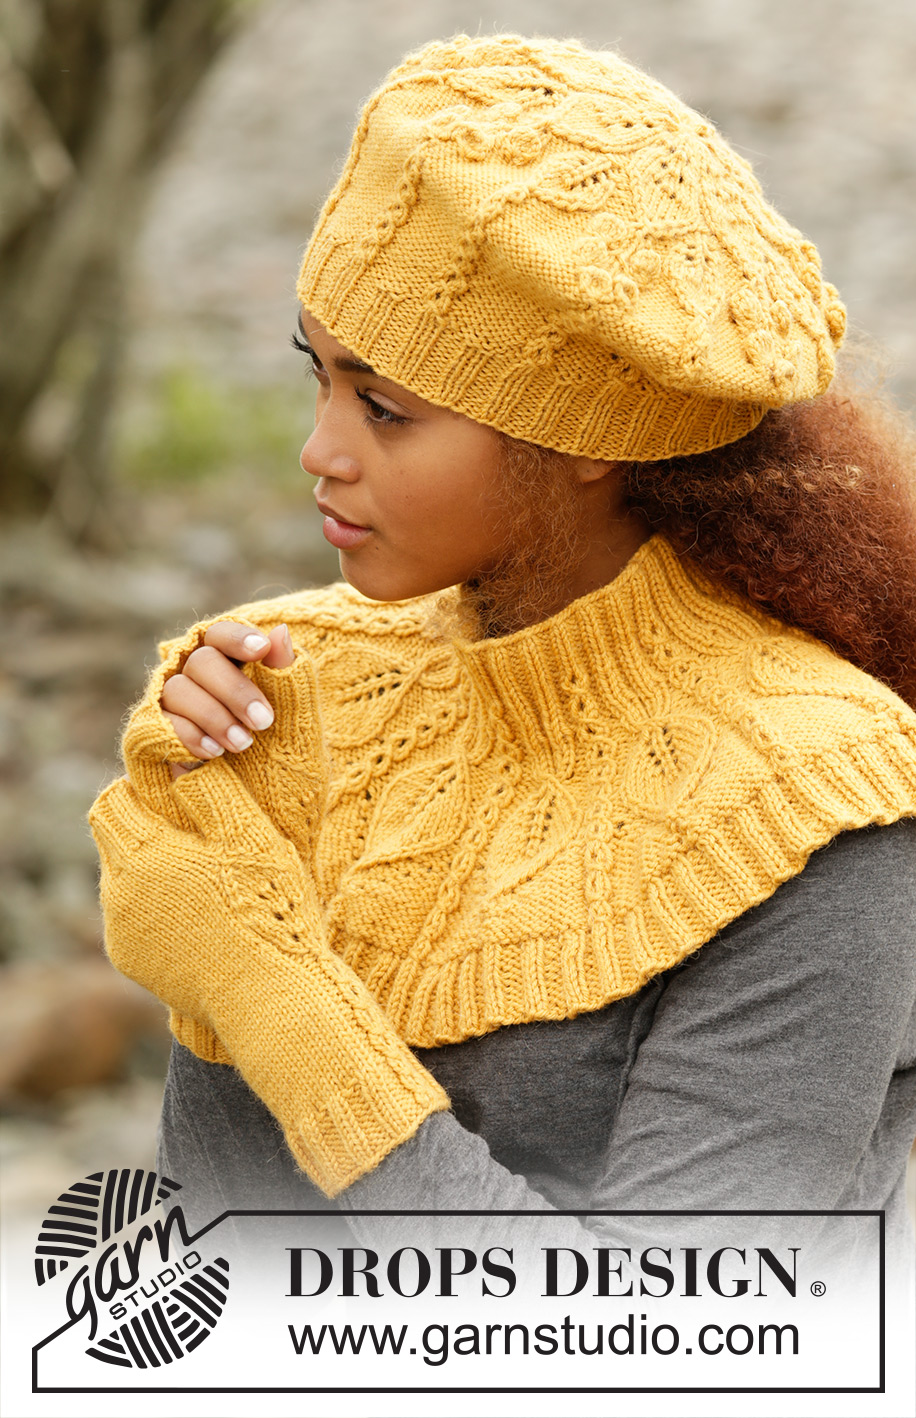
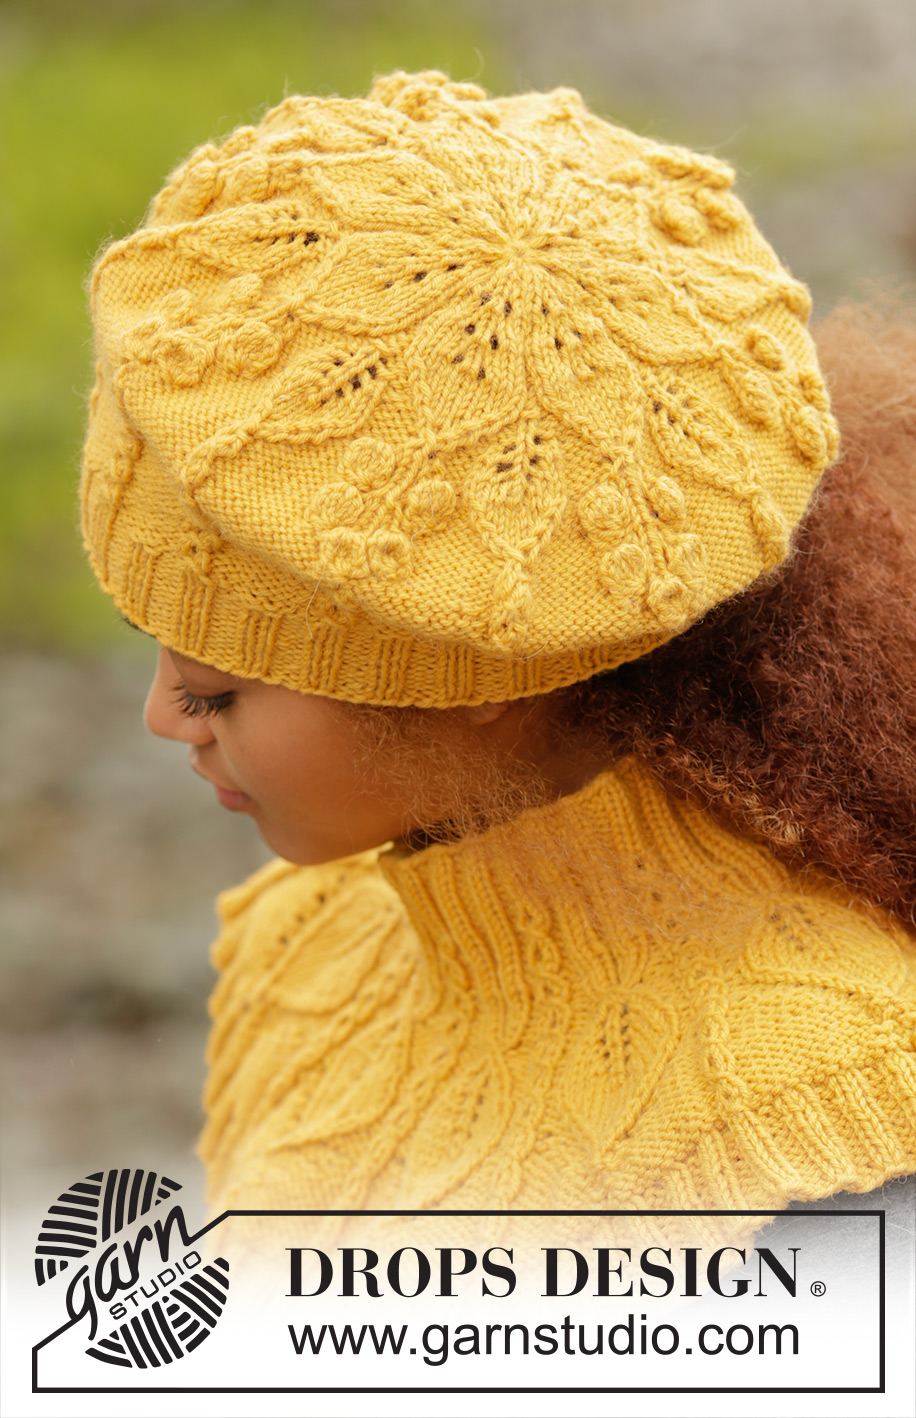
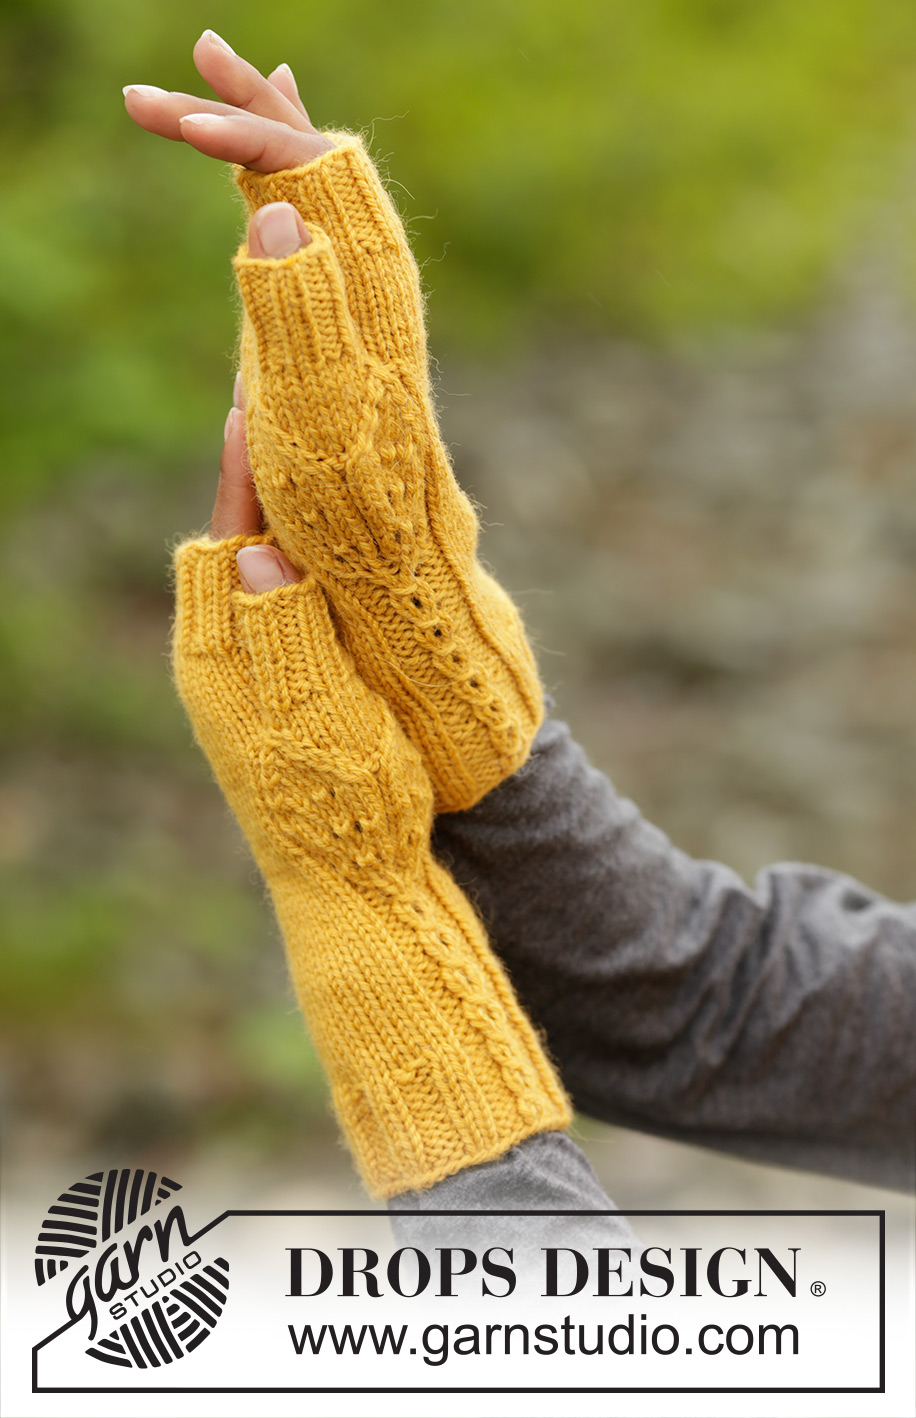
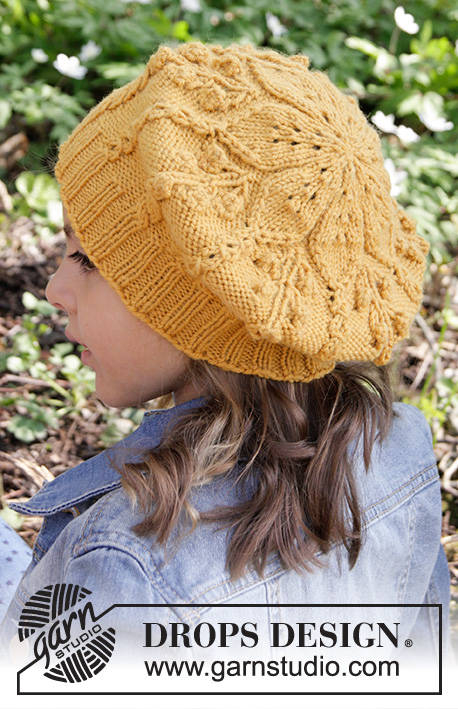
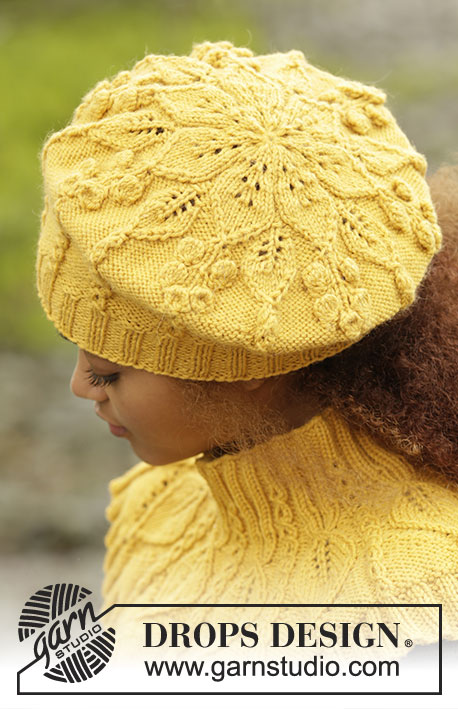
Set consists of: Knitted DROPS beret and neck warmer with leaf pattern worked top down in ”Lima” and DROPS wrist warmers with leaf pattern in “Lima”.
DROPS 173-43 |
|||||||||||||||||||||||||||||||||||||||||||||||||||||||||||||
|
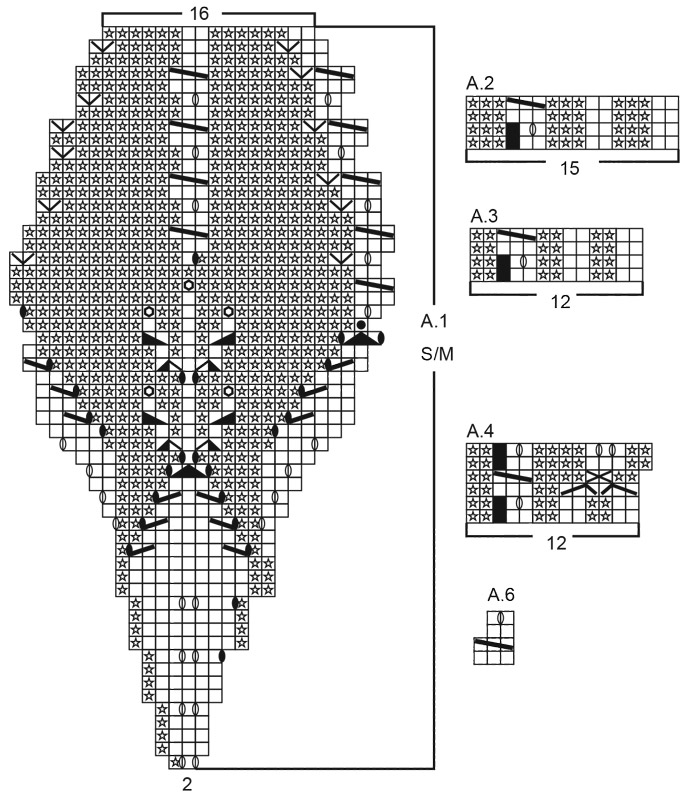
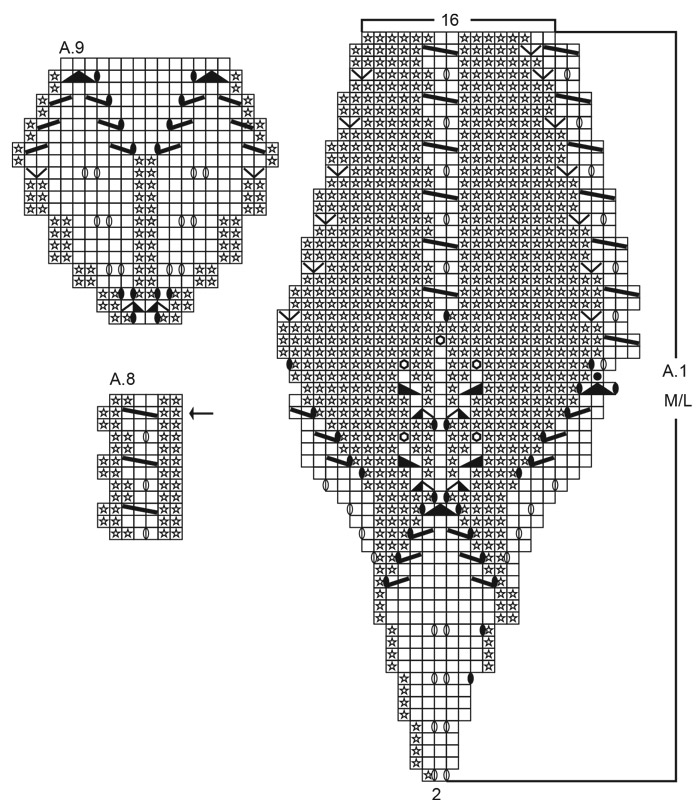
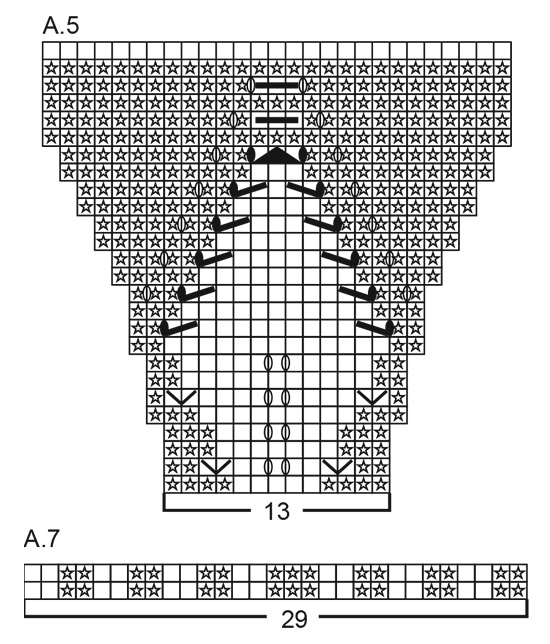
BERET: PATTERN: See diagram A.1 (choose diagram for correct size). MAGIC CIRCLE: To avoid hole in the middle beg with this technique: Hold yarn end in the left hand and make a loop around left index finger (from left to right). Hold the loop with left thumb and index finger. Insert needle through loop, get yarn from ball (i.e. place yarn 1 time over needle from you), pull yarn back through loop, 1 YO (now place yarn from the back and towards you) and pull YO through sts on needle, * insert needle through loop, 1 YO (place yarn from the back and towards you), pull YO through loop, 1 YO (from the back and towards you) and pull YO through outermost st on right needle (i.e. the last st made) *, repeat from *-* until there are 14 sts on needle. Distribute sts on 4 double pointed needles size 3.5 mm as explained in pattern. Then work as explained in pattern – AT THE SAME TIME pull yarn end so that loop is tighten tog and the hole disappears. CAST-OFF TIP: Make 1 YO after approx. every 4th st while casting off (cast off YO as a st) to make the cast-off edge more elastic. ---------------------------------------------------------- BERET: Work in the round on double pointed needles top down, switch to circular needle when needed. Beg with MAGIC CIRCLE - see explanation above and cast on 14 sts with Lima as explained above – NOTE: If you do not want to start with a magic circle cast on 14 sts on double pointed needles size 3.5 mm with Lima (when beret is done baste a yarn up and down through sts around hole at the top and tighten tog). Distribute sts on 4 double pointed needles size 3.5 mm with 4 sts on each of the first 3 needles and 2 sts on last needle. Then work pattern according to diagram A.1 (choose diagram for correct size = 7 repetitions of 2 sts). REMEMBER THE KNITTING TENSION When A.1 has been worked, there are 112 sts on needle in both sizes and piece measures approx. 19-21 cm from the top down. Switch to circular needle size 3 mm and work rib in the round (= K 2/P 2) – adjust to work 2 K over every pattern border and P 2 + K 2 + P 2 between every pattern border. When rib measures 3-4 cm (or desired measurements), cast off with K over K and P over P - READ CAST-OFF TIP. ---------------------------------------------------------- NECK WARMER: PATTERN: See diagrams A.2 to A.7. INCREASE TIP: Inc 1 st in transition between P and K by making 1 YO. On next round P YO twisted to avoid holes. ---------------------------------------------------------- NECK WARMER: Worked in the round on circular needle, top down. Cast on 120-135 sts on circular needle size 3.5 mm with Lima. K 1 round. Then work rib in the round = K 2/P 3. When rib measures 3-4 cm, switch to circular needle size 4 mm. Then work pattern in the round according to diagram A.2 (= 8-9 repetitions of 15 sts) until A.2 has been worked 2 times in total vertically – AT THE SAME TIME on last round dec all 3 P to 2 P (dec 1 st by P 2 tog = 24-27 sts dec) = 96-108 sts on needle. Now work 1 repetition vertically according to diagram A.3 the same way. After A.3 piece measures approx. 7-8 cm. Then work pattern according to diagram A.4 (= 8-9 repetitions of 12 sts). When A.4 has been worked 1 time vertically, there are 128-144 sts on needle (incl YOs in pattern) - NOTE: Finish last round when 2 sts remain on round, insert 1 marker (round beg here now). Work next round as follows: * Work A.5 (= 13 sts), A.6 (= 3 sts) *, repeat from *-* 8-9 times in total. Continue pattern like this and inc as shown in diagram. REMEMBER THE KNITTING TENSION! When A.5 has been worked, there are 232-261 sts on needle. Switch to circular needle size 3.5 mm and work rib in the round according to diagram A.7 (= 8-9 repetitions of 29 sts). AT THE SAME TIME after 2 round rib inc every other 2 P to 3 P - READ INCREASE TIP = 256-288 sts. After the next 2 round inc the remaining 2 P to 3 P = 280-315 sts. When rib measures 3-4 cm, loosely cast off with K over K and P over P. Neck warmer measures approx. 21-23 cm from top and down. ---------------------------------------------------------- WRIST WARMER: PATTERN: See diagrams A.8 and A.9. ---------------------------------------------------------- RIGHT WRIST WARMER: Worked in the round on double pointed needles. Cast on 50-55 sts on double pointed needles size 3 mm with Lima. K 1 round. Work next round as follows: * K 2, P 3 *, repeat from *-* 4-5 times in total, K 2, P 1, work pattern according to diagram A.8 (= 6 sts), P 1, repeat from *-* 4-4 times in total. Continue rib and A.8 like this until piece measures 3 cm. Now dec 3 P to 2 P the entire round = 40-44 sts. Switch to double pointed needles size 3.5 mm, work next round as follows: Work 18-22 sts in stocking st, continue A.8 and finish with 16-20 sts in stocking st. REMEMBER THE KNITTING TENSION When piece measures 8-9 cm (ending after a row like row marked with arrow in diagram), work pattern according to diagram A.9 over A.8 (work the other sts in stocking st). Continue pattern like this and inc and dec as shown in diagram. When A.9 has been worked, there are 48-52 sts on needle and piece measures approx. 15-16 cm. Work 1 round in stocking st and slip AT THE SAME TIME the middle 10 sts in A.9 on a stitch holder for thumb, in addition cast on 2 new sts on needle behind the thumb = 40-44 sts on needle. Continue in the round in stocking st until piece measures 19-20 cm (approx. 3 cm remain until finished measurements – try the wrist warmer on and work to desired measurements). Switch to double pointed needles size 3 mm and K 1 round while at the same time inc 4 sts evenly = 44-48 sts. Then work rib in the round = K 2/P 2 for 3 cm. LOOSELY cast off sts with K over K and P over P. Entire wrist warmer measures approx. 22-23 cm. THUMB: Slip the 10 sts from stitch holder back on double pointed needles size 3.5 mm and pick up 6 new sts behind the thumb = 16 sts. Work 2 rounds in stocking st (make sure to avoid a tight thumb). Then work rib in the round = K 2/P 2 for 3-3½ cm (or desired measurements). Cast off sts with K over K and P over P. LEFT WRIST WARMER: Work as right wrist warmer but reversed, i.e. work first round with rib as follows: * P 3, K 2 *, repeat from *-* 4-4 times in total, P 1, A.8 (= 6 sts), P 1, K 2, repeat from *-* 4-5 times in total. After rib work 16-16 sts in stocking st, A.8 and 18-22 sts in stocking st. |
|||||||||||||||||||||||||||||||||||||||||||||||||||||||||||||
Diagram explanations |
|||||||||||||||||||||||||||||||||||||||||||||||||||||||||||||
|
|||||||||||||||||||||||||||||||||||||||||||||||||||||||||||||
 |
|||||||||||||||||||||||||||||||||||||||||||||||||||||||||||||
 |
|||||||||||||||||||||||||||||||||||||||||||||||||||||||||||||
 |
|||||||||||||||||||||||||||||||||||||||||||||||||||||||||||||
Have you finished this pattern?Tag your pictures with #dropspattern #hellosunshineset or submit them to the #dropsfan gallery. Do you need help with this pattern?You'll find 31 tutorial videos, a Comments/Questions area and more by visiting the pattern on garnstudio.com. © 1982-2026 DROPS Design A/S. We reserve all rights. This document, including all its sub-sections, has copyrights. Read more about what you can do with our patterns at the bottom of each pattern on our site. |
|||||||||||||||||||||||||||||||||||||||||||||||||||||||||||||


With over 40 years in knitting and crochet design, DROPS Design offers one of the most extensive collections of free patterns on the internet - translated to 17 languages. As of today we count 325 catalogues and 12291 patterns translated into English (UK/cm). 12291
We work hard to bring you the best knitting and crochet have to offer, inspiration and advice as well as great quality yarns at incredible prices! Would you like to use our patterns for other than personal use? You can read what you are allowed to do in the Copyright text at the bottom of all our patterns. Happy crafting!
Post a comment to pattern DROPS 173-43
We would love to hear what you have to say about this pattern!
If you want to leave a question, please make sure you select the correct category in the form below, to speed up the answering process. Required fields are marked *.