
Popular categories
Looking for a yarn?


Comments / Questions (39)
![]() Martina wrote:
Martina wrote:
Stickar strl 1-3 mån. Efter ökn. ska man dela upp maskorna jag får inte det att stämma för jag vet inte om flätan ska tillhöra fram, bakstycket eller ärmarna. När jag delar upp till framstycket delas flätan så att på mitten. Jag får inte det att stämma vid uppdelningen??
12.06.2018 - 23:36DROPS Design answered:
Hej, det ska vara 1 fläta i varje raglanlinje. Vid uppdelningen sätts alltså de flesta av flätans maskor på en tråd till ärm.
13.06.2018 - 17:26
![]() Maune wrote:
Maune wrote:
J'aurais aimé que vous proposiez un échantillon plutot que commencer et tout redéfaire arrivée à la fin de l'empiècement pour pouvoir comparer avec la mesure du bas ! dommage !! merci quand même pour vos modèles gratuits toujours tres beaux.
11.06.2018 - 18:06DROPS Design answered:
Bonjour Mme Maune, vous trouverez les informations sur l'échantillon dans l'en-tête du modèle: 24 m x 48 rangs point mousse = 10 x 10 cm. Bon tricot!
12.06.2018 - 09:04
![]() Diana wrote:
Diana wrote:
Liebes Drops-Team, ich habe eine Frage zu den Knopflöchern. Es heißt, dass die Knopflöcher in den Hin-Reihen gestrickt werden. Das bedeutet aber auch, dass dann das Knopfloch am Anfang der Reihe eingearbeitet werden sollte und nicht am Ende so wie hier beschrieben: Stricken bis noch 4 Maschen in der Reihe sind, 1 Umschlag, 2 Maschen rechts zusammenstricken und 2 Masche rechts. Oder verstehe ich hier was falsch? Viele Grüße, Diana
19.04.2018 - 11:17DROPS Design answered:
Liebe Diana, die Knopflöcher werden an der rechten Blende (beim Tragen gesehen) und die Jacke wird von oben nach unten gestrickt, dh mit linkem Vorderteil angefangen und mit rechten Vorderteil beendet, so werden die Knopflöcher am Ende einer Hinreihe gestrickt. Viel Spaß beim stricken!
19.04.2018 - 11:40
![]() Katarzyna wrote:
Katarzyna wrote:
Co oznacza (w karczku) A.1 ponad 6 następnymi oczkami, i A.2 ponad 6 następnymi oczkami i jak to wykonać? Proszę o odpowiedź. Dziękuję Katarzyna
12.03.2018 - 11:30DROPS Design answered:
Witaj Kasiu! Schematy A.1 i A.2 to warkocze i są wykonywane na 6 oczkach. Najlepiej wyodrębnić sobie te oczka nitkami w kontrastowym kolorze lub markerami, wtedy będziesz wiedziała, gdzie dokładnie ma się znajdować schemat. Np. dla najmniejszego rozmiaru zrobiłabym tak: 11 oczek ściegiem francuskim (= lewy przód), NITKA/MARKER, A.1 (= 6 oczek), NITKA/MARKER, 10 oczek ściegiem francuskim (= lewy rękaw), NITKA/MARKER, A.2 (= 6 oczek), NITKA/MARKER , 14 oczek ściegiem francuskim (= tył), itd. Powodzenia!
12.03.2018 - 15:14
![]() Katarzyna wrote:
Katarzyna wrote:
Co oznacza A.1 ponad 6 następnymi oczkami, i A.2 ponad 6 następnymi oczkami i jak to wykonać? Proszę o odpowiedź. Dziękuję Katarzyna
09.03.2018 - 22:12
![]() Katarzyna wrote:
Katarzyna wrote:
I czy dodaje te 8 oczek na karczku po wykonaniu 2 ściągaczy francuskich na prawej czy lewej stronie robótki.? Katarzyna
08.03.2018 - 17:30DROPS Design answered:
Witaj Katarzyno! Oczka należy dodać równomiernie. Jak to zrobić znajdziesz TUTAJ. Miłej pracy!
08.03.2018 - 21:25
![]() Katarzyna wrote:
Katarzyna wrote:
Witam, w karczku na początku przerobić 2 ściągacze francuskie, a w ostatnim rzędzie dodać 8 oczek, ale w którym miejscu dodać te 8 oczek i w jaki sposób? Czy to ma być gdzieś w trakcie pracy, czy 8 o. na samym końcu, czy na samym początku, czy 4 na początku , i 4 na końcu? Bardzo proszę o odpowiedź. Katarzyna
08.03.2018 - 17:10DROPS Design answered:
Witaj Katarzyno! Oczka należy dodać równomiernie. Jak to zrobić znajdziesz TUTAJ. Miłej pracy!
08.03.2018 - 21:26
![]() Charlotte wrote:
Charlotte wrote:
Hei. Sitter å strikker på denne i str 0-1 mnd. Etter økningene til ermer står det at man skal sitte igjen med 176 masker på pinnen, og oppskriften videre er lagt opp etter 176 masker. Problemet er at etter økningene sitter man igjen med 184 masker (har regnet på det og følger man oppskriften sitter man igjen med akkurat dette antallet) og ingenting stemmer lengre. Hvordan blir da fordelingen videre?
01.03.2018 - 16:36DROPS Design answered:
Hej Charlotte, du har 80 masker, tager 8 masker ud pr raglan ialt 12 gange = 96+80=176 masker. God fornøjelse!
06.03.2018 - 16:21
![]() Czesława wrote:
Czesława wrote:
Proszę wyjaśnić mi jak zrobić warkocz, gdzie go umiejscowić, jak zrobić reglan?
27.02.2018 - 18:03DROPS Design answered:
Czesiu, warkocze są w miejscu reglanów (warkocz wg schematu A.1 z lewej strony, a wg A.2 z prawej). Ich rozmieszczenie jest opisane w początkowej części opisu karczku. Jak dodawać oczka na reglan: dodawać z każdej strony każdego schematu A.1 i A.2 następująco: dodać (0) 4-5-7-11 (12-16) razy 1 oczko co 2 rzędy i (9) 8-9-9-8 (9-8) razy 1 oczko co 4 rzędy = (152) 176-200-216-240 (256-284) oczka. Wszystko zależy, który rozmiar wykonujesz. Powodzenia!
27.02.2018 - 18:54
![]() Sylvia Milhado wrote:
Sylvia Milhado wrote:
Er staat nergens beschreven op welk moment je met de kabel begint. Ik begrijp nu dat dat waarschijnlijk de bedoeling is zodra je gaat meerderen bij A1 en A2. Klopt dat.
16.12.2017 - 17:36DROPS Design answered:
Hoi Sylvia, Ja dat klopt inderdaad, de kabel zit in A.1 en A.2. Bij de paragraaf over de pas staat aangegeven waar je A.1 en A.2 breit en dat zijn dus de kabels.
17.12.2017 - 20:10
|
||||||||||
Little Explorer#littleexplorerjacket |
||||||||||
|
|
||||||||||
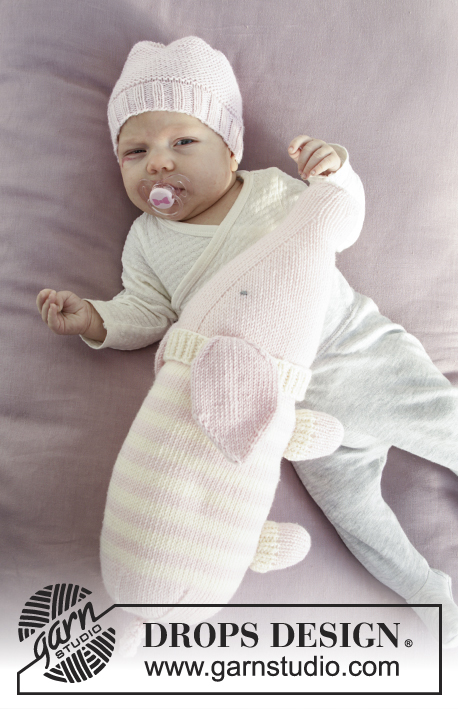
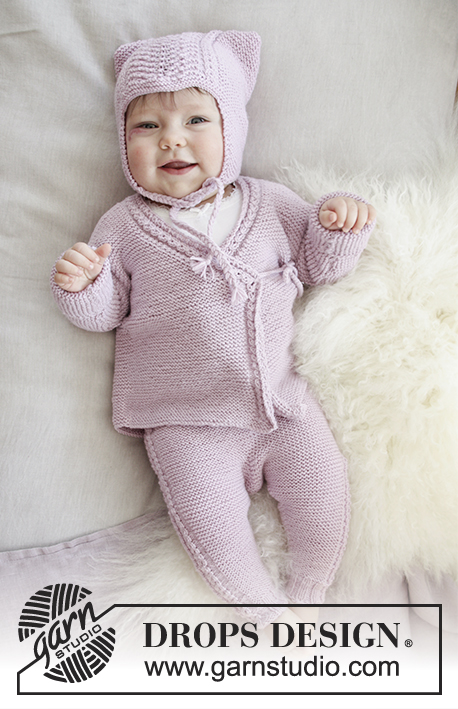
Knitted baby jacket with cables, garter stitch and raglan, worked top down. Sizes: premature – 4 years. The piece is worked in DROPS BabyMerino.
DROPS Baby 29-12 |
||||||||||
|
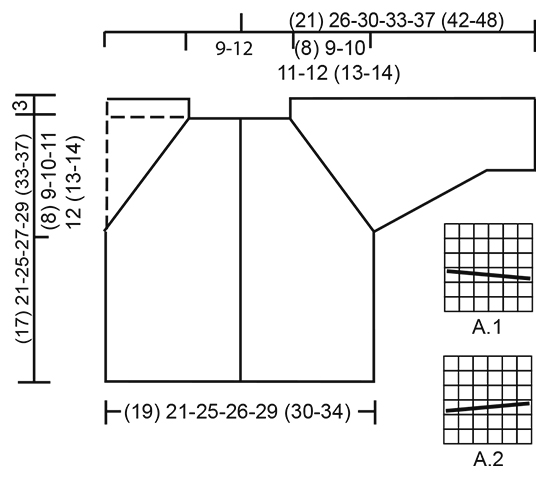
INFORMATION FOR THE PATTERN: RIDGE/GARTER STITCH (worked back and forth): 1 ridge = Knit 2 rows. PATTERN: See diagrams A.1 and A.2. The diagrams show all the rows in the pattern seen from the right side. RAGLAN: All the increases are made from the right side. Increase 8 stitches on a row as follows: Work to the first A.1, 1 yarn over, work A.1, 1 yarn over. Repeat by all A.1 and A.2 (= 2 stitches increased by each cable = 8 stitches in total on the row). On the next row, the yarn overs are knitted twisted to prevent holes. DECREASE TIP (for the sleeves): All decreases are made from the right side! Decrease 1 stitch in each side of the piece as follows: Work 1 stitch in garter stitch, slip 1 stitch as if to knit, knit 1, pass the slipped stitch over (= 1 stitch decreased), work in garter stitch until there are 3 stitches left, knit 2 together (= 1 stitch decreased) and finish with 1 stitch in garter stitch (= a total of 2 stitches decreased). BUTTONHOLES: The first buttonhole is made when the piece measures approx. 1 cm, then make the next (3) 4-4-4-5 (5-5) with approx. 4 cm between them. Decrease from the right side for the buttonholes on the right band (when the garment is worn) as follows: Work until there are 4 stitches left on the needle, make 1 yarn over, knit 2 together and knit 2. On the next row, knit the yarn overs. There will be holes. ---------------------------------------------------------- JACKET: The jacket is worked top down, back and forth on circular needle from mid front. The sleeves are worked back and forth on circular needle and are sewn together at the end. YOKE: Cast on (72) 72-80-80-80 (80-84) stitches (including 4 band stitches in each side towards mid front) with circular needle size 3 mm and Baby Merino. Work 2 RIDGES – see description above and increase 8 stitches on the last row = (80) 80-88-88-88 (88-92) stitches. The next row is worked as follows from the right side – remember BUTTONHOLES on the band – see description above: Work (11) 11-13-13-13 (13-14) stitches in garter stitch (= left front piece), A.1 (= 6 stitches), work 10 stitches garter stitch (= left sleeve), A.2 (= 6 stitches), work (14) 14-18-18-18 (18-20) stitches in garter stitch (= back piece), A.1 over the next 6 stitches, work 10 stitches in garter stitch (= right sleeve), A.2 over the next 6 stitches, work (11) 11-13-13-13 (13-14) stitches in garter stitch (= right front piece). Work 1 row from the wrong side. Increase to RAGLAN – see description above – on each side of every A.1 and A.2 as follows: Increase 1 stitch on every 2nd row (0) 4-5-7-11 (12-16) times, then 1 stitch every 4th row (9) 8-9-9-8 (9-8) times = (152) 176-200-216-240 (256-284) stitches. REMEMBER THE KNITTING TENSION! The piece measures approx. (8) 9-10-11-12 (13-14) cm from the cast-on edge. The next row from the right side is worked as follows: (23) 26-30-32-35 (37-41) stitches in garter stitch, place the next (34) 40-44-48-54 (58-64) stitches on a thread for the sleeve, cast on 7 stitches under the sleeve, work (38) 44-52-56-62 (66-74) stitches in garter stitch, place the next (34) 40-44-48-54 (58-64) stitches on a thread for the sleeve, cast on 7 stitches under the sleeve, work (23) 26-30-32-35 (37-41) stitches in garter stitch = (98) 110-126-134-146 (154-170) stitches. Insert 1 marker in the piece, THE PIECE IS NOW MEASURED FROM HERE! Work garter stitch until the piece measures (9) 12-15-16-17 (20-23) cm from the marker. Cast off. SLEEVE: Place the (34) 40-44-48-54 (58-64) stitches from the thread back on circular needle size 3 mm. Insert 1 marker in the piece, THE PIECE IS NOW MEASURED FROM HERE! Cast on 4 stitches at the end of the next 2 rows (= 4 new stitches in each side of the piece) = (42) 48-52-56-62 (66-72) stitches. Work garter stitch back and forth. When the piece measures 2 cm from the separation, decrease 1 stitch in each side of the piece – READ DECREASE TIP. Decrease in this way every (10th) 8th-8th-6th-6th (8th-8th) row a total of (3) 5-7-9-11 (12-14) times = (36) 38-38-38-40 (42-44) stitches. Continue with garter stitch until the sleeve measures (10) 14-17-18-21 (24-29) cm. Cast off. Work the other sleeve in the same way. ASSEMBLY: Sew together the sleeve seams inside the 1 edge stitch. Sew together the opening under the sleeves. Sew the buttons on to the left front piece. CROCHET EDGE: Crochet an edge along the entire opening of the jacket with hook size 3 mm as follows, begin mid back on neck: * 1 double crochet, 1 chain stitch, skip forward approx.0.5 cm *, repeat from *-* and finish with 1 slip stitch in the first double crochet. |
||||||||||
Diagram explanations |
||||||||||
|
||||||||||
 |
||||||||||
Have you finished this pattern?Tag your pictures with #dropspattern #littleexplorerjacket or submit them to the #dropsfan gallery. Do you need help with this pattern?You'll find 25 tutorial videos, a Comments/Questions area and more by visiting the pattern on garnstudio.com. © 1982-2026 DROPS Design A/S. We reserve all rights. This document, including all its sub-sections, has copyrights. Read more about what you can do with our patterns at the bottom of each pattern on our site. |
||||||||||


With over 40 years in knitting and crochet design, DROPS Design offers one of the most extensive collections of free patterns on the internet - translated to 17 languages. As of today we count 324 catalogues and 12290 patterns translated into English (UK/cm). 12290
We work hard to bring you the best knitting and crochet have to offer, inspiration and advice as well as great quality yarns at incredible prices! Would you like to use our patterns for other than personal use? You can read what you are allowed to do in the Copyright text at the bottom of all our patterns. Happy crafting!
Post a comment to pattern DROPS Baby 29-12
We would love to hear what you have to say about this pattern!
If you want to leave a question, please make sure you select the correct category in the form below, to speed up the answering process. Required fields are marked *.