
Popular categories
Looking for a yarn?


Comments / Questions (210)
![]() Emanuela wrote:
Emanuela wrote:
Io ho lavorato solo per la prima volta il sotto manica con 9 maglie iniziali a dritto. Il resto dei giri li ho eseguiti a punto mais. Ho sbagliato?
12.10.2025 - 16:34DROPS Design answered:
Buonasera Emanuela, dopo aver lavorato le 9 maglie a diritto, deve procedere come indicato nelle spiegazioni. Buon lavoro!
12.10.2025 - 19:38
![]() Louise wrote:
Louise wrote:
Bonjour, je ne comprends pas comment décaler le point fantaisie lors des augmentations sous les manches. Dois-je m’appuyer sur le fait qu’il s’agit de la dernière d’A1 après le marqueur et insérer un nouvel A1 pour les nouvelles mailles ? Idem pour l’augmentation avant le marqueur qui arriverait donc avant la 3eme d’A1 ? Merci beaucoup !
23.09.2025 - 21:56DROPS Design answered:
Bonjour Louise, lorsque vous commencez le point fantaisie des manches, dans les tailles 1, 3 et 6, vous commencez A.1 par les 3 dernières mailles, la 1ère maille du tour est alors 1 maille envers - vous augmenterez de part et d'autre de cette maille envers. Bon tricot!
24.09.2025 - 17:03
![]() Emanuela wrote:
Emanuela wrote:
Se lavoro esattamente il motivo degli schemi, gli intrecci si susseguono ogni 3 ferri (giri) per le trecce piccole, dalla foto paiono più grandi, devo calcolare un giro in più (ferro di ritorno) per ciascuno giro del diagramma?
27.07.2025 - 17:00DROPS Design answered:
Buonasera Emanuela, nel diagramma sono riportati tutti i ferri del diagramma. Buon lavoro!
31.07.2025 - 22:55
![]() Mechtild wrote:
Mechtild wrote:
Hallo , ich bin jetzt bei den verkürzten Reihen am Halsausschnitt Größe M Meine Fragen: sollen zwischen den neu gesetzten Markierern 94 Maschen liegen ? Und wenn ja , dann reduziert sich ja beim Abnehmen die Maschenzahl innerhalb der Markierer in jeder Hinrunde nur um 4 Maschen. Was geschieht mit den Maschen vom vorderen Halsausschnitt ? Für mich momentan noch unverständlich. Danke für Ihre Unterstützung !
22.04.2025 - 15:29DROPS Design answered:
Liebe Mechtild, wenn man die verkürzten Reihen für den Halsausschnitt strickt, wird man immer weniger Maschen stricken, so werden die mittleren Maschen vom Vorderteil nicht gestrickt damit der Halsausschnitt vorne tiefer als der hinten wird. Gleichzeitig nehmen Sie für Raglan wie zuvor ab, so nach der 1. Reihe sind es nur noch 86 M, wenden und nur 83 M stricken (Halsausschnitt ist jetzt symmetrisch); wenden und 80 M stricken und gleichzeitig 8 M für Raglan abnehmen = 72 M sind übrig, wenden, 69 M stricken, usw bis alle verkürzten Reihen fertig sind, dann bis Anfang der Runden stricken. Dann Halsblende stricken. Viel spaß beim Stricken!
23.04.2025 - 07:14
![]() Mechtild wrote:
Mechtild wrote:
Hallo , ich bin jetzt bei den verkürzten Reihen am Halsausschnitt Größe M Meine Fragen: sollen zwischen den neu gesetzten Markierern 94 Maschen liegen ? Und wenn ja , dann reduziert sich ja beim Abnehmen die Maschenzahl innerhalb der Markierer in jeder Hinrunde nur um 4 Maschen. Was geschieht mit den Maschen vom vorderen Halsausschnitt ? Für mich momentan noch unverständlich. Danke für Ihre Unterstützung !
21.04.2025 - 12:52
![]() Mechtild wrote:
Mechtild wrote:
Ich habe begonnen den ersten Ärmel zu stricken. Was heißt " in der Breite" stricken ?
10.03.2025 - 12:41DROPS Design answered:
Liebe Metchild, wenn man "A.1 2-2-2-2-2-3 x in der Breite " liest, mussm man hier die 4 Maschen A.1 insgesamt 2 oder 3 Mal stricken (= über die nächsten 8 - 12 Maschen). Viel Spaß beim Stricken!
10.03.2025 - 13:15
![]() Sonia wrote:
Sonia wrote:
Hello, I started with the serves and don’ t understand the pattern… shouldn’t it begin with a rib, simple rib ? I begónia with the explanation but it starts with diagrams. Só I don’t understand when it says: “Continue like this and repeat the first 2 rounds ? in diagram until 12 rounds have been worked. Now work from the 3rd round ? in diagram as follows: …. Can you help me?
15.02.2025 - 19:31DROPS Design answered:
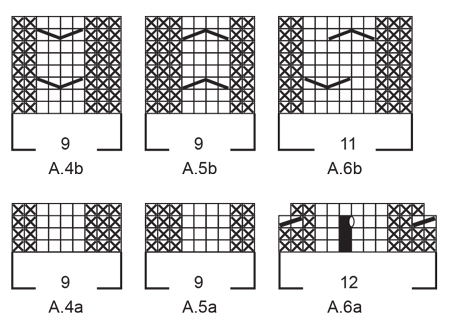
Dear Sonia, you don't start with a fully simple rib: you have rib sections and one repeat of chart A.4a and A.5a of 9 sts each in between these sections, at the middle and end of the round. Then, continue with the established rib over the rib stitches and the first two rounds of each respective chart. Repeat these first 2 rounds of the charts (which are completely identical) while working the rib until you have worked a total of 12 rib and charts rounds. Then work round 3 of the charts and change the rib pattern of the rib stitches as indicated in the next set of instructions. Happy knitting!
17.02.2025 - 01:27
![]() Mechtild wrote:
Mechtild wrote:
Hallo ! ich habe folgende Fragen : Ich möchte den "Rower " in Größe M ( 280 M ) stricken, habe aber Probleme mit den Abnahmen . Laut Anleitung werden einmal 7 Maschen und einmal 9 Maschen abgenommen, was dann wiederholt wird . Also insgesamt 32 M. 280 M - 32 M = 248 M Laut Anleitung müsste ich aber eine Maschenzahl von 236 M haben. Wo liegt der Verständnisfehler, wenn ich davon ausgehe , dass ihre Anleitun g stimmt ? Ich würde mich sehr über eine Klärung freuen !
02.02.2025 - 12:52DROPS Design answered:
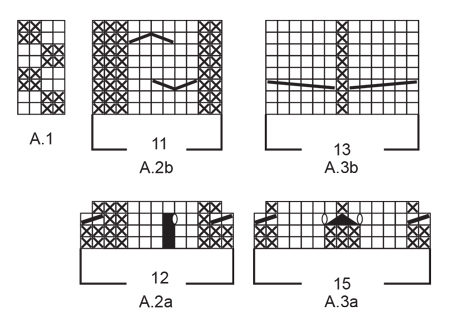
Liebe Mechtild, in den Diagramme muss man auch ab- bzw zu-nehmen: A.2 (11=12-2+1)+A.3a(13=15-4+2)+A.4a(9)+34 (41 M Bündchen - 7)+A.5a(9M)+A.3a (13=15-4+2) + A.6a(11=12-2+1)+18 M Glattrechts (= 27 M Bündchen -9)=11+13+9+34+9+13+11+18=118 x 2 (bis Anfang der Runde wieder) = 236 Maschen. Viel Spaß beim Stricken!
03.02.2025 - 09:38
![]() Floriane wrote:
Floriane wrote:
Bonjour, Dans la section \'dos et devant\', taille M, comment tricoter en respectant le motif de point de blé (répétitions de A1) après les augmentations ? Si je respecte l\'alternance 2 m endroit / 2 m envers, je tricote le premier jeté torse à l\'endroit, le deuxième torse à l\'envers. Mais cela rompt la continuité du motif de point de blé. Pouvez-vous me dire comment faire ? Merci beaucoup.
14.01.2025 - 18:22DROPS Design answered:
Bonjour Floriane, le point fantaisie ne tombera pas juste après la 1ère augmentation, mais après la 2ème, vous aurez augmenté 4 m de chaque côté, soit 1 rapport en largeur du point fantaisie, ces mailles seront tricotées toutes en A.1. Bon tricot!
15.01.2025 - 08:24
![]() Tirmarche wrote:
Tirmarche wrote:
Bonjour, dans le diagramme A2a que veut dire " oas de maille"??
13.12.2024 - 17:49
|
|||||||||||||||||||||||||||||||
The Rower#therowersweater |
|||||||||||||||||||||||||||||||
 |
 |
||||||||||||||||||||||||||||||
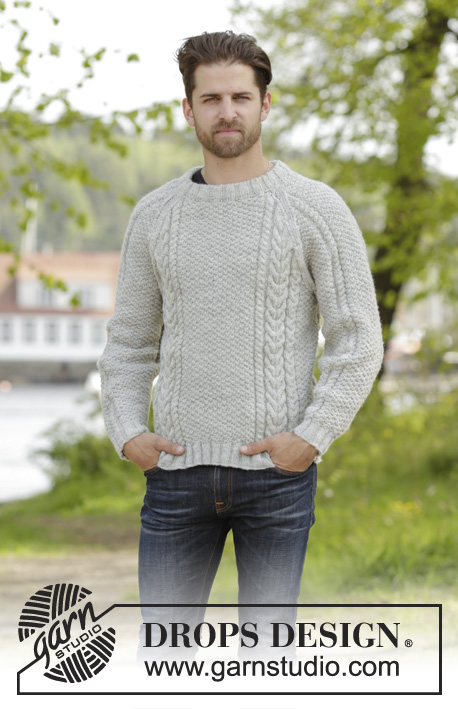
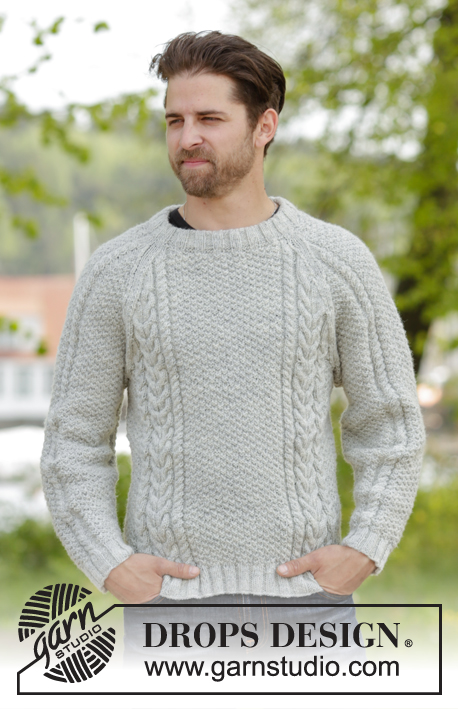
Knitted DROPS men’s jumper with cables, raglan and folding edge at the neck in Karisma. Size: S - XXXL.
DROPS 174-15 |
|||||||||||||||||||||||||||||||
|
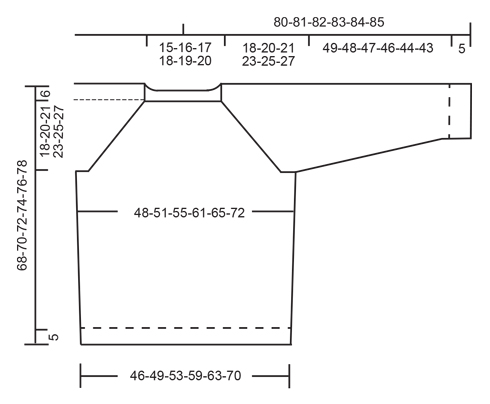
PATTERN: See diagrams A.1 to A.6. INCREASE TIP: Work until 1 st remains before marker, 1 YO, work next 2 (marker is between these sts), 1 YO. On next round work YOs twisted. Work the new sts into the pattern. DECREASE TIP 1 (applies to rib): When dec sts in rib, dec evenly by P 2 tog over sections with P in rib. DECREASE TIP 2 (applies to elevation): All dec are done from RS! Work until 4 sts remain before marker, work the next 3 K tog (= 2 sts dec), work the next 2 K (marker is in the middle of these sts), work the next 3 K twisted tog (= 2 sts dec). Repeat at the other marker. RAGLAN: Dec as follows before marker: Work until 3 sts remain before marker, K 2 tog, K 1 (marker is here). Dec as follows after marker: K 1, slip 1 st as if to K, K 1, psso NOTE: When dec sts in stocking st in diagram A.2, A.3, A.4, A.5 and A.6 (i.e. there is not enough sts for cable), continue with K over K and P over P until all sts in diagram have been dec. ---------------------------------------------------------- JUMPER: Worked in the round. BODY: Cast on 268-280-292-316-340-376 sts with Karisma on circular needle size 3.5 mm. K 1 round. Then work rib as follows: * A.2a (= 12 sts), A.3a (= 15 sts), A.4a (= 9 sts), P 1, (K 3/P 3), repeat from (-) 6-6-7-7-8-8 times in total, K 3, P 1, A.5a (= 9 sts), A.3a, A.6a (= 12 sts), (K 3/P 3), repeat from (-) 3-4-4-6-7-10 times in total, K 3 *, repeat from *-* 1 more time on round. Repeat the first 2 round in diagram and work K over K and P over P the remaining sts until 12 rounds have been worked in total. Now work as follows: * Work 3rd round in diagram over the first 36 sts, the work rib as before over the next 41-41-47-47-53-53 sts AT THE SAME TIME dec 11-7-9-9-11-11 sts evenly - READ DECREASE TIP 1, work 3rd round over the next 36 sts, then work rib as before over the next 21-27-27-39-45-63 sts AT THE SAME TIME dec 7-9-5-5-7-9 sts evenly *, repeat from *-* 1 more time on round = 220-236-252-276-292-324 sts. Work last round in diagram A.2a to A.6.a and K over K and P over P over the remaining sts in rib. Rib measures approx. 5 cm. Switch to circular needle size 4 mm. Now work pattern as follows: * Work A.2b (= 11 sts), A.3b (= 13 sts), A.4b (= 9 sts), work A.1 over the next 28-32-36-36-40-40 sts, work the first 2 sts in A.1, A.5b (= 9 sts), A.3b (= 13 sts), A.6b (= 11 sts), work A.1 over the next 12-16-20-32-36-52 sts, work the first 2 sts in A.1 *, repeat from *-* 1 more time. Continue pattern like this in the round. REMEMBER THE KNITTING TENSION When piece measures 15-15-16-16-17-17 cm, insert 2 markers in piece as follows: Insert 1st marker after 103-109-115-121-127-135 sts and 2nd marker 7-9-11-17-19-27 sts before end of round (= 110-118-126-138-146-162 sts between each of the markers). On next round inc 1 st in each side of marker in each side - Read INCREASE TIP! Repeat inc when piece measures 26-27-27-28-28-29 cm = 228-244-260-284-300-332 sts. When piece measures 44-44-45-45-45-45 cm, work as follows: Work until 5 sts remain before 1st marker, cast off the next 10 sts for armhole (= 5 sts on each side of marker), work until 5 sts remain before 2nd marker, cast off the next 10 sts for armhole (= 5 sts on each side of marker), work the remaining sts on round. There are 104-112-120-132-140-156 sts for both front and back piece. Put piece aside and knit the sleeves. SLEEVES: Worked in the round on double pointed needles/circular needle. Cast on 60-60-66-66-66-72 sts with Karisma on double pointed needles size 3.5 mm. Work rib as follows: K 3, (P 3, K 3) repeat from (-) 3-3-4-4-4-5 times in total, A.4a (= 9 sts), K 3, (P 3, K 3), repeat from (-) 3 times in total for all sizes, A.5a (= 9 sts). Continue like this and repeat the first 2 rounds in diagram until 12 rounds have been worked. Now work from the 3rd round in diagram as follows: Work rib as before over the first 21-21-27-27-27-33 sts AT THE SAME TIME dec 3-3-5-5-5-7 sts evenly, continue over A.4a as before, work rib as before over the next 21 sts AT THE SAME TIME dec 3 sts evenly in all sizes = 54-54-58-58-58-62 sts. Work last round in diagram A.4a to A.5.a and K over K and P over P over the remaining sts. Now continue as follows: K the first 9-9-11-11-11-13 sts, insert a marker here (= mid under sleeve). NOTE: This is done to re-place the start of round. The round starts here now. Change to double pointed needles size 4 mm. Work the last 3-3-1-1-1-3 sts in diagram A.1, then work entire A.1 1-1-2-2-2-2 times in width, work the first 2 sts in A.1, A.4b, work A.1 over the next 18 sts, A.5b, work A.1 2-2-2-2-2-3 times in width and finish with the first 1-1-3-3-3-1 st in A.1. Continue pattern in the round like this. When piece measures 7 cm in all sizes, beg inc under sleeve. READ INCREASE TIP. Inc like this every 12th-9th-9th-7th-6th-6th round 11-5-5-17-15-15 times and every 0-8th-8th-0-5th-5th round 0-10-10-0-4-4 times (= 11-15-15-17-19-19 times in total) = 76-84-88-92-96-100 sts. When piece measures 54-53-52-51-49-48 cm (NOTE: shorter measurements in the larger sizes because of longer yoke), cast off 10 sts mid under sleeve (= 5 sts on each side of marker) = 66-74-78-82-86-90 sts. Knit another sleeve the same way. YOKE: Slip sleeves on to same circular needle size 4 mm as body where armholes were cast off (without working them first) = 340-372-396-428-452-492 sts. Insert 1 marker in every transition between sleeves and body = 4 markers. Continue pattern as before but now work 4 K over every transition between body and sleeves (= 2 K on each side of markers). NOTE: Beg of round is at marker in transition between right sleeve and back piece. AT THE SAME TIME on first round, beg dec for RAGLAN – see explanation above! NOTE: Dec differently on body and sleeves. RAGLAN BODY: Dec like this every other round 17-20-20-22-25-26 times and every round 13-13-15-17-17-22 times (= 30-33-35-39-42-48 times in total). RAGLAN SLEEVES: Dec like this every 4th round 4-3-2-3-4-5 times and every other round 16-21-24-25-26-27 times (= 20-24-26-28-30-32 times in total). When all dec for raglan are done, 140-144-152-160-164-172 sts remain. Work 1 round with pattern as before but finish when 24 sts remain on round in all sizes (= after 2 sts after marker between front piece and right sleeve). Insert a marker here. This is now beg of round. Now work an elevation back and forth in the back of neck as follows: NOTE: Continue with pattern as before and now dec 2 sts on each side of marker in transition between sleeves and back piece (= 8 sts dec on row from RS) - READ DECREASE TIP 2! AT THE SAME TIME work back and forth as follows: ROW 1 (= RS): Work 92-94-98-102-104-108 sts (including the 8 dec sts), ROW 2 (= WS): Turn and work 81-83-87-91-93-97 sts, ROW 3: Turn and work 78-80-84-88-90-94 sts (including the 8 dec sts), ROW 4: Turn and work 67-69-73-77-79-83 sts, ROW 5: Turn and work 64-66-70-74-76-80 sts (including the 8 dec sts), ROW 6: Turn and work 53-55-59-63-65-69 sts, ROW 7: Turn and work 50-52-56-60-62-66 sts (including the 8 dec sts), ROW 8: Turn and work back to marker (= beg of round). 32 sts have been dec in total in elevation and 108-112-120-128-132-140 sts remain on round. Switch to circular needle size 3.5 mm. Now work 1 round K as follows: Work the first 14 sts and inc 1 st (= sleeve), work the next 4 sts, then work the next 24-26-30-34-36-40 sts (= back piece) while inc 3-1-3-5-3-5 sts evenly, work the next 4 sts, work the next 14 sts and inc 1 st (= sleeve), work the next 4 sts, work the next 40-42-46-50-52-56 sts (= front piece) while dec 1-3-1-5-1-5 sts evenly, work the remaining 4 sts = 112-112-124-130-136-142 sts. Now work rib as follows: P 3, K 3, P 3, K 3, P 3, K 4, (P 3, K 3), repeat from (-) 4-4-5-6-6-7 times in total, P 3, K 4, P 3, K 3, P 3, K 3, P 3, K 4, (P 3, K 3), repeat from (-) 6-6-7-7-8-8 times, P 3, K 4. Continue in the round with K over K and P over P until rib measures 7 cm. Loosely cast off. ASSEMBLY: Sew the openings under the sleeves. Fold rib at the top of neck down on inside of garment. Fasten rib to get a folding edge, make sure to avoid a tight edge. |
|||||||||||||||||||||||||||||||
Diagram explanations |
|||||||||||||||||||||||||||||||
|
|||||||||||||||||||||||||||||||
 |
|||||||||||||||||||||||||||||||
 |
|||||||||||||||||||||||||||||||
 |
|||||||||||||||||||||||||||||||
Have you finished this pattern?Tag your pictures with #dropspattern #therowersweater or submit them to the #dropsfan gallery. Do you need help with this pattern?You'll find 35 tutorial videos, a Comments/Questions area and more by visiting the pattern on garnstudio.com. © 1982-2026 DROPS Design A/S. We reserve all rights. This document, including all its sub-sections, has copyrights. Read more about what you can do with our patterns at the bottom of each pattern on our site. |
|||||||||||||||||||||||||||||||


With over 40 years in knitting and crochet design, DROPS Design offers one of the most extensive collections of free patterns on the internet - translated to 17 languages. As of today we count 324 catalogues and 12290 patterns translated into English (UK/cm). 12290
We work hard to bring you the best knitting and crochet have to offer, inspiration and advice as well as great quality yarns at incredible prices! Would you like to use our patterns for other than personal use? You can read what you are allowed to do in the Copyright text at the bottom of all our patterns. Happy crafting!
Post a comment to pattern DROPS 174-15
We would love to hear what you have to say about this pattern!
If you want to leave a question, please make sure you select the correct category in the form below, to speed up the answering process. Required fields are marked *.