
Popular categories
Looking for a yarn?


Comments / Questions (71)
Walshy wrote:
Just finished this. Love it! Thanks for the pattern.
26.10.2018 - 20:30
![]() Esmee wrote:
Esmee wrote:
Goedenavond Garnstudio, Ik zou graag de Polswarmer maken maar ik snap niet helemaal hoe ik moet beginnen. ik wil een maat S/M maken dus dan moet ik 50 steken opzetten, is dat op een naald of over 3 a 4 losse naalden zonder knop? Moet ik met losse naalden breien en dan met 2a3a4 naalden? En als ze in het begin van het patroon hebben over brei de volgende nld als volgd bedoelden ze dan 1 naald of de hele set dus van de marker tot de marker? Met vriendelijk groeten, Esmee
03.12.2017 - 18:15DROPS Design answered:
Hallo Esmee, Om in de rondte te breien met naalden zonder knop, zet je eerst het aantal steken op en dan verdeel je de steken in de rondte over 3 naalden. Je begint met breien met de vierde naald. Met de volgende naald wordt de hele naald of de hele toer bedoeld, dus over alle opgezette steken.
04.12.2017 - 11:08
![]() Claudia wrote:
Claudia wrote:
Buongiorno, nella riga 33 del diagramma A1 non so come lavorare il diritto che mi trovo all'inizio e che nel diagramma compare come spazio vuto (non compare quadretto vuoto) - il diagramma rientra di un quadretto. Cosa faccio con la maglia del giro precedente? Grazie davvero per la disponibilità, il berrettino sta venendo benissimo!!!
12.11.2017 - 19:11DROPS Design answered:
Buongiorno Claudia. Se capiamo correttamente la riga, deve iniziare con un gettato prima dell'ultima maglia del giro precedente, poi passa 1 m senza lavorarla, 2 maglie insieme e accavalla la m passata sulle 2 m lavorate insieme. Buon lavoro!
13.11.2017 - 11:52
![]() Ginette wrote:
Ginette wrote:
Bonjour , merci pour tout ces beaux patrons que vous nous offrez et je sais que c'est beaucoup de travail . encore merci, je fait le cache cou et dans le schéma A5 , ligne 17, la 9ème maille ne devrait elle pas être a l'envers? ainsi que la 1ere après les mailles endroit je croix que ce serais 9 m env, 5 m end ,9 m env. merci de vérifier et a bientôt
03.11.2017 - 21:32DROPS Design answered:
Bonjour Ginette et merci. Je trouve effectivement comme vous, soi 9 m env, 5 m end, 9 m env au 17ème rang, puis 11 m env, 3 m end, 11 m env au 19ème rang. Nos stylistes vont vérifier cette partie du diagramme. Bon tricot!
06.11.2017 - 09:11
![]() Alice Skjønberg wrote:
Alice Skjønberg wrote:
Hei. Strikker største størrelsen pulsvanter. Har nå fellt fra 3 vr til 2 vr, og har 44 m. På neste omg står det: strikk 20 m glattstr, A8, 18 m glattstr. Men det stemmer ikke med tidligere omganger. Jeg får 22 m før A8, og 16 m etter A8. Har jeg gjort noe feil i begynnelsen?
09.08.2017 - 17:34DROPS Design answered:
Hei Alice. Ser ut som det er en feil i den største størrelsen. Vi skal ta en titt og evnt legge ut en rettelse. Takk for at du gjorde oss oppmerksom på dette. God fornøyelse videre på pulsvarmerene.
14.08.2017 - 15:25DENİZ GÜÇ wrote:
I knitted this beret for 4 times. And i have plans to knit more. ☺ Thanks for everything.
28.01.2017 - 21:27
![]() Lily Holloway wrote:
Lily Holloway wrote:
Bonjour, j'ai commencé le tour de coup de ce modèle et je ne comprend pas un point du diagramme A4 "glisser 2 m sur l'aiguille auxiliaire devant l'ouvrage, 1 m env, 1 jeté, glisser la 1ère m de l'aiguille auxiliaire à l'end, 1 m end, passer la m glissée par-dessus la m tricotée (au tour suivant, tricoter le jeté torse à l'env". Auriez vous une vidéo ? Merci encore pour tous ces beaux modèles.
15.01.2017 - 23:53DROPS Design answered:
Bonjour Mme Holloway, tricotez ce symbole ainsi: glisser 2 m sur l'aiguille auxiliaire devant l'ouvrage, tricotez la maille suivante à l'env, faites 1 jeté, reprenez les 2 mailles en attente et glissez la 1ère m à l'end, tricotez la 2ème maille à l'endroit, passez la m glissée par-dessus la m tricotée. Le jeté fait ici doit être tricoté torse à l'env au tour suivant pour éviter un trou. Bon tricot!
16.01.2017 - 10:40
![]() Elisabeth Johansen wrote:
Elisabeth Johansen wrote:
Jeg strikker Hello Sunshine hals, jeg er på diagram A5 omgang 10 og har strikket 2 vrange på begynnelsen av omg. Neste symbol i diagrammet finner jeg ikke i forklaring på symbolene,omg 10, mask 3, hvordan strikker jeg den?
07.01.2017 - 10:39DROPS Design answered:
Hej Elisabeth. Det er: 1 kast mellom 2 m, på neste omg strikkes kastet vridd rett/vridd vrang slik diag viser (= ikke hull) efterfulgt af: ta 1 m løs av p som om den skulle strikkes rett, 1 rett, løft den løse m over
09.01.2017 - 15:03
![]() Jansson wrote:
Jansson wrote:
Hej! Jag förstår inte A4, rad 5. Var börjar varvet? Jag får inte ihop mönstret?
24.11.2016 - 21:34DROPS Design answered:
Hej Jansson. Den starter samme sted. Du har i forrige omg lavet et omslag ved krydset og mindsket 1 m i fletten til venstre. Saa du har samme antal m og strikker: 2 vr, 3 r (her er omslaget imellem), 4 vr, 2 r (her var mindsket 1 m) og 2 vr.
14.12.2016 - 14:44
![]() Ute wrote:
Ute wrote:
Hallo Ihr, Dass Mann A1 7mal wdh. muss, ist mir klar. Aber laut Bild sind über A1 nochmal ein Blatt und ein längsmuster. Das fehlt in der Anleitung. Welch Mustermessen hier gestrickt werden?
24.10.2016 - 17:27DROPS Design answered:
Liebe Ute, es wird nur A.1 gestrickt, das erste grössere Blatt ist am Anfang A.1, die 2. kleinere Blätter sind dann zwischen jedes diagram gestrickt (am Ende + am Anfang), und gleichzeitig sind die Noppen über die grössere Blätter gestrickt. Mütze habe ich selber gestrickt und sieht wie auf dem Foto aus.
25.10.2016 - 08:54
|
|||||||||||||||||||||||||||||||||||||||||||||||||||||||||||||
Hello Sunshine#hellosunshineset |
|||||||||||||||||||||||||||||||||||||||||||||||||||||||||||||
 |
 |
||||||||||||||||||||||||||||||||||||||||||||||||||||||||||||
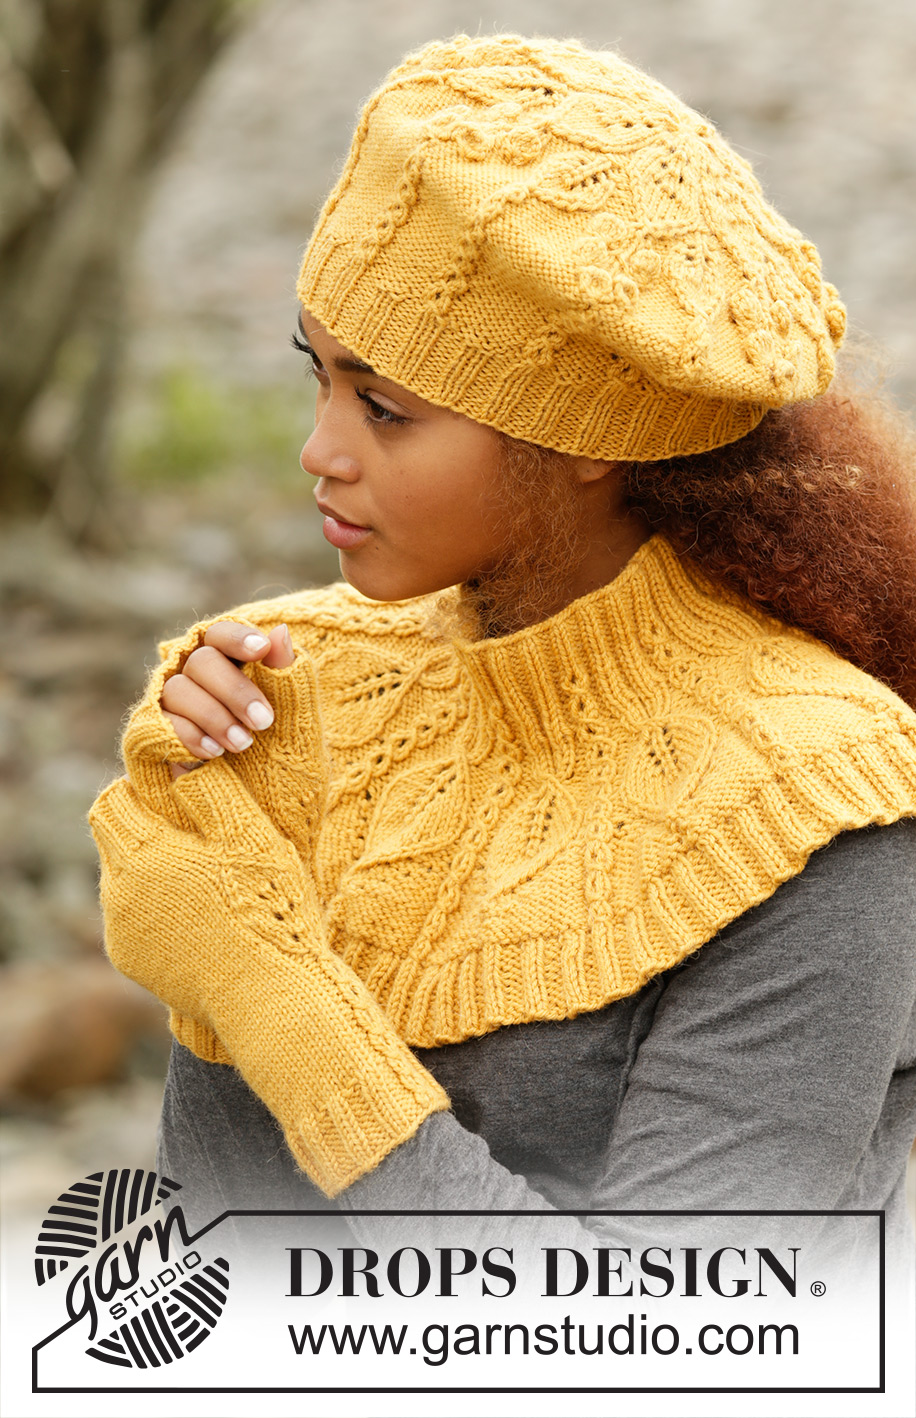
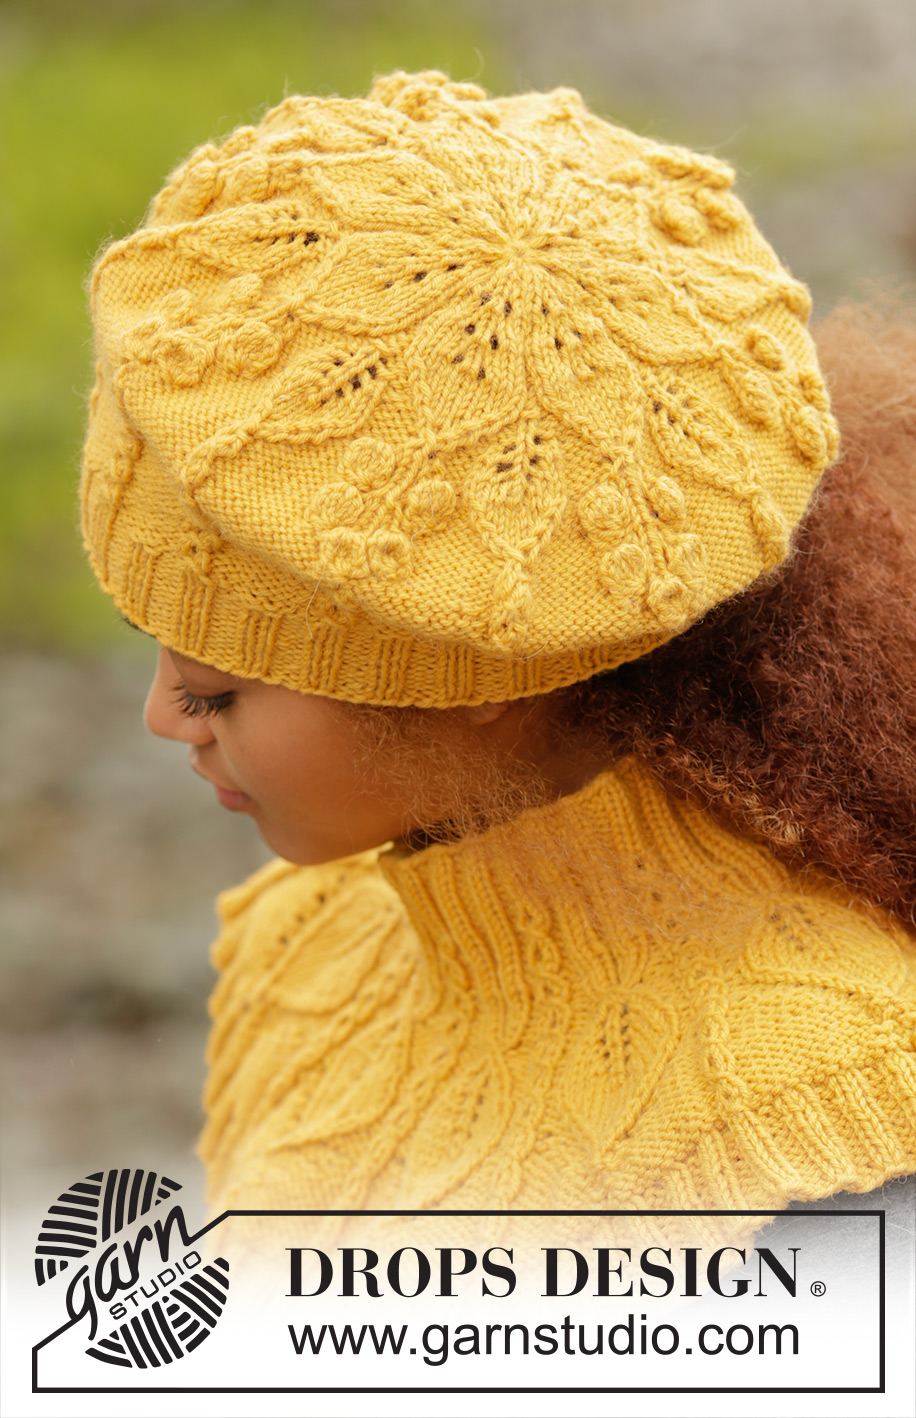
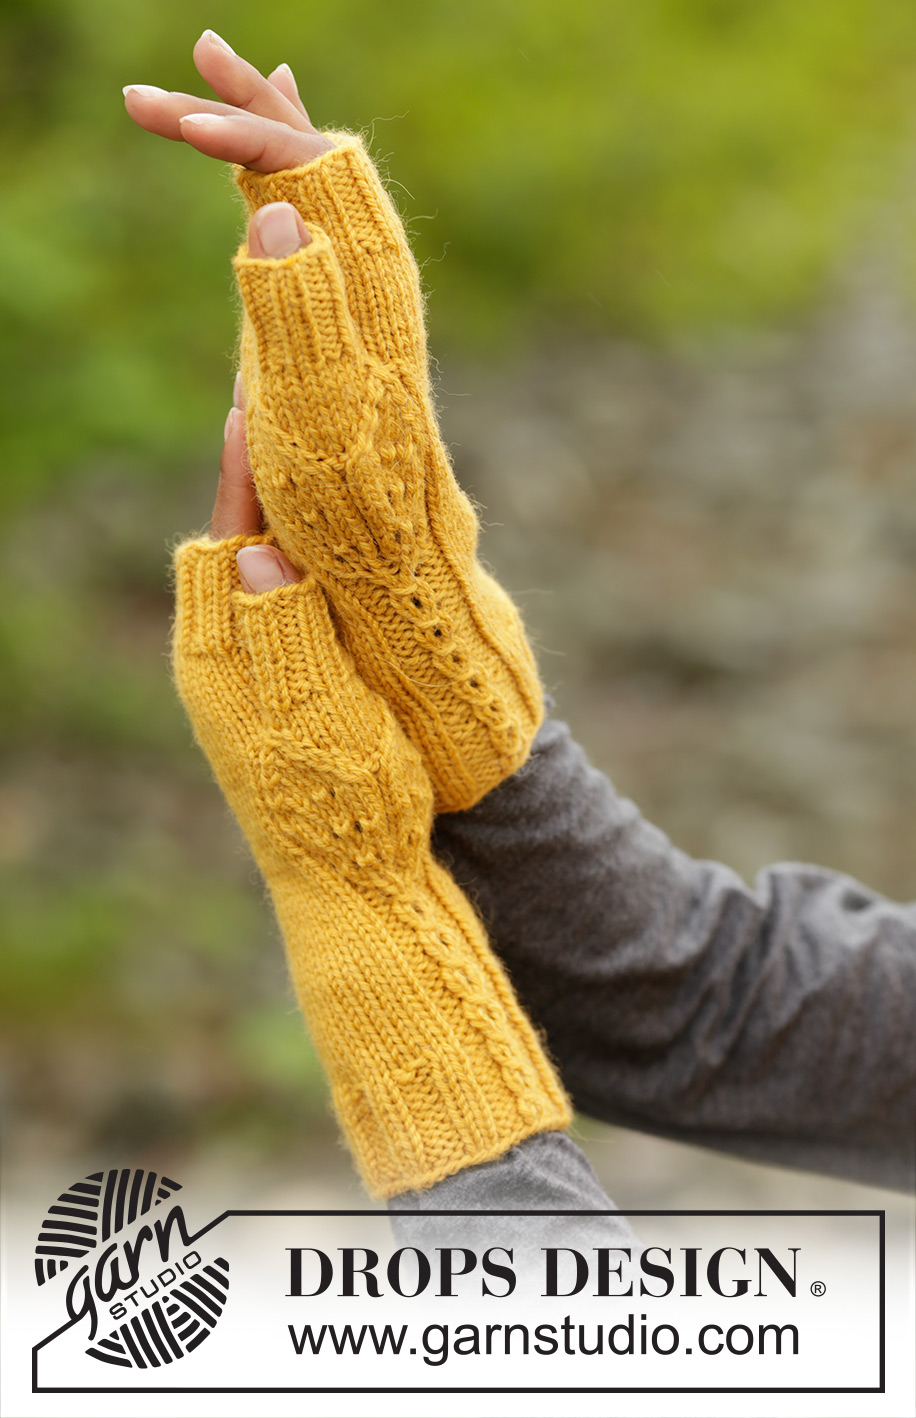
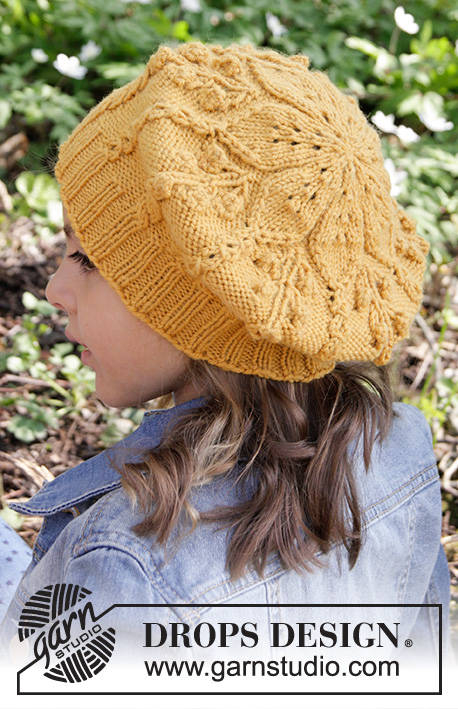
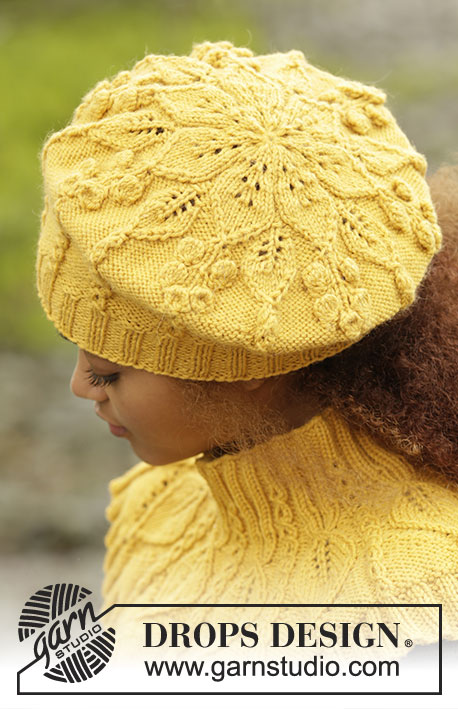
Set consists of: Knitted DROPS beret and neck warmer with leaf pattern worked top down in ”Lima” and DROPS wrist warmers with leaf pattern in “Lima”.
DROPS 173-43 |
|||||||||||||||||||||||||||||||||||||||||||||||||||||||||||||
|
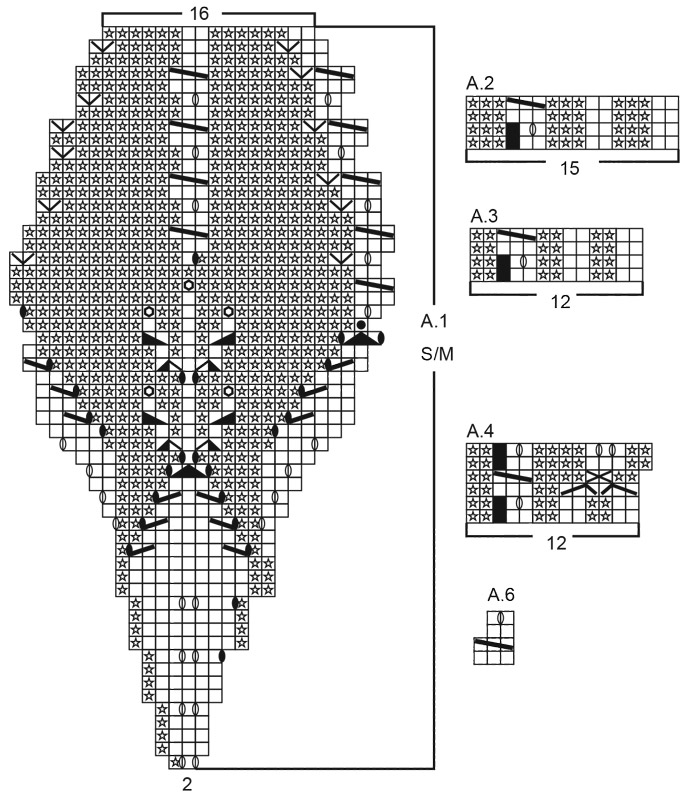
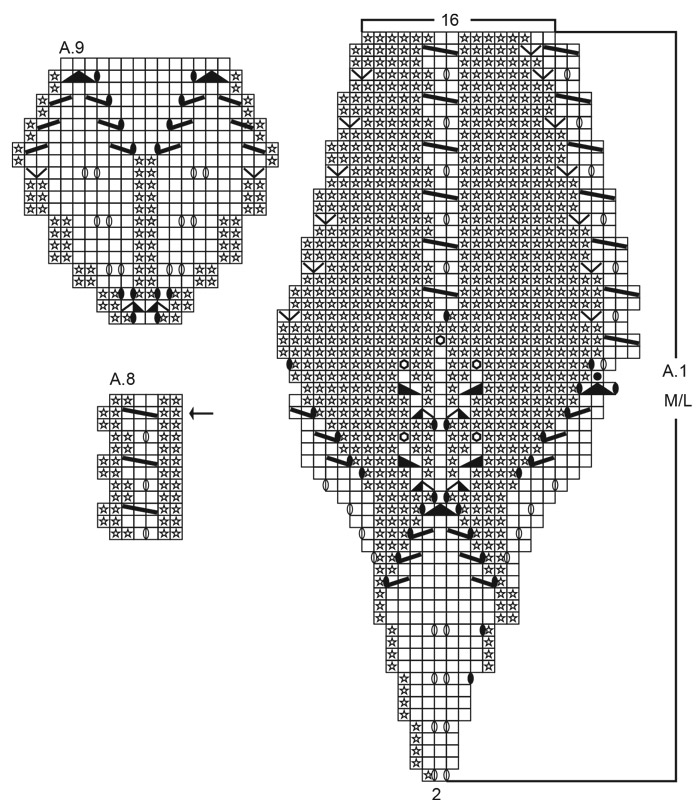
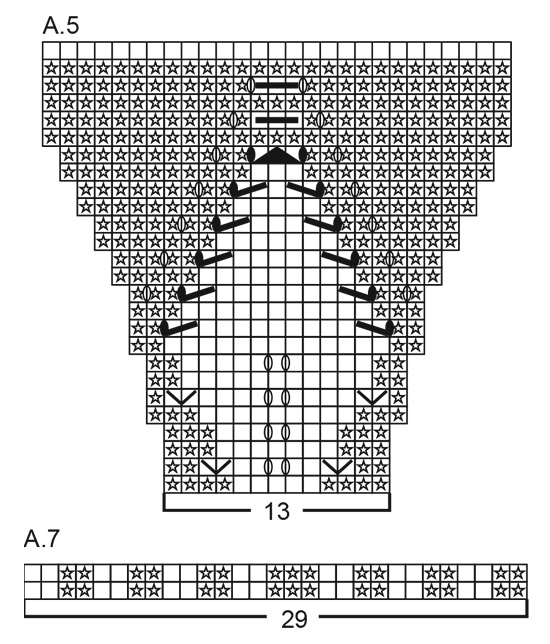
BERET: PATTERN: See diagram A.1 (choose diagram for correct size). MAGIC CIRCLE: To avoid hole in the middle beg with this technique: Hold yarn end in the left hand and make a loop around left index finger (from left to right). Hold the loop with left thumb and index finger. Insert needle through loop, get yarn from ball (i.e. place yarn 1 time over needle from you), pull yarn back through loop, 1 YO (now place yarn from the back and towards you) and pull YO through sts on needle, * insert needle through loop, 1 YO (place yarn from the back and towards you), pull YO through loop, 1 YO (from the back and towards you) and pull YO through outermost st on right needle (i.e. the last st made) *, repeat from *-* until there are 14 sts on needle. Distribute sts on 4 double pointed needles size 3.5 mm as explained in pattern. Then work as explained in pattern – AT THE SAME TIME pull yarn end so that loop is tighten tog and the hole disappears. CAST-OFF TIP: Make 1 YO after approx. every 4th st while casting off (cast off YO as a st) to make the cast-off edge more elastic. ---------------------------------------------------------- BERET: Work in the round on double pointed needles top down, switch to circular needle when needed. Beg with MAGIC CIRCLE - see explanation above and cast on 14 sts with Lima as explained above – NOTE: If you do not want to start with a magic circle cast on 14 sts on double pointed needles size 3.5 mm with Lima (when beret is done baste a yarn up and down through sts around hole at the top and tighten tog). Distribute sts on 4 double pointed needles size 3.5 mm with 4 sts on each of the first 3 needles and 2 sts on last needle. Then work pattern according to diagram A.1 (choose diagram for correct size = 7 repetitions of 2 sts). REMEMBER THE KNITTING TENSION When A.1 has been worked, there are 112 sts on needle in both sizes and piece measures approx. 19-21 cm from the top down. Switch to circular needle size 3 mm and work rib in the round (= K 2/P 2) – adjust to work 2 K over every pattern border and P 2 + K 2 + P 2 between every pattern border. When rib measures 3-4 cm (or desired measurements), cast off with K over K and P over P - READ CAST-OFF TIP. ---------------------------------------------------------- NECK WARMER: PATTERN: See diagrams A.2 to A.7. INCREASE TIP: Inc 1 st in transition between P and K by making 1 YO. On next round P YO twisted to avoid holes. ---------------------------------------------------------- NECK WARMER: Worked in the round on circular needle, top down. Cast on 120-135 sts on circular needle size 3.5 mm with Lima. K 1 round. Then work rib in the round = K 2/P 3. When rib measures 3-4 cm, switch to circular needle size 4 mm. Then work pattern in the round according to diagram A.2 (= 8-9 repetitions of 15 sts) until A.2 has been worked 2 times in total vertically – AT THE SAME TIME on last round dec all 3 P to 2 P (dec 1 st by P 2 tog = 24-27 sts dec) = 96-108 sts on needle. Now work 1 repetition vertically according to diagram A.3 the same way. After A.3 piece measures approx. 7-8 cm. Then work pattern according to diagram A.4 (= 8-9 repetitions of 12 sts). When A.4 has been worked 1 time vertically, there are 128-144 sts on needle (incl YOs in pattern) - NOTE: Finish last round when 2 sts remain on round, insert 1 marker (round beg here now). Work next round as follows: * Work A.5 (= 13 sts), A.6 (= 3 sts) *, repeat from *-* 8-9 times in total. Continue pattern like this and inc as shown in diagram. REMEMBER THE KNITTING TENSION! When A.5 has been worked, there are 232-261 sts on needle. Switch to circular needle size 3.5 mm and work rib in the round according to diagram A.7 (= 8-9 repetitions of 29 sts). AT THE SAME TIME after 2 round rib inc every other 2 P to 3 P - READ INCREASE TIP = 256-288 sts. After the next 2 round inc the remaining 2 P to 3 P = 280-315 sts. When rib measures 3-4 cm, loosely cast off with K over K and P over P. Neck warmer measures approx. 21-23 cm from top and down. ---------------------------------------------------------- WRIST WARMER: PATTERN: See diagrams A.8 and A.9. ---------------------------------------------------------- RIGHT WRIST WARMER: Worked in the round on double pointed needles. Cast on 50-55 sts on double pointed needles size 3 mm with Lima. K 1 round. Work next round as follows: * K 2, P 3 *, repeat from *-* 4-5 times in total, K 2, P 1, work pattern according to diagram A.8 (= 6 sts), P 1, repeat from *-* 4-4 times in total. Continue rib and A.8 like this until piece measures 3 cm. Now dec 3 P to 2 P the entire round = 40-44 sts. Switch to double pointed needles size 3.5 mm, work next round as follows: Work 18-22 sts in stocking st, continue A.8 and finish with 16-20 sts in stocking st. REMEMBER THE KNITTING TENSION When piece measures 8-9 cm (ending after a row like row marked with arrow in diagram), work pattern according to diagram A.9 over A.8 (work the other sts in stocking st). Continue pattern like this and inc and dec as shown in diagram. When A.9 has been worked, there are 48-52 sts on needle and piece measures approx. 15-16 cm. Work 1 round in stocking st and slip AT THE SAME TIME the middle 10 sts in A.9 on a stitch holder for thumb, in addition cast on 2 new sts on needle behind the thumb = 40-44 sts on needle. Continue in the round in stocking st until piece measures 19-20 cm (approx. 3 cm remain until finished measurements – try the wrist warmer on and work to desired measurements). Switch to double pointed needles size 3 mm and K 1 round while at the same time inc 4 sts evenly = 44-48 sts. Then work rib in the round = K 2/P 2 for 3 cm. LOOSELY cast off sts with K over K and P over P. Entire wrist warmer measures approx. 22-23 cm. THUMB: Slip the 10 sts from stitch holder back on double pointed needles size 3.5 mm and pick up 6 new sts behind the thumb = 16 sts. Work 2 rounds in stocking st (make sure to avoid a tight thumb). Then work rib in the round = K 2/P 2 for 3-3½ cm (or desired measurements). Cast off sts with K over K and P over P. LEFT WRIST WARMER: Work as right wrist warmer but reversed, i.e. work first round with rib as follows: * P 3, K 2 *, repeat from *-* 4-4 times in total, P 1, A.8 (= 6 sts), P 1, K 2, repeat from *-* 4-5 times in total. After rib work 16-16 sts in stocking st, A.8 and 18-22 sts in stocking st. |
|||||||||||||||||||||||||||||||||||||||||||||||||||||||||||||
Diagram explanations |
|||||||||||||||||||||||||||||||||||||||||||||||||||||||||||||
|
|||||||||||||||||||||||||||||||||||||||||||||||||||||||||||||
 |
|||||||||||||||||||||||||||||||||||||||||||||||||||||||||||||
 |
|||||||||||||||||||||||||||||||||||||||||||||||||||||||||||||
 |
|||||||||||||||||||||||||||||||||||||||||||||||||||||||||||||
Have you finished this pattern?Tag your pictures with #dropspattern #hellosunshineset or submit them to the #dropsfan gallery. Do you need help with this pattern?You'll find 31 tutorial videos, a Comments/Questions area and more by visiting the pattern on garnstudio.com. © 1982-2026 DROPS Design A/S. We reserve all rights. This document, including all its sub-sections, has copyrights. Read more about what you can do with our patterns at the bottom of each pattern on our site. |
|||||||||||||||||||||||||||||||||||||||||||||||||||||||||||||


With over 40 years in knitting and crochet design, DROPS Design offers one of the most extensive collections of free patterns on the internet - translated to 17 languages. As of today we count 324 catalogues and 12290 patterns translated into English (UK/cm). 12290
We work hard to bring you the best knitting and crochet have to offer, inspiration and advice as well as great quality yarns at incredible prices! Would you like to use our patterns for other than personal use? You can read what you are allowed to do in the Copyright text at the bottom of all our patterns. Happy crafting!
Post a comment to pattern DROPS 173-43
We would love to hear what you have to say about this pattern!
If you want to leave a question, please make sure you select the correct category in the form below, to speed up the answering process. Required fields are marked *.