
Popular categories
Looking for a yarn?


Comments / Questions (38)
![]() Sophie A wrote:
Sophie A wrote:
Bonjour, Je suis en train de terminer la partie dos. Je fais taille S avec 119 mailles montées. Cependant, je n'arrive pas à comprendre la partie "Quand l'ouvrage mesure 54 cm, diminuer 12 mailles à intervalles réguliers au- dessus des 43 mailles centrales: il reste 97 mailles " etc . Pouvez-vous me donner des explications plus claires ? Merci
23.01.2026 - 18:42DROPS Design answered:
Bonjour Sophie, vous allez rabattre les mailles centrales pour l'encolure au rang suivant, mais, il faut davantage de mailles avec des torsades que pour du jersey, ainsi, pour éviter de déformer l'encoure, on va d'abord diminuer des mailles pour que la bordure d'encoure soit droite, ainsi, vous diminuez 12 mailles à intervalles dans les 43 mailles centrales, il vous reste: 109-12=97 mailles, au rang suivant, vous rabattez les 29 m centrales pour l'encolure et terminez chaque épaule (- 33 m) séparément. Bon tricot!
26.01.2026 - 07:52
![]() Sophie A wrote:
Sophie A wrote:
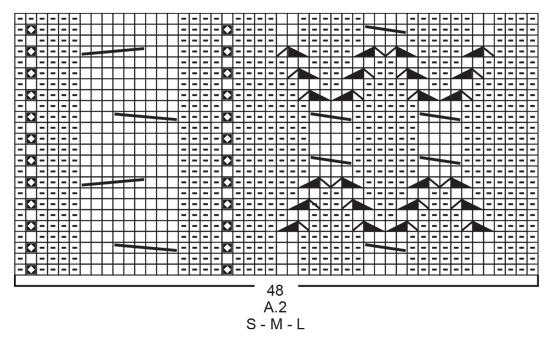
Bonjour, Il y a une erreur pour le diagramme A.2 S-M-L: au rang 24 , la 2ème case en partant de la gauche devrait être vide et non avec un trait pour qu'il soit correct. Bonne journée
19.01.2026 - 10:38
![]() Marion wrote:
Marion wrote:
Hi , wenn ich die Reihen der Diagramme gestrickt habe, werden sie dann von unten immer wiederholt bis zur richtigen Länge?
17.11.2025 - 17:20DROPS Design answered:
Liebe Marion, ja genau, Sie fangen dann einfach wieder unten an und stricken die Diagramme wieder nach oben. Viel Spaß beim Stricken!
17.11.2025 - 22:29
![]() Jeanette wrote:
Jeanette wrote:
Hej, Jag har fått olika mönster på vänster och höger sida på A1 (bakstycket). A1-mönstret ska väl se lika ut på både vänster och höger sida? Finns det en bild på hur det ska se ut?
25.10.2025 - 17:08DROPS Design answered:
Hei, Jeanette, A.1 og A.5 er speilbilder av hverandre, og gjør at bakstykket blir symmetrisk. Vennlig hilsen DROPS Design
27.10.2025 - 14:21
![]() Anja wrote:
Anja wrote:
Kunt u een foto van het achterpand laten zien.? Dan kun je beter volgen hoe het patroon is opgebouwd.
02.10.2025 - 21:24DROPS Design answered:
Hi Anja, I will forward your request to graphics team. To do the back, follow the pattern. The back is similiar to the front, with different cables on both sides. Happy knitting!
03.10.2025 - 09:37
![]() Anja wrote:
Anja wrote:
Hoe doe je dit? rechtervoorpand minder dan aan de goede kant 6 steken verdeeld over de eerste 18 steken in A.4 En linkervoorpand de laatste steken in A2. Dan kun je de kabel niet meer over 9 steken maken. Als je het patroon volgt dan zou de kabel over 6 steken moeten maken.
02.10.2025 - 21:22DROPS Design answered:
Dag Anja,
Klopt, deze kabel brei je ook niet meer omdat je gaat minderen voor de hals en omdat het kabelen ervoor zorgt dat het werk een beetje samentrekt, minder je nu over het gedeelte van de kabel om te voorkomen dat het werk daar te wijd wordt.
22.10.2025 - 20:27
![]() Barbara wrote:
Barbara wrote:
Thank you for the reply but that is not what I meant. As I have interpreted the pattern from the diagrams, the middle part of the pattern shows up on the right side of the sweater & cables on each side show up on the wrong side so that I see the back side of these from the right side. I checked my interpretation of the diagrams & when I did not find errors with that, I tried to figure a way to change the pattern so the cables would be reversed but was not able to - hope this clarifies...
01.09.2025 - 16:30
![]() Barbara wrote:
Barbara wrote:
Why does the cable part of the pattern (3 sts (front & back) to cable needle, K 2 sts, K 2 its from cable needle) are on the back of the piece while the rest are on the front? I have checked my interpretation of the direction repeatedly and looked for fixes but cannot figure it out. Please ask for clarification or advise... Thank you!
29.08.2025 - 04:56DROPS Design answered:
Dear Barbara, do you mean the last symbol in the chart (place 3 stitches on cable needle behind piece, knit 3, knit 3 from cable needle)? There is another symbol where you also work the cable behind the piece. This is part of the cable pattern and helps direct the cable and lean it towards the other side. You can see an example in this video. Happy knitting!
31.08.2025 - 22:55
![]() Marie wrote:
Marie wrote:
Pouvez-vous donner des explications plus claires pour les diminutions de l'encombrement et épaules dos. Merci
07.07.2025 - 13:40DROPS Design answered:
Bonjour Marie, au rang suivant, rabattez les 29-29-31-31-33-33 mailles centrales pour l'encolure et terminez chaque épaule séparément. Commencez par l'epaule gauche, tricotez 2 rangs, au rang suivant (sur l'endroit) rabattez 1 maille au debut du rang (a partir de l'encolure) = 33-35-38-43-46-54 mailles pour l'épaule. Terminez selon les explications. Pour l'epaule droite, prenez le nouveau fil, tricotez un rang sur l'envers, ensuite un rang sur l'endroit et a la fin de ce rang diminuez 1 maille. Terminez l'epaule droite comme avant. Bon tricot!
20.07.2025 - 09:59
![]() Rosemarie Nilsson wrote:
Rosemarie Nilsson wrote:
Hur gör jag när jag ska sticka "1 rätmaska i maskan under nästa maska" ?? Vad gör jag med den rätmaskan som är över den som jag stickade under?
13.05.2025 - 14:57DROPS Design answered:
Hej Rosemarie. I denna video ser du hur du stickar 1 rätmaska i maskan under nästa maska. Mvh DROPS Design
14.05.2025 - 11:50
|
|||||||||||||||||||||||||
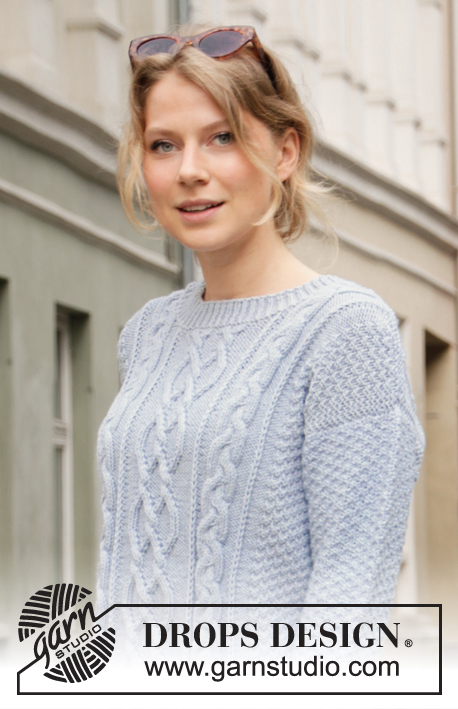
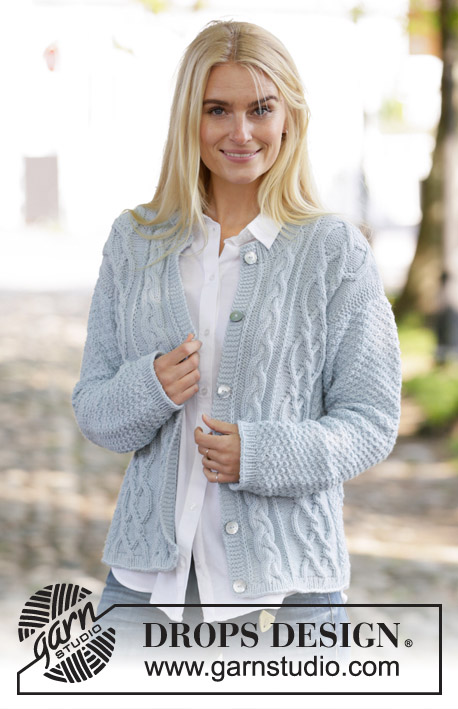
Winter Delight Jacket#winterdelightjacket |
|||||||||||||||||||||||||
 |
 |
||||||||||||||||||||||||
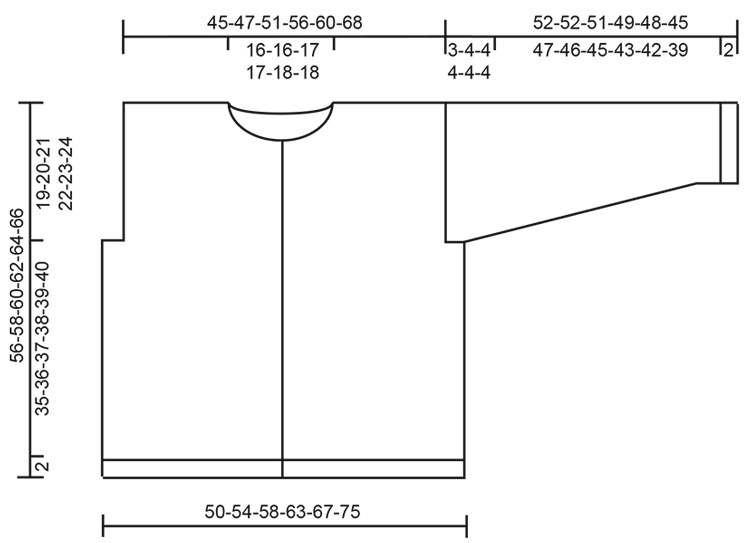
Knitted jacket with cables and double moss stitch. The piece is worked in DROPS Merino Extra Fine. Sizes S – XXXL.
DROPS 205-6 |
|||||||||||||||||||||||||
|
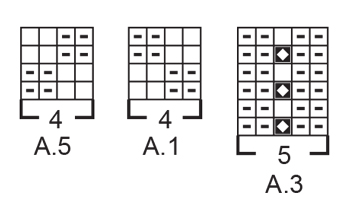
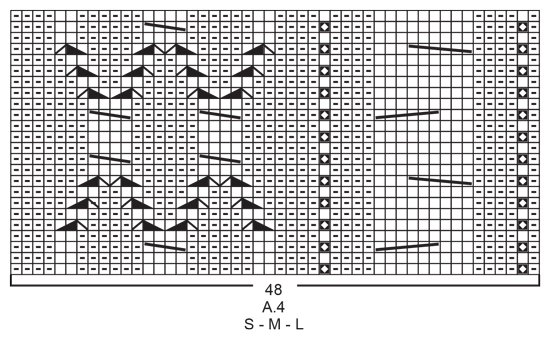
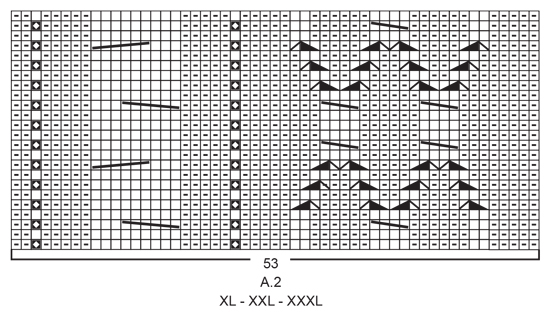
------------------------------------------------------- EXPLANATIONS FOR THE PATTERN: ------------------------------------------------------- RIDGE/GARTER STITCH (worked back and forth): Knit all rows. 1 ridge in height = Knit 2 rows. PATTERN: See diagrams A.1 to A.5. Choose diagram for your size (applies to A.2 and A.4). The diagrams show all rows in the pattern seen from the right side. KNITTING TIP: In this pattern you knit up stitches along the armholes and the sleeves are worked top down. This is to control the sleeve-length. If you would like to work the sleeves separately and sew them in afterwards, this can be done by casting on the same number of stitches as are knitted up along the armholes and then following the instructions in the text. To sew in the sleeves place the sleeve under the garter stitch edge along the armholes so the edge is visible – sew in the outermost stitch along the garter stitch edge). DECREASE TIP (for mid under sleeve): Decrease 1 stitch before the marker thread as follows: Work until there are 2 stitches left before the marker thread, knit 2 together if this stitch should be a knit stitch or purl 2 together if this stitch should be a purl stitch. Decrease 1 stitch after the marker thread as follows: Knit 2 twisted if this stitch should be a knit stitch or purl 2 twisted together if this stitch should be a purl stitch. BUTTONHOLES: Work buttonholes on right band (when garment is worn). 1 BUTTONHOLE = Start from the right side and knit together the second and third stitch from the edge and make 1 yarn over. On the next row (wrong side) knit the yarn over to leave a hole. Work buttonholes when the piece measures: S: 2, 11, 21, 30 and 40 cm M: 2, 12, 22, 32 and 42 cm L: 2, 10, 19, 27, 36 and 44 cm XL: 2, 11, 20, 29, 38 and 46 cm XXL: 2, 11, 20, 29, 38 and 47 cm XXXL: 2, 12, 21, 31, 40 and 49 cm NOTE: The last buttonhole is worked on the neck. ------------------------------------------------------- START THE PIECE HERE: ------------------------------------------------------- JACKET – SHORT OVERVIEW FOR THE PIECE: Front and back pieces are worked back and forth with circular needle, bottom up. The shoulder seams are sewn together then stitches are knitted up around the armholes for the sleeves – read KNITTING TIP! The sleeves are worked back and forth with circular needle until the sleeve cap is finished, then the sleeve is continued in the round, top down with short circular needle/double pointed needles to finished length. The bottom of the armhole is then sewn up and the neck worked to finish. BACK PIECE: Cast on 119-127-135-145-153-169 stitches with circular needle size 3.5 mm and Merino Extra Fine. Purl 1 row (= wrong side). The next row is worked as follows from the right side: 1 edge stitch in GARTER STITCH – read description above, * knit 1, purl 1 *, work from *-* until there are 2 stitches left on the row, knit 1 and finish with 1 edge stitch in garter stitch. Continue this rib for 2 cm but adjust so the last row has been worked from the right side. Purl 1 row from the wrong side with 1 edge stitch in garter stitch in each side. Change to circular needle size 4.5 mm. Now start the pattern by working the next row from the right side as follows: 1 edge stitch in garter stitch, work A.1 over the next 8-12-16-16-20-28 stitches (= 2-3-4-4-5-7 repeats of 4 stitches), work A.2 (= 48-48-48-53-53-53 stitches), A.3 (= 5 stitches), A.4 (= 48-48-48-53-53-53 stitches), A.5 over the next 8-12-16-16-20-28 stitches (2-3-4-4-5-7 repeats of 4 stitches) and finish with 1 edge stitch in garter stitch. Continue this pattern. REMEMBER THE KNITTING TENSION! When the piece measures 37-38-39-40-41-42 cm cast off 5-7-7-7-7-7 stitches at the beginning of the next 2 rows for the armholes = 109-113-121-131-139-155 stitches. Continue the pattern as before but now with 4 edge stitches in garter stitch on each side towards the armholes. When the piece measures 54-56-58-60-62-64 cm decrease 12 stitches evenly over the middle 43-43-43-48-48-48 stitches on the row = 97-101-109-119-127-143 stitches left. On the next row cast off the middle 29-29-31-31-33-33 stitches for the neck and each shoulder is finished separately. Continue the pattern and cast off 1 stitch on the next row from the neck = 33-35-38-43-46-54 stitches left on shoulder. Continue working until the piece measures 55-57-59-61-63-65 cm. Knit 1 row from the right side where you decrease 4 stitches evenly spaced over the cable on the shoulder = 29-31-34-39-42-50 stitches. Knit 1 row from the wrong side. Loosely cast off with knit from the right side. Work the other shoulder in the same way. The back piece measures approx. 56-58-60-62-64-66 cm from the shoulder down. RIGHT FRONT PIECE (when the garment is worn): Cast on 62-66-70-75-79-87 stitches (including 5 band stitches towards mid front) with circular needle size 3.5 mm and Merino Extra Fine. Purl 1 row (= wrong side). The next row is worked as follows from the right side (i.e. from mid front): 5 band stitches in garter stitch, * knit 1, purl 1 *, work from *-* until there is 1 stitch left on the row and finish with 1 edge stitch in garter stitch. Continue this rib for 2 cm but adjust so that the last row is worked from the right side – remember BUTTONHOLES on the band – read description above. Purl 1 row from the wrong side with 1 edge stitch in garter stitch on the side and 5 band stitches in garter stitch towards mid front. Change to circular needle size 4.5 mm. Now start the pattern, working the next row from the right side as follows: 5 band stitches in garter stitch, work A.4 (= 48-48-48-53-53-53 stitches), A.5 over the next 8-12-16-16-20-28 stitches (= 2-3-4-4-5-7 repeats of 4 stitches) and finish with 1 edge stitch in garter stitch towards the side. Continue this pattern. When the piece measures 37-38-39-40-41-42 cm cast off 5-7-7-7-7-7 stitches for the armhole at the beginning of the row from the wrong side = 57-59-63-68-72-80 stitches. Continue this pattern but now with 4 edge stitches in garter stitch towards the armhole. When the piece measures 48-50-52-53-55-57 cm decrease from the right side 6 stitches evenly spaced over the first 18 stitches in A.4 = 51-53-57-62-66-74 stitches left. On the next row place the outermost 9-9-9-9-10-10 stitches towards mid front on 1 strand for the neck (without working them). Continue this pattern and cast off for the neck at the beginning of each row from neck as follows: Cast off 2 stitches 3 times in all sizes and then 1 stitch 3-3-4-4-4-4 times = 33-35-38-43-46-54 stitches left on the shoulder. Continue working until the piece measures 55-57-59-61-63-65 cm. Knit 1 row from the right side where you decrease 4 stitches evenly over the cable on the shoulder = 29-31-34-39-42-50 stitches. Knit 1 row from the wrong side then cast off loosely with knit from the right side. The front piece measures approx. 56-58-60-62-64-66 cm from the shoulder down. LEFT FRONT PIECE (when the garment is worn): Cast on 62-66-70-75-79-87 stitches (including 5 band stitches towards mid front) with circular needle size 3.5 mm and Merino Extra Fine. Purl 1 row (= wrong side). The next row is worked as follows from the right side (i.e. from the side): 1 edge stitch in garter stitch, * purl 1, knit 1 *, work from *-* until there are 5 stitches left on the row and finish with 5 band stitches in garter stitch towards mid front. Continue this rib for approx. 2 cm but adjust so the last row worked is from the right side. Purl 1 row from the wrong side with 5 band stitches in garter stitch towards mid front and 1 edge stitch in garter stitch towards the side. Change to circular needle size 4.5 mm. Now start the pattern by working the next row from the right side as follows: 1 edge stitch in garter stitch, work A.1 over the next 8-12-16-16-20-28 stitches (= 2-3-4-4-5-7 repeats of 4 stitches), A.2 (= 48-48-48-53-53-53 stitches) and finish with 5 band stitches in garter stitch towards mid front. Continue this pattern. When the piece measures 37-38-39-40-41-42 cm cast off 5-7-7-7-7-7 stitches for the armhole at the beginning of the next row from the right side = 57-59-63-68-72-80 stitches. Continue the pattern as before with 4 edge stitches in garter stitch towards the armhole. When the piece measures 48-50-52-53-55-57 cm decrease 6 stitches evenly spaced over the last 18 stitches in A.2 = 51-53-57-62-66-74 stitches left. On the next row place the outermost 9-9-9-9-10-10 stitches towards mid front on 1 thread for the neck, but to avoid cutting the strand work the stitches before placing them on the thread. Continue the pattern and cast off for the neck at the beginning of each row from the neck as follows: Cast off 2 stitches 3 times in all sizes and then 1 stitch 3-3-4-4-4-4 times = 33-35-38-43-46-54 stitches left on the shoulder. Continue working until the piece measures 55-57-59-61-63-65 cm. Knit 1 row from the right side where you decrease 4 stitches evenly spaced over the cable on the shoulder = 29-31-34-39-42-50 stitches. Knit 1 row from the wrong side. Loosely cast off with knit from the right side. ASSEMBLY: Sew the shoulder seams inside the cast-off edge. SLEEVE: Knit up stitches along the armhole on the front and back pieces. Start in the corner of the armhole on the one side of the piece where stitches were cast off for the armhole and knit up from the right side 76-80-84-88-92-96 stitches inside the 1 edge stitch in garter stitch with circular needle size 4.5 mm and Merino Extra Fine (do not knit up stitches along the bottom of the armhole) – read KNITTING TIP! Work A.1 back and forth with 1 edge stitch in garter stitch on each side. When the sleeve measures 3-4-4-4-4-4 cm from where stitches were knitted up insert 1 marker on the row; this marker shows where the sleeve will be sewn to the bottom of the armhole and the sleeve is now measured from this marker! Continue by working the sleeve in the round. Change to short circular needle or double pointed needles size 4.5 mm. Insert 1 marker thread at the beginning of the round and allow it to follow your work onwards; it will be used when decreasing mid under the sleeve. Continue A.1 in the round over all stitches. When the sleeve measures 2-3-2-3-3-2 cm from the marker decrease 2 stitches mid under sleeve – read DECREASE TIP-2. Decrease like this every 3-2½-2½-2-2-1½ cm a total of 15-16-17-18-19-20 times = 46-48-50-52-54-56 stitches. Continue working until the sleeve measures 47-46-45-43-42-39 cm from the marker (there is approx. 2 cm left to finished length; you can try the jacket on and work to desired length). NOTE: Shorter measurements in larger sizes due to wider shoulders and longer sleeve cap. Change to double pointed needles size 3.5 mm and work rib (= knit 1 / purl 1) for 2 cm but adjust so that on first round of rib you knit over knit and purl over purl. Loosely cast off with knit. The sleeve measures approx. 52-52-51-49-48-45 cm from where stitches were knitted up. Work the other sleeve in the same way. ASSEMBLY: Sew the side seams – sew in the outermost loop of the outermost stitch so the seam is flat. Sew the sleeve to the bottom of the armhole from the marker to the corner on each side. NECK: Knit up from the right side with circular needle 3.5 mm approx. 90 to 100 stitches around the neck (including the stitches on the threads in front). Knit 1 row from the wrong side. Knit 1 row from the right side where you increase the number of stitches evenly to 99-101-103-105-109-111 stitches (the number of stitches should be divisible by 2 + 1). The next row is worked as follows from the wrong side: S, M and L: 5 band stitches in garter stitch, knit 1, purl 1 *, work from *-* until there are 6 stitches left on the row, knit 1 and finish with 5 band stitches in garter stitch. XL, XXL and XXXL: 5 band stitches in garter stitch, knit 2, * purl 1, knit 1 *, work from *-* until there are 8 stitches left on the row, purl 1, knit 2 and finish with 5 band stitches in garter stitch. Continue this rib but after 1 cm work the last buttonhole over the other buttonholes on the right band. Cast off with garter stitch over garter stitch, knit over knit and purl over purl when the neck measures 3 cm. ASSEMBLY: Sew buttons onto the left band. |
|||||||||||||||||||||||||
Diagram explanations |
|||||||||||||||||||||||||
|
|||||||||||||||||||||||||
 |
|||||||||||||||||||||||||
 |
|||||||||||||||||||||||||
 |
|||||||||||||||||||||||||
 |
|||||||||||||||||||||||||
 |
|||||||||||||||||||||||||
Have you finished this pattern?Tag your pictures with #dropspattern #winterdelightjacket or submit them to the #dropsfan gallery. Do you need help with this pattern?You'll find 31 tutorial videos, a Comments/Questions area and more by visiting the pattern on garnstudio.com. © 1982-2026 DROPS Design A/S. We reserve all rights. This document, including all its sub-sections, has copyrights. Read more about what you can do with our patterns at the bottom of each pattern on our site. |
|||||||||||||||||||||||||


With over 40 years in knitting and crochet design, DROPS Design offers one of the most extensive collections of free patterns on the internet - translated to 17 languages. As of today we count 324 catalogues and 12290 patterns translated into English (UK/cm). 12290
We work hard to bring you the best knitting and crochet have to offer, inspiration and advice as well as great quality yarns at incredible prices! Would you like to use our patterns for other than personal use? You can read what you are allowed to do in the Copyright text at the bottom of all our patterns. Happy crafting!
Post a comment to pattern DROPS 205-6
We would love to hear what you have to say about this pattern!
If you want to leave a question, please make sure you select the correct category in the form below, to speed up the answering process. Required fields are marked *.