
Popular categories
Looking for a yarn?


Comments / Questions (150)
![]() Maude Brassard wrote:
Maude Brassard wrote:
Je ne comprends pas la dernière phrase du patron manche « Tricoter en jersey les mailles qui ne peuvent se tricoter en point fantaisie pendant les diminutions…faire jeté si on diminue dans le point ajouré Merci de m’éclairer
24.04.2026 - 00:52DROPS Design answered:
Bonjour Mme Brassard, quand on tricote le point ajouré, chaque diminution doit être compensée par 1 jeté pour bien conserver le bon nombre de mailles, mais lorsque l'on diminue le point ajouré, on ne va pas toujours pouvoir tricoter (1 dim, 1 jeté), donc on va simplement tricoter les mailles en jersey si on ne peut pas avoir la compensation, si vous faites quand même le jeté, alors votre nombre de mailles restera le même et ne diminuera pas, la diminution au milieu sous la manche doit être une vraie diminution (vous avez 2 m en moins à chaque diminution); entre ces diminutions, votre nombre de mailles doit bien rester le même. Bon tricot!
24.04.2026 - 09:18
![]() Maude Brassard wrote:
Maude Brassard wrote:
Bonjour, Pouvez vous me dire s’il existe une technique particulière pour détricoter quelques rangs point fantaisie sans perdre de mailles. J’ai dû défaire 8 rangs de l’empiècement et ça été la vraie galère Salutations
11.04.2026 - 16:43
![]() Myrian Reyes wrote:
Myrian Reyes wrote:
Hej , jeg strikker L størrelse . Efter man begynder at strikke omgangen med A2, 2m, A3, A4(x5), A5, 2m,A6 regner jeg med at man fortsætter med de samme diagrammer opad til man har 26cm. Men er det nok diagram til at strikke så mange cm ( fra 22cm til 26cm) ? Hvordan fortsætter diagrammet på ærmerne efter man er nået de 26cm ? Er det de samme som for deling mellem ærme og krop ? Med venlig hilsen
09.04.2026 - 09:30DROPS Design answered:
Hei Myrian. Fortsett mønsteret på samme måte videre, dvs mønsteret gjentar seg som vist i A.1. For hver gang det er strikket 20 omganger er det plass til 1 rapport mer med hullmønster i bredden på hvert erme. mvh DROPS Design
13.04.2026 - 12:52
![]() Klein wrote:
Klein wrote:
Ich habe jetzt die Passe und einmal den Musterssatz A1 gestrickt. Nun soll man im Muster weiterstricken (Reihe 11 bis 30). Reihe 11 hat doch nur 31 Maschen, und würde jetzt wieder nach Reihe 30 anschließen, die ja aber mit 51 Maschen aufgehört hat. Ich bin mir nicht sicher, was ich machen soll. Bin noch Strickanfängerin und das ist mein erstes Muster.
28.03.2026 - 12:14DROPS Design answered:
Liebe Frau Klein, die Zunahmen sind aber noch nicht fertig, so stricken Sie die Zunahmen wie bei A.1 weiter (am Anfang + am Ende vom Lochmuster), dann stricken Sie A.3, A.4 und A.5 und stricken Sie die Zunahmen wie in A.1. Viel Spaß beim Stricken!
07.04.2026 - 09:18
![]() Delphine wrote:
Delphine wrote:
Bonjour, je fais ce modèle en T/M, j'ai fait A1 entier donc j'ai bien 16/17/51/17/32/17/51/16M (234M) ensuite si je fais A1*= 20 tours et 27x d'augmentation, j'ai 16/27/71/27/32/27/71/27/19M (314M) il me manque 4 tours pour aller à 330M. Je ne comprends pas, dois-je reprendre les 4 premier tours depuis A1*?
20.03.2026 - 13:19DROPS Design answered:
Bonjour Delphine, en taille M, vous devez augmenter 27 fois, autrement dit, vous tricotez A.1 en entier = vous avez augmenté 15 fois, puis vous tricotez la partie avec l'étoile = vous avez augmenté 10 fois, tricotez encore les 4 premiers rangs de la partie avec l'étoile = vous augmente encore 2 fois soit: 15+10+2=27 fois. Tricotez ensuite si besoin sans augmenter, ainsi: A.2, A.3, 5xA.4, A.5 et A.6. Bon tricot!
20.03.2026 - 15:36
![]() Sauvage wrote:
Sauvage wrote:
Bonjour Je ne comprends pas les explications de votre diagramme A1 car à partir du second rang,il faut augmenter une mailles de chaque côté mais combiné aux autres points hors diagramme, je ne comprends pas comment tricoter la suite ,je ne retombe pas au dessus des mailles envers, c'est incompréhensible, merci de votre aide,cordialement
31.01.2026 - 12:29DROPS Design answered:
Bonjour Mme Sauvage, notez que les diagrammes se tricotent en rond, les cases blanches seront ainsi toujours des mailles endroit et les croix toujours des mailles envers. Les augmentations des raglans figurent dans A.1 (en début + en fin de rang, tous les 2 rangs), vous devez ainsi avoir 2 jetés de plus que le nombre de diminutions de chaque motif. Lisez bien le diagramme tous les tours de droite à gauche. Bon tricot!
02.02.2026 - 08:22
![]() Jess wrote:
Jess wrote:
I dont understand how to follow the pattern onwards after picking up the 10 stitches under the sleeve? (size m) I started my row at the marker thread as the pattern says but doing this has shifted everything across 5 stitches so the pattern does match what ive previously knitted? Thank you in advance.
07.01.2026 - 18:47DROPS Design answered:
Hi Jess, It sounds as if you are now working the sleeve. You begin the round at the marker-thread (in the middle of the knitted-up stitches under the sleeve). Follow the instructions in the text, with the correct number of knitted stitches, before working the diagrams from the correct row as stated, and the pattern should continue from the yoke without displacement. Regards, Drops Team.
08.01.2026 - 06:02
![]() Lynn wrote:
Lynn wrote:
Bij het in het rond breien (of het nu haken of breien is, geen verschil), is de voorkant OK, maar de achterkant opgebold, veel te groot dus. Komt nooit goed na het wassen/dragen. Hoe kan dit voorkomen worden? Minder steken op rug? Alle modellen geven evenveel steken vooraan als achteraan… Dank U
07.01.2026 - 10:17DROPS Design answered:
Dag Lynn,
Als dit bij jou het geval is, dan zou je inderdaad de volgende keer het beste meer steken op de voorkant kunnen hebben en/of minder steken op de achterkant.
07.01.2026 - 18:13
![]() Bettan wrote:
Bettan wrote:
Stickar stl M Har när A1 börjar 114 maskor och enl mönster ska det göras 6 omslag + 1 före och 1 efter =8 och det borde bli 16 på varvet och att det då ska vara 122 på varvet. Jag får130. Hjälp mej tänka och göra rätt Tack
12.12.2025 - 16:22DROPS Design answered:
Hei Bettan. Se vårt tidliger svar til deg. mvh DROPS Design
15.12.2025 - 10:47
![]() Bettan wrote:
Bettan wrote:
Stickar M har 114 maskor när A1 börjar och med 6 omsl och 1 före och 1 efter A1 blir det +8 på varje sida =16 på varvet men det står att det ska vara 122 Hur ska jag göra rätt?
12.12.2025 - 15:10DROPS Design answered:
Hei Bettan. Jo, i str. M har du 114 masker og på 1. omgang når det strikkes etter diagram A.1 gjør det 4 kast = 114 + 4 = 118 masker og i tillegg økes det med 2 masker hver gang A.1 strikkes og A.1 strikkes 2 ganger = 4 økte masker = 118 + 4 = 122 masker. mvh DROPS Design
15.12.2025 - 10:41
|
|||||||||||||||||||||||||
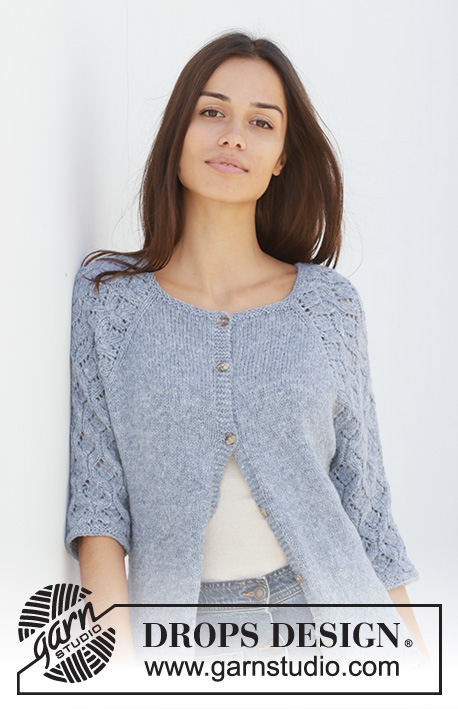
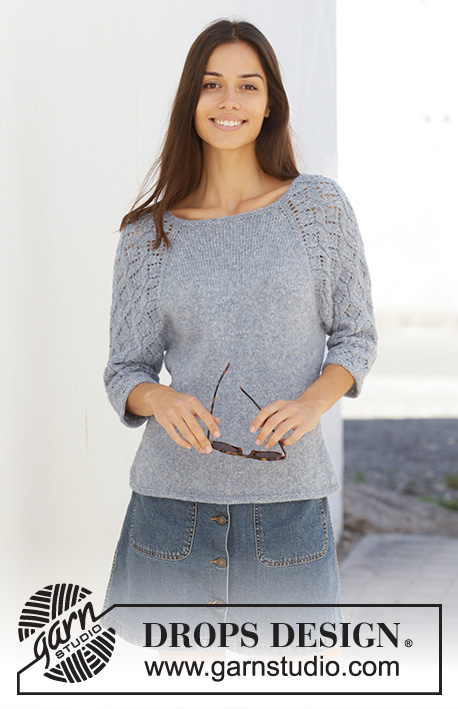
Blue Nostalgia#bluenostalgiasweater |
|||||||||||||||||||||||||
 |
 |
||||||||||||||||||||||||
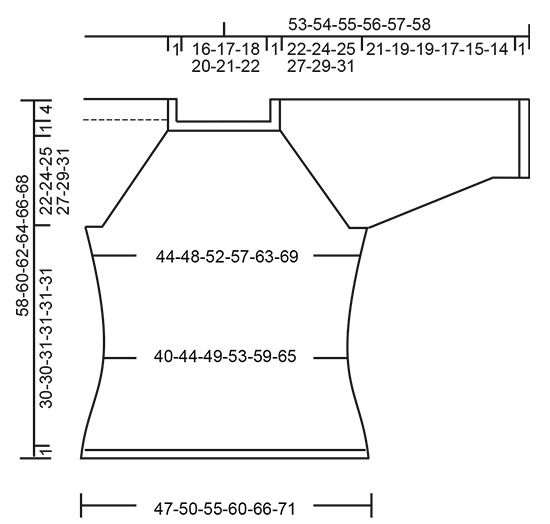
Knitted jumper with raglan in DROPS Sky. The piece is worked top down with lace pattern on sleeves. Sizes S – XXXL.
DROPS 199-3 |
|||||||||||||||||||||||||
|
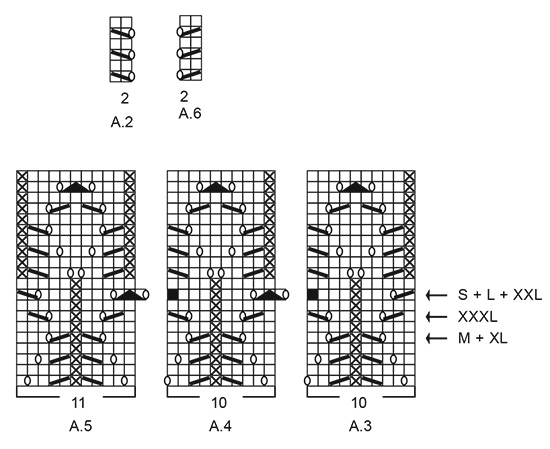
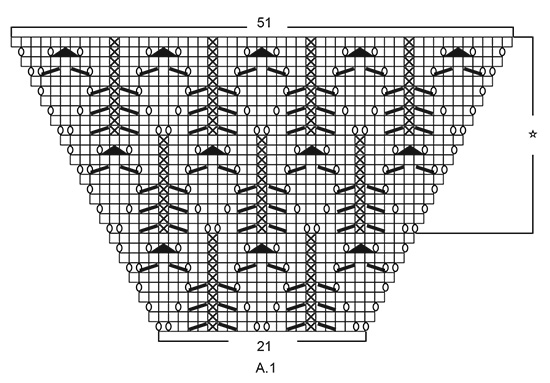
------------------------------------------------------- EXPLANATIONS FOR THE PATTERN: ------------------------------------------------------- RIDGE/GARTER STITCH (worked in the round): 1 ridge in height = 2 rounds; knit 1 round and purl 1 round. INCREASE TIP-1 (evenly spaced): To work out how to increase evenly, count the total number of stitches on the needle (e.g. 100 stitches), and divide by the number of increases to be made (e.g. 10) = 10. In this example, increase by making 1 yarn over after each 10th stitch. On the next round work the yarn overs twisted to avoid holes. PATTERN: See diagrams A.1 to A.6. Find your size in the diagrams (applies to A.3 to A.5). The diagrams show all rows in the pattern seen from the right side. DECREASE TIP (for sides of body and sleeves): Work until there are 3 stitches left before marker thread, knit 2 together, knit 2 (marker thread sits between these stitches), slip 1 stitch, knit 1 and pass the slipped stitch over the knitted stitch. INCREASE TIP-2 (for sides of body): Work until there are 2 stitches left before marker thread, 1 yarn over, knit 4 (marker thread sits in the middle of these stitches), 1 yarn over. On the next round work the yarn overs twisted to avoid holes. Then work the new stitches in stocking stitch. ------------------------------------------------------- START THE PIECE HERE: ------------------------------------------------------- JUMPER - SHORT OVERVIEW OF THE PIECE: Yoke and body are worked in the round with circular needle from mid back, top down. Sleeves are worked in the round with short circular needle/double pointed needles, top down. YOKE: Cast on 100-106-110-116-120-126 stitches with circular needle size 3.5 mm and Sky. Work 2 RIDGES – read description above. Knit 1 round where you increase 10-8-8-10-10-8 stitches evenly spaced – read INCREASE TIP-1 = 110-114-118-126-130-134 stitches. Change to circular needle size 4 mm. Knit 1 round. The next round is worked as follows: Work stocking stitch over the first 15-16-17-19-20-21 stitches (= half back piece), 1 yarn over, 2 stitches in stocking stitch, work A.1 over 21 stitches (= sleeve), 2 stitches in stocking stitch, 1 yarn over, work 30-32-34-38-40-42 stitches in stocking stitch (= front piece), 1 yarn over, 2 stitches stocking stitch, work A.1 over 21 stitches (= sleeve), 2 stitches in stocking stitch, 1 yarn over, work stocking stitch over the last 15-16-17-19-20-21 stitches (= half back piece). There are now 118-122-126-134-138-142 stitches on the needle. Continue this pattern onwards; i.e. on the sleeves increase on each side as shown in A.1. On the next round knit the yarn overs (= holes) and the increased stitches are worked into the pattern as you go as shown in A.1. On front and back pieces increase with yarn overs before/after the 2 stitches in stocking stitch in each side (there will be 2 stitches stocking stitch between each raglan increase). On the next round knit the yarn overs twisted (= no holes) and the increased stitches are worked in stocking stitch. Increase like this every 2nd round. You increase a total of 8 stitches on each increase-round (= 4 yarn overs + 4 stitches increased in A.1). REMEMBER THE KNITTING TENSION! When A.1 has been worked 1 time in height there are 230-234-238-246-250-254 stitches on the needle. Continue this pattern onwards, i.e. the pattern repeats itself as shown in A.1. Each time you have worked 20 rounds there will be room for 1 more repeat of lace pattern in width on each sleeve. When you have increased a total of 24-27-29-32-34-38 times there are 302-330-350-382-402-438 stitches on the needle and the piece measures 18-20-22-24-25-28 cm from the cast-on edge mid front. Continue with stocking stitch and pattern as before, but without increasing; i.e. the 69-75-79-85-89-97 stitches in A.1 are worked as follows: Work A.2 (= 2 stitches), 2-0-2-0-2-1 stitches in stocking stitch, starting on the round marked with an arrow for your size work A.3 (= 10 stitches), A.4 over the next 40-50-50-60-60-70 stitches (= 4-5-5-6-6-7 reports of 10 stitches), A.5 (= 11 stitches), 2-0-2-0-2-1 stitches in stocking stitch and A.6 (= 2 stitches). Continue until the piece measures approx. 23-25-26-28-30-32 cm from the cast-on edge mid front. The next round is worked as follows: Work 41-45-49-54-59-65 stitches in stocking stitch (= half back piece), place the next 69-75-77-83-83-89 stitches on 1 thread for sleeve, cast on 10-10-12-12-14-14 new stitches on the needle (= in side under sleeve), work 82-90-98-108-118-130 stitches stocking stitch (= front piece), place the next 69-75-77-83-83-89 stitches on 1 thread for sleeve, cast on 10-10-12-12-14-14 new stitches on the needle (= in side under sleeve) and work the remaining 41-45-49-54-59-65 stitches in stocking stitch (= half back piece). Body and sleeves are finished separately. THE PIECE IS NOW MEASURED FROM HERE! BODY: = 184-200-220-240-264-288 stitches. Insert 1 marker thread on each side in the middle of the 10-10-12-12-14-14 stitches cast on under each sleeve. Allow them to follow your work onwards; they will be used a little later when decreasing/increasing. Work stocking stitch. When the piece measures 2 cm from the division decrease 1 stitch on each side of both marker threads - read DECREASE TIP = 4 stitches decreased. Decrease like this every 3 cm a total of 4 times = 168-184-204-224-248-272 stitches. Continue working until the piece measures 14 cm from the division. Now increase 1 stitch on each side of both marker threads – read INCREASE TIP-2 = 4 stitches increased. Increase like this every 2 cm a total of 7 times = 196-212-232-252-276-300 stitches. Continue working until the piece measures 30-30-31-31-31-31 cm from the division. Change to circular needle size 3.5 mm and work 2 ridges. Loosely cast off, but to avoid the cast-off edge being tight you can cast off with needle size 4 mm. The jumper measures approx. 58-60-62-64-66-68 cm from the shoulder down. SLEEVE: Place the 69-75-77-83-83-89 stitches from the thread on the one side of the piece on short circular needle/double pointed needles size 4 mm and knit up 1 stitch in each of the 10-10-12-12-14-14 stitches cast on under the sleeve = 79-85-89-95-97-103 stitches. Insert 1 marker thread in the middle of the 10-10-12-12-14-14 stitches cast on under the sleeve and allow it to follow your work onwards; it will be used a little later when decreasing. Start the round at the marker thread. Start on the correct round in the diagrams so that the pattern continues from the yoke and work as follows: Work 4-2-4-2-3-1 stitches in stocking stitch, A.3 (= 10 stitches), A.4 over the next 50-60-60-70-70-80 stitches (= 5-6-6-7-7-8 repeats of 10 stitches), A.5 (= 11 stitches) and 4-2-4-2-3-1 stitches in stocking stitch. Continue this pattern. When the piece measures 2 cm from the division, decrease 2 stitches mid under sleeve – remember DECREASE TIP. Decrease like this every 3rd-3rd-3rd-2nd-2nd-2nd round a total of 14-15-15-16-15-16 times = 51-55-59-63-67-71 stitches. The stitches which do not fit into the pattern as you decrease are worked in stocking stitch, but make sure that if decreases are in the pattern you also make a yarn over. Continue working until the piece measures 21-19-19-17-15-14 cm from the division (shorter measurements in larger sizes due to longer yoke). Change to double pointed needles size 3.5 mm and work 2 ridges. Loosely cast off, but to avoid the cast-off edge being tight you can cast off with needle size 4 mm. Sleeve measures approx. 22-20-20-18-16-15 cm from the division. Work the other sleeve in the same way. |
|||||||||||||||||||||||||
Diagram explanations |
|||||||||||||||||||||||||
|
|||||||||||||||||||||||||
 |
|||||||||||||||||||||||||
 |
|||||||||||||||||||||||||
 |
|||||||||||||||||||||||||
Have you finished this pattern?Tag your pictures with #dropspattern #bluenostalgiasweater or submit them to the #dropsfan gallery. Do you need help with this pattern?You'll find 27 tutorial videos, a Comments/Questions area and more by visiting the pattern on garnstudio.com. © 1982-2026 DROPS Design A/S. We reserve all rights. This document, including all its sub-sections, has copyrights. Read more about what you can do with our patterns at the bottom of each pattern on our site. |
|||||||||||||||||||||||||


With over 40 years in knitting and crochet design, DROPS Design offers one of the most extensive collections of free patterns on the internet - translated to 17 languages. As of today we count 324 catalogues and 12290 patterns translated into English (UK/cm). 12290
We work hard to bring you the best knitting and crochet have to offer, inspiration and advice as well as great quality yarns at incredible prices! Would you like to use our patterns for other than personal use? You can read what you are allowed to do in the Copyright text at the bottom of all our patterns. Happy crafting!
Post a comment to pattern DROPS 199-3
We would love to hear what you have to say about this pattern!
If you want to leave a question, please make sure you select the correct category in the form below, to speed up the answering process. Required fields are marked *.