
Popular categories
Looking for a yarn?


Comments / Questions (58)
![]() Nati wrote:
Nati wrote:
Hola, os hice una pregunta y no he tenido respuesta, sigo a la espera, gracias
18.12.2018 - 00:41DROPS Design answered:
Hola Nati, Sin ver la labor no podemos ver donde está el fallo. Seguramente es la tensión del tejido, que no era igual a la recomendada en el patrón. ¿Has hecho una muestra? ¿Has estado tomando medidas durante el trabajo? Al ser así y trabajando de arriba abajo, es bastante más fácil ajustar para la talla deseada.
19.12.2018 - 22:39
![]() Nati wrote:
Nati wrote:
Hola, qué hice mal que me salió pequeño a pesar de seguir al pie de la letra el patrón, gracias anticipadas
11.12.2018 - 23:46DROPS Design answered:
Ver la respuesta arriba
19.12.2018 - 22:39
![]() Nati wrote:
Nati wrote:
Hola, hice el jersey siguiendo al pie de la letra el patrón y me ha quedado pequeño, una pena, lo quería para Navidad
11.12.2018 - 23:01
![]() Retkesné Edit wrote:
Retkesné Edit wrote:
Jó napot kívánok! Segítséget szeretnék kérni! A vállrész leírása szerint a diagram szerinti minta lekötése után lustakötésre és piros fonalra váltunk. Ugyanakkor a képen nekem úgy tűnik, hogy a pulóver teste harisnyakötéssel készült. Tudnának nekem ebben felvilágosítást adni? Hálásan köszönöm, további szép napot kívánok! Edit.
22.11.2018 - 09:09DROPS Design answered:
Kedves Edit! Köszönjük levelét. Igaza van, a pulóver teste piros színnel és harisnyakötéssel folytatódik. Javítottuk a hibát a fordításban, és a kellemetlenségért elnézést kérünk. Sikeres kézimunkázást!
25.11.2018 - 10:55
![]() Nathalie wrote:
Nathalie wrote:
J'ai fait l'empiecement, pour un pull en 7/8ans. Je me retrouve avec beaucoup plus de mailles qu'indiquées. 240au lieu de 228. J'ai vérifié si je ne m'étais pas trompée, mais il semble que non... Pourriez vous éclairer ma lanterne...?
04.11.2018 - 19:27DROPS Design answered:
Bonjour Nathalie, en taille 7/8 ans, vous devez bien avoir 240 m - c'est en taille 5/6 ans que vous auriez eu 228 m. Bon tricot!
05.11.2018 - 09:54
![]() Anja wrote:
Anja wrote:
Der Pulli ist zuckersüß - Tausend Dank für diese Anleitung ;)
22.10.2018 - 23:13
![]() Marina Grigoryeva wrote:
Marina Grigoryeva wrote:
Eine Frage zu Erhöhung. Das „noch weitere 2 x an beiden Seiten stricken,“ lese ich als insgesamt 4 weitere Reihen, 2 Reihen mit 24 Maschen bis Markierer und dann noch 2 mit 32 Maschen bis Markierer. Allerdings bedeutet das bei der vierte Reihe nur 1 Masche stricken und es wird wieder gewendet. Habe ich den Satz richtig verstanden, oder waren insgesamt nur 2 Reihen damit gemeint? Viele Grüße Marina
20.09.2018 - 13:29DROPS Design answered:
Liebe Frau Grigoryeva, ja genau, es werden noch 4 Reihen mehr gestrickt: 1 Hinreihe bis 24 M (in der 1. - 3. Größe) bleiben, wenden und die Rückreihe bis 24 M bleiben, dann noch 1 Hinreihe bis 32 M bleiben, wenden, 1 Rückreihe bis 32 M bleiben, wenden und die nächste Reihe bis zur hinteren Mitte rechts (= Hinreihe) stricken. Jetzt stricken Sie die Passe in der Runde. Viel Spaß beim stricken!
20.09.2018 - 13:34
![]() Mariarosaria wrote:
Mariarosaria wrote:
Buongiorno volevo chiedervi se tutto il maglione bisogna farlo con i ferri circolari corti O ad un certo punto bisogna usare i ferri circolari normali. Complimenti e grazie.
20.09.2018 - 10:32DROPS Design answered:
Buongiorno Mariarosaria. Può passare ai ferri circolari lunghi quando ci sono troppe maglie per quelli corti. Buon lavoro!
20.09.2018 - 10:46
|
|||||||||||||
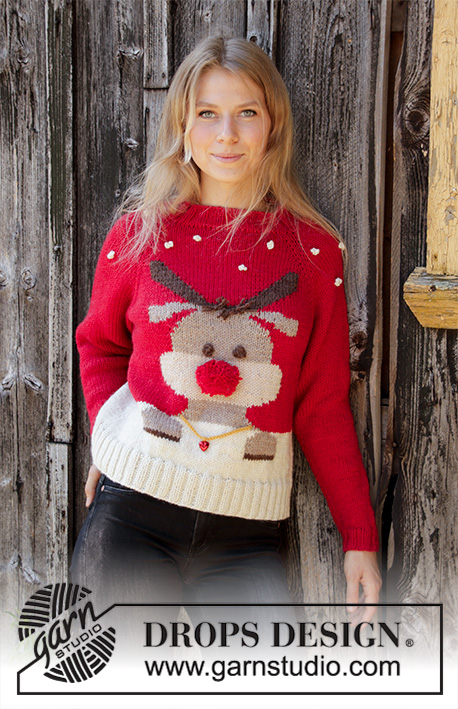
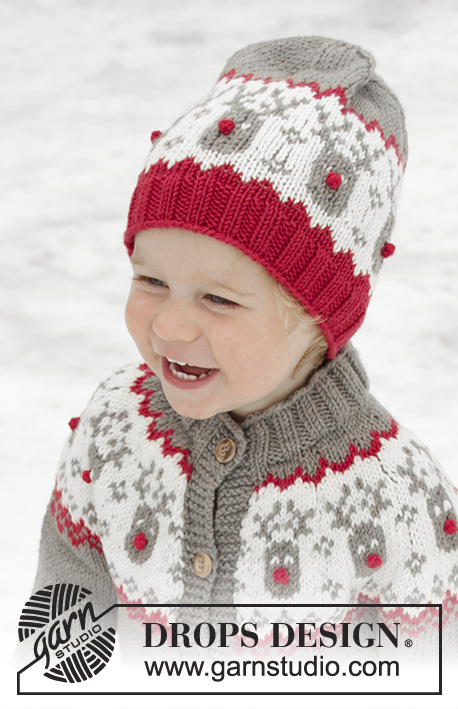
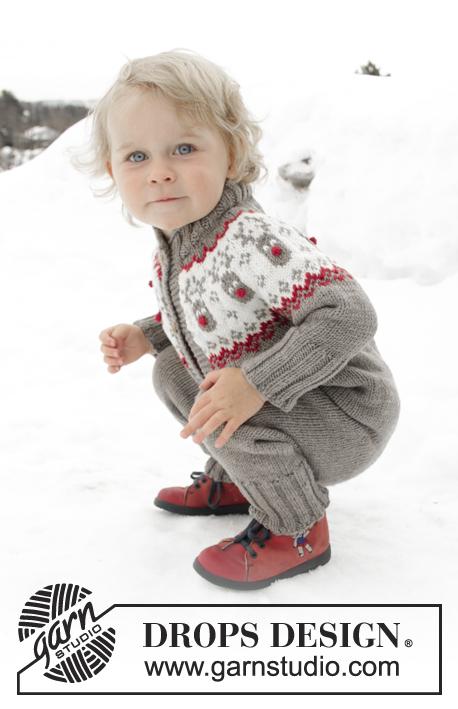
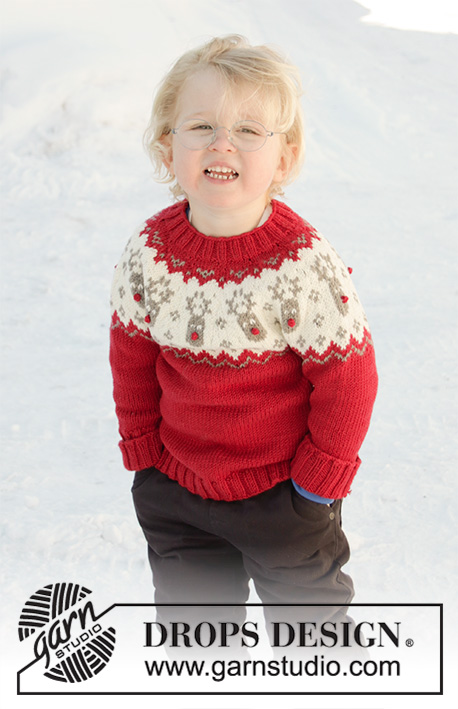
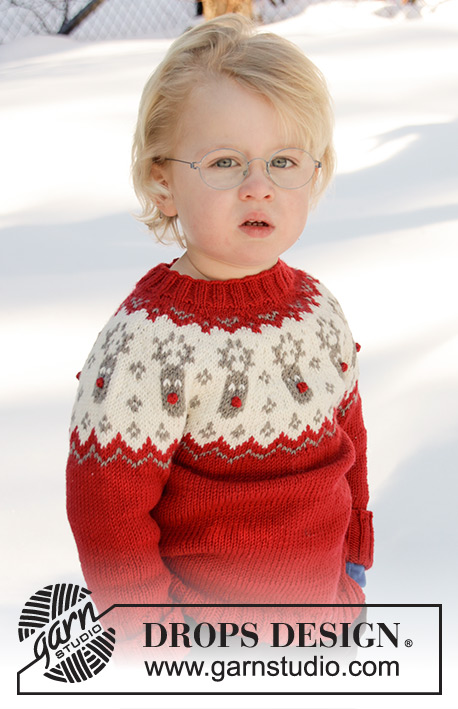
Little Red Nose#littlerednosesweater |
|||||||||||||
 |
 |
||||||||||||
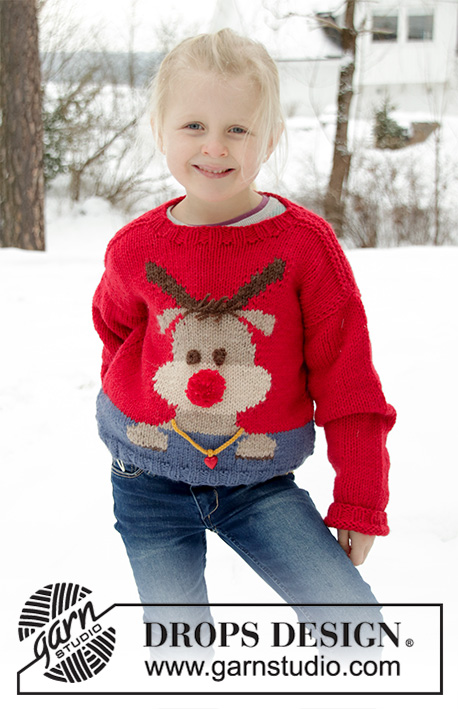
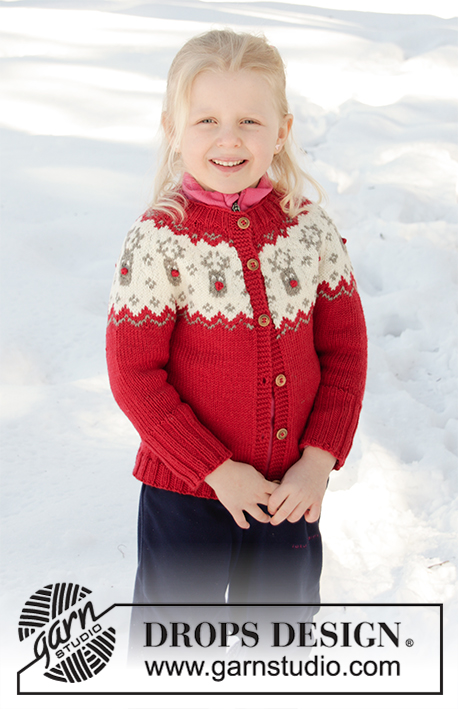
Knitted Christmas jumper for babies and children with round yoke in DROPS Merino Extra Fine. The piece is worked top down with Nordic pattern. Sizes 12 months – 12 years.
DROPS Children 32-10 |
|||||||||||||
|
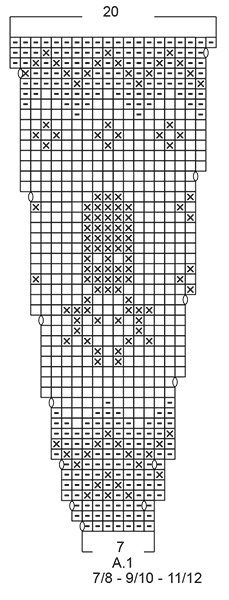
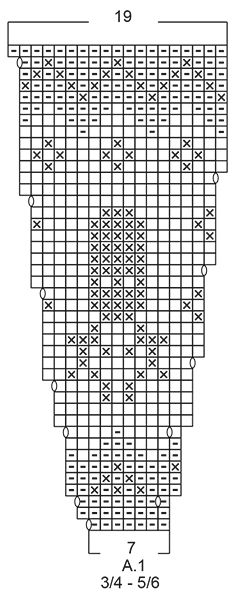
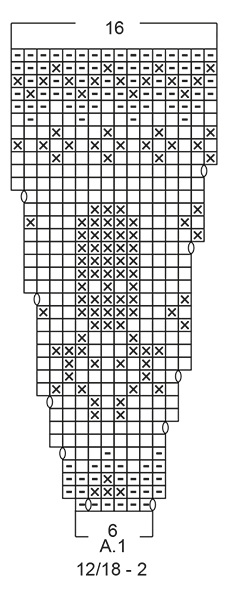
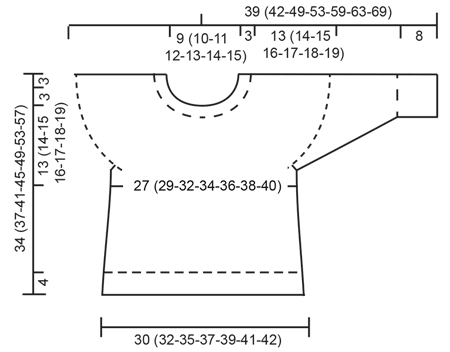
EXPLANATIONS FOR THE PATTERN: ------------------------------------------------------- PATTERN: See diagram A.1. Choose diagram for your size. The whole pattern is worked in stocking stitch. DECREASE/INCREASE TIP: To work out when to decrease/increase on the round, count the total number of stitches on the needle (e.g. 72 stitches) and divide by the number of decreases/increases to be made (e.g. 6) = 12. In this example, decrease by working together each 11th and 12th stitch, or increase after each 12th stitch by making 1 yarn over (the yarn overs are worked twisted on the next row to avoid holes). INCREASE TIP (for sides of body): Increase 1 stitch on each side of marker thread as follows: Start 2 stitches before marker thread, make 1 yarn over, work 4 stitches (marker thread sits in the middle of these 4 stitches), make 1 yarn over (= 2 stitches increased). On the next round work the yarn overs twisted to avoid holes. DECREASE TIP (for mid under sleeves): Decrease 1 stitch on each side of the marker thread as follows: Start 3 stitches before the marker thread, knit 2 together, knit 2 (marker thread sits between these 2 stitches), slip 1 stitch as if to knit, knit 1 and pass the slipped stitch over the knitted stitch (= 2 stitches decreased). ELEVATION (back of neck): Skip this section if you do not want an elevation. SIZE 12/18 MONTHS (2-5/6-7/8) YEARS: place 1 marker between 2 stitches mid-front (after 33 (36-42-42) stitches). SIZE (3/4-9/10-11/12) YEARS: place 1 marker in the stitch mid-front (in stitch 39-46-46) Knit until there are 8 (8-8-10-10-12-12) stitches left before the marker, turn, tighten strand and purl until there are 8 (8-8-10-10-12-12) stitches left on the other side, turn, tighten strand and knit until there are 16 (16-16-18-18-20-20) stitches left, turn, tighten strand and purl until there are 16 (16-16-18-18-20-20) stitches left on other side. Continue by working 8 stitches less each time you turn, 2 more times in each side, turn, tighten strand and knit to mid-back. ------------------------------------------------------- START THE PIECE HERE : ------------------------------------------------------- JUMPER - SHORT OVERVIEW OF THE PIECE: The piece is worked in the round, top down. A yoke is worked first, then divided for body and sleeves. The round starts approx. mid back. Body is worked in the round with circular needle. Sleeves are worked in the round with double pointed needles. NECK: Cast on 72 (76-80-84-88-96-100) stitches with red and double pointed needles/short circular needle size 3 mm (in the 2 smallest sizes you need to cast on and work with double pointed needles until you have enough stitches to use a circular needle; the other sizes can be cast on and worked with circular needle). Knit 1 round. Then work rib (= knit 2 / purl 2). Continue this rib for 3 cm. YOKE: Change to double pointed needles/short circular needle size 4 mm. Knit 1 round and decrease 6 (4-3-0-4-5-9) stitches evenly on round – read DECREASE/INCREASE TIP = 66 (72-77-84-84-91-91) stitches. You can now work an elevation in back of neck so that the yoke is slightly higher at the back. This elevation can be left out; the neck will then be the same front and back – work ELEVATION – read description above or continue working. Work pattern A.1 - NOTE: Choose diagram for your size (= 11 (12-11-12-12-13-13) repeats of 6 (6-7-7-7-7-7) stitches). Continue this pattern and increase as shown in diagram. REMEMBER THE KNITTING TENSION! When A.1 has been completed there are 176 (192-209-228-240-260-260) stitches on the needle. Continue with stocking stitch and red. On the next round increase 7 (7-10-7-3-0-11) stitches evenly on round = 183 (199-219-235-243-260-271) stitches. When the piece measures 13 (14-15-16-17-18-19) cm mid front (measured without neck), divide the piece as follows: Work 25 (27-30-32-34-36-38) stitches, place the next 42 (46-50-54-54-58-60) stitches on 1 thread for sleeve (without working them), cast on 8 stitches on the needle, work 49 (53-59-63-67-72-75) stitches, place the next 42 (46-50-54-54-58-60) stitches on 1 thread for sleeve (without working them), cast on 8 stitches on the needle and work the remaining 25 (27-30-32-34-36-38) stitches as before = 115 (123-135-143-151-160-167) stitches. BODY: Insert 1 marker thread in the middle of the 8 stitches cast on under each of the sleeves (= 57 (61-67-71-75-80-83) stitches between marker threads on the front piece). THE PIECE IS NOW MEASURED FROM HERE! When the piece measures 3 cm from where body and sleeves were divided, increase on each side of both marker threads – read INCREASE TIP. Repeat this increase when the piece measures 6 and 9 cm from where body and sleeves were divided = 127 (135-147-155-163-172-179) stitches. When the piece measures 11 (13-16-19-22-25-28) cm from where body and sleeves were divided, increase 9 (9-9-9-9-8-9) stitches evenly on the next round = 136 (144-156-164-172-180-188) stitches. Change to needles size 3 mm and work rib (= knit 2 / purl 2) for 4 cm. Then cast off with knit over knit and purl over purl. The whole jumper measures approx. 34 (37-41-45-49-53-57) cm, measured from shoulder. SLEEVE: Place the stitches from the one thread on double pointed needles size 4 mm and knit up 1 stitch in each of the 8 stitches cast on under the sleeve = 50 (54-58-62-62-66-68) stitches. Insert 1 marker thread in the middle of these 8 stitches (= mid under sleeve). THE PIECE IS NOW MEASURED FROM HERE! Work stocking stitch in the round with red. When the sleeve measures 1 cm from where body and sleeve were divided, decrease 2 stitches mid under sleeve – read DECREASE TIP. Decrease like this every 1½ (2-2-2½-3-3½-3½) cm a total of 6 (6-8-8-8-8-9) times = 38 (42-42-46-46-50-50) stitches. When the sleeve measures 10 (12-17-20-24-27-31) cm from where body and sleeve were divided, decrease 2 stitches evenly on round = 36 (40-40-44-44-48-48) stitches. Change to double pointed needles size 3 mm and work rib in the round (= knit 2 / purl 2) for 8 cm or to desired length. On the next round increase all purl 2 to purl 3 = 45 (50-50-55-55-60-60) stitches. Then cast off with knit over knit and purl over purl.. The sleeve measures a total of approx. 18 (20-25-28-32-35-39) cm from where body and sleeve were divided. Work the other sleeve in the same way. NOSES: Crochet with red and hook size 3 mm as follows: Work 4 chain stitches and 1 treble crochet in the 4th chain stitch from the hook, cut and fasten the strand. Work 1 nose for each reindeer (= 11 (12-11-12-12-13-13) noses). Tie the noses to each reindeer and fasten the strands. |
|||||||||||||
Diagram explanations |
|||||||||||||
|
|||||||||||||
 |
|||||||||||||
 |
|||||||||||||
 |
|||||||||||||
 |
|||||||||||||
Have you finished this pattern?Tag your pictures with #dropspattern #littlerednosesweater or submit them to the #dropsfan gallery. Do you need help with this pattern?You'll find 32 tutorial videos, a Comments/Questions area and more by visiting the pattern on garnstudio.com. © 1982-2026 DROPS Design A/S. We reserve all rights. This document, including all its sub-sections, has copyrights. Read more about what you can do with our patterns at the bottom of each pattern on our site. |
|||||||||||||


With over 40 years in knitting and crochet design, DROPS Design offers one of the most extensive collections of free patterns on the internet - translated to 17 languages. As of today we count 324 catalogues and 12290 patterns translated into English (UK/cm). 12290
We work hard to bring you the best knitting and crochet have to offer, inspiration and advice as well as great quality yarns at incredible prices! Would you like to use our patterns for other than personal use? You can read what you are allowed to do in the Copyright text at the bottom of all our patterns. Happy crafting!
Post a comment to pattern DROPS Children 32-10
We would love to hear what you have to say about this pattern!
If you want to leave a question, please make sure you select the correct category in the form below, to speed up the answering process. Required fields are marked *.