
Popular categories
Looking for a yarn?







































Comments / Questions (63)
 Gail Wright wrote:
I don’t understand graph A12 if I cabling 8 stitches then 8 how can that be 12 stitches
24.01.2025 - 03:47
 Suzanne Daigle wrote:
Je ne comprends pas les explications dans empiècement à partir de : Quand il n'y a plus suffisamment de mailles....etc. Est-ce que je dois diminuer 6 mailles à tous les rangs ou juste une fois. Je fais le patron 7/ et ca dit que je dois avoir 84 mailles, pouvez-vous me dire combien pour les manches et combien pour dos et devant. Merci
03.12.2024 - 20:39DROPS Design answered:
Bonjour Mme Daigle, quand les torsades se trouvent près des raglans et que vous ne pouvez plus les tricoter car il n'y a plus 12 mailles deA.3 pour les tricoter, tricotez simplement les 12 mailles de A.3 ensemble 2 par 2 (il reste ainsi 6 mailles dans chaque A.3), vous conserverez ainsi la bonne largeur. Il restera ainsi 12 m pour chaque manche et 30 m pour le devant et le dos= 84 m au total. Bon tricot!
04.12.2024 - 07:31
 Carla Van Tichelt wrote:
Ik brei model 30-3 Ylva, graag duidelijke uitleg hoe ik verder moet vanaf de mouwen ook op de rondbreinaald staan volgens instructievideo na enkele nldn met raglan starten, zou 8st per nld zijn telkens beide zijden mouwinzet. Zie ik fit juist? Volgens instructievideo zou dit zo ok zijn. Graag even uw hulp en antwoord mvg Carla
13.06.2024 - 12:42DROPS Design answered:
Dag Carla,
Ja, dat klopt. Je voegt een markeerdraad in tussen de mouwen en de panden, dus in totaal 4 markeerdraden en je begint gelijk nadat je de panden en de mouwen op 1 naald hebt, met minderen voor de raglan. Je mindert voor en na iedere markeerdraad, dus 8 minderingen per toer dat je mindert.
16.06.2024 - 19:35
 Pilar Oviedo wrote:
Me encantan sus patrones los tejo siempre y este lo he tomado de modelo y lo voy adaptando a mis gustos. Muchas gracias por compartirlos.
21.05.2022 - 12:09
Monique Beerthuizen wrote:
Goedemiddag. Vraag over de trui 30-3. De kabel die beschreven staat is 4/4/4. Je haalt 4st naar voren breid 4steken de steken weer terug zetten. Het vreemde wat ik vind je blijft een aantal rechte steken over klopt dit.?? Alvast bedankt voor reactie Monique
13.03.2022 - 17:37DROPS Design answered:
Dag Monique,
Dat klopt, een stukje verder in patroon A.3 brei je een kabel over de laatste 8 steken en laat je de eerste 4 steken links liggen op die manier krijg je een 4/4/4 kabel.
14.03.2022 - 12:31
Monique wrote:
Goedemiddag. Eén vraag over de kabel van deze trui 30-3. Is 4 voor je werk nemen. 4steken breien. 4steken terug zetten. Alleen klopt t dan dat je dan totaal een aantal steken recht breid. Zie bij jullie filmpjes ook 3 3 en dan is de kabel afgelopen. ..... Bedankt voor de reactie. Monique Beerthuizen
13.03.2022 - 13:46
Riet Devilee-Weijtens wrote:
Ik zie dat er erg veel vragen zijn over de raglan en de minderingen. Is het een idee om dit in de patroonbeschrijving aan te passen? Blijkbaar is het heel onduidelijk. Alvast bedankt!
09.11.2021 - 11:24
Riet Devilee-Weijtens wrote:
Hallo! Voor mij is de beschrijving van de minderingen bij de raglan heel onduidelijk. Ik ben meteen begonnen met de minderingen nadat ik de mouwen bij het hele werk heb gevoegd en ben begonnen met de raglan en dus de minderingen. Maar nu ben ik aan de 92 steken (ik maak de trui in de maat 134-140) en heb maar een hele korte schouderlijn. Had ik om de naald moeten minderen? Of moet ik eerst 3 naalden gewoon breien en dan pas met de minderingen beginnen? Alvast bedankt voor je antwoord. Groetjes!
09.11.2021 - 11:22DROPS Design answered:
Dag Riet,
Klopt je moet inderdaad pas op de vierde naald minderen. Je mindert eerst 5 keer iedere vierde naald, en dan 6 keer iedere andere naald (dus iedere tweede naald).
10.11.2021 - 16:47
Lorraine wrote:
I’m working through the Ylva pattern & you have helped me before. I’m on the Yoke, decreasing towards the neckline. I don’t understand instructions “when there are not enough stitches on each side towards the raglan lines to make the cables in A.3…decrease 6 stitches in A.3 in each side by knitting 2 by 2 together etc.” I’m finding this very confusing
11.10.2021 - 23:54DROPS Design answered:
Hi Lorraine, There are 12 stitches in each cable pattern (A.3) and when you do not have 12 stitches left after decreasing to raglan, you finish the cable on each side and decrease 6 stitches by knitting the first 2 stitches together, then knitting the next 2 stitches together etc. over all 12 stitches. These stitches are then continued in stocking stitch. Hope this helps and happy knitting!
12.10.2021 - 07:08
Lorraine wrote:
I’m making Ylva size7/8. Do I do an increase purlwise on each end of row to total 152? What is the reason for marker thread @ 76? Do I then continue in pattern for previous round following A.3 until measures 29 cm.?
18.09.2021 - 22:20DROPS Design answered:
Dear Lorraine, you should increase 1 stitch in the 23 purled stitches on each side to get 24 purled sts on each side, then insert a marker in the middle of these both sections of P24 = sides of the jumper, you will cast off later stitches on each side of these markers for armholes. And work now with purled stitches and A.3 until piece measures 29 cm. Happy knitting!
20.09.2021 - 10:56
|
|||||||||||||
Ylva#ylvasweater |
|||||||||||||
 |
 |
||||||||||||
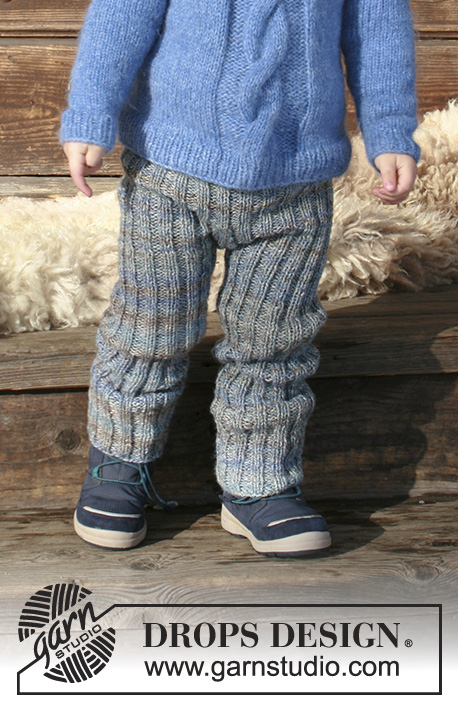
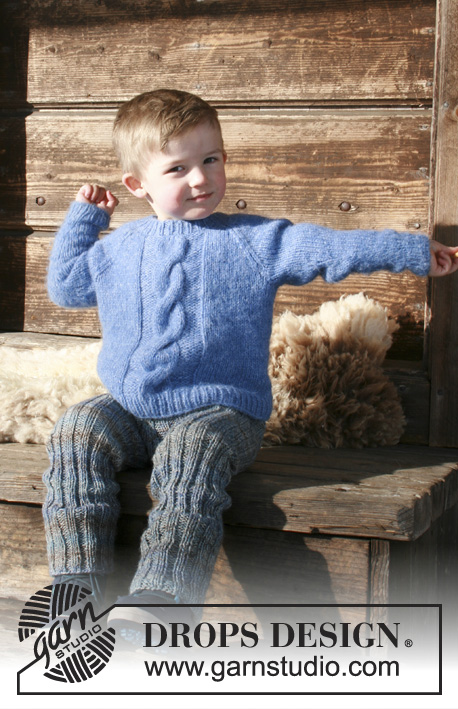
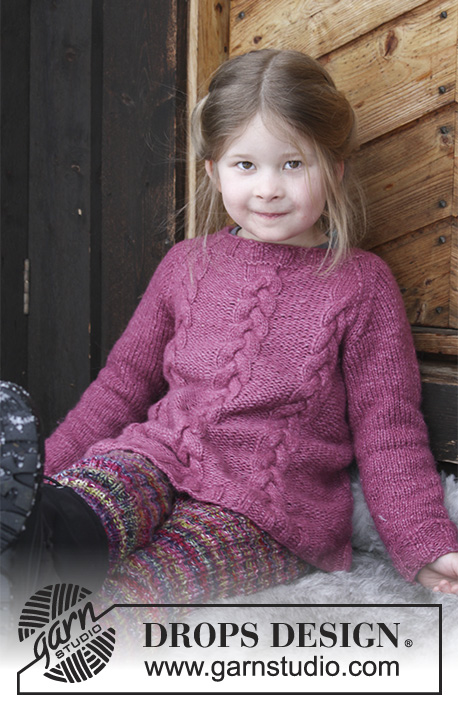
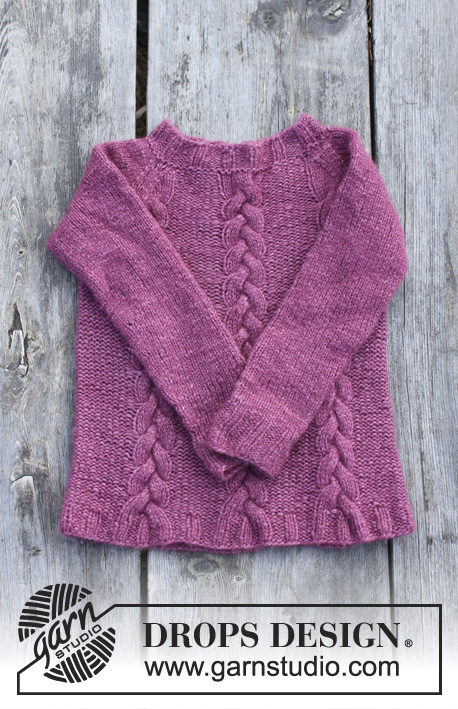
Knitted jumper with cables and raglan for kids. Size 2 - 12 years Piece is knitted in DROPS Air.
DROPS Children 30-3 |
|||||||||||||
|
INFORMATION FOR PATTERN: GARTER STITCH (worked in the round): 1 ridge = 2 rounds. Knit 1 round and purl 1 round. PATTERN: See diagrams A.1, A.2 and A.3. Choose diagram for your size in A.2. INCREASE TIP: Increase as follows mid under sleeve - beg 1 stitch before marker: Make 1 yarn over, knit 2 (marker is between these 2 stitches), make 1 yarn over. On next round knit yarn overs twisted to avoid holes. RAGLAN: Decrease 2 stitches in every transition between body and sleeves. Begin 3 stitches before marker thread: Knit 2 together, knit 2 (marker thread is between these stitches), slip 1 stitch knitwise, knit 1, pass slipped stitch over stitch worked. KNITTING TIP: If knitting tension is incorrect in height and the knitting is too tight, the yoke will be too short and the armholes too small. This can be adjusted by working 1 extra round without decrease evenly spaced between decrease ---------------------------------------------------------- BODY: Worked in the round on circular needle, bottom up. Cast on 132-142-150-150-150-160 stitches on circular needle size 5 mm with Air. Knit 1 round, then work rib as follows: SIZE 2 years: Knit 1, purl 3, knit 2, purl 3, A.1 (= 12 stitches), A.2 (= 6 stitches), A.1, A.2. A.1, * purl 3, knit 2 *, work from *-* over the next 15 stitches, purl 3, A.1, A.2, A.1, A.2, A.1, purl 3, knit 2, purl 3, knit 1. SIZE 3/4 - 5/6 - 7/8 - 9/10 years: Purl 1, knit 2, purl 3, knit 2, purl 3, A.1 (= 12 stitches), A.2 (= 6-8-8-8 stitches), A.1, A.2, A.1, * purl 3, knit 2 *, work from *-* over the next 20 stitches, purl 3, A.1, A.2, A.1, A.2, A.1, purl 3, knit 2, purl 3, knit 2, purl 2. SIZE 11/12 years: Knit 1, purl 3, knit 2, purl 3, knit 2, purl 3, A.1 (= 12 stitches), A.2 (= 8 stitches), A.1, A.2, A.1, * purl 3, knit 2 *, work from *-* over the next 25 stitches, purl 3, A.1, A.2, A.1, A.2, A.1, purl 3, knit 2, purl 3, knit 2, purl 3, knit 1. ALL SIZES: Continue with rib like this for 4 cm. Switch to circular needle size 6 mm. Then work as follows: Purl the first 9-11-11-11-11-14 stitches, A.3 (= 12 stitches), purl 6-6-8-8-8-8, A.3, purl 6-6-8-8-8-8, A.3, purl the next 18-23-23-23-23-28 stitches, A.3, purl 6-6-8-8-8-8, A.3, purl 6-6-8-8-8-8, A.3, purl over the last 9-12-12-12-12-14 stitches. On next round adjust number of stitches over the 18-23-23-23-23-28 stitches purl in each side to 18-22-20-24-26-28 stitches = 132-140-144-152-156-160 stitches. Insert 1 marker thread in each side, in the middle of purl stitches (= 66-70-72-76-78-80 stitches on back piece and front piece). Continue with A.3 and purl as before upwards. REMEMBER THE KNITTING TENSION! When piece measures 20-23-26-29-32-35 cm, cast off 6 stitches in each side for armholes (cast off 3 stitches on each side of both marker treads). There are 60-64-66-70-72-74 stitches on back piece and front piece. Put piece aside and work the sleeves. SLEEVE: Work in the round on double pointed needles, switch to short circular needle when needed. Cast on 30-30-30-35-35-35 stitches on double pointed needles size 5 mm with Air. Knit 1 round, then work rib = knit 2/purl 3. When piece measures 4 cm, switch to double pointed needles size 6 mm. Knit 1 round while decreasing 4-4-4-7-7-5 stitches evenly = 26-26-26-28-28-30 stitches. Insert 1 marker at beginning of round (= mid under sleeve). Then work in stocking stitch. When piece measures 6 cm, increase 2 stitches mid under sleeve - read INCREASE TIP. Increase like this every 3-3½-3½-4½-4½-5 cm 5-6-7-6-7-7 times in total = 36-38-40-40-42-44 stitches. When piece measures 21-26-29-33-37-41 cm, cast off 6 stitches mid under sleeve (cast off 3 stitches on each side of marker thread) = 30-32-34-34-36-38 stitches. Put piece aside and knit another sleeve. YOKE: Slip sleeves on to same circular needle as body where armholes were cast off = 180-192-200-208-216-224 stitches. Insert a marker thread in all transitions between sleeves and body (= 4 marker threads). Continue with pattern as before and decrease for RAGLAN - see explanation above. Decrease every 4th round 5-5-6-5-5-6 times and every other round 4-5-5-6-6-6 times = 9-10-11-11-11-12 times in total. When there are not enough stitches in each side towards the raglan lines to make the cables in A.3, decrease 6 stitches in A.3 in each side by knitting 2 by 2 stitches together. On last decrease for raglan decrease 6 stitches the same way over the two middle repetitions of A.3. After all decreases are done, 72-76-76-84-92-92 stitches remain on round. Knit 1 round over all stitches while decreasing 12-16-16-19-22-22 stitches evenly = 60-60-60-65-70-70 stitches. Work 1 ridge in GARTER STITCH - see explanation above. Then work rib = knit 2/purl 3 for 3-3-3-4-4-4 cm. Cast off stitches with knit over knit and purl over purl. ASSEMBLY: Sew the opening under the sleeves. |
|||||||||||||
Diagram explanations |
|||||||||||||
|
|||||||||||||
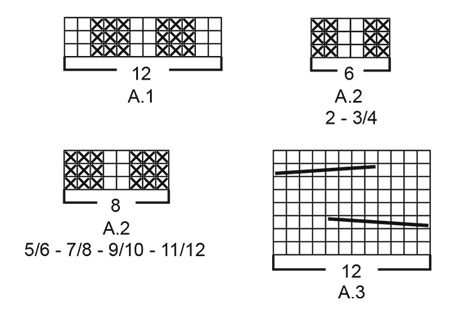 |
|||||||||||||
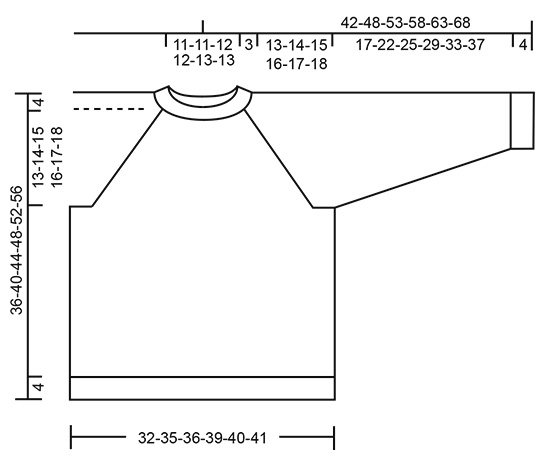 |
|||||||||||||
Have you finished this pattern?Tag your pictures with #dropspattern #ylvasweater or submit them to the #dropsfan gallery. Do you need help with this pattern?You'll find 20 tutorial videos, a Comments/Questions area and more by visiting the pattern on garnstudio.com. © 1982-2026 DROPS Design A/S. We reserve all rights. This document, including all its sub-sections, has copyrights. Read more about what you can do with our patterns at the bottom of each pattern on our site. |
|||||||||||||






With over 40 years in knitting and crochet design, DROPS Design offers one of the most extensive collections of free patterns on the internet - translated to 17 languages. As of today we count 333 catalogues and 12532 patterns translated into English (UK/cm). 12532
We work hard to bring you the best knitting and crochet have to offer, inspiration and advice as well as great quality yarns at incredible prices! Would you like to use our patterns for other than personal use? You can read what you are allowed to do in the Copyright text at the bottom of all our patterns. Happy crafting!
Post a comment to pattern DROPS Children 30-3
We would love to hear what you have to say about this pattern!
If you want to leave a question, please make sure you select the correct category in the form below, to speed up the answering process. Required fields are marked *.