
Popular categories
Looking for a yarn?


Comments / Questions (22)
![]() Lamure wrote:
Lamure wrote:
Bonjour, je ne comprends pas trop comment faire la 3 ème rangee du diagramme du diagramme A3 et enchaîner avec A4. Car le schéma A3 prends plus de 8 mailles et empiète sur le schéma A4.. Comment les intégrer ensemble ? Je vous remercie de la réponse
05.05.2025 - 17:21DROPS Design answered:
Bonjour Mme Lamure, au 5ème rang des diagrammes, on va tricoter la dernière maille de A.1 avec les 2 premières mailles de A.2 (le 1er jeté est désormais la dernière maille de A.1), puis on tricote la dernière maille de A.2 avec les 2 premières mailles du A.2 suivant / de A.3, ainsi le 1er jeté est la nouvelle dernière maille de A.2. Bon tricot!
06.05.2025 - 10:05
![]() Livia Bratus wrote:
Livia Bratus wrote:
Buonasera e grazie per la precedente risposta. Ho però un altro dubbio : ho iniziato gli aumenti del raglan ma non riesco a capire come inserire il motivo. Ho provato a leggere le risposte già date ma non riesco a capire. Grazie in anticipo per l\'aiuto
15.01.2025 - 21:58
![]() Livia Bratus wrote:
Livia Bratus wrote:
Buongiorno ho confrontato la correzione con la spiegazione dello sprone ma non sono riuscita a trovare la differenza. potreste aiutarmi? Grazie, non vedo l'ora di iniziare a lavorare il modello!
11.01.2025 - 14:36DROPS Design answered:
Buonasera Livia, le spiegazioni comprendono già le correzioni, non deve aggiungere nulla. Buon lavoro!
11.01.2025 - 20:04
![]() Maria wrote:
Maria wrote:
Can the body also be knit in the round? I don't understand why it needs to be split. Thank you
04.04.2022 - 12:28DROPS Design answered:
Dear Maria, you can adapt the pattern to work the body in the round, but just note that there should be 12 cm vents on each side, ie you should divide piece and end front and back piece separately on the last 12 cm to keep vents. Happy knitting!
04.04.2022 - 15:06
![]() Rita wrote:
Rita wrote:
Hej! Mönstret lämnar mycket utrymme för tolkning på flera ställen tyvärr. Trots upprepade kontroller och omstart 6ggr går inte mönstret ihop efter första raglanökningen. Instruktioner varv för varv skulle göra det lättare att förstå. För svårtolkad för en rätt erfaren stickare vilket är synd då mönstret är så vackert.
13.08.2021 - 18:12
![]() Petra Wisiak wrote:
Petra Wisiak wrote:
Hallo! Ich verstehe nicht, wie ich die Maschen der Raglanzunahme in das Muster einarbeiten soll. Bitte um Hilfe, danke!☺
05.12.2020 - 14:47DROPS Design answered:
Liebe Frau Wisiak, die neuen Maschen nach den Raglanlinien werden wie in A.1 gestrickt (= lesen Sie das Diagram links nach recht) - und vor den Raglanlinien werden die neuen Maschen wie in A.3 gestrickt (Diagram rechts nach links lesen). Stricken Sie krausrechts die Maschen, die nicht im Lochmuster gestrickt werden können (wenn Sie nicht genügend Maschen haben, um 1 Abnahme + den dazugehörigenden Umschlag zu stricken). Viel Spaß beim stricken!
07.12.2020 - 07:44
![]() Amy wrote:
Amy wrote:
Prachtig patroon! Ik wil deze maken, maar dan de hele mouw ook in kantpatroon. Mijn vraag is: heb ik dan meer garen nodig? Ik heb nu 125g in huis. Volgens de beschrijving is dat genoeg voor de maat die ik wil maken, maar misschien moet ik dan nog een bol bijbestellen?
21.01.2020 - 15:35DROPS Design answered:
Dag Amy,
Nee hoor, je hoeft dan geen extra garen te bestellen. Je hebt genoeg aan dezelfde hoeveelheid (en misschien heb je zelfs minder nodig.)
26.01.2020 - 14:37
![]() Katja wrote:
Katja wrote:
Es steht: Die Zunahmen in jeder 2. Runde 6x (Grösse L) arbeiten. Bedeutet das, dass ich in der 2. runde 6 mal zunehmen soll? Normalerweise nimmt man doch nur an den markierten Maschen/Raglanmaschen zu, aber das sind nur 4?
03.02.2019 - 09:45DROPS Design answered:
Liebe Katja, Sie sollen insgesamt 6 Zunahmenrunde (in jede 2. Runde) stricken, aber Siei werden jeweils 8 Maschen (= 2 für jeden Ärmel + 2 am Vorder bzw Rückenteil) zunehmen, nach diesen 6 Zunahmenrunde haben Sie 8 Maschen x 6 zugenommen. Dann in jede 4. Runde 22-24 x zunehmen (auch 8 Maschen wie zuvor). Viel Spaß beim stricken!
04.02.2019 - 12:06
![]() Vibeke wrote:
Vibeke wrote:
Str. Xl
28.09.2018 - 15:09
![]() Vibeke wrote:
Vibeke wrote:
Hej Jeg kan simpelthen ikke gennemskue hvori den rettelse I har beskrevet består. Jeg ender med at få 2 masker for meget når jeg er igennem første mønster pind Mvh. Vibeke
26.09.2018 - 17:01DROPS Design answered:
Hej Vibeke, hvilken størrelse strikker du, så skal vi prøve at guide dig igennem første mønsterpind :)
28.09.2018 - 14:47
|
||||||||||||||||||||||
Song of the Sea#songoftheseasweater |
||||||||||||||||||||||
 |
 |
|||||||||||||||||||||
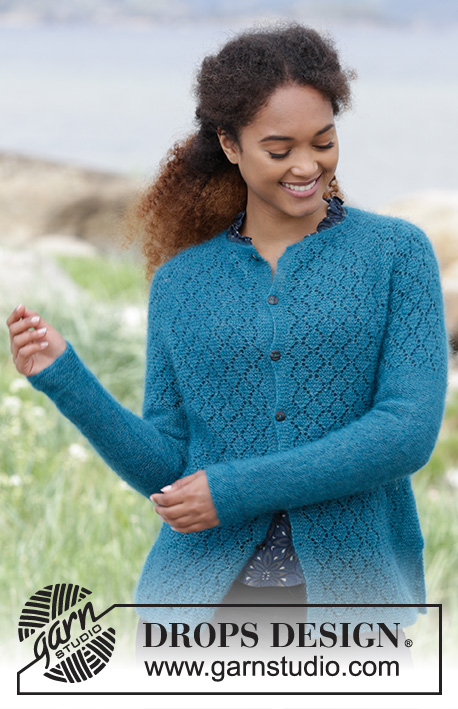
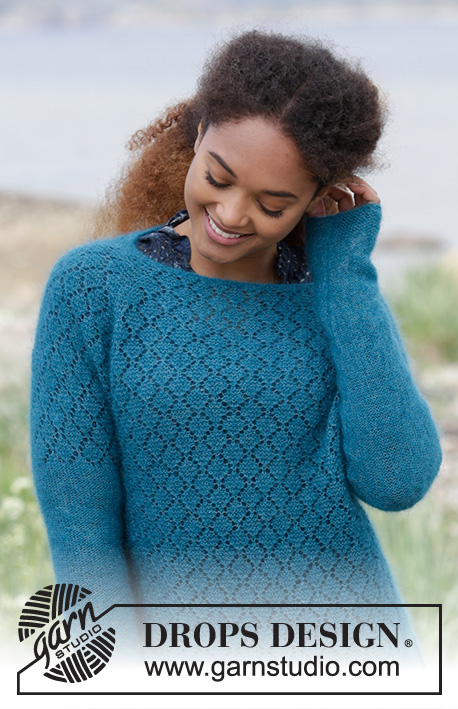
Knitted jumper with raglan, lace pattern, garter stitch and split in the side, worked top down. Sizes S - XXXL. The piece is worked in DROPS Kid-Silk.
DROPS 181-22 |
||||||||||||||||||||||
|
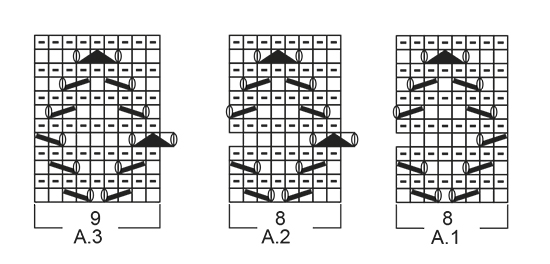
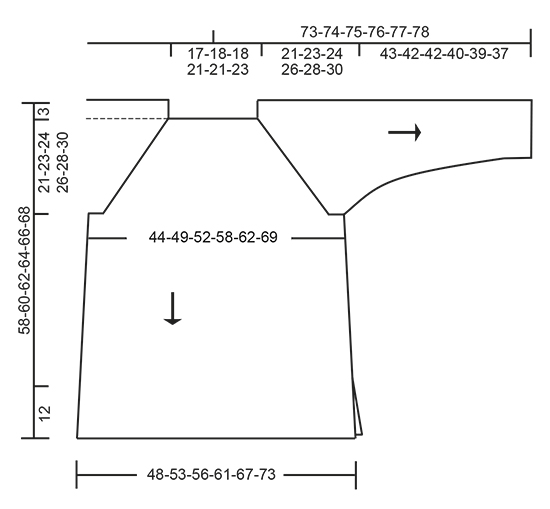
INFORMATION FOR THE PATTERN: RIDGE/GARTER STITCH (worked back and forth): 1 ridge = Knit 2 rows. RIDGE/GARTER STITCH (worked in the round): 1 ridge = 2 rounds. Knit 1 round and purl 1 round. PATTERN: See diagrams A.1 to A.3. The diagrams show all the rows in the pattern seen from the right side. RAGLAN: Start 1 stitch before the marker thread, make 1 yarn over, knit 2 (the marker thread sits between these 2 stitches), make 1 yarn over (= 2 stitches increased). Repeat by all 4 marker threads (= a total of 8 stitches increased). On the next round, work the yarn overs twisted to prevent holes. INCREASE TIP-2 (for the sides in front and back pieces): All increases are worked from the right side. Increase 1 stitch on the inside of 2 stitches in each side of the piece as follows: Work 2 stitches garter stitch, 1 yarn over, work pattern as before until there are 2 stitches left, 1 yarn over, 2 stitches garter stitch. On the next round, knit the yarn overs twisted to prevent holes. INCREASE TIP-1 (for yoke) To work out how to increase evenly, count the total number of stitches on the needle (e.g. 16 stitches) and divide by the number of increases to be made (e.g. 11) = 1.4. In this example, increase alternately after approx. every first and 2nd stitch. DECREASE TIP (for sleeve): All decreases are worked from the wrong side (i.e. with knit) Knit 2, knit 2 together (= 1 stitch decreased), knit until there are 4 stitches left, slip 1 stitch as if to knit, knit 1, pass the slipped stitch over the knitted stitch (= 1 stitch decreased), finish with knit 2. ---------------------------------------------------------- JUMPER: The yoke is worked in the round, top down, with circular needle, before dividing for the front and back pieces, which are worked back and forth with circular needle. The sleeves are worked back and forth with circular needle. YOKE: Cast on 98-104-104-116-116-126 stitches with circular needle size 2.5 mm and 2 strands Kid-Silk. Remove one of the strands and continue with 1 strand Kid-Silk. Work 2 RIDGES – see description above. Work, increase and insert 4 marker threads as follows: Knit 16 stitches at the same time as you increase 11 stitches evenly over these stitches – read INCREASE TIP-1, insert 1 marker thread (= left sleeve), knit 33-36-36-42-42-47 stitches at the same time as you increase 10-15-15-17-17-20 stitches evenly (= front piece), insert 1 marker thread, knit 16 stitches at the same time as you increase 11 stitches evenly (= right sleeve), insert 1 marker thread, knit 32-35-35-41-41-46 stitches at the same time as you increase 10-15-15-17-17-20 stitches evenly, insert 1 marker thread and finish with 1 stitch garter stitch (= back piece) = 140-156-156-172-172-188 stitches. Purl 1 round. Change to circular needle size 3.5 mm. Then work as follows: Work 1 stitch in garter stitch, A.1 over the next 8 stitches, A.2 over the next 8 stitches, A.3 over the next 9 stitches, 2 stitches garter stitch (the marker thread sits in the middle of these stitches = left sleeve), work A.1 over the next 8 stitches, work A.2 over the next 24-32-32-40-40-48 stitches, A.3 over the next 9 stitches, 2 stitches garter stitch (the marker thread sits in the middle of these stitches = front piece), A.1 over the next 8 stitches, A.2 over the next 8 stitches, A.3 over the next 9 stitches, 2 stitches garter stitch (the marker thread sits in the middle of these stitches = right sleeve), work A.1 over the next 8 stitches, work A.2 over the next 24-32-32-40-40-48 stitches, A.3 over the next 9 stitches, 1 stitch in garter stitch (= back piece) REMEMBER THE KNITTING TENSION! Continue with pattern and increase to RAGLAN – see description above. The increased stitches are worked into the pattern as you go. Increase every 2nd round 1-2-6-6-7-7 times, then every 4th round 21-23-22-24-26-28 times (= a total of 22-25-28-30-33-35 times). After all the increases, there are 316-356-380-412-436-468 stitches on the needle. The piece measures approx. 21-23-24-26-28-30 cm. The next round is worked as follows: Place the first 66-74-82-86-92-92 stitches on a thread for sleeve, cast on 8-8-12-12-16-16 new stitches on the needle (= in the side under the sleeve), continue pattern over the next 92-104-108-120-126-142 stitches (= front piece), place the next 66-74-82-86-92-92 stitches on a thread for sleeve, cast on 8-8-12-12-16-16 new stitches on the needle (= in the side under the sleeve), continue with pattern over the next 92-104-108-120-126-142 stitches (= back piece). Insert a marker in the middle of the new stitches under the sleeves in both sides. These markers mark the divide between the front and back pieces. The front piece, back piece and sleeves are now finished separately. THE PIECE IS NOW MEASURED FROM HERE! BACK PIECE: = 100-112-120-132-142-158 stitches. The piece is now worked back and forth. The next row is worked as follows from the right side: Adjust so that the pattern matches the pattern on the yoke. Work 5-7-7-5-6-6 stitches garter stitch, A.1 over the next 8 stitches, A.2 over the next 72-80-88-104-112-128 stitches, A.3 over the next 9 stitches, 6-8-8-6-7-7 stitches garter stitch. Continue pattern in this way. When the piece measures 5 cm from the separation, increase 1 stitch inside 2 stitches in each side of the piece (= 2 stitches increased) – read INCREASE TIP-2! The increased stitches are worked in garter stitch. Increase in this way every 4-5-5-5-3-4 cm a total of 5-4-4-4-6-5 times = 110-120-128-140-154-168 stitches. Continue the pattern until the piece measures 32-32-33-33-33-33 cm from the separation (the piece measures 56-58-60-62-64-66 cm in total from shoulder), finish the pattern after a complete or half repeat in height. Work 5 RIDGES – see description above, over all stitches, then loosely cast off with double strand. FRONT PIECE: Work as for back piece. SLEEVE: Place the 66-74-82-86-92-92 stitches from the thread in the one side of the piece on circular needle size 3.5 mm and cast on 4-4-6-6-8-8 stitches in each side of the piece at the end of the next 2 rows = 74-82-94-98-108-108 stitches. Work stocking stitch back and forth, but the wrong side should face outwards (purl from right side, knit from wrong side). When the piece measures 2 cm from the separation, decrease 1 stitch in each side – read DECREASE TIP. Decrease in this way every 2½-2-1½-1½-1-1 cm a total of 13-16-21-21-25-24 times = 48-50-52-56-58-60 stitches. Continue working until the sleeve measures 39-38-38-36-35-33 cm from the separation (shorter measurements in larger sizes because of wider neck and longer yoke). Change to circular needle size 2.5 mm. Now work garter stitch back and forth over all stitches for 4 cm. Then loosely cast off with double strand. The sleeve measures 43-42-42-40-39-37 cm from the separation and down. Work the other sleeve in the same way. ASSEMBLY: Sew the underarm sleeves, from the separation and down – sew inside the 1 edge stitch in each side. Sew the side seams from the separation and down – sew edge to edge in the outermost loop of the outermost stitch, so that the seam is flat, but stop when you have approx.12 cm left in each side (= split). Sew the seam in the other side in the same way. |
||||||||||||||||||||||
Diagram explanations |
||||||||||||||||||||||
|
||||||||||||||||||||||
 |
||||||||||||||||||||||
 |
||||||||||||||||||||||
 |
||||||||||||||||||||||
Have you finished this pattern?Tag your pictures with #dropspattern #songoftheseasweater or submit them to the #dropsfan gallery. Do you need help with this pattern?You'll find 29 tutorial videos, a Comments/Questions area and more by visiting the pattern on garnstudio.com. © 1982-2026 DROPS Design A/S. We reserve all rights. This document, including all its sub-sections, has copyrights. Read more about what you can do with our patterns at the bottom of each pattern on our site. |
||||||||||||||||||||||


With over 40 years in knitting and crochet design, DROPS Design offers one of the most extensive collections of free patterns on the internet - translated to 17 languages. As of today we count 324 catalogues and 12290 patterns translated into English (UK/cm). 12290
We work hard to bring you the best knitting and crochet have to offer, inspiration and advice as well as great quality yarns at incredible prices! Would you like to use our patterns for other than personal use? You can read what you are allowed to do in the Copyright text at the bottom of all our patterns. Happy crafting!
Post a comment to pattern DROPS 181-22
We would love to hear what you have to say about this pattern!
If you want to leave a question, please make sure you select the correct category in the form below, to speed up the answering process. Required fields are marked *.