
Popular categories
Looking for a yarn?


Comments / Questions (74)
![]() Mélanie wrote:
Mélanie wrote:
Je ne sais pas comment faire pour monter les 8 sous la manche. Merci Tricoter les 31-33-36-41-44-49 premières mailles comme avant, glisser les 46-50-56-62-64-66 mailles suivantes en attente sur un fil pour la manche et monter 8-8-8-8-10-10 mailles sous la manche,
15.01.2022 - 17:26DROPS Design answered:
Bonjour Mélanie, cette leçon montre sur la photo 11) comment on va monter les mailles sous la manche; si vous préférez en vidéo, cette vidéo montre à environ 7:45 comment monter ces mailles. Bon tricot!
17.01.2022 - 08:21
![]() Zornitsa wrote:
Zornitsa wrote:
Salve, la correzione per lo sprone per quale giro di segnapunti si riferisce? Ancora dal primo?
22.10.2021 - 12:36DROPS Design answered:
Buonasera Zornitsa, la correzione fa riferimento al posizionamento del segnapunti 2. Buon lavoro!
24.10.2021 - 19:56
![]() Jocelyne wrote:
Jocelyne wrote:
Je fais la grandeur xxl j’ai fais pour le col les 24 augmentations demandé, je fais quoi ensuite? Merci de me repondre
26.06.2021 - 17:21DROPS Design answered:
Bonjour Jocelyne, en XXL vous augmentez d'abord 24 fois tous les 2 tours puis 1 fois tous les 4 tours et 1 fois tous les 6 tours = vous aurez alors 304 mailles et votre ouvrage mesurera environ 28 cm depuis le marqueur, tricotez comme avant mais sans augmenter jusqu'à 28 cm après le marqueur et divisez ensuite l'ouvrage pour le dos/le devant et les manches comme indiqué. Bon tricot!
28.06.2021 - 07:35
![]() Jocelyne wrote:
Jocelyne wrote:
J’ai tricoterai col mes premières jetés et après un rat endroit en prenant mes jetés torses ce qui donne des petits X . Si je suis correct les 2 rangs suivants je les tricote comment car plus de vidéo tutoriel. Merci de me répondre.
11.06.2021 - 20:09DROPS Design answered:
Bonjour Jocelyne, vous augmenter 8 mailles à chaque fois, chacune de ces augmentations se fait avec 1 jeté et ce jeté se tricote en point texturé, autrement dit, si la maille suivante/précédente est 1 m jersey, tricotez l'augmentation au point mousse (= soit à l'endroit, soit à l'envers en fonction de votre tour point mousse), si la maille suivante/précédente est 1 m point mousse, tricotez l'augmentation à l'endroit (= jersey). Bon tricot!
14.06.2021 - 07:46
![]() Jocelyne wrote:
Jocelyne wrote:
Besoins d’aide, je suis débutante et lis et comprends difficilement votre patron j’ai bloqué après les augmentations 1 . Tricoter endroit envers en augmentant des mailles jetées avant ou après les marqueurs. Après j’ai défait six fois. Aider moi en explications facile car le tutoriel ne m’aide pas ja ne tricote pas de la même technique quelle
10.06.2021 - 19:04DROPS Design answered:
Bonjour Jocelyne, placez bien vos marqueurs comme indiqué et augmentez soit avant soit après le marqueur indiqué en faisant 1 jeté, au tour suivant, tricotez le jeté en point texturé pour continuer le motif 1 m jersey, 1 m point mousse. Dans la vidéo, regardez le fil et pas la main qui le tient si c'est cela qui vous perturbe, la technique est ensuite la même (lorsque vous tricotez le point texturé en rond = 1 m end/1 m point mousse, vous tricotez la m point mousse d'abord à l'envers, puis à l'endroit au tour suivant (cr vidéo); la m end se tricote tous les tours à l'end. Bon tricot!
11.06.2021 - 08:00
![]() Mélanie wrote:
Mélanie wrote:
Bonjour, les augmentations ne sont pas évidentes pour moi. je suis bloquée à partir de 1 fois tous les 4 tours et 1 fois tous les 6 tours = 216-232-256-288-304-328 mailles.
27.05.2021 - 19:33DROPS Design answered:
Bonjour Mélanie, avez-vous déjà tricoté cette partie ou pas encore? Cette vidéo montre comment augmenter au début d'un pull de ce type et pourra probablement vous aider. Bon tricot!
28.05.2021 - 07:58
![]() Michèle Gaultier wrote:
Michèle Gaultier wrote:
A quel moment je dois commencer les rayures 13 ou 19cm pour la taille s. Dans les explications ce serait à 13cm et quand je regarde le modèle ce serait après le point texturé soit 19cm. Merci
04.04.2021 - 12:30DROPS Design answered:
Bonjour Mme Gaultier, le point texturé appartient aux RAYURES ; autrement dit, tricotez le point texturé pendant 13 cm en S (=rayure-1) à partir du marqueur (en plus du col) puis tricotez la "RAYURE-2" en jersey soit * 2 tours citron vert, 4 tours naturel* pendant 15 cm. Bon tricot!
06.04.2021 - 13:38
![]() Emanuela Verzani wrote:
Emanuela Verzani wrote:
Hi, I have a question, you write: Place the 46-50-56-62-64-66 stitches from the thread on the one side of the piece on double pointed needles size 5.5.mm and knit up 1 stitch in each of the 8-8-8-8-10-10 stitches cast on under the sleeve. In the video, however, you add 8 stitches when you connect the sleeves back up (which I have seen done before). This is not the same as knitting up from stitches cast under the sleeve is it or am I wrong? thanks
31.03.2021 - 13:30DROPS Design answered:
Dear Emanuela, first , when you divide the stitches for body and sleeves, you cast on stitches on the body. Later, when you put the stitches from the holder / thread back to the needles, you pick up stitches (or knit up, as in the pattern) in each of those stitches you cast on under the sleeves, when you divided the body and the sleeves. Happy Knitting
31.03.2021 - 14:36
![]() Katarina Grim wrote:
Katarina Grim wrote:
Hej! Jag stickar den minsta storleken. Har börjat gjort alla ökningar i bärestycket och undrar över följande där det står i mönstret: "Arbetet mäter ca 19-21-23-27-28-31 cm från markören. Sticka vidare tills arbetet mäter 21-23-24-27-28-31 cm." Ska jag sticka vidare till 21 cm från markören eller från början av arbetet? Sedan undrar jag också över följande: "RÄNDER: RAND 1: Sticka 13-13-14-14-14-14 cm ...:" Vad är det för mått som är 13 centimeter?
10.12.2020 - 19:14
![]() Anne Gore wrote:
Anne Gore wrote:
What is the finished width of the medium and large size jumpers? I am a UK size 12-14. What size do you suggest I knit?
28.11.2020 - 17:29DROPS Design answered:
Dear Anne Gore, since the patterns are for many different countries, each with their sizing guide, you should check the scheme with measurements below the pattern. If in doubt between 2 sizes, it's better to choose the larger one. Happy knitting!
29.11.2020 - 17:56
|
|
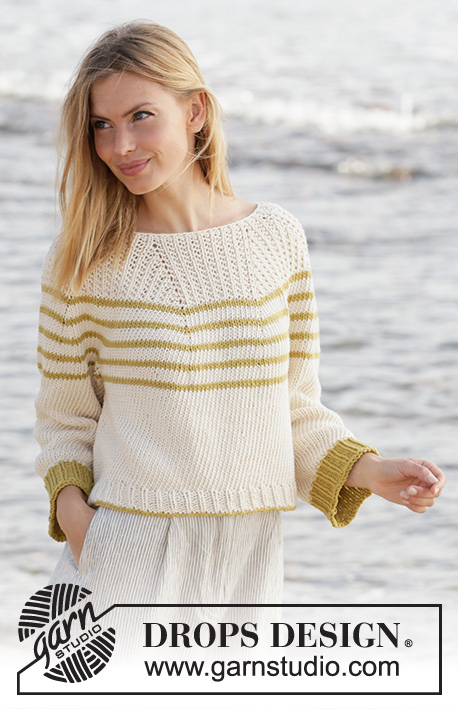
Breaking Sunlight#breakingsunlightsweater |
|
 |
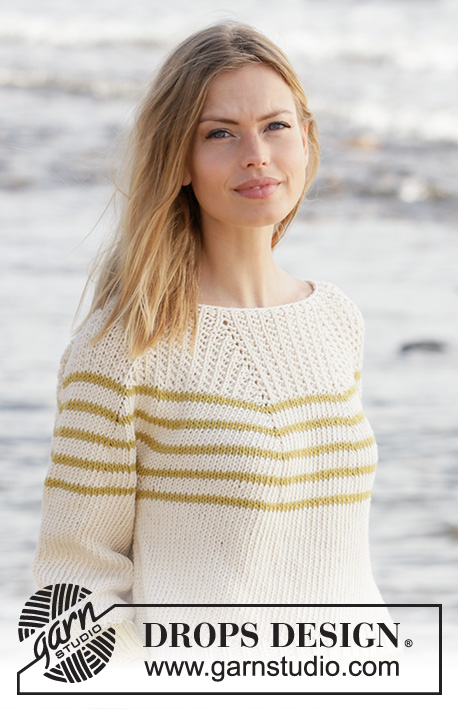 |
Knitted jumper with round yoke in DROPS Paris. The piece is worked top down with stripes and textured pattern. Sizes S - XXXL.
DROPS 213-36 |
|
|
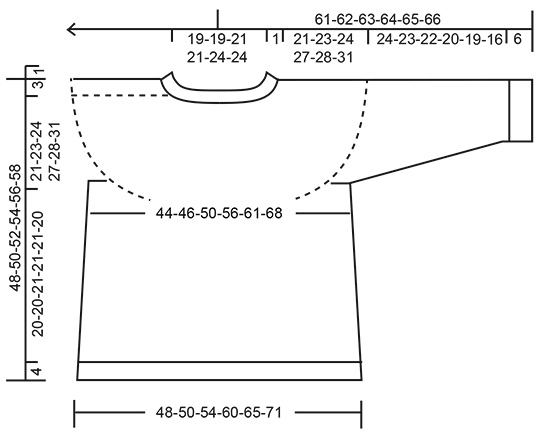
------------------------------------------------------- EXPLANATIONS FOR THE PATTERN: ------------------------------------------------------- RIDGE/GARTER STITCH (worked in the round): 1 ridge in height = 2 rounds; Knit 1 round and purl 1 round. INCREASE TIP-1 (for yoke): Increase with 1 yarn over after markers 1, 3, 5 and 7. Increase with 1 yarn over before markers 2, 4, 6 and 8. The yarn overs are worked twisted on the next round to avoid holes. The increase stitches are worked into the textured pattern as you go, i.e. increase-1 is worked in garter stitch, increase-2 is worked in stocking stitch etc. When the textured pattern is finished, work the increased stitches in stocking stitch. INCREASE TIP-2 (for sides of body): Work until there are 2 stitches left before the marker thread, make 1 yarn over, knit 4 (marker thread sits between these 4 stitches) make 1 yarn over (= 2 stitches increased at each marker thread; 4 stitches increased on round). On the next round work the yarn overs twisted to avoid holes. Then work the new stitches in stocking stitch. STRIPES: STRIPE 1: Work 13-13-14-14-14-14 cm with off-white and work textured pattern as follows: * Knit 1, work 1 stitch in GARTER STITCH – read description above *, work from *-* to end of round. STRIPE 2: Work stocking stitch and stripes as follows: Work * 2 rounds with lime, 4 rounds with off white *, work from *-* for 15-15-15-16-16-16 cm, adjust so you finish after a complete stripe (applies to the stripe with lime). STRIPE 3: Finish the piece with off-white and stocking stitch. DECREASE TIP (for sleeves): Decrease 1 stitch on each side of the marker thread as follows: Work until there are 3 stitches left before the marker thread, knit 2 together, knit 2 (marker thread sits between these 2 stitches), slip 1 stitch as if to knit, knit 1 and pass the slipped stitch over the knitted stitch. CASTING-OFF TIP: To avoid the cast-off edge being tight you can cast off with a larger size needle. If the edge is still tight, make 1 yarn over after approx. each 4th stitch at the same time as casting off and the yarn overs are cast off as normal stitches. ------------------------------------------------------- START THE PIECE HERE: ------------------------------------------------------- JUMPER – SHORT OVERVIEW OF THE PIECE: The neck and yoke are worked in the round with circular needle, from mid back and top down. The yoke is divided for body and sleeves and the body is continued in the round with circular needle. The sleeves are worked with double pointed needles, top down. NECK: Cast on 80-80-88-88-96-96 stitches with circular needle size 4.5 mm and off-white. Knit 1 round. The next round is worked as follows: * Knit 1, purl 1 *, work from *-* to end of round. Work 2 rounds like this and then change to circular needle size 5.5 mm. Insert 1 marker at the beginning of the round (= approx. mid back); the yoke will be measured from this marker! YOKE: The piece is worked in STRIPES – read description above. On the next round insert 8 markers (all markers are inserted into knitted stitches) as follows: Insert marker 1 in the 7th-7th-9th-9th-9th-9th stitch. Insert marker 2 in the 13th-13th-15th-15th-15th-15th stitch. Insert marker 3 in the 27th-27th-31st-31st-33rd-33rd stitch. Insert marker 4 in the 33rd-33rd-37th-37th-39th-39th stitch. Insert marker 5 in the 47th-47th-53rd-53rd-57th-57th stitch. Insert marker 6 in the 53rd-53rd-59th-59th-63rd-63rd stitch. Insert marker 7 in the 67th-67th-75th-75th-81st-81st stitch. Insert marker 8 in the 73rd-73rd-81st-81st-87th-87th stitch. On the next round increase 1 stich by each marker – read INCREASE TIP-1 (= 8 stitches increased). The number of stitches before marker 1, between markers 2 and 3, markers 4 and 5, markers 6 and 7 and after marker 8 remain the same. The increased stitches are between markers 1 and 2, markers 3 and 4, markers 5 and 6 and between markers 7 and 8. REMEMBER THE KNITTING TENSION! Increase like this every 2nd round a total of 15-17-19-23-24-27 times, every 4th round 1 time and every 6th round 1 time = 216-232-256-288-304-328 stitches. The piece measures approx. 19-21-23-27-28-31 cm from the marker. Continue working until the piece measures 21-23-24-27-28-31 cm. Now divide the piece for body and sleeves as follows: Work the first 31-33-36-41-44-49 stitches as before, place the next 46-50-56-62-64-66 stitches on a thread for sleeve and cast on 8-8-8-8-10-10 stitches under the sleeve, work 62-66-72-82-88-98 stitches as before, place the next 46-50-56-62-64-66 stitches on a thread for sleeve and cast on 8-8-8-8-10-10 stitches under the sleeve, and work 31-33-36-41-44-49 stitches as before. BODY: = 140-148-160-180-196-216 stitches. Insert 1 marker thread in the middle of the 8-8-8-8-10-10 stitches under each sleeve (= in sides of body). There are 70-74-80-90-98-108 stitches between the marker threads. Allow the threads to follow your work onwards; they will be used when increasing in the sides. When the piece measures 4 cm from the division, increase 1 stitch on each side of both marker threads – read INCREASE TIP-2 (= 4 stitches increased). Increase like this every 4 cm a total of 3 times = 152-160-172-192-208-228 stitches. When the body measures 20-20-21-21-21-20 cm from the division increase 10-11-11-12-11-12 stitches evenly on the next round = 162-171-183-204-219-240 stitches. Change to circular needle size 4.5 mm and work rib (= knit 1 / purl 2) for 4 cm. Cast off with knit using lime– read CASTING-OFF TIP! SLEEVES: Place the 46-50-56-62-64-66 stitches from the thread on the one side of the piece on double pointed needles size 5.5.mm and knit up 1 stitch in each of the 8-8-8-8-10-10 stitches cast on under the sleeve = 54-58-64-70-74-76 stitches. Insert a marker thread in the middle of the 8-8-8-8-10-10 stitches under the sleeve. Allow the thread to follow your work onwards; it will be used when decreasing under the sleeve. Continue with stocking stitch and stripes in the round. When the sleeve measures 3 cm from the division, decrease 1 stitch on each side of the marker thread – read DECREASE TIP (= 2 stitches decreased). Decrease like this every 3-2½-2-1½-1-1 cm a total of 6-7-9-11-12-12 times = 42-44-46-48-50-52 stitches. When the sleeve measures 24-23-22-20-19-16 cm from the division increase 0-1-2-0-1-2 stitches = 42-45-48-48-51-54 stitches. Change to double pointed needles size 4.5 mm and work rib (= knit 1 / purl 2) in the round using lime and for 6 cm. Cast off with knit using lime. Work the other sleeve in the same way. |
|
 |
|
Have you finished this pattern?Tag your pictures with #dropspattern #breakingsunlightsweater or submit them to the #dropsfan gallery. Do you need help with this pattern?You'll find 26 tutorial videos, a Comments/Questions area and more by visiting the pattern on garnstudio.com. © 1982-2026 DROPS Design A/S. We reserve all rights. This document, including all its sub-sections, has copyrights. Read more about what you can do with our patterns at the bottom of each pattern on our site. |
|


With over 40 years in knitting and crochet design, DROPS Design offers one of the most extensive collections of free patterns on the internet - translated to 17 languages. As of today we count 324 catalogues and 12290 patterns translated into English (UK/cm). 12290
We work hard to bring you the best knitting and crochet have to offer, inspiration and advice as well as great quality yarns at incredible prices! Would you like to use our patterns for other than personal use? You can read what you are allowed to do in the Copyright text at the bottom of all our patterns. Happy crafting!
Post a comment to pattern DROPS 213-36
We would love to hear what you have to say about this pattern!
If you want to leave a question, please make sure you select the correct category in the form below, to speed up the answering process. Required fields are marked *.