
Popular categories
Looking for a yarn?


Comments / Questions (12)
![]() Monika Królikowska-Chudek wrote:
Monika Królikowska-Chudek wrote:
Dzień dobry, rozumiem że wzór jest na prawą i na lewą stronę robótki, czyli na lewej stronie przerabiam drugi rząd a nie jak oczka schodzą z drutów?
04.03.2025 - 09:46DROPS Design answered:
Witaj Moniko, schematy pokazują wszystkie oczka, widok na prawej stronie robótki. Jak odczytywać schematy w robótce na drutach znajdziesz TUTAJ, patrz część ‘W tę i z powrotem’. Gdy w legendzie jest napisane '1 oczko prawe na prawej stronie robótki, oczko lewe na lewej stronie robótki' to de facto na lewej stronie robótki przerabiamy oczka tak jak schodzą z drutu. Pozdrawiamy!
04.03.2025 - 11:02
![]() Helle Madsen wrote:
Helle Madsen wrote:
Tak for dit svar, men det er ikke hvad der står i opskriften. Her står: strik næst sidste pind i A.1a og A.2b, strik vrang over de næste 19-25-31-37-43-49 masker og tag samtidig 0-3-6-8-8-9 masker ind jævnt fordelt, 3 masker retstrik = 88-94-100-108-120-130 masker. Strik næste pind tilbage fra vrangen med 3 masker
18.02.2021 - 14:02DROPS Design answered:
Hej Helle, det må vi få rettet fra a til b, så man strikker de to første diagrammer færdigt først. Det er dem som indeholder indtagningerne så dem er man nødt til at få færdige inden man fortsætter med næste stykke :)
18.02.2021 - 14:44
![]() Helle Madsen wrote:
Helle Madsen wrote:
Jeg er netop startet på denne smukke bluse, men er løbet ind i et problem, som jeg ikke kan knække. Jeg har slået 113 m op, strikket de 8 omg. Nu skal jeg til at tage ind: strik 3 ret, strik 25 m - og tag 3 m ind (så er der 22m tilbage), strik næstsidste omg. i mønster A.2a - dvs. der tages 7 m ind, strik A.2b, strik 25 m - tag 3 m ind (22m tilbage) osv, osv. Nu har jeg taget 13 m ind på denne omg. og ender op med 100 m på pinden. Der skal være 94 m. Hvad gør jeg galt ???
18.02.2021 - 09:31DROPS Design answered:
Hej Helle, du tager 13 masker ind ifølge A.1a og A.2a. Det vil sige 113-3-3-13 = 94 masker. God fornøjelse!
18.02.2021 - 13:35
![]() Judy Schulte wrote:
Judy Schulte wrote:
Gauge: should it be worked on size 6 or 8 needles? I got gauge on size 8 needles. Should I use that size to knit the sweater and not size 6 as instructed?
02.08.2019 - 15:37DROPS Design answered:
Dear Judy, you're right: you should use the needle you reach the gauge with. Happy crafting!
02.08.2019 - 15:46
![]() Caroline wrote:
Caroline wrote:
In de uitleg staat volgens mij een fout. Bij het Achterpand staat (boord naald 9) :brei de volgende tot de laatste naald in A.1a en A.2b, Volgens mij moet dit zijn A.1a en A.2a.
25.03.2019 - 19:17
![]() Silvia wrote:
Silvia wrote:
Posso fare questo modello con i ferri dritti? Se la risposta è si, vorrei chiedervi come devo regolarmi per i diagrammi...considero sempre che rappresentano il diritto del lavoro e quindi quando lavoro il rovescio devo cambiare i punti ? Grazie mille
04.02.2019 - 15:10DROPS Design answered:
Buongiorno Silvia, come può leggere nelle spiegazioni questo modello è lavorato in piano in parti separate e poi cucito alla fine, per cui può lavorarlo con i ferri dritti seguendo le istruzioni. Buon lavoro!
04.02.2019 - 15:50
![]() Sarah wrote:
Sarah wrote:
Bonjour, je souhaiterais tricoter ce modèle en employant le coloris Bruyère pour le Kid Silk. Pouvez-vous m'indiquer quelle est la couleur correspondante pour l'alpaga ? c'est difficile à voir sur l'ordinateur. merci et bonne journée
29.01.2019 - 08:54DROPS Design answered:
Bonjour Sarah, pour toute assistance au choix des couleurs, merci de bien vouloir directement contacter votre magasin DROPS, même par mail ou téléphone, on saura vous y conseiller. Bon tricot!
29.01.2019 - 09:25
![]() Tanja wrote:
Tanja wrote:
Sorry... der Fehler ist beim Rückenteil in Reihe 9 zu finden.
28.01.2019 - 21:38DROPS Design answered:
Liebe Tanja, danke für den Hinweis, deutsche Anleitung wird angepasst. Viel Spaß beim stricken!
29.01.2019 - 09:30
![]() Tanja wrote:
Tanja wrote:
"die vorletzte Reihe von A.1a und A.2b stricken" Dieser Part enthält einen Fehler. Es muss heißen A.1a und A.2a. Wunderschönes Modell! Ich bin gerade an dieser Stelle. :-)
28.01.2019 - 21:36
![]() Sylvie wrote:
Sylvie wrote:
Comment faire pour avoir le modèle en explication? Merci d'avance
24.01.2019 - 19:24DROPS Design answered:
Bonjour Sylvie, ce modèle n'est pas encore disponible, revenez régulièrement pour voir s'il a été publié. Bon tricot!
25.01.2019 - 08:48
|
|||||||||||||||||||||||||||||||||||||
Sweet Topaz#sweettopazsweater |
|||||||||||||||||||||||||||||||||||||
 |
 |
||||||||||||||||||||||||||||||||||||
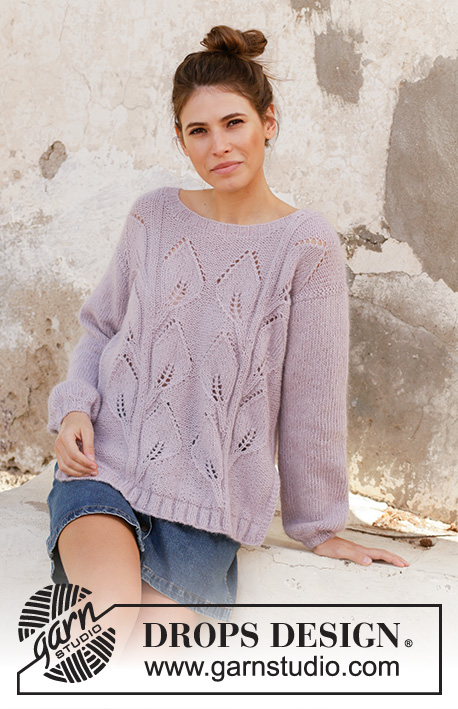
Knitted jumper with leaf pattern in DROPS Alpaca and DROPS Kid-Silk. Size: S - XXXL
DROPS 201-6 |
|||||||||||||||||||||||||||||||||||||
|
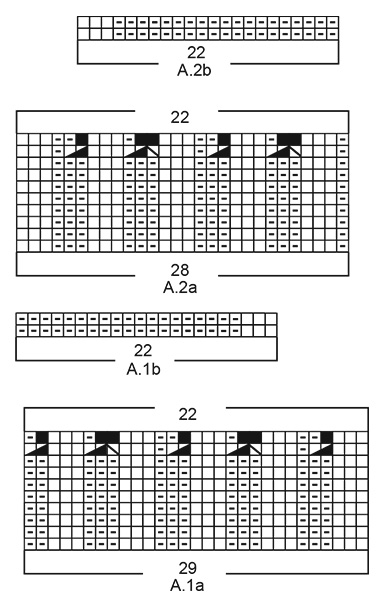
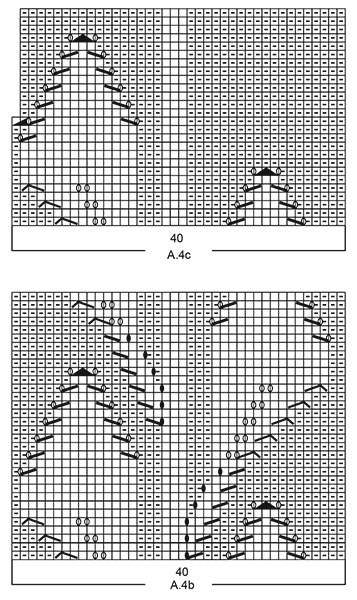
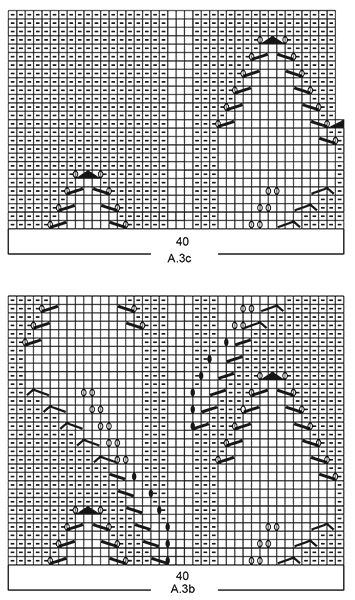
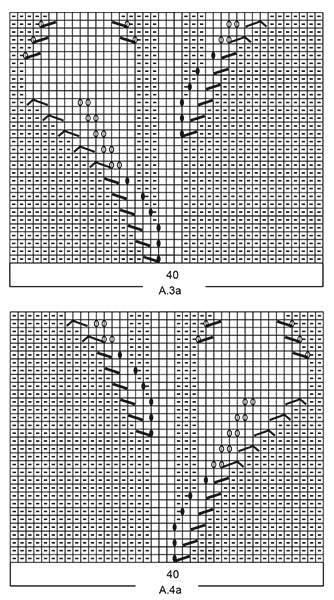
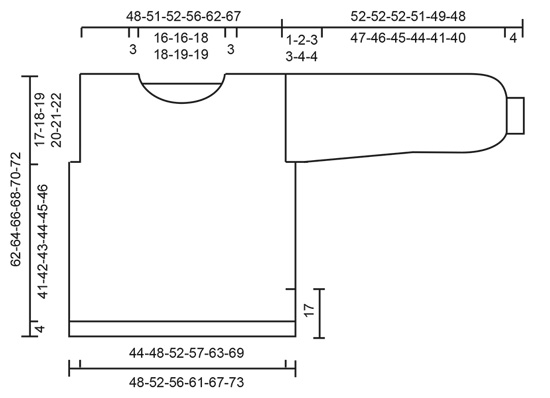
---------------------------------------------------------- EXPLANATION FOR THE PATTERN: ---------------------------------------------------------- GARTER STITCH (back and forth): Knit all rows. 1 ridge vertically = knit 2 rows. PATTERN: See diagrams A.1 to A.4. Diagrams show all rows in pattern seen from the right side. DECREASE TIP (evenly): To calculate how to decrease evenly, use the number of stitches decreases are done over (e.g. 25 stitches) and divide stitches by number of decreases to be done (e.g. 3) = 8.3. In this example decrease by working approx. every 7th and 8th stitch together. INCREASE TIP (applies to sleeves): Work until 2 stitches remain before marker thread, 1 yarn over, knit 4 (marker thread is in the middle of these stitches), 1 yarn over. On next round knit yarn overs twisted to avoid holes. Then work the new stitches in stocking stitch. ---------------------------------------------------------- START THE PIECE HERE: ---------------------------------------------------------- JUMPER - SHORT OVERVIEW OF THE PIECE: Worked back and forth in several pieces and sewn together when finished. Work sleeves in the round on double pointed needles/a short circular needle. BACK PIECE: Cast on 101-113-125-137-149-161 stitches on circular needle size 4 mm with 1 strand Alpaca and 1 strand Kid-Silk (= 2 strands). Purl 1 row from wrong side. Then work rib as follows: 3 stitches in GARTER STITCH – read explanation above, purl 1, (knit 3, purl 3) over the next 18-24-30-36-42-48 stitches, A.1a over the next 29 stitches, A.2a over the next 28 stitches, (purl 3, knit 3) over the next 18-24-30-36-42-48 stitches, purl 1, 3 stitches in garter stitch. Continue back and forth like this until the first 8 rows in diagrams have been worked vertically. Work next row as follows: 3 stitches in garter stitch, purl the next 19-25-31-37-43-49 stitches and decrease at the same time 0-3-6-8-8-9 stitches evenly – read DECREASE TIP, work next to last row in A.1a and A.2a, purl the next 19-25-31-37-43-49 stitches and decrease at the same time 0-3-6-8-8-9 stitches evenly, 3 stitches in garter stitch = 88-94-100-108-120-130 stitches. Work next row from wrong side with 3 stitches in garter stitch in each side, work last row in A.1a and A.2a and stocking stitch with wrong side out (= knit from wrong side) over the remaining stitches. Switch to circular needle size 5 mm. Now work in the different sizes as follows: In size S and M work from next section below (skip the rest of this section). Continue as follows in size L, XL, XXL and XXXL work first pattern as follows: 3 stitches in garter stitch, purl 25-29-35-40, A.1b over the next 22 stitches, A.2b over the next 22 stitches, purl 25-29-35-40, 3 stitches in garter stitch. Continue back and forth like this until piece measures 5-5-6-6 cm in total from cast-on edge, adjust so that next row is worked from right side. All sizes: Now work pattern as follows: 3 stitches in garter stitch, purl 1-4-7-11-17-22, A.3a over the next 40 stitches, A.4a over the next 40 stitches, purl 1-4-7-11-17-22, 3 stitches in garter stitch. REMEMBER THE KNITTING TENSION! When piece measures 17 cm, cast on 1 new stitch at the end of the next 2 rows for edge stitch (this marks the vent) = 90-96-102-110-122-132 stitches. Work the new stitch in each side in garter stitch (= 4 stitches in garter stitch in each side). When A.3a and A.4a have been worked vertically, continue with A.3b over A.3a and A.4b over A.4a 2 times in total vertically. When piece measures 45-46-47-48-49-50 cm, cast off 2-4-5-5-6-7 stitches for armholes at the beginning of the next 2 rows = 86-88-92-100-110-118 stitches. Continue with the pattern as before and work the outermost 3 stitches in each side in garter stitch. When A.3b and A.4b have been worked vertically 2 times, work A.3c over A.3b and A.4c over A.4b, then work knit over knit and purl over purl until finished measurements. At the same time when piece measures 58-60-62-64-66-68 cm, cast off the middle 36-36-38-38-40-40 stitches for neck and finish each shoulder separately. Then on next row from neck cast off 1 stitch (1 stitch is also decreased in diagram A.3c/A.4c) = 23-24-25-29-33-37 stitches. When piece measures 62-64-66-68-70-72 cm, cast off all stitches. Work the other shoulder the same way. FRONT PIECE: Cast on and work pattern the same way as back piece. Cast off stitches for armholes as on back piece = 86-88-92-100-110-118 stitches. When A.3b and A.4.b have been worked vertically 2 times, work A.3c over A.3b and A.4c over A.4b, then work knit over knit and purl over purl until finished measurements. At the same time when piece measures 53-54-56-57-59-60 cm, slip the middle 20-20-20-20-22-22 stitches on a stitch holder for neck and finish each shoulder separately. Then cast off stitches on every row from neck as follows: Cast off 4 stitches 1 time, 2 stitches 1 time and 1 stitch 3-3-4-4-4-4 times (decrease in addition 1 stitch in diagram A.3c/A.4c) = 23-24-25-29-33-37 stitches. When piece measures 62-64-66-68-70-72 cm, cast off all stitches. Work the other shoulder the same way. SLEEVES: Work sleeves in the round on double pointed needles/a short circular needle in stocking stitch with right side outwards. Cast on 36-36-42-42-42-48 stitches on double pointed needles size 4 mm. Knit 1 round. Insert 1 marker thread at beginning of round and move it upwards when working. Work rib (knit 3/purl 3) for 4 cm. * Knit 2, 1 yarn over *, work from *-* in the round on round = 54-54-63-63-63-72 stitches. Switch to double pointed needles size 5 mm. Work in stocking stitch in the round. When piece measures 14 cm, increase 2 stitches under sleeve - read INCREASE TIP. Increase like this approx. every 14-9-0-10-8-14 cm 2-4-1-3-4-2 times in total = 58-62-65-69-71-76 stitches. Continue with stocking stitch until sleeve measures 47-46-45-44-41-40 cm (shorter measurements in the larger sizes because of wider shoulders). Now continue back and forth (this is done to make it possible to sew the sleeve to where stitches were cast off for armhole on body). When sleeve measures 52-52-52-51-49-48 cm, cast off all stitches. Work another sleeve the same way. ASSEMBLY: Sew shoulder seams inside cast-off edge. Sew sleeves in body with stocking stitch (right side) sew inside 1 edge stitch in garter stitch on body and inside cast-off edge on sleeve. Sew seam under sleeves and down the side on body down to where 1 stitch was cast on (= approx. 17 cm vent). Repeat in the other side. NECK EDGE: Begin at the top in the middle on one shoulder and pick up 108-108-114-114-120-120 stitches from right side with 1 strand of each quality ( = 2 strands) on circular needle size 4 mm. Work rib (knit 3/purl 3) for 3 cm. Cast off stitches with knit over knit and purl over purl. |
|||||||||||||||||||||||||||||||||||||
Diagram explanations |
|||||||||||||||||||||||||||||||||||||
|
|||||||||||||||||||||||||||||||||||||
 |
|||||||||||||||||||||||||||||||||||||
 |
|||||||||||||||||||||||||||||||||||||
 |
|||||||||||||||||||||||||||||||||||||
 |
|||||||||||||||||||||||||||||||||||||
 |
|||||||||||||||||||||||||||||||||||||
Have you finished this pattern?Tag your pictures with #dropspattern #sweettopazsweater or submit them to the #dropsfan gallery. Do you need help with this pattern?You'll find 35 tutorial videos, a Comments/Questions area and more by visiting the pattern on garnstudio.com. © 1982-2026 DROPS Design A/S. We reserve all rights. This document, including all its sub-sections, has copyrights. Read more about what you can do with our patterns at the bottom of each pattern on our site. |
|||||||||||||||||||||||||||||||||||||


With over 40 years in knitting and crochet design, DROPS Design offers one of the most extensive collections of free patterns on the internet - translated to 17 languages. As of today we count 324 catalogues and 12291 patterns translated into English (UK/cm). 12291
We work hard to bring you the best knitting and crochet have to offer, inspiration and advice as well as great quality yarns at incredible prices! Would you like to use our patterns for other than personal use? You can read what you are allowed to do in the Copyright text at the bottom of all our patterns. Happy crafting!
Post a comment to pattern DROPS 201-6
We would love to hear what you have to say about this pattern!
If you want to leave a question, please make sure you select the correct category in the form below, to speed up the answering process. Required fields are marked *.