
Popular categories
Looking for a yarn?


Comments / Questions (150)
![]() Maritha Magnusson wrote:
Maritha Magnusson wrote:
Undrar vad som menas med att de lyfta maskorna stickas vridna. Är det de lyfta maskorna på ärmen som stickas vridna var fjärde varv och ej vridna vartannat varv. Eller gäller detta maskorna som lyfts för raglan på fram och bakstycke?
08.05.2019 - 23:34DROPS Design answered:
Hej. Omslagen ska stickas vridna när du ökar i början av oket (där det står läs ÖKNINGSTIPS-1) och vid sidorna på fram- och bakstycket (där det står läs ÖKNINGSTIPS-2), dvs där det inte ska bli hål. Lycka till!
09.05.2019 - 13:08
![]() Marleen Lowel wrote:
Marleen Lowel wrote:
Wil mouw verder breien. Heb 83 steken van mouw en 12 steken opgenomen van opgezette steken. Dan heb ik een markeerder gestoken in helft van opgenomen steken: dus 6 ervoor en 6 erna. Volgens jullie beschrijving moeten we beginnen in helft van opgenomen steken: dus 6 vóór de mouwsteken. 2 rechts en dan A3. Als ik dit doe, kom ik niet gelijk met het patroon: de averechtse steken vallen niet meer boven elkaar. Wat doe ik verkeerd? Bedankt voor jullie hulp.
23.04.2019 - 23:12DROPS Design answered:
Dag Marleen,
Ik heb het patroon gecontroleerd en je zou precies uit moeten komen met het patroon en de averechte steken. Je begint in het midden van de 12 steken onder de mouw. Tel evt. alles nog even goed na. Misschien heb je wat over het hoofd gezien.
17.06.2019 - 16:56
![]() Martha wrote:
Martha wrote:
Met welke lengte naald nr 3.5 kan ik het best bij de pas beginnen? Er staan 2 lengtes hierboven vermeld, maar er staat nergens in het patroon waar je welke het best kunt gebruiken.
30.03.2019 - 14:53DROPS Design answered:
Dag Martha,
Je kunt hiervoor het beste die van 40 cm gebruiken. Als de steken niet meer goed op de naald passen, stap je over op 80 cm.
31.03.2019 - 11:31
![]() Renate wrote:
Renate wrote:
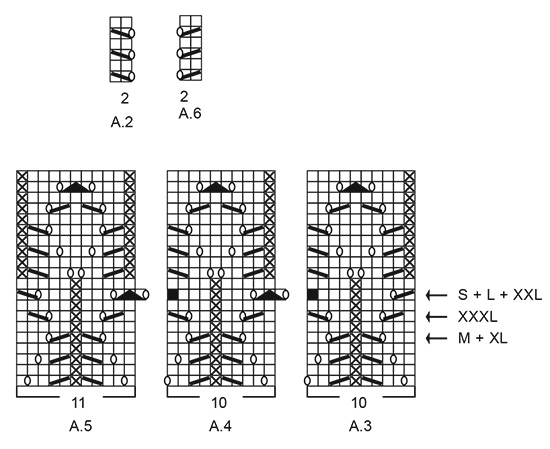
Sorry, das habe ich nicht verstanden, in der Anleitung steht es anders (da fehlen A2 und A6): „...und wie folgt stricken: 4-2-4-2-3-1 Maschen glatt rechts, A.3 (= 10 Maschen), A.4 über die nächsten 50-60-60-70-70-80 Maschen (= 5-6-6-7-7-8 Rapporte à 10 Maschen), A.5 (= 11 Maschen) und 4-2-4-2-3-1 Maschen glatt rechts“ Wenn ich die erste Reihe mit A5 beende, dann sind noch 7 M übrig (5 neue M und 2 von A6). Wie stricke ich die? Fallen A2 und A6 jetzt weg?
26.03.2019 - 11:01DROPS Design answered:
Liebe Renate, A.2 wird jetzt nicht mehr gestrickt. Von der mitte unter den Ärmel (5 M) stricken Sie: 2 M rechts, A.3 (= die 3 letzten der 5 neuen Maschen + die 2 M von A.2 + die 2 M die bei der Passe glatt gestrickt wurden + die 5 nächsten Maschen = 10 M), dann wiederholen Sie A.4 und mit A.5 und 2 Maschen glatt enden. Setzen Sie neuen Markierer zwischen jedem Rapport, es kann so immer helfen. Viel Spaß beim stricken!
26.03.2019 - 12:18
![]() Renate wrote:
Renate wrote:
Nun habe ich den Rumpf fertig und will die Ärmel mit den stillgelegten Maschen fortsetzen. Aber nun soll ich nach der Anleitung die Runde in der Mitte der neu aufgenommenen 10 Maschen beginnen. D.h. ich habe 5 Maschen mehr, bevor meine Musterreihe mit A2 beginnt. Die Anleitung sagt jetzt, ich solle 2 M glatt rechts (für Größe M) stricken und dann direkt mit A2 fortsetzen. Das passt aber dann nicht mit dem Muster in der Reihe von A2 zusammen, die eigentlich dran wäre. Wo ist mein Denkfehler?
25.03.2019 - 17:07DROPS Design answered:
Liebe Renate, das Muster beginnt jetzt mit 2 M glatt rechts, dann stricken Sie A.3 (über die 3 der 5 neuen Maschen + die 2 M in A.2 + die 5 ersten Maschen im vorrigen A.3 unten) = 10 M und so stricken Sie weiter mit A.4 und mit A.5 beenden (die letzten 6 M von vorrigen A.5 unten + die 2 M in A.2 + 3 der neuen Maschen) und 2 M glatt (die 2 letzten der neuen Maschen). Viel Spaß beim stricken!
26.03.2019 - 08:32
![]() Frauke Diemel wrote:
Frauke Diemel wrote:
Der Halsausschnitt ist viel zu weit geworden. Da der Pullover von oben nach unten gestrickt wurde frage ich mich wie ich den Ausschnitt nun verkleinern kann. Auch rollt er sich stark nach außen. Was kann ich am besten tun?
24.03.2019 - 22:05DROPS Design answered:
Liebe Frau Diemel, die Halsausschnitt in diesem Modell ist etwas breit (wie im Foto gezeigt) - leider können wir nicht jede Anleitung nach jeder Anfrage anpassen, aber sicher hat Ihr DROPS Laden einige Tips für Sie, nehmen Sie bitte Kontakt mit Ihm auf - auch telefonisch oder per E-Mail. Viel Spaß beim stricken!
25.03.2019 - 12:05
![]() Frauke Die,el wrote:
Frauke Die,el wrote:
Guten Tag! Ich bin gerade dabei den Pullover Blue Nostalgia zu Stricken. in der Anleitung steht, das das Bündchen in 2 Rippen Kraus gestrickt werden soll. Dies habe ich auch bereits am Halsausschnitt und unterem Bündchen mit 0,5 dünnerer Nadel gestrickt. Nun rollt sich der Pullover an den Rändern jedoch nach außen. Kann das durch Bügeln behoben werden?
24.03.2019 - 22:03DROPS Design answered:
Liebe Frau Die,el, Sie können die Jacke mit Stecknadeln auf einer geeigneten Unterlage spannen, anfeuchten (z.B. mit einer Sprühflasche für Blumen) und trocknen lassen, danach entfernen Sie die Stecknadeln, dann sollte sich der Rand nicht mehr rollen. Viel Spaß beim stricken!
25.03.2019 - 12:04
![]() Françoise Lelarge wrote:
Françoise Lelarge wrote:
Merci pour tout vos conseils et de votre gentillesse. Je tricote beaucoup sur les modèles drop pour toute ma famille et nous les trouvons supers, cordialement. Françoise
20.03.2019 - 10:10
![]() Françoise Lelarge wrote:
Françoise Lelarge wrote:
Bonsoir j'ai encore besoin de votre aide pour le diagramme A2 et A6 se tricote sur les deux mailles du raglan ? , c'est à dire avant et après M1 merci
19.03.2019 - 18:42DROPS Design answered:
Bonjour Mme Lelarge, tout à fait, comme on n'augmente plus pour le raglan, on va tricoter A.2 et A.6 (= 1 diminution + 1 jeté) pour que les jours le long des raglans continuent comme avant, mais sans augmenter. Bon tricot!
20.03.2019 - 08:41
![]() Françoise Lelarge wrote:
Françoise Lelarge wrote:
Bonjour comment peut-on savoir si on a 34 augmenter au total (avec les jetés du côté des manches ?) j'avoue que je suis un peu perdue. Merci de tout vos bons conseils qui me sont très utile.
18.03.2019 - 10:55DROPS Design answered:
Bonjour Mme Lelarge, une fois que vous avez augmenté 34 fois, vous avez 59 m pour chaque demi-dos, 97 m pour chaque manche, 118 m pour le devant et 4 x 2 m pour les raglan = 438 m. Bon tricot!
18.03.2019 - 14:23
|
|||||||||||||||||||||||||
Blue Nostalgia#bluenostalgiasweater |
|||||||||||||||||||||||||
 |
 |
||||||||||||||||||||||||
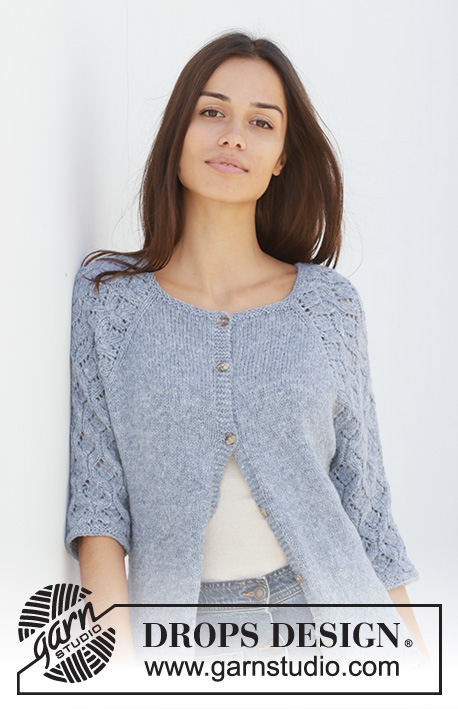
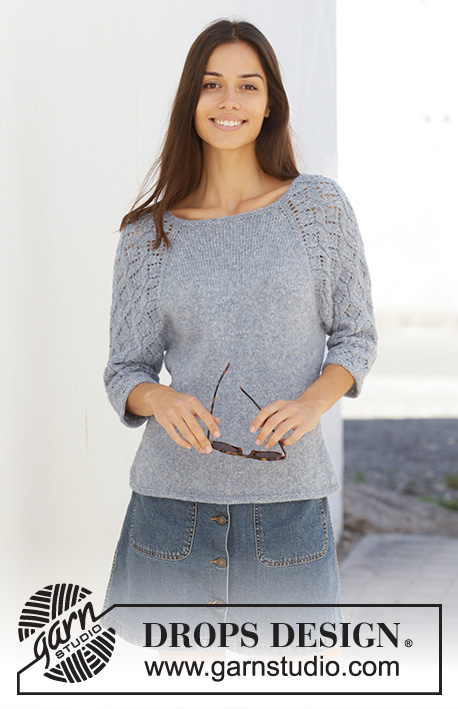
Knitted jumper with raglan in DROPS Sky. The piece is worked top down with lace pattern on sleeves. Sizes S – XXXL.
DROPS 199-3 |
|||||||||||||||||||||||||
|
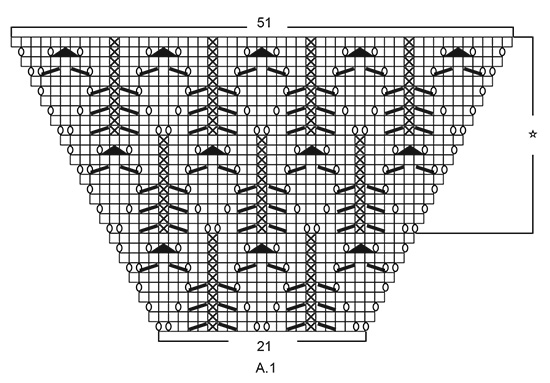
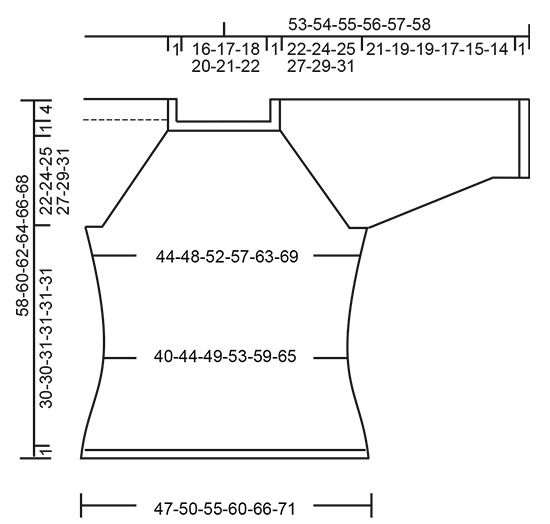
------------------------------------------------------- EXPLANATIONS FOR THE PATTERN: ------------------------------------------------------- RIDGE/GARTER STITCH (worked in the round): 1 ridge in height = 2 rounds; knit 1 round and purl 1 round. INCREASE TIP-1 (evenly spaced): To work out how to increase evenly, count the total number of stitches on the needle (e.g. 100 stitches), and divide by the number of increases to be made (e.g. 10) = 10. In this example, increase by making 1 yarn over after each 10th stitch. On the next round work the yarn overs twisted to avoid holes. PATTERN: See diagrams A.1 to A.6. Find your size in the diagrams (applies to A.3 to A.5). The diagrams show all rows in the pattern seen from the right side. DECREASE TIP (for sides of body and sleeves): Work until there are 3 stitches left before marker thread, knit 2 together, knit 2 (marker thread sits between these stitches), slip 1 stitch, knit 1 and pass the slipped stitch over the knitted stitch. INCREASE TIP-2 (for sides of body): Work until there are 2 stitches left before marker thread, 1 yarn over, knit 4 (marker thread sits in the middle of these stitches), 1 yarn over. On the next round work the yarn overs twisted to avoid holes. Then work the new stitches in stocking stitch. ------------------------------------------------------- START THE PIECE HERE: ------------------------------------------------------- JUMPER - SHORT OVERVIEW OF THE PIECE: Yoke and body are worked in the round with circular needle from mid back, top down. Sleeves are worked in the round with short circular needle/double pointed needles, top down. YOKE: Cast on 100-106-110-116-120-126 stitches with circular needle size 3.5 mm and Sky. Work 2 RIDGES – read description above. Knit 1 round where you increase 10-8-8-10-10-8 stitches evenly spaced – read INCREASE TIP-1 = 110-114-118-126-130-134 stitches. Change to circular needle size 4 mm. Knit 1 round. The next round is worked as follows: Work stocking stitch over the first 15-16-17-19-20-21 stitches (= half back piece), 1 yarn over, 2 stitches in stocking stitch, work A.1 over 21 stitches (= sleeve), 2 stitches in stocking stitch, 1 yarn over, work 30-32-34-38-40-42 stitches in stocking stitch (= front piece), 1 yarn over, 2 stitches stocking stitch, work A.1 over 21 stitches (= sleeve), 2 stitches in stocking stitch, 1 yarn over, work stocking stitch over the last 15-16-17-19-20-21 stitches (= half back piece). There are now 118-122-126-134-138-142 stitches on the needle. Continue this pattern onwards; i.e. on the sleeves increase on each side as shown in A.1. On the next round knit the yarn overs (= holes) and the increased stitches are worked into the pattern as you go as shown in A.1. On front and back pieces increase with yarn overs before/after the 2 stitches in stocking stitch in each side (there will be 2 stitches stocking stitch between each raglan increase). On the next round knit the yarn overs twisted (= no holes) and the increased stitches are worked in stocking stitch. Increase like this every 2nd round. You increase a total of 8 stitches on each increase-round (= 4 yarn overs + 4 stitches increased in A.1). REMEMBER THE KNITTING TENSION! When A.1 has been worked 1 time in height there are 230-234-238-246-250-254 stitches on the needle. Continue this pattern onwards, i.e. the pattern repeats itself as shown in A.1. Each time you have worked 20 rounds there will be room for 1 more repeat of lace pattern in width on each sleeve. When you have increased a total of 24-27-29-32-34-38 times there are 302-330-350-382-402-438 stitches on the needle and the piece measures 18-20-22-24-25-28 cm from the cast-on edge mid front. Continue with stocking stitch and pattern as before, but without increasing; i.e. the 69-75-79-85-89-97 stitches in A.1 are worked as follows: Work A.2 (= 2 stitches), 2-0-2-0-2-1 stitches in stocking stitch, starting on the round marked with an arrow for your size work A.3 (= 10 stitches), A.4 over the next 40-50-50-60-60-70 stitches (= 4-5-5-6-6-7 reports of 10 stitches), A.5 (= 11 stitches), 2-0-2-0-2-1 stitches in stocking stitch and A.6 (= 2 stitches). Continue until the piece measures approx. 23-25-26-28-30-32 cm from the cast-on edge mid front. The next round is worked as follows: Work 41-45-49-54-59-65 stitches in stocking stitch (= half back piece), place the next 69-75-77-83-83-89 stitches on 1 thread for sleeve, cast on 10-10-12-12-14-14 new stitches on the needle (= in side under sleeve), work 82-90-98-108-118-130 stitches stocking stitch (= front piece), place the next 69-75-77-83-83-89 stitches on 1 thread for sleeve, cast on 10-10-12-12-14-14 new stitches on the needle (= in side under sleeve) and work the remaining 41-45-49-54-59-65 stitches in stocking stitch (= half back piece). Body and sleeves are finished separately. THE PIECE IS NOW MEASURED FROM HERE! BODY: = 184-200-220-240-264-288 stitches. Insert 1 marker thread on each side in the middle of the 10-10-12-12-14-14 stitches cast on under each sleeve. Allow them to follow your work onwards; they will be used a little later when decreasing/increasing. Work stocking stitch. When the piece measures 2 cm from the division decrease 1 stitch on each side of both marker threads - read DECREASE TIP = 4 stitches decreased. Decrease like this every 3 cm a total of 4 times = 168-184-204-224-248-272 stitches. Continue working until the piece measures 14 cm from the division. Now increase 1 stitch on each side of both marker threads – read INCREASE TIP-2 = 4 stitches increased. Increase like this every 2 cm a total of 7 times = 196-212-232-252-276-300 stitches. Continue working until the piece measures 30-30-31-31-31-31 cm from the division. Change to circular needle size 3.5 mm and work 2 ridges. Loosely cast off, but to avoid the cast-off edge being tight you can cast off with needle size 4 mm. The jumper measures approx. 58-60-62-64-66-68 cm from the shoulder down. SLEEVE: Place the 69-75-77-83-83-89 stitches from the thread on the one side of the piece on short circular needle/double pointed needles size 4 mm and knit up 1 stitch in each of the 10-10-12-12-14-14 stitches cast on under the sleeve = 79-85-89-95-97-103 stitches. Insert 1 marker thread in the middle of the 10-10-12-12-14-14 stitches cast on under the sleeve and allow it to follow your work onwards; it will be used a little later when decreasing. Start the round at the marker thread. Start on the correct round in the diagrams so that the pattern continues from the yoke and work as follows: Work 4-2-4-2-3-1 stitches in stocking stitch, A.3 (= 10 stitches), A.4 over the next 50-60-60-70-70-80 stitches (= 5-6-6-7-7-8 repeats of 10 stitches), A.5 (= 11 stitches) and 4-2-4-2-3-1 stitches in stocking stitch. Continue this pattern. When the piece measures 2 cm from the division, decrease 2 stitches mid under sleeve – remember DECREASE TIP. Decrease like this every 3rd-3rd-3rd-2nd-2nd-2nd round a total of 14-15-15-16-15-16 times = 51-55-59-63-67-71 stitches. The stitches which do not fit into the pattern as you decrease are worked in stocking stitch, but make sure that if decreases are in the pattern you also make a yarn over. Continue working until the piece measures 21-19-19-17-15-14 cm from the division (shorter measurements in larger sizes due to longer yoke). Change to double pointed needles size 3.5 mm and work 2 ridges. Loosely cast off, but to avoid the cast-off edge being tight you can cast off with needle size 4 mm. Sleeve measures approx. 22-20-20-18-16-15 cm from the division. Work the other sleeve in the same way. |
|||||||||||||||||||||||||
Diagram explanations |
|||||||||||||||||||||||||
|
|||||||||||||||||||||||||
 |
|||||||||||||||||||||||||
 |
|||||||||||||||||||||||||
 |
|||||||||||||||||||||||||
Have you finished this pattern?Tag your pictures with #dropspattern #bluenostalgiasweater or submit them to the #dropsfan gallery. Do you need help with this pattern?You'll find 27 tutorial videos, a Comments/Questions area and more by visiting the pattern on garnstudio.com. © 1982-2026 DROPS Design A/S. We reserve all rights. This document, including all its sub-sections, has copyrights. Read more about what you can do with our patterns at the bottom of each pattern on our site. |
|||||||||||||||||||||||||


With over 40 years in knitting and crochet design, DROPS Design offers one of the most extensive collections of free patterns on the internet - translated to 17 languages. As of today we count 324 catalogues and 12290 patterns translated into English (UK/cm). 12290
We work hard to bring you the best knitting and crochet have to offer, inspiration and advice as well as great quality yarns at incredible prices! Would you like to use our patterns for other than personal use? You can read what you are allowed to do in the Copyright text at the bottom of all our patterns. Happy crafting!
Post a comment to pattern DROPS 199-3
We would love to hear what you have to say about this pattern!
If you want to leave a question, please make sure you select the correct category in the form below, to speed up the answering process. Required fields are marked *.