
Popular categories
Looking for a yarn?


Comments / Questions (47)
![]() Alicia Gugelmeier wrote:
Alicia Gugelmeier wrote:
Hola no me queda claro cómo hacer los aumentos en el canesú antes de comenzar la guarda, cuantos puntos debo tener al final del mismo y antes de la guarda de flores , gracias
02.04.2026 - 17:32DROPS Design answered:
Hola Alicia, los aumentos están indicados en el diagrama A.2 y dependerá del número de tallas. El dibujo de flores se trabaja a la vez que se continúan los aumentos del canesú, y no al final de este. Por ejemplo, por cada vez que se repite el diagrama en las tallas 3/4 - 5/6 - 7/8 años, se trabajan 6 aumentos para el canesú, antes de llegar al dibujo de flores. Por lo que tendrías 78-84-90 pts aumentados respectivamente (y 167-179-191 pts en total, respectivamente). Para las tallas 9/10 - 11/12 se trabajan 5 aumentos para el canesú por cada repetición del diagrama, antes del dibujo de flores. Esto serían 70-75 pts aumentados, respectivamente y 179-191 pts en total, respectivamente.
26.04.2026 - 23:45
![]() Mireille wrote:
Mireille wrote:
Je lis toutes les questions posées et je suis un peu rassurée sur mon incompétence car je ne suis donc pas la seule à avoir des difficultés à comprendre ses explications ! Pourquoi sont-elles si difficiles à suivre?!
24.01.2026 - 18:07DROPS Design answered:
Bonjour Mireille, si vous avez des difficultés à comprendre certaines parties des explications, n'hésitez pas à utiliser cette rubrique pour poser votre question, nous pourrons ainsi vous aider. Bon tricot!
26.01.2026 - 08:26
![]() Mireille wrote:
Mireille wrote:
Bonjour, pouvez-vous me dire le nombre de mailles qu’il faut avoir juste avant de commencer la fleur c-à-dire au rang 17?
21.01.2026 - 11:23DROPS Design answered:
Bonjour Mireille, en taille 3/4 ans, 5/6 et 7/8 ans, vous avez12 m avant la fleur (6 m + 6 augm.) et en taille 9/10 et 11/12 ans, vous avez aussi 12 m (7 m + 5 augm.). Bon tricot!
23.01.2026 - 09:01
![]() Heather wrote:
Heather wrote:
Having trouble with yoke increases, can’t seem to get the increases on top of last lot, plus never the right stitch numbers after trying to do increases. I knitting the 3-4,
20.11.2025 - 05:40DROPS Design answered:
Hi Heather, The yoke increases are not directly above each other but at the beginning and end (alternately) of each repeat of the diagram A.2 which increases in width after each increase. There are 10 increases in height in each repeat of A.2 x 13 = 130 increased stitches when A.2 is finished. You had 89 stitches before starting the diagram: 89 + 130 = 219 stitches. Hope this helps. Regards, Drops Team.
20.11.2025 - 06:17
![]() Josephine wrote:
Josephine wrote:
Hi, Can you tell me what ‘A.1 over 1 stitch’ means please? I’m making the smallest size so looking at A2 diagram. Can you tell me how many stitches I increase on each of the eight increase rows in order to get from 89 to 219 stitches? I have tried working it out but can’t hit the 219 number. Thank you Josephine
23.09.2025 - 20:53DROPS Design answered:
Hi Josephine, Diagram A.1 is only 1 stitch in width, so it is worked across 1 stitch. You need to increase 130 stitches from 89 to 219 stitches. The pattern A.2 (with increases) is worked x 13 on the row in your size, so there will be 13 increased stitches (1 in each repeat) on 8 increase-rows and 26 on the increase-row with 2 increases near the top of the diagram. 13 x 8 = 104. Then 104 + 26 = 130. Hope this helps. Regards, Drops Team.
24.09.2025 - 06:58
![]() Francoise wrote:
Francoise wrote:
Bonjour ! Est ce que je peux ajouter 2 mailles au début du tricot et 2 mailles à la fin ( donc 7 m de bordure ) pour avoir une finition en icord ?
09.06.2025 - 15:16
![]() Brigitte wrote:
Brigitte wrote:
Lorsque on doit augmenter dans l'empiècement doit-on faire 1 augmentation en répétant 15 fois le bloc des 6 mailles de base (du coup 7 mailles 15 fois ? où on augmente 1 fois en début de rang ? Pouvez vous éclaircir les explications s'il vous plaît J'ai posé plusieurs questions envoyées les unes après les autres Merci de les lire toutes les 3 pour la réponse Brigitte
29.03.2025 - 18:48DROPS Design answered:
Bonjour Brigitte, comme les augmentations ne se font que dans A.2, vous allez augmenter dans chaque A.2 comme indiqué dans le diagramme. Par ex, si vous devez répéter le diagramme 15 fois, vous aurez 15 augmentations à chaque fois, et (en taille 7/8 si j'ai bien compris), vous aurez ainsi 7 mailles dans chaque A.1 et 7x15 + 1 m de A.1 + 2 x5 m de bordure devant après le premier rang des diagrammes. Lorsque les diagrammes seront terminés, vous aurez ainsi: 5 m de bordure, 1 m de A.1, 15x16 m de A.2, 5 m de bordure = 251 mailles. Mettez éventuellement un marqueur entre chaque A.2 (et après A.1) pour mieux vous repérer et ainsi mieux vérifier votre nombre de mailles. Bon tricot!
31.03.2025 - 08:42
![]() Brigitte wrote:
Brigitte wrote:
Suite de ma question combien de fois doit on répéter A1 1 fois au début ou/et 1 fois avant chaque 6 m ??? Brigitte
29.03.2025 - 18:18DROPS Design answered:
Bonjour Brigitte, comme indiqué ci-dessous, A.1 ne va se tricoter qu'une seule fois, au début du rang sur l'endroit/à la fin du rang sur l'envers, après/avant la bordure devant; et on va répéter A.2 13 à 15 fois selon la taille. Bon tricot!
31.03.2025 - 08:35
![]() Brigitte wrote:
Brigitte wrote:
Bonjour. Je ne comprends pas où se place le diagramme A1 quand on commence l'empiècement on répète 14 fois A2 mais où mettons A1 ? Que veut dire au dessus la maille de suivantes? Merci de votre explication Brigitte
29.03.2025 - 18:11DROPS Design answered:
Bonjour Brigitte, on tricote A.1 en début de rang sur l'endroit puis on répète A.2 - sur l'envers, on répète A.2 en lisant bien le diagramme de gauche à droite et on termine par A.1. Le motif est ainsi symétrique. Lorsqu'il est indiqué de tricoter A.1 au-dessus de la maille suivante, on doit alors simplement tricoter la maille suivante en suivant le diagramme A.1. Bon tricot!
31.03.2025 - 08:35
![]() COSME Christiane wrote:
COSME Christiane wrote:
Bonjour en faisant les 2 premiers rg est ce que c' est 1 point de riz dans l ' attente d' une réponse je vous remercie Christiane C
23.12.2024 - 10:07
|
|||||||||||||||||||
Daisy Delight Cardigan#daisydelightcardigan |
|||||||||||||||||||
 |
 |
||||||||||||||||||
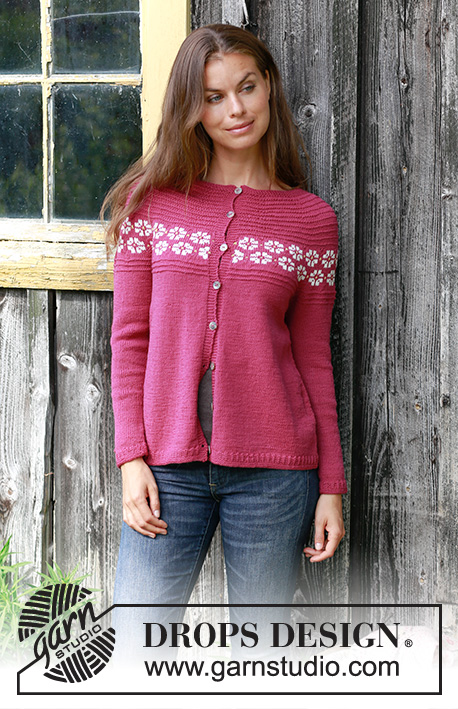
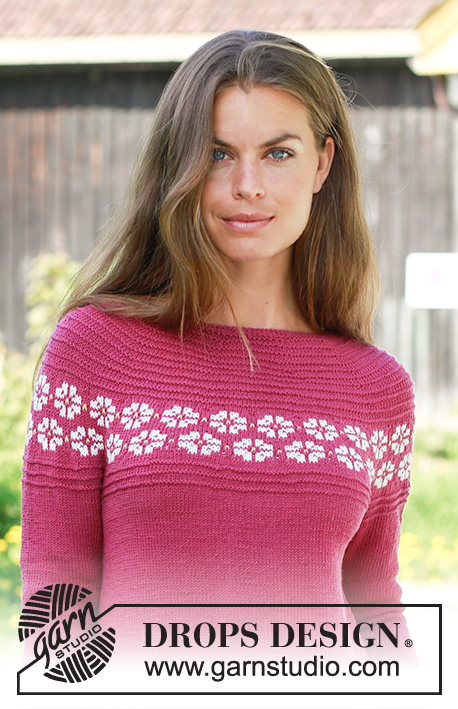
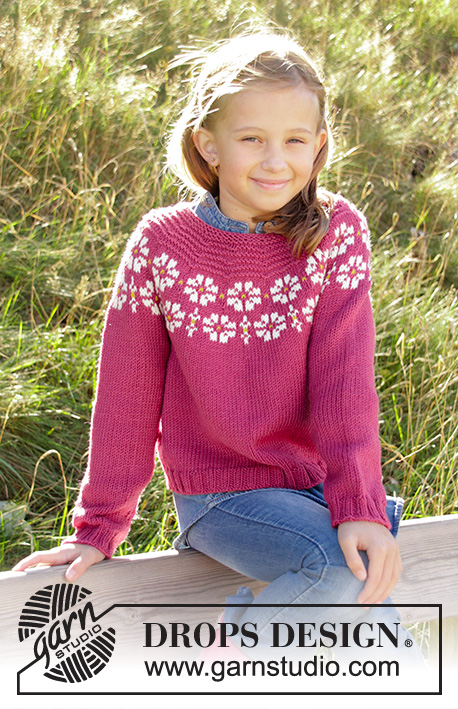
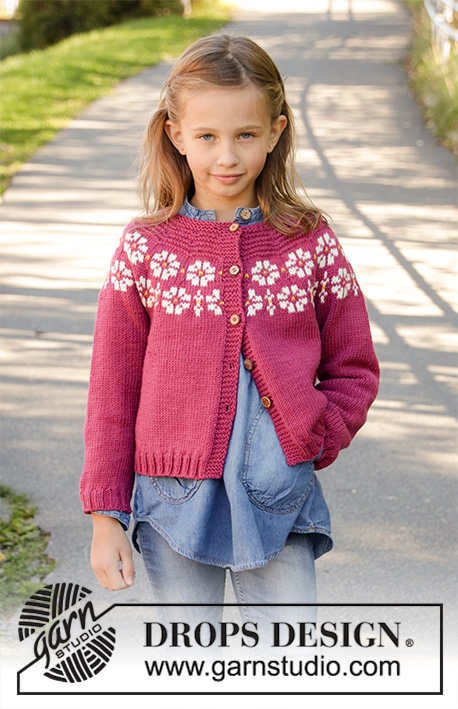
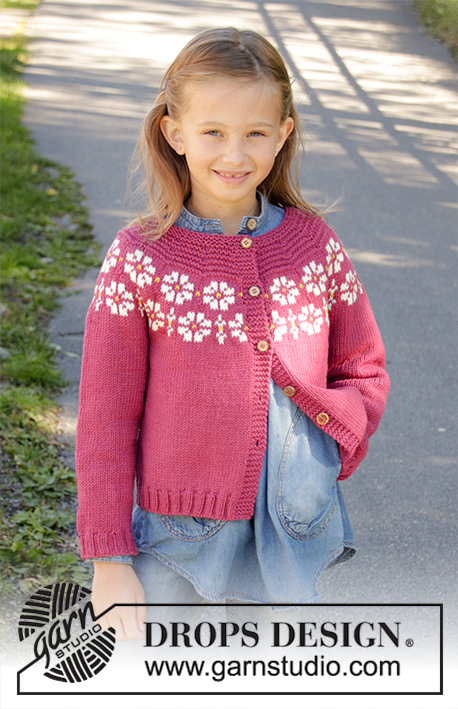
Knitted jacket for children in DROPS Merino Extra Fine. DROPS Lima or DROPS Cotton Light. The piece is worked top down with flowers, coloured pattern, garter stitch and stocking stitch. Sizes 3-12 years.
DROPS Children 34-5 |
|||||||||||||||||||
|
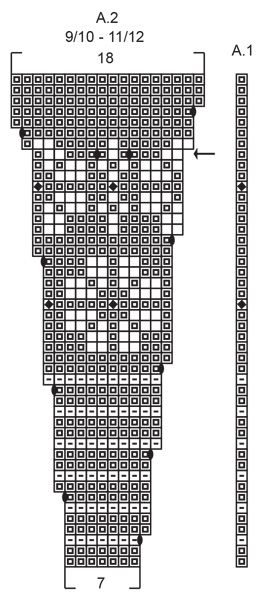
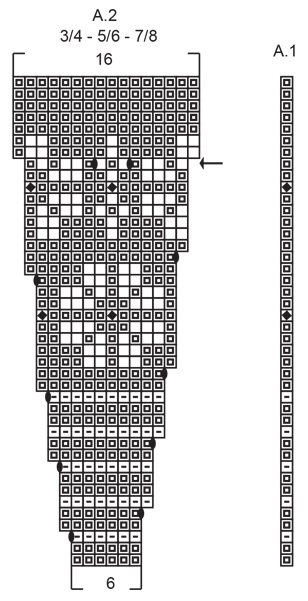
EXPLANATIONS FOR THE PATTERN: ------------------------------------------------------- RIDGE/GARTER STITCH (worked back and forth): 1 ridge = Knit 2 rows. PATTERN: See diagrams A.1 and A.2. Choose diagram for your size. The diagrams show all the rows in the pattern seen from the right side. INCREASE TIP-1 (evenly spaced): To work out how to increase evenly, count the total number of stitches on the needle (e.g. 72 stitches) and divide by the number of increases to be made (e.g. 17) = 4.2. In this example increase by making 1 yarn over after approx. each 4th stitch. On the next row work the yarn overs twisted to avoid holes. INCREASE TIP-2 (for sides of body): Work until there is 1 stitch left before the marker thread, 1 yarn over, knit 2 (marker thread sits in the middle of these 2 stitches), 1 yarn over = 2 stitches increased. On the next row work the yarn overs twisted to avoid holes. Then work the new stitches in stocking stitch. DECREASE TIP (for sleeves): Decrease 1 stitch on each side of the marker thread as follows: Work until there are 3 stitches left before the marker thread, knit 2 together, knit 2 (marker thread sits in the middle of these 2 stitches), slip 1 stitch as if to knit, knit 1 and pass the slipped stitch over the knitted stitch = 2 stitches decreased. BUTTONHOLES: Work buttonholes on the right band (when garment is worn). 1 buttonhole = start from the wrong side and knit together stitches 2 and 3 from the edge, make 1 yarn over. On the next row knit the yarn over to leave a hole. The first buttonhole is worked after 1 cm on the neck and then the other 4-4-5-5-5 buttonholes are worked every 6-6-6-7-7 cm. ------------------------------------------------------- START THE PIECE HERE: ------------------------------------------------------- JACKET - SHORT OVERVIEW OF THE PIECE: The piece is worked back and forth with circular needle, top down, then the front and back pieces are worked back and forth. The sleeves are worked in the round with short circular needle/double pointed needles. YOKE: Cast on 72-76-80-86-92 stitches with circular needle size 4 and heather/cerise/dark red. Work 2 RIDGES – see description above – remember BUTTONHOLES on right band – see description above. Knit 1 row where you increase 17-19-21-23-24 stitches evenly on row - READ INCREASE TIP-1! = 89-95-101-109-116 stitches on needle. Knit 1 row from the wrong side. Insert a marker in this row and measure onwards from here. Work according to diagrams A.1 and A.2 from the right side as follows: Work 5 band stitches in GARTER STITCH, A.1 over 1 stitch, A.2 a total of 13-14-15-14-15 times on the row and 5 band stitches in garter stitch. REMEMBER THE KNITTING TENSION! When diagrams A.1 and A.2 have been completed in height there are 219-235-251-263-281 stitches on the needle. On the next row from the right side increase 3-3-5-1-5 stitches evenly on row = 222-238-256-264-286 stitches. Continue with stocking stitch and 5 band stitches in garter stitch on each side until the piece measures 15-15-16-17-18 cm from the marker. The next row from the right side is worked as follows: Work 5 band stitches in garter stitch, 31-33-36-37-38 stitches in stocking stitch (= front piece), place the next 44-48-51-53-62 stitches on a thread (= sleeve), cast on 6 new stitches under the sleeve, work 62-66-72-74-76 stitches in stocking stitch (= back piece), place the next 44-48-51-53-62 stitches on a new thread (= sleeve), cast on 6 new stitches, work 31-33-36-37-38 stitches (= front piece) and 5 band stitches in garter stitch. BODY: There are 146-154-166-170-174 stitches on the needle. THE PIECE IS NOW MEASURED FROM HERE! Insert 1 marker thread in the middle of the 6 new stitches cast on under each sleeve. Work stocking stitch back and forth, with 5 band stitches in garter stitch on each side. When the piece measures 3 cm increase 1 stitch on each side of each marker (= 4 stitches increased) READ INCREASE TIP–2! Repeat the increase every 3-4-5-6-7 cm a total of 3 times = 158-166-178-182-186 stitches on the needle. Continue working as before until the piece measures 12-16-19-22-25 cm. Work 1 row from the right side where you increase 10-10-10-10-10 stitches evenly on row (do not increase on the bands) = 168-176-188-192-196 stitches. The next row is worked as follows from the right side: Work 5 band stitches in garter stitch, purl 2, * knit 2, purl 2 *. Work from *-* until there are 5 stitches left and work 5 band stitches in garter stitch. Continue this rib for 3 cm. On the next row from the right side cast off with garter stitch over garter stitch, knit over knit and purl over purl. Cut and fasten the strand. SLEEVE: Place the stitches from one thread on short circular needle/double pointed needles size 4 mm (= 44-48-51-53-62 stitches) and knit up 1 stitch in each of the 6 stitches cast on under the sleeve (= 50-54-57-59-68 stitches). Insert 1 marker thread in the middle of these 6 stitches. Work stocking stitch in the round for 2 cm. Now decrease 1 stitch on each side of the marker thread - READ DECREASE TIP. Continue with stocking stitch and repeat the decrease every 4-3½-4-4-3½ cm until you have decreased a total of 5-7-7-8-10 times = 40-40-43-43-48 stitches on the needles. Work stocking stitch until the sleeve measures 22-27-30-34-37 cm. Work 1 round and increase 4-4-5-5-4 stitches evenly on the round = 44-44-48-48-52 stitches. Work rib in the round with knit 2 / purl 2 for 3 cm. Loosely cast off with knit over knit and purl over purl. Cut and fasten strand. Work the other sleeve in the same way. ASSEMBLY: Sew opening under sleeves. Sew buttons onto left band. |
|||||||||||||||||||
Diagram explanations |
|||||||||||||||||||
|
|||||||||||||||||||
 |
|||||||||||||||||||
 |
|||||||||||||||||||
 |
|||||||||||||||||||
Have you finished this pattern?Tag your pictures with #dropspattern #daisydelightcardigan or submit them to the #dropsfan gallery. Do you need help with this pattern?You'll find 31 tutorial videos, a Comments/Questions area and more by visiting the pattern on garnstudio.com. © 1982-2026 DROPS Design A/S. We reserve all rights. This document, including all its sub-sections, has copyrights. Read more about what you can do with our patterns at the bottom of each pattern on our site. |
|||||||||||||||||||


With over 40 years in knitting and crochet design, DROPS Design offers one of the most extensive collections of free patterns on the internet - translated to 17 languages. As of today we count 324 catalogues and 12290 patterns translated into English (UK/cm). 12290
We work hard to bring you the best knitting and crochet have to offer, inspiration and advice as well as great quality yarns at incredible prices! Would you like to use our patterns for other than personal use? You can read what you are allowed to do in the Copyright text at the bottom of all our patterns. Happy crafting!
Post a comment to pattern DROPS Children 34-5
We would love to hear what you have to say about this pattern!
If you want to leave a question, please make sure you select the correct category in the form below, to speed up the answering process. Required fields are marked *.