
Popular categories
Looking for a yarn?


Comments / Questions (18)
![]() Sigríður Sólveig Þormóðsdóttir wrote:
Sigríður Sólveig Þormóðsdóttir wrote:
Líst vel á þessa peysu
02.02.2025 - 14:47
![]() Sigríður Sólveig Þormóðsdóttir wrote:
Sigríður Sólveig Þormóðsdóttir wrote:
Líst vel á þessa peysu
02.02.2025 - 14:46
![]() Sigríður Sólveig Þormóðsdóttir wrote:
Sigríður Sólveig Þormóðsdóttir wrote:
Hæ
02.02.2025 - 14:43
![]() Conny wrote:
Conny wrote:
Verstehe ich es richtig. Die Reihe mit den Zunahmen, ist die Reihe mit den Umschlägen?
06.11.2024 - 12:41DROPS Design answered:
Liebe Conny, die 1. beschriebene Runde mit den Umschlägen ist mit Zunahmen = 174-178-182-202-202-210 Maschen nach dieser Runde. Damit sind es Umschläge für Lochmuster (siehe 4. Symbole in den Diagrammen) + Umschläge in den Diagrammen (Zunahmen für die Zöpfe - siehe 5. Symbol) + Umschläge für Raglan und mitte Vorne/Rücken. Die Umschläge bei der 1. Reihe vom Teil "a" alle Diagrammene werden nur einmal gestrickt. Viel Spaß beim Stricken!
06.11.2024 - 16:05
![]() Johanna wrote:
Johanna wrote:
Hallo, das Diagramm geht ja einmal 10 Reihen in die Höhe und einmal 12 Reihen hoch. Heisst das, wenn ich mit Reihe 10 fertig bin stricke ich bei Reihe 1 weiter und bei Reihe 11? Dann verschiebt sich das Diagramm?
02.11.2024 - 01:09DROPS Design answered:
Liebe Johanna, die Diagramme wiederholen Sie in der Höhe genauso wie beim Diagram beschrieben, dh nach der letzten Reihe stricken Sie ab 1. Reihe wieder; so werden die Diagramme nicht alle auf einmal bei der 1. Reihe wiederholt;. Viel Spaß beim Stricken!
04.11.2024 - 08:00
![]() Arja Van Der Kooij wrote:
Arja Van Der Kooij wrote:
Ik heb de trui gebreid tot en met de pas, daarna de steken van de mouwen op en hulpdraad gezet en nu bezig met voor en achterpand tegelijkertijd in de rondte te breien, zoals ook aangegeven staat in de beschrijving.( Achter- en voorpand worden pas apart verder gebreid bij de scheiding van de panden voor de split opzij) Toch staat hier nu in de beschrijving, bij het verder breien van het lijf, (nld 1 t/m 4) dat de tweede toer aan de verkeerde kant gebreid moet worden. Volgens mij klopt dat niet,
20.01.2024 - 12:43DROPS Design answered:
Dag Arja,
Het lijf wordt inderdaad eerst in de rondte gebreid en pas na ongeveer 18 of 19 cm wordt het voorpand en het achterpand apart verder gebreid. Ik zal het doorgeven aan de ontwerpafdeling om te controleren.
21.01.2024 - 11:14
![]() Katharina wrote:
Katharina wrote:
Danke, so habe ich es auch gemacht. Aber es passt doch rechnerisch schon nicht. Wie viele Runden sollte ich bei den 442M haben? Die Vorder-und Rückseite werden gleich gearbeitet oder habe ich da vielleicht den Fehler?
30.03.2022 - 15:04DROPS Design answered:
Liebe Katharina, so sollte es aber passen: nach der 1. Runde haben Sie 178 Maschen, dann nehmen Sie 1 M nach dem 1., 4., 6. und 9. Markierer und vor dem 2., 4., 7. und 9. Markierer (= 8 Mal) noch weitere 28 Mal = 28x8 = 224 Zunahmen + nach dem 3. und 8. Markierer und vor dem 5. und 10. Markierer (= 4 Mal) noch weiteren 10 Mal = 4x10= 40 M. 178+224+40= 442 M. In jeder 2. Runde nehmen Sie 29 Mal = 58 Runden brauchen Sie insgesamt (die Zunahmen in jeder 4. Runde werden dann früher fertig: nach 44 Runden). Hoffentlich kann es Ihnen helfen.
30.03.2022 - 16:17
![]() Koch, Katharina wrote:
Koch, Katharina wrote:
Ich habe leider noch eine Frage.Ich habe alle Schritte bis zum Stillegen für die Ärmel gestrickt.Die Länge von ca.24cm(Gr.M) passt,aber nicht die Maschenanzahl.Die Umschläge vor/nach 1.,2.,4.,7.,9.Markierer habe ich in jeder 2.Runde gestrickt= 29 Reihen insgesamt. Zusätzlich zu diesen Umschlägen habe ich dann die Umschläge nach/vor dem 3.,5.,8.,10.Markierer in jeder 4.Reihe gestrickt. Nun sind nicht 66 M am Ärmel,sondern 76M,Vorder-/Rückteil je 164M (anstatt 155).Wo liegt der Fehler?
30.03.2022 - 12:10DROPS Design answered:
Liebe Frau Koch, Sie sollen nach dem 3. + nach dem 8. Markierer; und vor dem 5. + vor dem 10. Markierer, dh nicht beidseitig von diesen Markierer sondern entweder davor oder danach. So haben Sie 66 M aschen bei den Ärmeln und 155 Maschen bei dem Vorder- /Rückenteil und 442 M insgesamt. Viel Spaß beim stricken!
30.03.2022 - 14:53
![]() Katharina wrote:
Katharina wrote:
Vielen Dank für die schnelle Antwort! Eine Frage habe ich noch zu den Mustern 1b - 4b: werden die Umschläge in der Folgereihe verschränkt gestrickt oder nicht?Viele Grüße
10.02.2022 - 07:57DROPS Design answered:
Liebe Katharina, diese Umschläge werden ganz nonrmal gestrickt, genauso wie beim A.2b/A.3b, die sollen Löcher bilden. Viel spaß beim stricken!
10.02.2022 - 09:27
![]() Katharina wrote:
Katharina wrote:
Guten Tag, ich habe alle ersten Schritte gestrickt und nun 178 M (für Größe M) auf der Rundnadel. Wie stricke ich jetzt weiter? Es steht "Wenn A1a bis A4a 1x in der Höhe gestrickt wurden, A.1b bis A4b über A1a bis A4a stricken. Hat A1a nun 11 oder 14 Maschen? In welcher Reihenfolge stricke ich welches Muster wie oft? Danke vorab für die Hilfe!
07.02.2022 - 07:51DROPS Design answered:
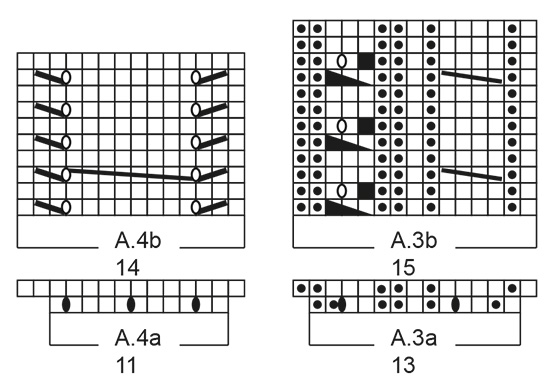
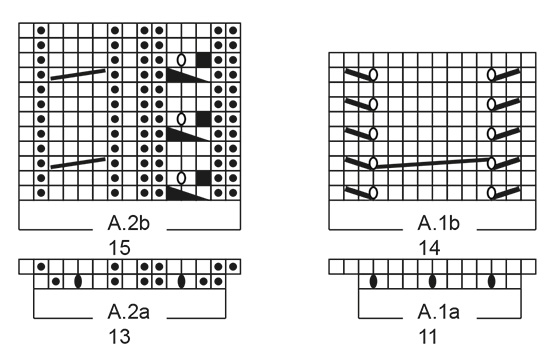
Liebe Katharina, die Diagramme a werden nur einmal in der Höhe gestrickt, bei der 1. Reihe von allen -a Diagramme wird es jeweils zugenommen. Dann stricken Sie die Diagramme -B über die neue Maschenanzahl, z.B. A.1a strickt man über 11 Maschen + 3 Zunahmen bei der 1. Reihe = 13 Maschen. Nach der 2. Reihe gestrickt ist, strickt man die 14 M A.1b. Die 10 Reihen in A.1b (= A.4b) wierderholen Sie dann in der höhe. A.2b/A.3b werden über 12 Reihen gestrickt, so wird man diese 12 Reihen wiederholen. Viel Spaß beim stricken!
07.02.2022 - 10:56
|
||||||||||||||||||||||||||||||||||||||||
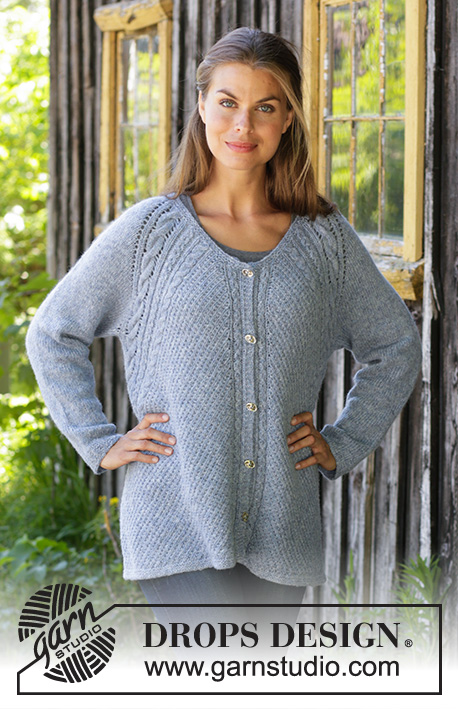
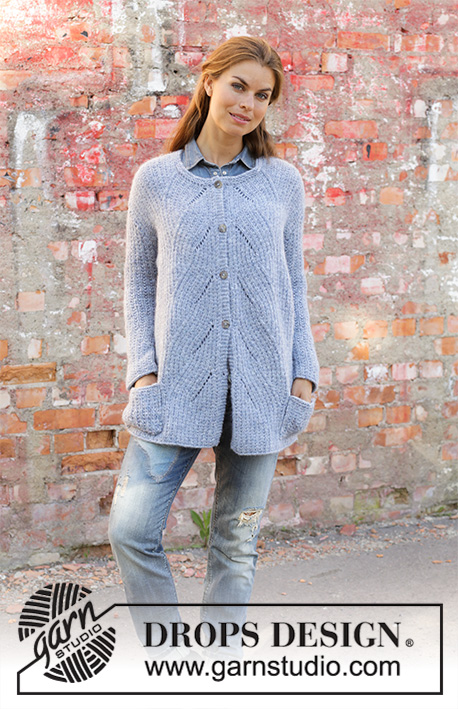
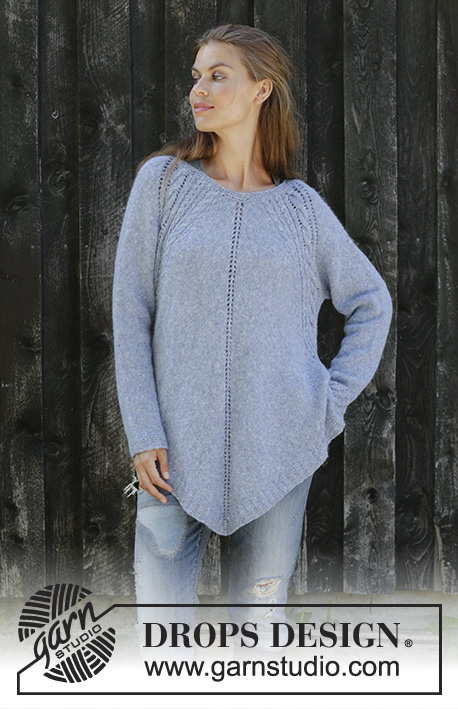
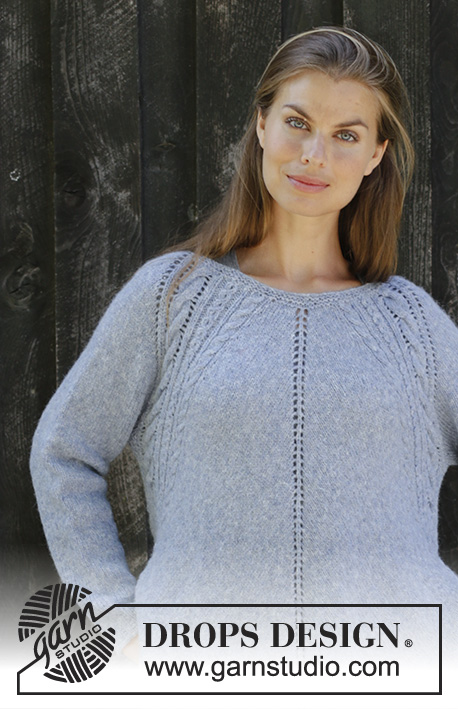
Casual Diamond#casualdiamondsweater |
||||||||||||||||||||||||||||||||||||||||
 |
 |
|||||||||||||||||||||||||||||||||||||||
Knitted poncho jumper with raglan in DROPS Sky. Piece is knitted top down with cables. Size: S - XXXL
DROPS 194-19 |
||||||||||||||||||||||||||||||||||||||||
|
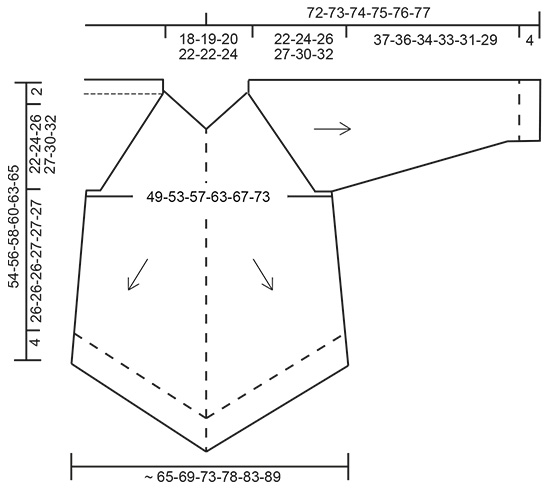
EXPLANATION FOR THE PATTERN: ---------------------------------------------------------- GARTER STITCH (worked in the round): 1 ridge = 2 rounds. Knit 1 round and purl 1 round. GARTER STITCH (back and forth): 1 ridge = knit 2 rows. PATTERN: See diagrams A.1 to A.4. While decreasing and increasing in diagram A.2b and A.3b, the number of stitches can vary according to this with 4 stitches, if decrease has been done. INCREASE TIP (evenly): To calculate how to increase evenly, use the total number of stitches on row (e.g. 122 stitches) and divide stitches by number of increases to be done (e.g. 20) = 6.1. In this example increase by making 1 yarn over after approx. every 6th stitch. On next round work yarn over twisted to avoid hole. DECREASE TIP (applies to sleeves): Decrease 1 stitch on each side of marker thread as follows: Work until 3 stitches remain before marker thread, knit 2 together, knit 2 stitches (marker thread is between these stitches), slip 1 stitch knitwise, knit 1, pass slipped stitch over stitch worked (= 2 stitches decreased in total). ---------------------------------------------------------- START THE PIECE HERE: ---------------------------------------------------------- PONCHO JUMPER - SHORT OVERVIEW OF THE GARMENT: Worked in the round on circular needle, top down in angle down to armhole. Now divide yoke for body and sleeves. Work body in the round, before dividing it into front and back piece and there is a vent in the sides, piece is then worked back and forth. Sleeves are worked in the round on double pointed needles. YOKE: Cast on 122-126-130-146-146-154 stitches on circular needle size 3.5 mm with Sky. Work 2 ridges in GARTER STITCH in the round - read explanation above. Knit 1 round and increase 20-20-20-24-24-24 stitches evenly - read INCREASE TIP = 142-146-150-170-170-178 stitches. Purl 1 round. Switch to circular needle size 4.5 mm. Now work and increase stitches as follows: Left sleeve: Work 1 stitch in stocking stitch and insert 1st marker in this stitch, 1 yarn over (= 1 stitch increased), 6-6-6-8-6-6 stitches in stocking stitch, 1 yarn over (= 1 stitch increased), 1 stitch in stocking stitch and insert 2nd marker in this stitch. Back piece: Work A.1a (= 11 stitches), A.2a (= 13 stitches), 1 stitch in stocking stitch and insert 3rd marker in this stitch, 1 yarn over (= 1 stitch increased), 6-7-8-12-13-15 stitches in stocking stitch, 1 yarn over (= 1 stitch increased), 1 stitch in stocking stitch and insert 4th marker in this stitch (= mid stitch), 1 yarn over (= 1 stitch increased), 6-7-8-12-13-15 stitches in stocking stitch, 1 yarn over (= 1 stitch increased), 1 stitch in stocking stitch and insert 5th marker in this stitch, A.3a (= 13 stitches), A.4a (= 11 stitches). Right sleeve: Work 1 stitch in stocking stitch and insert 6th marker in this stitch, 1 yarn over (= 1 stitch increased), 6-6-6-8-6-6 stitches in stocking stitch, 1 yarn over (= 1 stitch increased), 1 stitch in stocking stitch and insert 7th marker in this stitch. Front piece: Work A.1a over 11 stitches, A.2a over 13 stitches, 1 stitch in stocking stitch and insert 8th marker in this stitch, 1 yarn over (= 1 stitch increased), 6-7-8-12-13-15 stitches in stocking stitch, 1 yarn over (= 1 stitch increased), 1 stitch in stocking stitch and insert 9th marker in this stitch (= mid stitch), 1 yarn over (= 1 stitch increased), 6-7-8-12-13-15 stitches in stocking stitch, 1 yarn over (= 1 stitch increased), 1 stitch in stocking stitch and insert 10th marker in this stitch, A.3a over 13 stitches, A.4a over 11 stitches. 2 stitches have been increased on each sleeve and 14 stitches on each front/back piece (i.e. 2 stitches for raglan, 2 stitches at middle stitch and 10 stitches increased in pattern A.1a to A.4a) = 174-178-182-202-202-210 stitches. Yarn overs on sleeves and on each side of the middle stitches are NOT worked twisted (= hole), while yarn over after A.2 and before A.3 are worked twisted (= not hole). REMEMBER THE KNITTING TENSION! When A.1a to A.4a have been worked 1 time vertically, A.1b to A.4b over A.1a to A.4a. Continue increase like this (first increase is already explained) Increase with 1 yarn over after 1st, 4th, 6th and 9th marker and before 2nd, 4th, 7th and 9th marker every other round 26-29-31-33-36-39 times in total (i.e. 25-28-30-32-35-38 more times). Do not work these yarn overs twisted = holes. Increase with 1 yarn over after 3rd and 8th marker and before 5th and 10th marker every 4th round 9-11-14-12-16-19 times (i.e. 8-10-13-11-15-18 more times. Work these yarn overs twisted = not holes. when all increases are done, there are 60-66-70-76-80-86 stitches on each sleeve and 143-155-167-175-191-207 stitches on each front/back piece = 406-442-474-502-542-586 stitches in total. Piece measures approx. 22-24-26-27-30-32 cm from cast-on edge measured mid on top of sleeve. On next round divide piece for body and sleeves as follows: (last round worked is 1 round with increases). Left sleeve: Slip the first 60-66-70-76-80-86 stitches on a stitch holder for sleeve and cast on 8-8-8-12-12-12 stitches under sleeve. Insert 1 marker in the middle of these stitches. Back piece: Work pattern and stocking stitch as before (= 143-155-167-175-191-207 stitches). Right sleeve: Slip stitches on a stitch holder and cast on stitches under sleeve as on left sleeve. Front piece: Work pattern and stocking stitch as before (= 143-155-167-175-191-207 stitches). BODY: = 302-326-350-374-406-438 stitches. Displace round so that it begins at marker thread under sleeve. Work stitches for armhole in stocking stitch. Continue as follows: ROUND/ROW 1 (= from right side): Back piece: Work 2 stitches in stocking stitch, slip 1 stitch knitwise, knit 1, pass slipped stitch over stitch worked (= 1 stitch decreased), A.1b, A.2b and stocking stitch until middle stitch, 1 yarn over (= 1 stitch increased), 1 stitch in stocking stitch (= middle stitch), 1 yarn over (= 1 stitch increased), work stocking stitch, A.3b and A.4b until 4 stitches remain before marker thread, knit 2 together (= 1 stitch decreased), 2 stitches in stocking stitch. Front piece: Work as back piece. I.e. decrease 4 stitches in total and increase 4 stitches in total, so that number of stitches is the same. ROUND/ROW 2 (= from wrong side): Work pattern and stocking stitch as before (do not work yarn overs twisted = holes). ROUND/ROW 3: Back piece: Work pattern and stocking stitch as before until middle stitch, 1 yarn over (= 1 stitch increased), 1 stitch in stocking stitch (= middle stitch), 1 yarn over (= 1 stitch increased), work stocking stitch and pattern until marker thread (= 2 stitches increased). Front piece: Work as back piece. I.e. increase 4 stitches in total. ROUND/ROW 4: Work pattern and stocking stitch as before (do not work yarn overs twisted = holes). Repeat rounds 1 to 4. I.e. stitches in A.1b to A.4b are decreased and stitches in stocking stitch are increased mid front/back. When there is not enough stitch to cable, continue with knit over knit and purl over purl over pattern. Continue like this until piece measures 18-18-18-19-19-19 cm from where body was divided from sleeves, adjust so that next round is 2nd or 4th round. Now divide front and back piece at the marker threads and finish each part separately (= approx. 12 cm vent in the sides). BACK PIECE: Continue 1st to 4th row (work first row from right side) back and forth, but now work the outermost 2 stitches in each side in GARTER STITCH – read explanation above. Continue like this until piece measures 26-26-26-27-27-27 cm from where body was divided from sleeves = approx. 183-195-207-221-237-253 stitches. Work 1 row from wrong side as before, but adjust number of stitches to 92-100-104-112-120-128 stitches on each side of middle stitch, i.e. increase approx. 1-3-1-2-2-2 stitches evenly on each side of middle stitch (= 2-6-2-4-4-4 stitches increased in total) = 185-201-209-225-241-257 stitches. Switch to circular needle size 3.5 mm. Now work a rib edge over all stitches as follows: ROW 1 (= from right side): Work 2 stitches in garter stitch, slip 1 stitch knitwise, knit 1, pass slipped stitch (= 1 stitch decreased), work * 2 stitches in stocking stitch, 2 stitches in garter stitch *, work from *-* until middle stitch, 1 yarn over (= 1 stitch increased), 1 stitch in stocking stitch (= middle stitch), 1 yarn over (= 1 stitch increased), work * 2 stitches in garter stitch, 2 stitches in stocking stitch *, work from *-* until 4 stitches remain, knit 2 together (= 1 stitch decreased) and finish with 2 stitches in garter stitch. ROW 2 (= from wrong side): Purl over stocking stitch and garter stitch over garter stitch, work the increased stitches in rib (there should be holes). Repeat rows 1 to 2. I.e. on every row from right side increase 2 stitches and decreased 2 stitches so that number of stitches is the same. When piece measures 30-30-30-31-31-31 cm, from where body was divided from sleeves, cast off by knitting from right side. Piece measures approx. 54-56-58-60-63-65 cm from shoulder and down on the shortest. FRONT PIECE: Work as back piece. SLEEVE: Sleeves are worked in the round on double pointed needles. Slip the 60-66-70-76-80-86 stitches from stitch holder in one side of piece on double pointed needles size 4.5 mm and pick up 1 stitch in each of the 8-8-8-12-12-12 stitches cast on under sleeve = 68-74-78-88-92-98 stitches. Insert 1 marker thread in the middle of the 8-8-8-12-12-12 stitches (= mid under sleeve). Work in stocking stitch in the round. When piece measures 1 cm from where sleeves was divided from body, decrease 1 stitch on each side of marker thread - read DECREASE TIP. Decrease like this every 2½-2½-2-1½-1½-1 cm 12-13-15-18-20-21 times in total = 44-48-48-52-52-56 stitches. When piece measures 37-36-34-33-31-29 cm from where sleeves were divide from body, switch to double pointed needles size 3.5 mm and work rib (= knit 2/2 stitches in garter stitch). Cast off by knitting when piece measures 41-40-38-37-35-33 cm from where sleeve was divided from body. Work the other sleeve the same way. |
||||||||||||||||||||||||||||||||||||||||
Diagram explanations |
||||||||||||||||||||||||||||||||||||||||
|
||||||||||||||||||||||||||||||||||||||||
 |
||||||||||||||||||||||||||||||||||||||||
 |
||||||||||||||||||||||||||||||||||||||||
 |
||||||||||||||||||||||||||||||||||||||||
Have you finished this pattern?Tag your pictures with #dropspattern #casualdiamondsweater or submit them to the #dropsfan gallery. Do you need help with this pattern?You'll find 27 tutorial videos, a Comments/Questions area and more by visiting the pattern on garnstudio.com. © 1982-2026 DROPS Design A/S. We reserve all rights. This document, including all its sub-sections, has copyrights. Read more about what you can do with our patterns at the bottom of each pattern on our site. |
||||||||||||||||||||||||||||||||||||||||


With over 40 years in knitting and crochet design, DROPS Design offers one of the most extensive collections of free patterns on the internet - translated to 17 languages. As of today we count 324 catalogues and 12290 patterns translated into English (UK/cm). 12290
We work hard to bring you the best knitting and crochet have to offer, inspiration and advice as well as great quality yarns at incredible prices! Would you like to use our patterns for other than personal use? You can read what you are allowed to do in the Copyright text at the bottom of all our patterns. Happy crafting!
Post a comment to pattern DROPS 194-19
We would love to hear what you have to say about this pattern!
If you want to leave a question, please make sure you select the correct category in the form below, to speed up the answering process. Required fields are marked *.