
Popular categories
Looking for a yarn?


Comments / Questions (50)
![]() Marta wrote:
Marta wrote:
Que quiere decir que hay que cortar el hilo ? No se sigue tejiendo on misma hebra?
09.02.2024 - 01:24DROPS Design answered:
Hola Marta, sí, se corta el hilo y se reúne en el nuevo comienzo de la vuelta. Generalmente se hace esto cuando tienes que comenzar la vuelta en un punto diferente a dónde dejaste de trabajar; para no desalinear la prenda, se corta el hilo y se une en el sitio necesario para empezar a trabajar la siguiente parte.
11.02.2024 - 20:59
![]() Corina Avram wrote:
Corina Avram wrote:
Hello, I want to make this sweater longer than the pattern, where can I add more length to it? Would be before starting working the rib? Thank you
31.01.2024 - 12:51DROPS Design answered:
Hi Corina, Yes, the length of the body can be adjusted to your desired length before working the rib. Happy knitting!
01.02.2024 - 07:05
![]() Liesbeth Van Vliet wrote:
Liesbeth Van Vliet wrote:
Ik wil dit graag op rechte ipv rondbreinaalden breien. Is het mogelijk om het om te zetten? Ik kon er geen filter voor vinden.Of is op rechte naalden breien inmiddels zo achterhaald dat dat nergens meer te vinden is?
09.01.2024 - 17:46DROPS Design answered:
Dag Liesbeth,
Er is inderdaad geen filter voor patronen met rechte naalden en Noorse patronen worden veelal van oorsprong met rondbreinaalden gemaakt. Om een patroon aan te passen om op rechte naalden te breien hebben we een instructie gemaakt. Deze vind je hier. Helaas is niet niet voor alle patronen geschikt, maar kijk maar even of je hier wat aan hebt.
10.01.2024 - 10:15
![]() Maylén wrote:
Maylén wrote:
Jeg strikker størrelse XL og er nå ferdig med økninger og A1. Hadde da 132 masker, har økt 1 omgang til bolen og 1 omgang kun ermer = (132+8+4)=144 masker. Men i oppskriften står det at man skal øke til bolen 2 ganger, til ermer 1 gang (132+8+4+8)=152 masker. Det går ikke opp ut fra oppskriften. Er dette en feil ved oppskriften, eller er det noe jeg har gått glipp av her?
25.12.2023 - 10:51DROPS Design answered:
Hej Maylén, du har 132m + (2x4 till bolen) + (1 x 4 till ærmerne) = 144 masker :)
02.01.2024 - 09:58
![]() Marie-Martine MARC wrote:
Marie-Martine MARC wrote:
Bonjour, je suis en train de tricoter le pull Octobre Breeze 236 14 en taille M. Il me semble impossible d'obtenir le même nombre de mailles que vous pour l'encolure. En additionnant le nombre de jetés cela ne correspond pas. J'obtiens 114 et non 124. Pouvez vous m'aider s'il vous plaît. J'ai refait 5 fois. Un grand merci d'avance. Très cordialement.
11.12.2023 - 20:10DROPS Design answered:
Bonjour Mme Marc, en taille L vous commencez l'encolure avec 92 mailles, vous augmentez 2 mailles au 1er rang de A.1 , soit 2 mailles x 4 A.1 = 8 mailles augmentées; vous augmentez en même temps pour le raglan 8 m sur l'endroit et 4 m sur l'envers soit (8+4+8+4=24 m), vous aurez donc: 92+8+24=124 mailles quand les rangs raccourcis de l'encolure sont terminés. Bon tricot!
12.12.2023 - 08:52
![]() Denise wrote:
Denise wrote:
Bonjour, je tricote la taille m et après avoir fait l'encolure j'obtiens 116 mailles et non 124. 116 mailles correspond aux 92 mailles de départ plus les 24 mailles ajoutées en tricotant l'encolure. Manque t il des rangs pour la rehausse en taille M ? Cordialement.
06.12.2023 - 20:37DROPS Design answered:
Bonjour Denise, vous devez augmenter 2 mailles au 1er rang de chaque A.1 en plus des augmentations du raglan, autrement dit, au 1er rang, vous augmentez 8 m (raglan) + 8 m (2 m dans chaque A.1), puis 4 m au 2ème rang, 8 m au 3ème rang et 4 m au 4ème rang = 92+8+8+4+8+4=124 mailles. Bon tricot!
07.12.2023 - 08:38
![]() Josie Weatherford wrote:
Josie Weatherford wrote:
Hi thank you for the pattern, and I love your yarn and everything you do. Can I make a suggestion? In the beginning section when describing raglan, can you change it to make the yarn-overs be called a M1R and M1L stitch? This is what we call it in English. This simple description would have saved me from making holes in the yarn overs. You explained in detail what the yarn overs should look like not to leave a hole but it seemed so complicated I skipped it. When I read it again I realised.
18.10.2023 - 07:19
![]() Christine S-Nilson wrote:
Christine S-Nilson wrote:
I am working on size m starting with 92 stitches. In the neck line section I worked 4 rows increasing 8/4/8/4 as instructions show. Now I have 116 stitches. The yoke section starts with 124 stitches for size m. What am I doing wrong?
13.10.2023 - 16:46
![]() VD wrote:
VD wrote:
Hej, har gjort halsrigningen ca 6 ggr nu och ger upp för kvällen då det inte blir bra alls/fel antal maskor. Ska jag följa diagrammet från rätsidan enbart? eller både rät- och avigsidan? Blev förvirrad då diagrammet visar instruktioner från både rät/avigsidan samt texten säger annat. Hoppas ni kan hjälpa mig så att jag kan gå vidare.
22.09.2023 - 21:54DROPS Design answered:
Hej, halsen strikkes i rib; 1rät, 1avig. Sedan fortsäter du i slätstickning med A.1 vi varje markör (4 raglan-markörer) :)
05.10.2023 - 08:30
![]() Marlene wrote:
Marlene wrote:
Bonjour, Pour la mesure totale de l’empiècement « 21-23-25-27-29-31 cm après le col, mesurer le long du devant ». Le long du devant ? C’est le milieu du devant (entre deux marqueurs ?) ou le long du marqueur devant ? Le long du raglan ? Je vous remercie.
27.02.2023 - 14:43DROPS Design answered:
Bonjour Marlene, on doit mesurer après le col, au milieu du devant, autrement dit entre les marqueurs des raglans et bien dans le sens du tricot. Bon tricot!
27.02.2023 - 16:07
|
||||||||||
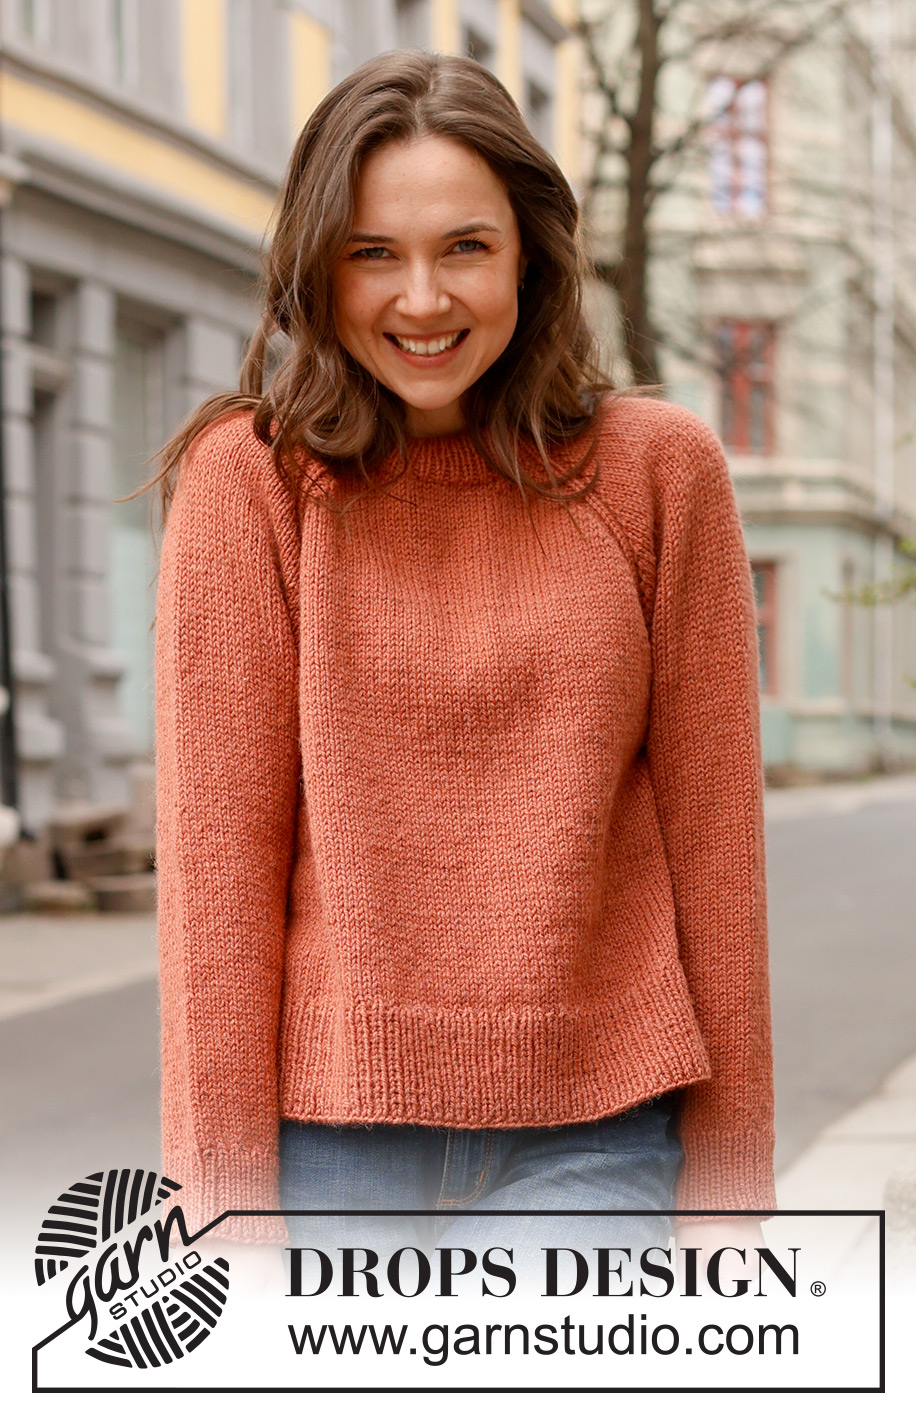
October Breeze#octoberbreezesweater |
||||||||||
 |
 |
|||||||||
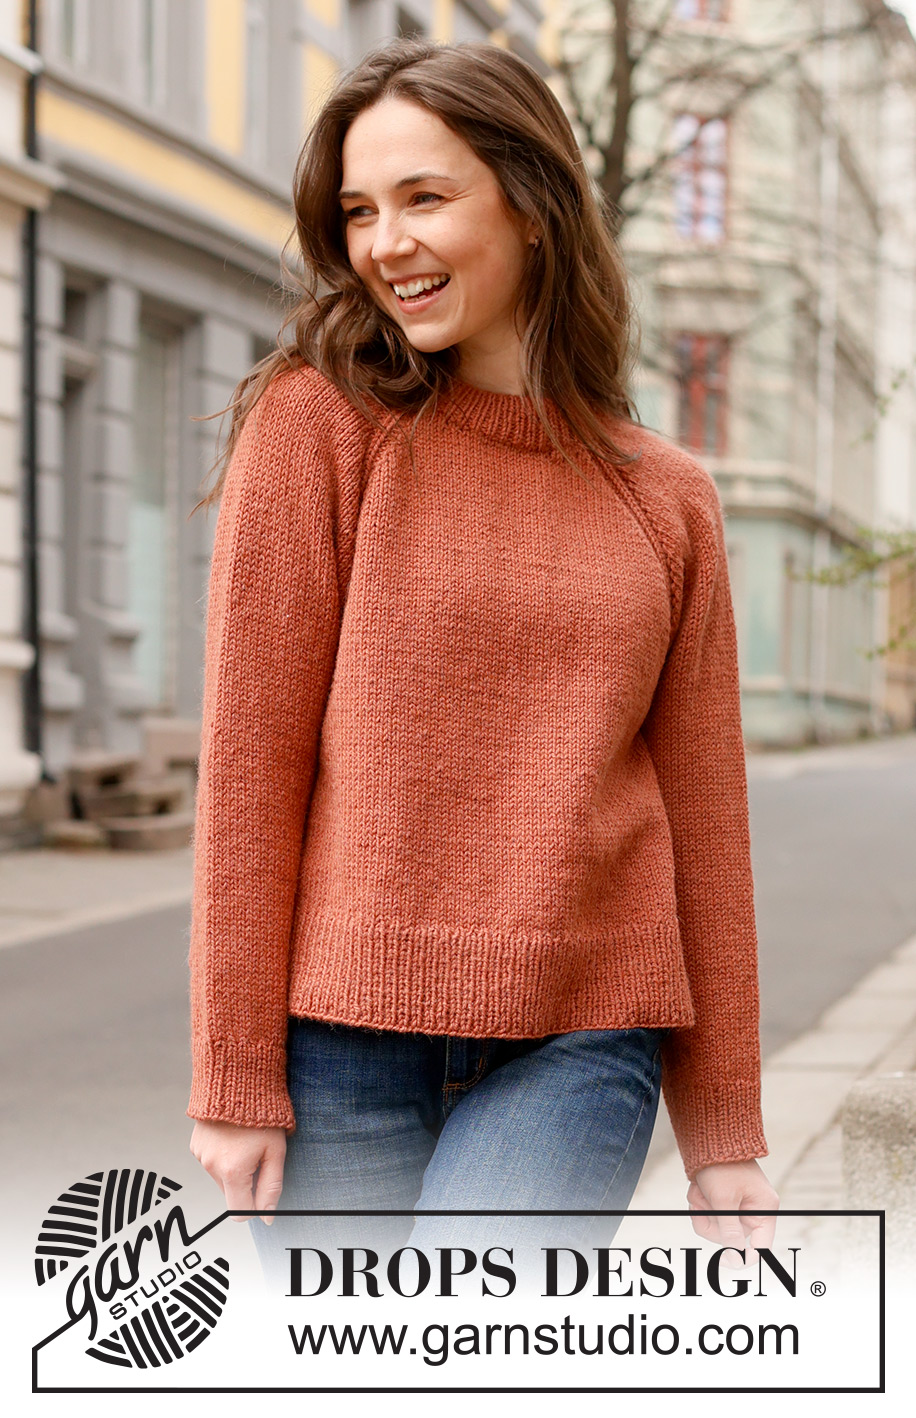
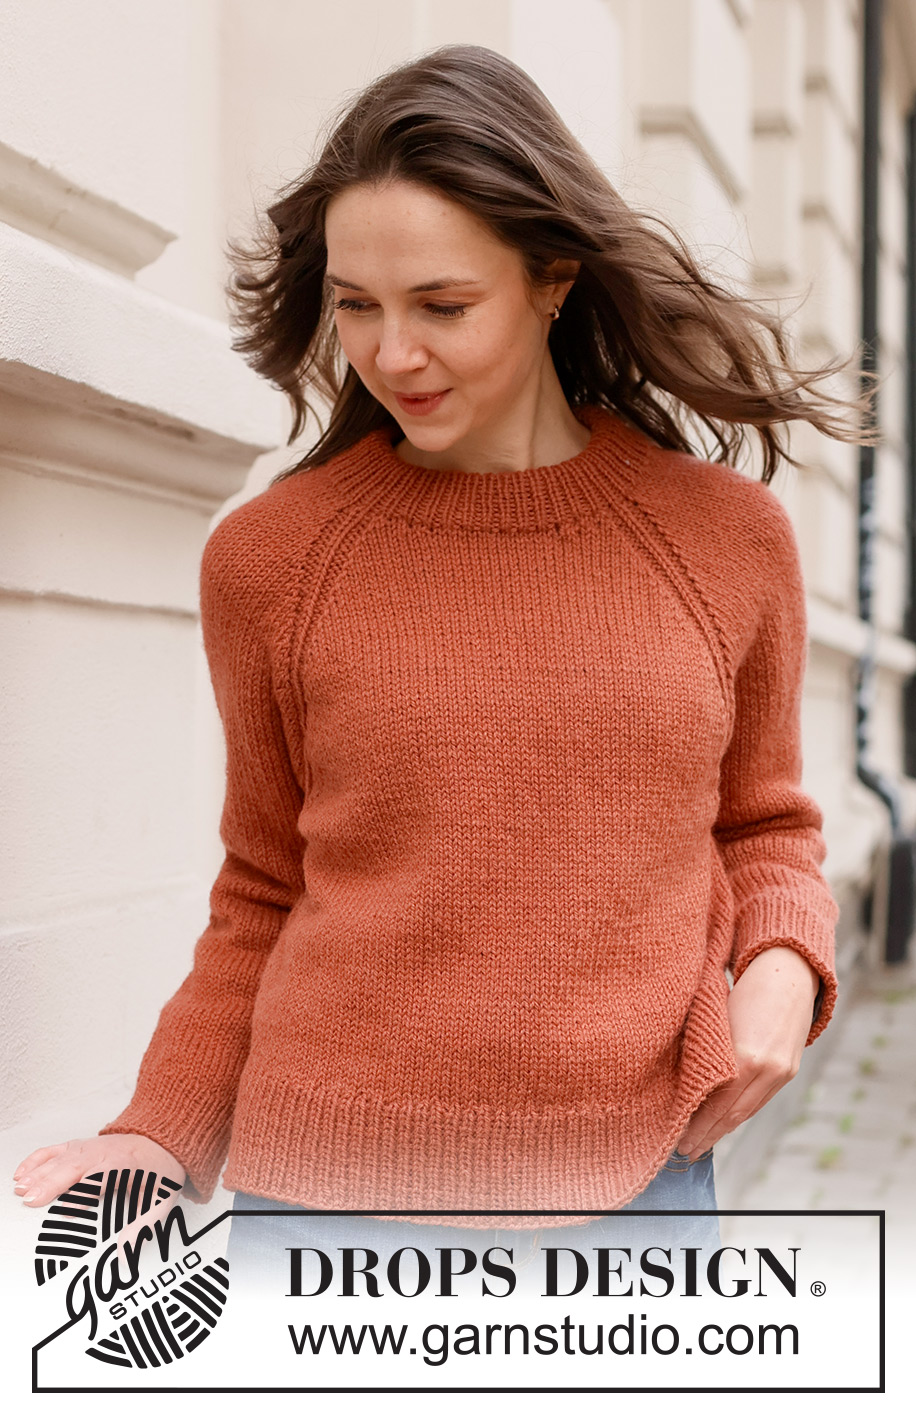
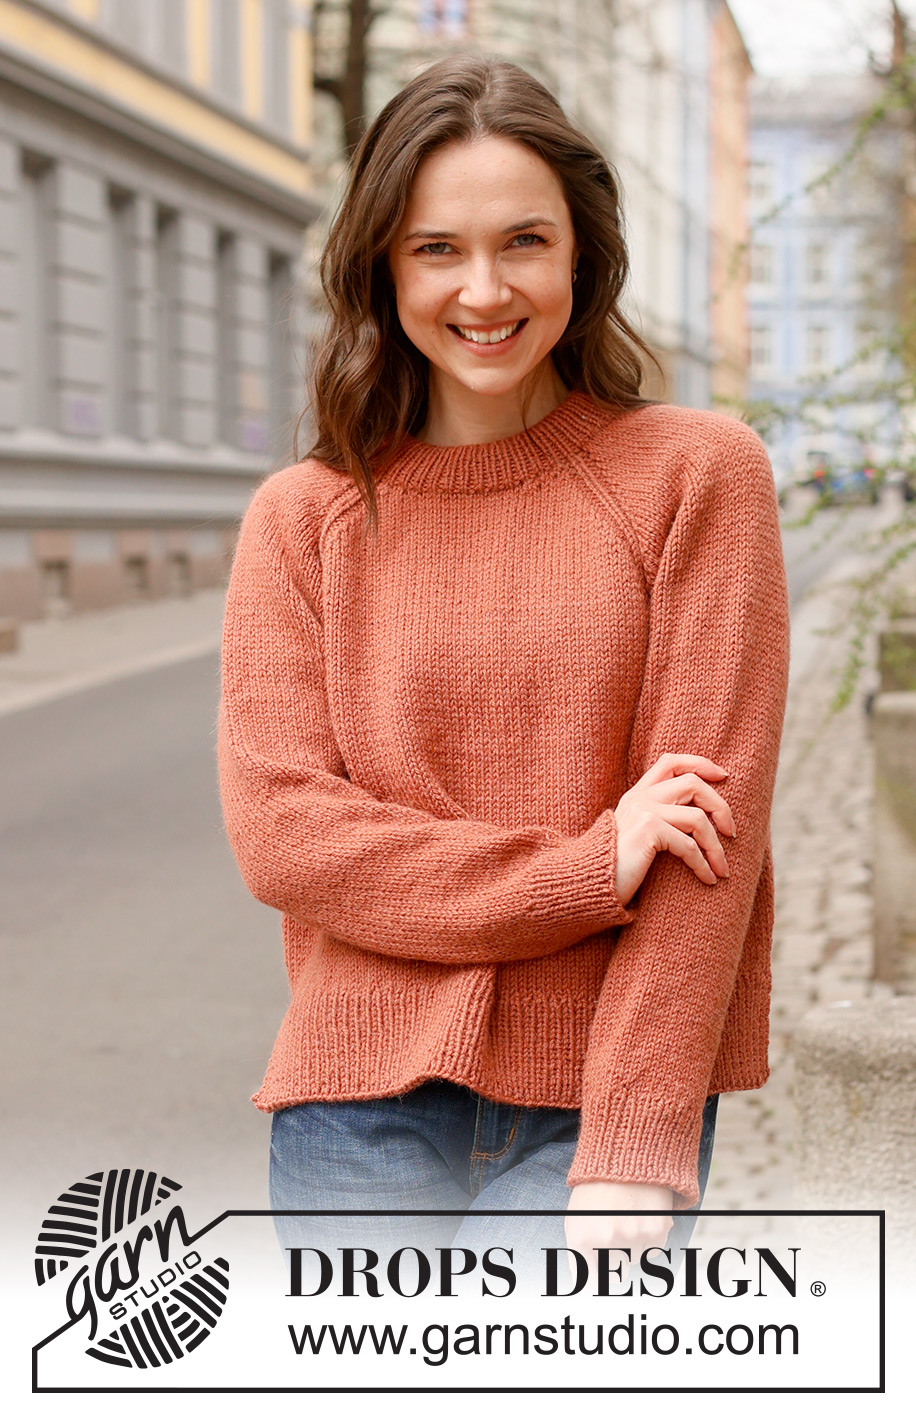
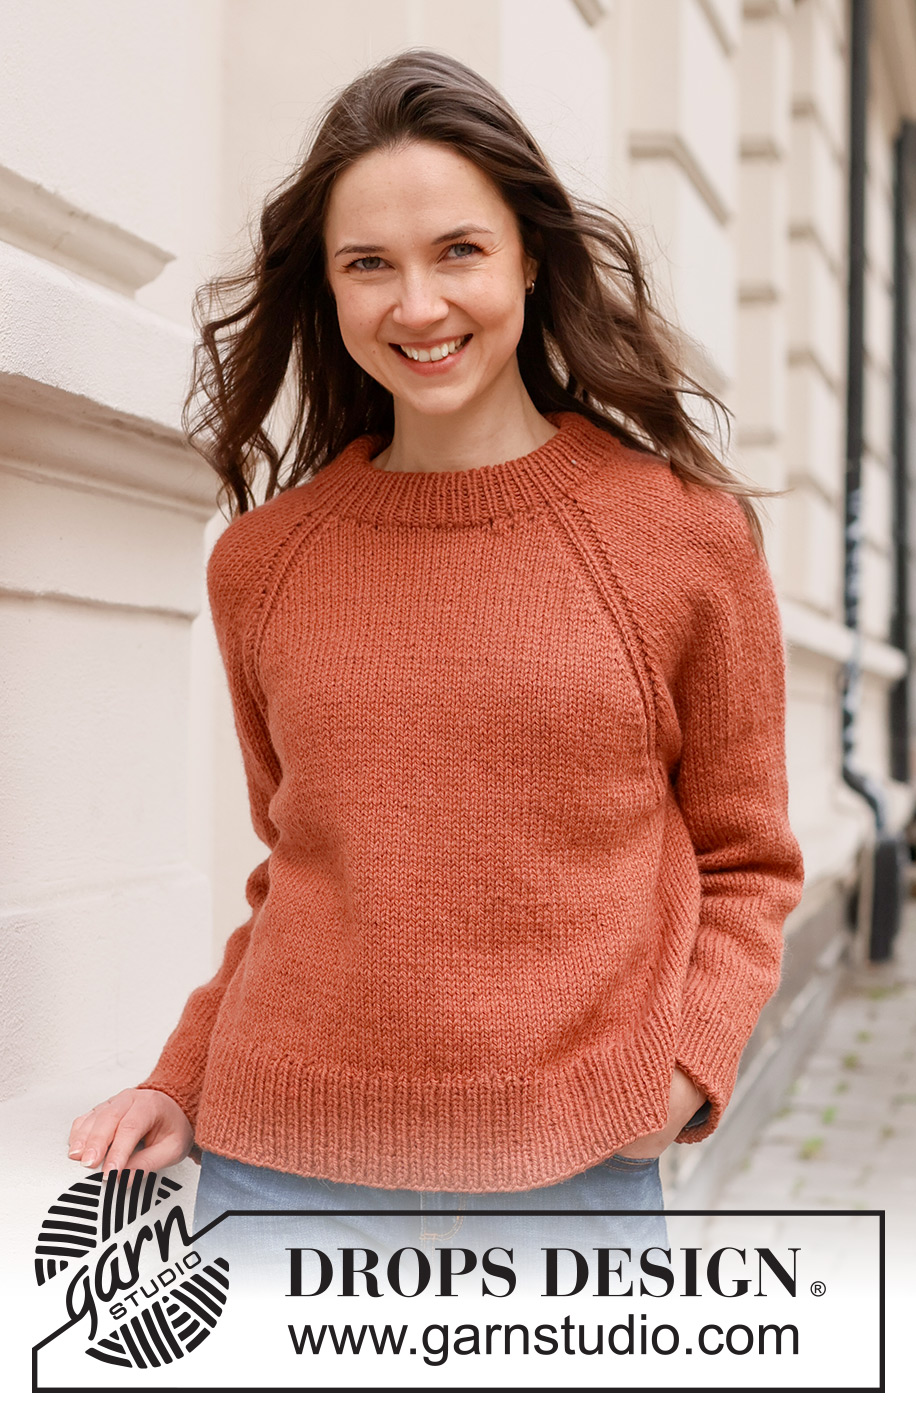
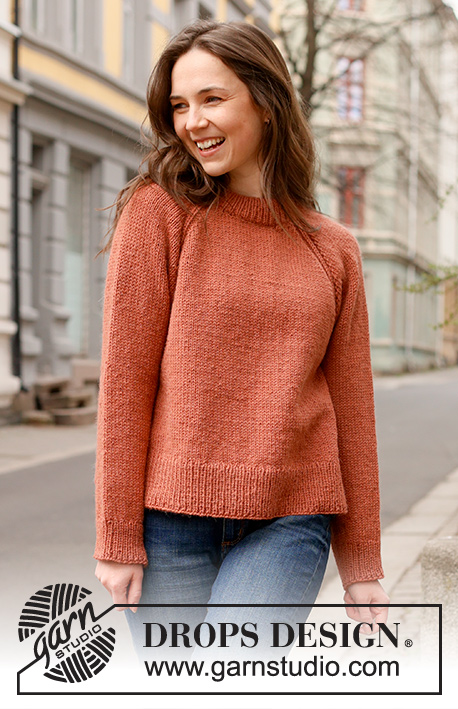
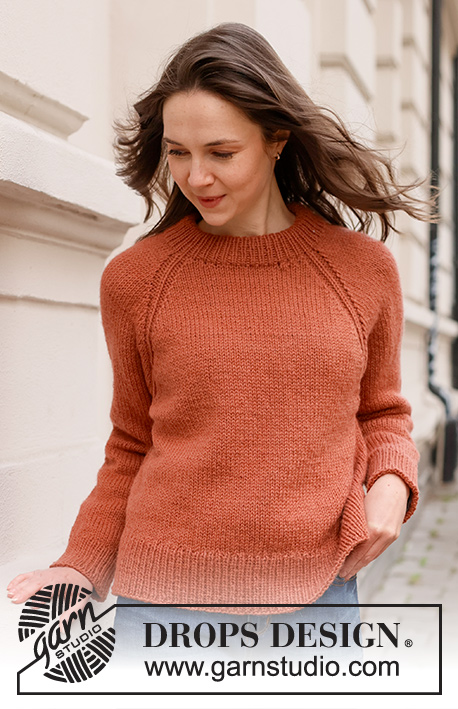
Knitted jumper in DROPS Nepal. The piece is worked top down with double neck and raglan. Sizes XS - XXL.
DROPS 236-14 |
||||||||||
|
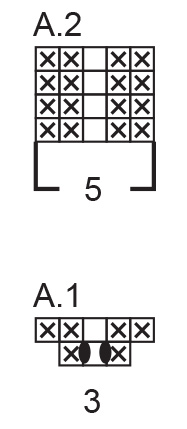
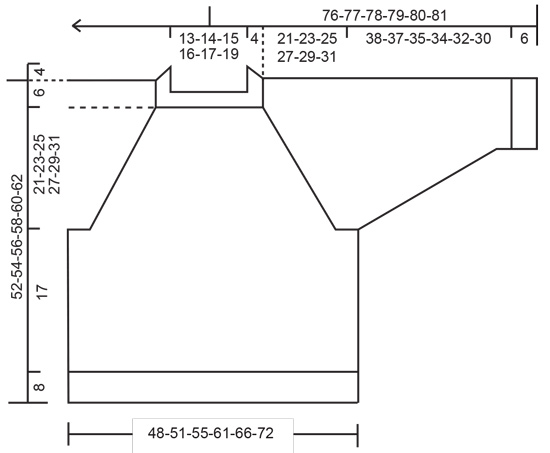
------------------------------------------------------- EXPLANATIONS FOR THE PATTERN: ------------------------------------------------------- RIDGE/GARTER STITCH (worked back and forth): Knit all rows. 1 ridge = knit 2 rows. PATTERN: See diagrams A.1 and A.2. The diagrams show all rows in the pattern from the right side. RAGLAN: All increases before/after A.1/A.2 (marker-stitch is the middle stitch in A.1/A.2). Increase for the body before markers 1 and 3 and after markers 2 and 4 when working from the right side and after markers 1 and 3 and before markers 2 and 4 when working from the wrong side. Increase for the sleeves after markers 1 and 3 and before markers 2 and 4 (always increase from the right side on the sleeves). Increase 1 stitch by making 1 yarn over. The yarn overs are worked as follows from the wrong side: BEFORE MARKER: Purl the back loop. No hole. AFTER MARKER: Slip the yarn-over off the left needle and replace it twisted (insert the left needle from the back when replacing it). Purl the front loop. No hole. The yarn overs are worked as follows from the right side: BEFORE MARKER: Slip the yarn-over off the left needle and replace it twisted (insert the left needle from the back when replacing it). Knit the front loop. The stitch twists to the right. No hole. AFTER MARKER: Knit the back loop (the stitch twists to the left). No hole. DECREASE TIP (for sleeves): Start 3 stitches before the marker, knit 2 together, knit 2 (marker sits between these 2 stitches), slip 1 stitch as if to knit, knit 1 and pass the slipped stitch over the knitted stitch. ------------------------------------------------------- START THE PIECE HERE: ------------------------------------------------------- JUMPER – SHORT OVERVIEW OF THE PIECE: The neck and yoke are worked in the round with circular needle, from mid back and top down. The yoke is divided for body and sleeves and the body is continued in the round with circular needle. The sleeves are worked with short circular needle/double pointed needles. DOUBLE NECK: Cast on 84-88-92-96-100-104 stitches with DROPS Nepal using short circular needles size 4 and 5 mm held together. Remove the needle size 5 mm keeping the stitches on the needle size 4 mm (this gives you an elastic cast-on edge). Work rib in the round (knit 1, purl 1) for 9 cm. Fold the neck double to the inside and work 1 more round of rib, working every 2nd stitch together with its corresponding stitch on the cast-on edge. You now have a double neck. Insert 4 markers without working the stitches, which are then used when increasing to raglan. Count 10-12-12-14-14-16 stitches (half back piece), insert marker-1 in the next stitch, count 19 stitches (sleeve), insert marker-2 in the next stitch, count 21-23-25-27-29-31 stitches (front piece), insert marker-3 in the next stitch, count 19 stitches (sleeve), insert marker-4 in the next stitch, there are 11-11-13-13-15-15 stitches left after the last marker (half back piece). Cut the strand. NECK-LINE: Change to circular needle size 5 mm. Now work a neck-line with short rows AT THE SAME TIME as increasing for raglan. In addition work A.1 at each marker (marker-stitch is the middle stitch in A.1): Start from the right side, 2 stitches before marker-3 (front left-hand side of the neck when the garment is worn). Work stocking stitch, A.1 and increase for RAGLAN on both sides of each A.1 – read description above, until you are 2 stitches past marker-2 (front right-hand side of neck and 8 stitches increased). Turn, tighten the strand and work from the wrong side, increasing for raglan only on the body, to 2 stitches past where the short rows began (4 stitches increased). Turn, tighten the strand and work from the right side to 2 stitches past where you turned last time – working A.2 over each A.1 and increasing for raglan on both sides of each A.2. Turn, tighten the strand and work from the wrong side to 2 stitches past where you turned last time, increasing for raglan only on the body. Cut the strand. YOKE: = 116-120-124-128-132-136 stitches. Work in the round over all stitches in the different sizes as follows: SIZES XS, S, M and L: Start mid-back, work stocking stitch, A.2, and increase raglan on the body and sleeves (on each side of A.2) every 2nd round 3-3-8-10 times = 140-144-188-208 stitches. Continue with stocking stitch, A.2 and increase for raglan, but every 2nd increase is only on the body (4 stitches increased); i.e. increase on the body every 2nd round and on the sleeves every 4th round. Increase like this 18-20-16-18 times on the body (9-10-8-9 times on the sleeves). A total of 25-27-28-32 times on the body and 14-15-18-21 times on the sleeves. After the last increase there are 248-264-284-316 stitches. Go to ALL SIZES. SIZES XL and XXL: Start mid-back, work stocking stitch, A.2 and continue to increase for raglan every round on the body 2-6 more times and every 2nd round on the sleeves 1-3 times = 144-172 stitches. Then increase on the body and sleeves (both sides of each A.2) every 2nd round 9-9 times = 216-244 stitches Continue with stocking stitch, A.2 and increase for raglan, but every 2nd increase is only on the body (4 stitches increased) – increase on the body every 2nd round and on the sleeves every 4th round. Increase like this 20-20 times on the body (10-10 times on the sleeves). A total of 35-39 times on the body and 22-24 times on the sleeves. After the last increase there are 336-364 stitches. Go to ALL SIZES. ALL SIZES. = 248-264-284-316-336-364 stitches. Work stocking stitch and A.2 without further increases until the yoke measures 21-23-25-27-29-31 cm after the neck, measured mid-front. On the next round divide for the body and sleeves: Work 37-41-42-48-51-57 stitches (half back piece), place the next 49-51-57-63-65-69 stitches on a thread for the sleeve, cast on 6-6-8-8-10-10 stitches (in side under sleeve), work 75-81-85-95-103-113 stitches (front piece), place the next 49-51-57-63-65-69 stitches on a thread for the sleeve, cast on 6-6-8-8-10-10 stitches (in side under sleeve), work 38-40-43-47-52-56 stitches (half back piece). Finish the body and sleeves separately. The piece is now measured from here! BODY: = 162-174-186-206-226-246 stitches. Insert 1 marker in the middle of the new stitches under each sleeve. Allow the markers to follow your work onwards; they are used when working the split in each side. Work stocking stitch in the round for a further 17 cm. On the next round divide the piece at both markers, place 81-87-93-103-113-123 stitches between the markers on circular needle size 4 mm and keep the remaining 81-87-93-103-113-123 stitches on the circular needle size 5 mm. Knit 1 row from the right side and increase 20-20-22-24-24-28 stitches evenly spaced = 101-107-115-127-137-151 stitches. Work back from the wrong side as follows: 1 stitch in GARTER STITCH – read description above, * purl 1, knit 1 *, work from *-* until there are 2 stitches left, purl 1 and 1 stitch in garter stitch. Continue this rib for 8 cm. Cast off a little loosely with knit over knit and purl over purl. Place the last 81-87-93-103-113-123 stitches back on circular needle 4 mm and knit 1 row from the right side increasing 20-20-22-24-24-28 stitches evenly spaced = 101-107-115-127-137-151 stitches. Work rib for 8 cm as for the first piece. Cast off a little loosely with knit over knit and purl over purl. The jumper measures approx. 52-54-56-58-60-62 cm from the shoulder down. SLEEVES: Place the 49-51-57-63-65-69 stitches from the thread on the one side of the piece on short circular needle/double pointed needles size 5 mm and knit up 1 stitch in each of the new stitches cast on under the sleeve = 55-57-65-71-75-79 stitches. Insert a marker in the middle of the new stitches under the sleeve. Allow the marker to follow your work onwards; it is used when decreasing under the sleeve. Work stocking stitch in the round for 4-4-4-3-3-3 cm. Now decrease 2 stitches on each side of the marker – read DECREASE TIP. Decrease like this every 6-6-3½-3-2½-2 cm a total of 6-6-9-11-12-13 times = 43-45-47-49-51-53 stitches. Continue working until the sleeve measures 38-37-35-34-32-30 cm from the division (or to desired length. There is approx. 6 cm left). Knit 1 round and increase 9 stitches evenly spaced = 52-54-56-58-60-62 stitches. Change to double pointed needles size 4 mm and work rib (knit 1, purl 1) for 6 cm. Loosely cast off with knit over knit and purl over purl. The sleeve measures approx. 44-43-41-40-38-36 cm from the division. Work the other sleeve in the same way. |
||||||||||
Diagram explanations |
||||||||||
|
||||||||||
 |
||||||||||
 |
||||||||||
Have you finished this pattern?Tag your pictures with #dropspattern #octoberbreezesweater or submit them to the #dropsfan gallery. Do you need help with this pattern?You'll find 37 tutorial videos, a Comments/Questions area and more by visiting the pattern on garnstudio.com. © 1982-2026 DROPS Design A/S. We reserve all rights. This document, including all its sub-sections, has copyrights. Read more about what you can do with our patterns at the bottom of each pattern on our site. |
||||||||||


With over 40 years in knitting and crochet design, DROPS Design offers one of the most extensive collections of free patterns on the internet - translated to 17 languages. As of today we count 324 catalogues and 12290 patterns translated into English (UK/cm). 12290
We work hard to bring you the best knitting and crochet have to offer, inspiration and advice as well as great quality yarns at incredible prices! Would you like to use our patterns for other than personal use? You can read what you are allowed to do in the Copyright text at the bottom of all our patterns. Happy crafting!
Post a comment to pattern DROPS 236-14
We would love to hear what you have to say about this pattern!
If you want to leave a question, please make sure you select the correct category in the form below, to speed up the answering process. Required fields are marked *.