
Popular categories
Looking for a yarn?


|
|
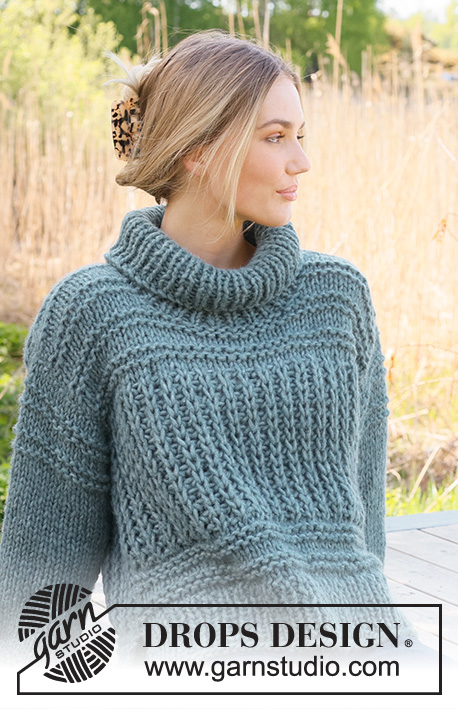
Chaperon Bleu |
|
 |
 |
Knitted jumper in DROPS Snow. The piece is worked bottom up in stocking stitch with raglan and a hood. Sizes S - XXXL.
DROPS 236-4 |
|
|
------------------------------------------------------- EXPLANATIONS FOR THE PATTERN: ------------------------------------------------------- RIDGE/GARTER STITCH (worked back and forth): Knit all rows. 1 ridge = knit 2 rows. INCREASE TIP-1 (for sleeves): Work until there are 2 stitches left before the marker, 1 yarn over, knit 4 (marker sits between these 4 stitches), 1 yarn over. On the next round knit the yarn overs twisted to avoid holes. Then work the new stitches in stocking stitch. INCREASE TIP-2 (for hood): Work until there are 2 stitches left before the marker thread, 1 yarn over, knit 4 (marker thread sits between these 4 stitches), 1 yarn over. On the next row work the yarn overs twisted to avoid holes. Then work the new stitches in stocking stitch. RAGLAN: Decrease to raglan in each transition between body and sleeves as follows: Work until there is 1 stitch left before marker-stitch, slip 2 stitches as if to knit together, knit 1, pass the slipped stitches over the knitted stitch. Repeat at each marker (8 stitches decreased on the row). ------------------------------------------------------- START THE PIECE HERE: ------------------------------------------------------- JUMPER - SHORT OVERVIEW OF THE PIECE: The front and back pieces are worked separately, back and forth, bottom up until the split is finished. Both pieces are placed on the same circular needle and the piece is continued in the round as far as the armholes. The sleeves are worked in the round with double pointed needles/short circular needle, bottom up, then placed on the same circular needle as the body. The yoke is continued in the round. The hood is worked back and forth to finish. BACK PIECE: Cast on 62-70-74-78-86-94 stitches with circular needle size 7 mm and DROPS Snow. Purl 1 row from the wrong side. Then work rib as follows: 4 stitches in GARTER STITCH – read description above, * knit 2, purl 2 *, work from *-* until there are 6 stitches left, knit 2 and 4 stitches in garter stitch. Work this rib back and forth for 14 cm, finishing after a row from the wrong side. Lay the piece to one side. FRONT PIECE: Cast on and work in the same way as the back piece. BODY: Place the front and back pieces on the same circular needle size 8 mm and knit 1 round where you decrease 24-28-28-28-28-32 stitches evenly spaced = 100-112-120-128-144-156 stitches. Insert 1 marker at the beginning of the round and 1 marker after 50-56-60-64-72-78 stitches (sides). Work stocking stitch in the round. REMEMBER THE KNITTING TENSION! When the piece measures 31 cm, cast off 6-6-6-8-8-10 stitches for the armholes on each side (cast off 3-3-3-4-4-5 stitches on each side of each marker) = 44-50-54-56-64-68 stitches on the front and back pieces. Lay the piece to one side and work the sleeves. SLEEVES: Cast on 32-32-36-36-40-40 stitches with double pointed needles size 7 mm and DROPS Snow. Knit 1 round, then work rib (knit 2, purl 2) in the round for 10 cm. Change to double pointed needles size 8 mm. Insert 1 marker at the beginning of the round (mid-under sleeve). Allow the marker to follow your work onwards; it is used when increasing under the sleeve. Work stocking stitch in the round. When the sleeve measures 12 cm from the cast-on edge, increase 1 stitch on each side of the marker – read INCREASE TIP. Increase like this every 8-6-7-4-3-2 cm a total of 4-5-4-6-7-10 times = 40-42-44-48-54-60 stitches. When the sleeve measures 42-40-38-37-35-34 cm, cast off 6-6-6-8-8-10 stitches under the sleeve (3-3-3-4-4-5 stitches on each side of the marker) = 34-36-38-40-46-50 stitches. Lay the piece to one side and work the other sleeve in the same way. YOKE: Place the sleeves onto the same circular needle as the body, where stitches were cast off for the armholes = 156-172-184-192-220-236 stitches. Insert 2 markers in the outermost stitch on each side of both the front and back pieces (4 markers). These are used when decreasing for raglan. Start at the transition between the back piece and the right sleeve and work stocking stitch in the round. When the yoke measures 3-4-5-5-4-3 cm, begin to decrease for RAGLAN – read description above. Decrease like this every 2nd round a total of 11-12-13-14-17-19 times = 68-76-80-80-84-84 stitches. Insert 1 marker-thread mid-front and 1 marker-thread mid-back. Cut the strand. Start 3 stitches before the marker-thread mid-front – the piece is now finished back and forth. ROW 1 (right side): Knit and decrease for raglan until there are 3 stitches left before the marker-thread mid-front. Knit up 1 stitch behind each of the next 6 stitches. Turn. ROW 2 (wrong side): Knit 5, purl until there are 5 stitches left, knit 5. On the next row from the right side decrease for raglan for the last time (you have decreased a total of 13-14-15-16-19-21 times) and there are 58-66-70-70-74-74 stitches. The yoke measures approx. 21-23-25-27-29-31 cm. HOOD: Work stocking stitch with 5 stitches in garter stitch on each side, AT THE SAME TIME increase 1 stitch on each side of the marker-thread mid-back and 1 stitch on each side of both raglan-lines on the front piece (6 stitches increased) – read INCREASE TIP-2. Increase like this 1 more time on the next row from the right side = 70-78-82-82-86-86 stitches. Continue with stocking stitch and garter stitch until the hood measures 37-38-39-40-41-42 cm. Cast off. Fold the hood and sew it together at the top. I-CORD EDGE: Work an edge around the hood as follows: Use 2 double pointed needles size 8 mm and cast on 2 stitches, knit up 1 stitch in the outermost loop of the bottom ridge on the right side of the hood (when the garment is worn) = 3 stitches on the needle. *Push the stitches back to the beginning of the needle and work again from the right side without turning. Knit 2, slip the next stitch as if to knit, knit up a new stitch in the next ridge on the hood, pass the slipped stitch over the knitted-up stitch *, work from *-* until an edge has been worked around the hood. NOTE! Knit up 1 stitch in each ridge, if this makes the edge tight, knit up 1 more stitch evenly along the hood. Knit together the last 3 stitches on the row, cut the strand, pull it through the remaining stitch and fasten. ASSEMBLY: Sew the openings under the sleeves. |
|

|
|
|
Have you made this or any other of our designs? Tag your pictures in social media with #dropsdesign so we can see them! Do you need help with this pattern?You'll find tutorial videos, a Comments/Questions area and more by visiting the pattern on garnstudio.com. © 1982-2024 DROPS Design A/S. We reserve all rights. This document, including all its sub-sections, has copyrights. Read more about what you can do with our patterns at the bottom of each pattern on our site. |
|


With over 40 years in knitting and crochet design, DROPS Design offers one of the most extensive collections of free patterns on the internet - translated to 17 languages. As of today we count 304 catalogues and 11415 patterns - 11415 of which are translated into English (UK/cm).
We work hard to bring you the best knitting and crochet have to offer, inspiration and advice as well as great quality yarns at incredible prices! Would you like to use our patterns for other than personal use? You can read what you are allowed to do in the Copyright text at the bottom of all our patterns. Happy crafting!
Comments / Questions (35)
Bærestykke: Jeg har strikke til Pinne 1(retten) "strikk opp 1 maske på baksiden av hver av de neste 6 maskene. Snu" Hva / hvordan gjør jeg det, menes det bakre ledd?
15.03.2024 - 22:01DROPS Design answered:
Hei Eli, Du skal strikke rett i både front- og bakledd i hver av de 6 maskene, slik at du øker 6 masker til kanten av hetta. God fornøyelse!
18.03.2024 - 07:00¿Cómo se teje al principio la capucha para que quede cruzada?
18.02.2024 - 00:20DROPS Design answered:
Hola Flor, cuando estás trabajando el raglán, después de las disminuciones tenías entre 68 y 84 puntos, dependiendo de la talla. Ahora insertas 1 hilo marcador y, a partir de ahí, comenzarás a trabajar la forma para que la capucha quede cruzada.
18.02.2024 - 22:55Bij de raglan mindering klopt het niet, kan toch niet bij voor de mouw én na de mouw hetzelfde in mindering .Wat gaat fout?
27.01.2024 - 20:58DROPS Design answered:
Dag Angela,
Je voegt de markeerdraden in de steken (en niet tussen de steken) en je meerdert in dit geval inderdaad op alle markeerdraden om dezelfde manier.
28.01.2024 - 18:39Como faço a Orla I-Cord? Podem explicar de maneira mais simples ou encaminhar um vídeo que explique? Obrigada.
24.12.2023 - 13:05DROPS Design answered:
Bom dia, Ao fundo da página com as explicações do modelo, encontra uma secção com vários tutoriais em vídeo, entre eles, um vídeo para explicar a orla I-Cord. Aqui está o vídeo; https://www.garnstudio.com/video.php?id=1727&lang=pt Bons tricôs!
09.01.2024 - 10:17Hallo, ich bin nun bei den Raglanabnahmen. Wo wandert der Markierungsfaden hin? Zwischen die zwei Abhebemaschen, nach die Abhebemaschen oder nach den Überzug? Und neigen sich bei dieser Technik nicht alle Abnahmen nach links? Theoretisch sollten sich die Abnahmen vor den Ärmeln doch nach links und nach den Ärmeln nach rechts neigen? Danke
17.12.2023 - 17:23DROPS Design answered:
Liebe Andy, der Markierungsfaden setzen Sie vor der Abnahme, damit die abgenommene Masche immer nach dem Markierungsfaden bleibt. In diesem Video zeigen wir, wie so eine Abnahme gestrickt wird. Viel Spaß beim stricken!
18.12.2023 - 09:03Moin, ich habe letztens eine Kapuze gestrickt, indem ich sie wie die Ferse bei einer Socke gearbeitet habe, das ginge doch bei diesem Modell sicherlich auch und man hätte nicht diese unschöne Mittelnaht! Gäbe es dafür eine Anleitung mit Maschenzahl usw? Liebe Grüße
13.12.2023 - 08:39DROPS Design answered:
Liebe Babsi, so was haben wir bei Pullover leider nicht, aber um eine Naht zu vermeiden können Sie die Maschen am Ende nicht abketten sonder mit Maschenstich zusammennähen - siehe Video. Viel Spaß beim stricken!
13.12.2023 - 16:13Bonjour, je coince sur les explications à partir ou il faut mettre les marqueurs mi dos et mi devant je ne comprends pas la suite pouvez vous m'expliquer comment faire après avoir mis les marqueurs? merci
11.12.2023 - 16:50DROPS Design answered:
Bonjour Mme Labaudre, une fois que vos marqueurs sont placés, coupez le fil. Vous allez maintenant tricoter non plus en rond mais en allers et retours à partir de l'encolure: en commençant 3 mailles avant le marqueur du milieu devant, tricotez toutes les mailles jusqu'à ces 3 mailles, vous relevez ensuite 1 maille derrière chacune des 6 mailles suivantes (fente d'encolure), tournez et tricotez le rang suivant sur l'envers, les 6 mailles côté encolure vont ainsi se chevaucher en bas de la fente d'encolure - retrouvez cette technique dans cette vidéo. Bon tricot!
12.12.2023 - 08:45Por favor suban un video donde se explique cómo empezar la capucha, porque para las principiantes no queda claro. Gracias.
09.12.2023 - 05:06I used the raglan ssk at each side of the sleeve, so 4 times in a round. But now I have 2 left leaning and 2 vertical decreases. Do I need twice the ssk and twice a k2tog to create the raglan sleaves? Ik heb de raglan instructie toegepast aan beide zijden van de mouwen, dus 4x per ronde. Nu heb ik 2 keer een schuine decrease en 2 keer een rechte decrease, waardoor de mouwen scheef zijn. Had ik een andere techniek moeten, gebruiken, met 2x ssk en 2x k2tog?
26.11.2023 - 10:03DROPS Design answered:
Dear Roosmarijn, this is not an ssk nor k2tog decrease (see RAGLAN above). You decrease 2 sts in each raglan line/ transition, so 8 sts in total on the row. You can see how to work this decrease here: https://www.garnstudio.com/video.php?id=736&lang=en. If you work in the same way in all of the raglan lines, the decreases should be equal in all lines. Happy knitting!
26.11.2023 - 22:45Skal bolen kun være 31 cm i alle størrelser? Er dette inklusive vrangborden?
09.11.2023 - 07:49DROPS Design answered:
Hei Veronika. Ja, det stemmer. Ønsker du den lengre (og har nok garn) kan du fint strikke den lengre. De 31 cm er inkl vrangborden. Se evnt. målene på målskissen lengst nederst på oppskriften. mvh DROPS Design
13.11.2023 - 11:57