
Popular categories
Looking for a yarn?


Comments / Questions (50)
![]() Selam wrote:
Selam wrote:
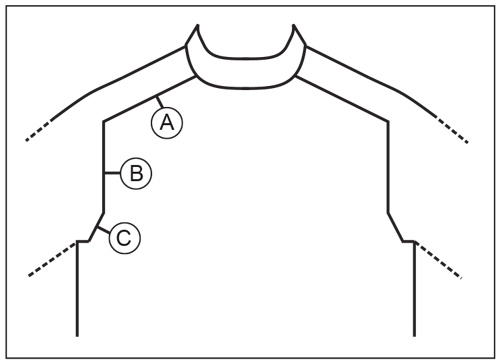
Thanks so I understand this: first only for the shoulders, Then sleeves and lastly then yoke?
28.04.2021 - 15:27DROPS Design answered:
Dear Selam, correct, first increase 4 sts on every round for shoulders, then increase 4 sts on every other round for sleeves, then increase 8 sts on every other round for yoke. Happy knitting!
29.04.2021 - 07:48
![]() Selam wrote:
Selam wrote:
Sleeves are increased every other round ? And back and fron piece every round? There are 3 separate instructions I'm confused??? How many increases whole working the yoke? 8 stitches? 4 every round 4 every other round? Thanks.
28.04.2021 - 01:00DROPS Design answered:
Dear Selam, you first increase 4 sts on every round for the saddle shoulders, then increase 4 sts on every other round for the sleeves and finally increase 8 sts on every other round for the yoke. Click on the link to see the matching videos - or find them under "related videos". Happy knitting!
28.04.2021 - 08:05
![]() Elin wrote:
Elin wrote:
Skal det være glatt strikk under ermene helt ned, eller skal de maskene inn i mønsteret. På bildet ser det ut som mønsteret strikkes helt rundt helt ned. På oppskriften står det ( A1 og glattstrikk over de 8 maskene. Dvs A1 repeteres 28 ganger i bredden på hvert av forstykkene og bakstykke.
17.04.2021 - 11:24DROPS Design answered:
Hei Elin. Ja, under ermene strikkes det glattstrikk, over de nye maskene som ble lagt opp. mvh DROPS design
26.04.2021 - 15:09
![]() Ina wrote:
Ina wrote:
Hallo, ich bin jetzt mit den Schultern fertig (Größe xxl). den 1. Teil Ärmelzunahmen hab ich auch fertig (12x in jeder 2. Runde). jetzt steht da: " Die Arbeit hat nun eine Länge ab Halsblende von 20 cm." nun soll ich glatt und das Muster fortsetzen, bis ich eine Länge von 20 cm erreicht habe. damit komme ich nicht klar. Muss ich jetzt nochmal 20 cm stricken ohne Zunahmen? Danke
11.04.2021 - 17:12DROPS Design answered:
Iebe Ina, In XXL haben Sie schon die gewünschte Länge erreicht (= 20 cm), jetz stricken Sie weiter (je 1 Masche beidseitig jedes Markierers jetzt zunehmen). Viel Spaß beim stricken!
12.04.2021 - 10:18
![]() Chebbi wrote:
Chebbi wrote:
Guten Abend , ich habe folgende Fragen zu DROPS / 215 / 21 : mit welche Methode sollen die 8 Maschen (GR.S)unter dem Ärmel zugenommen werden? Es steht diese Maschen als rechte M. stricken? auf dem Bild ist es im Muster. WAS gilt? ÄRMEL: Zusätzlich je 1 Masche aus den 8 neu angeschlagenen Maschen auffassen = 68. 60 +JE 1 MASCHE= 64? NICHT68 M? oder ? SCHADE ist die Anleitung nicht gleich eindeutig wie am Anfang. danke für hilfreich schöne Antworten
03.03.2021 - 21:25DROPS Design answered:
Liebe Chebbi, die neuen Maschen unter die Ärmel könnnen wie in diesem Video angeschlagen werden - diese Maschen werden dann beim rumpfteil glatt rechts gestrickt (dann wird es beidseitig abgenommen). Es werden je 8 M angeschlagen, bei den Ärmeln fassen Sie dann 8 M auf - diese Lektion zeigt ab Bild 9 wie man die Passe verteilt. Viel Spaß beim stricken!
04.03.2021 - 07:48
![]() Julia Weber wrote:
Julia Weber wrote:
Guten Tag, da ich mit Nadelstärke 4 die Maschenprobe nicht erreiche (ich brauche nur 18 M für 10 cm, statt der geforderten 20) Wechsel ich auf dünnere Nadeln , dh 3.5. Aber dann wird das Gestrick sehr fest und dick... Sollte ich lieber alle Angaben der Anleitung umrechnen? Die Maschenprobe bezieht sich in diesem Fall doch auf Nadelstärke 4,5, oder? Ich Danke Ihnen für Ihre Hilfe!
03.02.2021 - 16:23DROPS Design answered:
Liebe Frau Weber, wenn Sie 18 Maschen anstatt 20 Maschen für 10 cm bekommen dann haben Sie zuviele Maschen und sollten mit größeren Nadeln nochmal versuchen - Hier lesen Sie mehr über Maschenprobe - gerne können Sie auch Ihre Maschenprobe waschen/liegend trocknen lassen und dann erst messen und wiederholen mit größeren/dünneren Nadeln wenn die Maschenprobe nicht stimmt. Viel Spaß beim stricken!
04.02.2021 - 09:00
![]() Chaja wrote:
Chaja wrote:
Comment tricoter la maille entre les 2 augmentations de chaque côté du marqueur pour l’empiècement ? Merci d’avance !
31.01.2021 - 21:07DROPS Design answered:
Bonjour Chaja, les mailles avec les marqueurs vont se tricoter en jersey. Bon tricot!
01.02.2021 - 09:55
![]() Harriët Vaanholt wrote:
Harriët Vaanholt wrote:
Dank u wel, de link doet het. Ik ga ermee aan de slag. Warme groet!
17.01.2021 - 16:16
![]() Harriet Vaanholt wrote:
Harriet Vaanholt wrote:
Goedendag, is mijn vraag van 10-01-2021 misschien over het hoofd gezien? De link in het antwoord werkt n.l. niet. Ik heb wel gezocht maar kan de uitleg niet vinden. Alvast bedankt voor uw reactie.
17.01.2021 - 13:01DROPS Design answered:
Dag Harriet,
Excuses, er stond een typefout in de code, waardoor de link niet werkte. Zou je het nog eens willen proberen?
17.01.2021 - 13:10
![]() Harriet Vaanholt wrote:
Harriet Vaanholt wrote:
Dank u wel voor uw antwoord. Helaas werkt de link naar de turorial niet: Het is mogelijk om een verhoging in de hals te maken door daar verkorte toeren te breien. In deze video wordt dat uitgelegd. Ik heb al bij de tutorials gezocht maar kan hem niet vinden. Wilt u a.u.b. de link nogmaals plaatsen? Alvast heel hartelijk bedankt.
10.01.2021 - 15:47
|
||||||||||||||||||||||||||||
Follow the Fjord#followthefjordsweater |
||||||||||||||||||||||||||||
 |
 |
|||||||||||||||||||||||||||
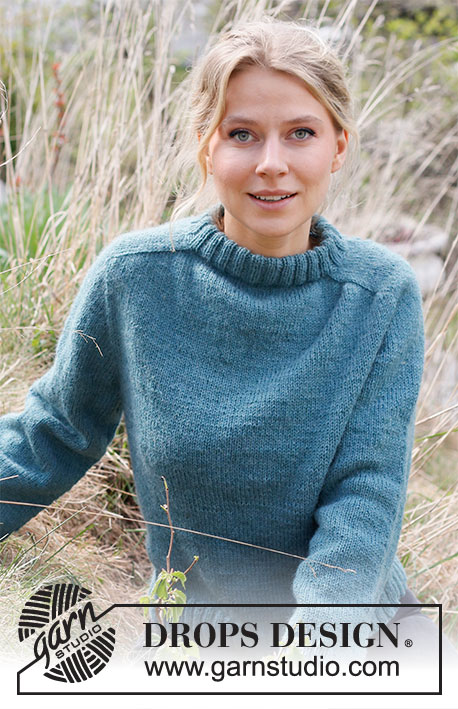
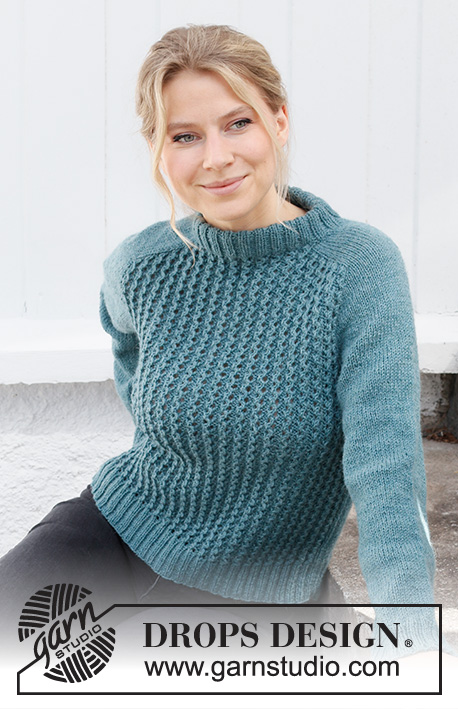
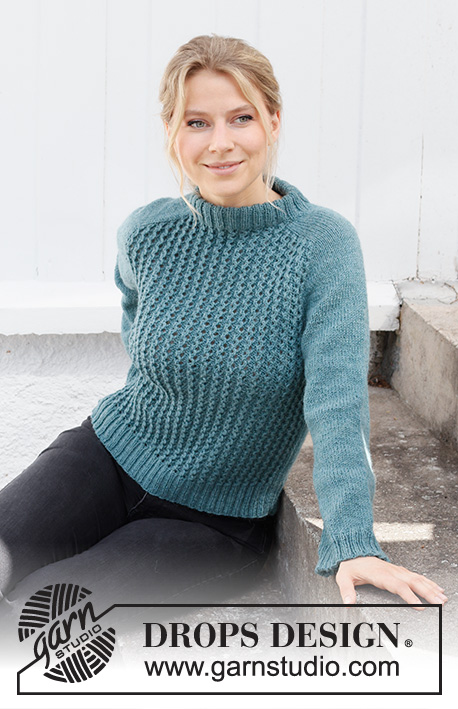
Knitted jumper in DROPS Karisma. The piece is worked top down with saddle shoulders and lace pattern. Sizes S - XXXL.
DROPS 215-21 |
||||||||||||||||||||||||||||
|
------------------------------------------------------- EXPLANATIONS FOR THE PATTERN: ------------------------------------------------------- PATTERN: See diagram A.1. INCREASE TIP-1 (evenly spaced): To work out how to increase evenly, count the total number of stitches on the needle (e.g. 12 stitches) and divide by the number of increases to be made (e.g. 4) = 3. In this example, increase by making 1 yarn over after each 3rd stitch. On the next round work the yarn overs twisted to avoid holes. INCREASE TIP-2: BEFORE MARKER: The new stitch will be twisted, leaning towards the right. Use left needle to pick up strand between 2 stitches from the round below, pick up strand from behind and knit stitch in front loop. AFTER MARKER: The new stitch will be twisted, leaning towards the left. Use left needle to pick up strand between 2 stitches from the round below, pick up strand from the front and knit stitch in back loop. DECREASE TIP (for sleeves): Decrease 1 stitch on either side of the marker as follows: Work until there are 3 stitches left before the marker, knit 2 together, knit 2 (marker thread sits between these 2 stitches), slip 1 stitch as if to knit, knit 1 and pass the slipped stitch over the knitted stitch. CASTING-OFF TIP: To avoid the cast-off edge being tight you can cast off with a larger size needle. If the edge is still tight, make 1 yarn over after approx. each 4th stitch at the same time as casting off; the yarn overs are cast off as normal stitches ------------------------------------------------------- START THE PIECE HERE: ------------------------------------------------------- JUMPER – SHORT OVERVIEW OF THE PIECE: The piece is worked in the round, top down. Stiches are increased on the yoke for the shoulders front and back, then stitches are increased for the sleeves. The yoke is divided for the body and sleeves; the body is continued in the round. The sleeves are worked in the round with double pointed needles, top down. NECK: Cast on 96-104-104-112-120-128 stitches with circular needle size 3.5 mm and Karisma. Knit 1 round. Then work rib as follows: Purl 1, * knit 2, purl 2 *, work from *-* until there are 3 stitches left, knit 2 and purl 1. Continue this rib for 8½ cm. Change to circular needle size 4.5 mm. Insert a marker at the beginning of the round (mid-back). Leave the marker there; THE PIECE IS MEASURED FROM THE MARKER! YOKE: On the next round you increase stitches, work pattern and insert 4 markers (between stitches) as follows: Work A.1 (= 4 stitches) over 16-20-20-20-20-24 stitches (= 4-5-5-5-5-6 times in width = half back piece), insert marker 1, knit 12-12-12-12-16-16 and increase 4-4-8-8-8-8 stitches evenly over these stitches – read INCREASE TIP-1, insert marker 2 (= shoulder), A.1 over the next 36-40-40-44-44-48 stitches (= 9-10-10-11-11-12 times in width = front piece), insert marker 3, knit 12-12-12-12-16-16 and increase 4-4-8-8-8-8 stitches evenly over these stitches, insert marker 4 (= shoulder) and A.1 over the last 20-20-20-24-24-24 stitches (= 5-5-5-6-6-6 times in width = half back piece) = 104-112-120-128-136-144 stitches. SADDLE SHOULDER INCREASE: Work stocking stitch over the shoulder stitches and pattern A.1 over the front and back pieces. On the next round increase for saddle shoulders as follows: Increase 1 stitch BEFORE markers 1 and 3 and 1 stitch AFTER markers 2 and 4 - read INCREASE TIP-2 (= 4 stitches increased). I.e. there are increases on back piece and front piece, and number of shoulder stitches remain the same. The increased stitches are worked into A.1 as you go. Pattern A.1 is repeated in height. Increase like this every round a total of 20-20-24-24-28-28 times = 184-192-216-224-248-256 stitches. The piece measures approx. 8-8-9-9-11-11 cm from the marker on the neck. REMEMBER THE KNITTING TENSION! SLEEVE INCREASE: Now increase for the sleeves as follows: Increase 1 stitch AFTER markers 1 and 3 and 1 stitch BEFORE markers 2 and 4 (= 4 stitches increased). I.e. increase in shoulder stitches, number of stitches in front piece and back piece remains the same. Increase like this every 2nd round a total of 14-11-13-12-12-14 times = 240-236-268-272-296-312 stitches. The piece measures approx. 19-16-19-18-20-22 cm from the marker. Continue with stocking stitch and pattern as before without further increases until the piece measures 19-17-19-19-20-22 cm. YOKE INCREASE: Now increase 1 stitch on each side of the marker as follows: Work until 1 stitch remain before markers 1 and 3, increase 1 stitch BEFORE marker, work 1 stitch, move the marker to the right needle and increase 1 stitch AFTER marker. Work until markers 2 and 4, increase 1 stitch BEFORE marker, move the marker to the right needle, work one stitch and increase 1 stitch AFTER marker (= 8 stitches increased). The increased stitches on the front and back pieces are worked into pattern A.1 and the increased stitches on the sleeves are worked in stocking stitch (stitches between markers 1 and 2 and markers 3 and 4). Increase like this every 2nd round a total of 8-12-12-16-16-16 times = 304-332-364-400-424-440 stitches. When all the increases are finished, the piece measures 25-26-28-30-32-34 cm from the marker on the neck. Now divide the piece for body and sleeves on the next round as follows: Work the first 44-52-56-60-64-68 stitches (= half back piece), place the next 60-62-70-76-80-84 stitches on a thread for the sleeve, cast on 8-8-8-8-8-12 stitches under the sleeve, work 92-104-112-124-132-136 stitches (= front piece), place the next 60-62-70-76-80-84 stitches on a thread for the sleeve, cast on 8-8-8-8-8-12 stitches under the sleeve and work the last 48-52-56-64-68-68 stitches (= half back piece). Body and sleeves are finished separately. BODY: = 200-224-240-264-280-296 stitches. Continue with pattern A.1 as before with stocking stitch over the 8-8-8-8-8-12 stitches cast on under each sleeve. A.1 is repeated 23-26-28-31-33-34 times in width on both the front and the back piece. When the body measures 22-23-23-23-23-23 cm, change to circular needle size 3.5 mm and work rib as follows: Purl over purl and knit over the lace pattern and over the 8-8-8-8-8-12 stocking stitches under the sleeves work as follows: Purl 1, * knit 2, purl 2 *, work from *-* 1-1-1-1-1-2 times, knit 2 and purl 1. You now have a rib with knit 2, purl 2 over all stitches. When the rib measures 7 cm, cast off with knit over knit and purl over purl – read CASTING-OFF TIP! SLEEVE: Place the 60-62-70-76-80-84 stitches from the thread on the one side of the piece on double pointed needles size 4.5 mm and knit up 1 stitch in each of the 8-8-8-8-8-12 stitches cast on under the sleeve = 68-70-78-84-88-96 stitches. Insert a marker in the middle of the new stitches under the sleeve. This will be used when decreasing under the sleeve. Work stocking stitch in the round. When the piece measures 3 cm from the division, decrease 1 stitch on each side of the marker – read DECREASE TIP. Repeat this decrease every 6-5-3-2-2-1½ cm a total of 5-5-8-10-11-14 times = 58-60-62-64-66-68 stitches. Continue with stocking stitch until the body measures 33-32-31-30-30-28 cm from the division. Knit 1 round where you increase 18-16-18-16-18-16 stitches evenly spaced = 76-76-80-80-84-84 stitches. Change to circular needle size 3.5 mm. Work rib (= knit 2, purl 2) for 5 cm. Cast off with knit over knit and purl over purl – remember CASTING-OFF TIP. Work the other sleeve in the same way. ASSEMBLY: Fold the neck double to the inside and sew down. To avoid the neck being tight and rolling outwards, it is important that the seam is elastic. |
||||||||||||||||||||||||||||
Diagram explanations |
||||||||||||||||||||||||||||
|
||||||||||||||||||||||||||||
 |
||||||||||||||||||||||||||||
 |
||||||||||||||||||||||||||||
Have you finished this pattern?Tag your pictures with #dropspattern #followthefjordsweater or submit them to the #dropsfan gallery. Do you need help with this pattern?You'll find 28 tutorial videos, a Comments/Questions area and more by visiting the pattern on garnstudio.com. © 1982-2026 DROPS Design A/S. We reserve all rights. This document, including all its sub-sections, has copyrights. Read more about what you can do with our patterns at the bottom of each pattern on our site. |
||||||||||||||||||||||||||||


With over 40 years in knitting and crochet design, DROPS Design offers one of the most extensive collections of free patterns on the internet - translated to 17 languages. As of today we count 324 catalogues and 12290 patterns translated into English (UK/cm).
We work hard to bring you the best knitting and crochet have to offer, inspiration and advice as well as great quality yarns at incredible prices! Would you like to use our patterns for other than personal use? You can read what you are allowed to do in the Copyright text at the bottom of all our patterns. Happy crafting!
Post a comment to pattern DROPS 215-21
We would love to hear what you have to say about this pattern!
If you want to leave a question, please make sure you select the correct category in the form below, to speed up the answering process. Required fields are marked *.