
Popular categories
Looking for a yarn?


Comments / Questions (47)
![]() Sandra Nancy wrote:
Sandra Nancy wrote:
El aumento manga martillo se hace en todas las vueltas? O cada 2 vueltas
08.01.2025 - 18:53DROPS Design answered:
Hola Sandra, los aumentos para los hombros martillo se trabajan cada vuelta. Los aumentos para las mangas (que están en el siguiente apartado) se trabajan cada 2ª vuelta.
12.01.2025 - 15:44
![]() Denise wrote:
Denise wrote:
Bonjour, dans le modèle Glacier Waters, les augmentations-2 sont-elles des augmentation intercalaires ou pas ? Quelle est la vidéo qui correspond à l’augmentation-2 ? Merci de votre réponse
04.12.2024 - 16:19DROPS Design answered:
Bonjour Denise, pour les augmentations-2, suivez cette vidéo - pensez jute à bien suivre le moment où vous devez faire chacune d'elle, comme indiqué dans les explications. Bon tricot!
04.12.2024 - 16:32
![]() Alberta wrote:
Alberta wrote:
Kia ora. I am now doing the 'Saddle shoulder increases, I'm a bit lost. The pattern says , 'increase every row'. Is that right? I guess I'm used to 'every alternate row. Please put me right. Thank you, by the way I love the design.
09.09.2024 - 02:54DROPS Design answered:
Dear Alberta, the increases for the saddle shoulders have to be worked on every round, so it's just right like this. Happy knitting!
09.09.2024 - 11:00
![]() Karen Pfammatter wrote:
Karen Pfammatter wrote:
When doing the SLEEVE INCREASE what method do we use to do the increases? The pattern does not specify if it is also INCREASE TIP-2
24.07.2024 - 13:34DROPS Design answered:
Hi Karen, you should apply INCREASE TIP-2 as well. Happy knitting!
24.07.2024 - 17:57
![]() Karen wrote:
Karen wrote:
When doing the YOKE INCREASE what method do we use to do the increases?
23.07.2024 - 20:26DROPS Design answered:
Hi Karen, please see INCREASE TIP-2. Happy knitting!
24.07.2024 - 10:43
![]() Robyn Waymouth wrote:
Robyn Waymouth wrote:
My son would like me to knit this jumper for him, but I am concerned about one aspect of the design. I doesn't appear to have any shaping that allows for the front neckline to be lower than the back. The photos show a fold below the chin, and several knitters have commented on this in Ravelry. Do you have any patterns that have this type of detail, as I'm not confident enough to try modifying the pattern myself. Thanks, Robyn
24.03.2024 - 09:21DROPS Design answered:
Dear Robyn, usually what we do is work an elevation for the back of the neck, instead of lowering the front piece. Since it's not a beginner technique we only use them in some patterns and not all of them, so that there are easier beginner friendly patterns and more advanced patterns for each type of knitter. For example, you have the following sweater, which has an elevation at the back, and has saddle shoulders as in this pattern: https://www.garnstudio.com/pattern.php?id=11723&cid=19. If you prefer it, you could also adapt this elevation for the current pattern or work the new pattern but in stocking stitch instead of the knot charts. Happy knitting!
25.03.2024 - 00:27
![]() Carmel wrote:
Carmel wrote:
Thank you, it's working out perfectly, thanks a mill!
01.03.2024 - 09:42
![]() Carmel Hogan wrote:
Carmel Hogan wrote:
I'm about to start the sleeve increases on Galcier Waters. Do I make the increases after the first stitch of the shoulder piece and before the last stitch of them. If I increase immediiatelly after marker 1 and 3, and before 2 and 4, the increase is directly beside the increases for the yoke. So I'm not able to figure out how to differentiate between yoke and sleeve increases. Thank you.
29.02.2024 - 19:39DROPS Design answered:
Dear Carmel, you first work the saddle shoulder increases. Then, after these are finished, start with the sleeve increases, positioned as indicated in the pattern. Then, after finishing the increases for the sleeves, start with the yoke increases. You increase 1 stitch BEFORE markers 1 and 3 for the saddle shoulders and yoke and AFTER markers 1 and 3 for the sleeves. In the case of markers 2 and 4, you increase AFTER these for the saddle shoulders and yoke and BEFORE them for the sleeves. Happy knitting!
29.02.2024 - 22:33
![]() Trish wrote:
Trish wrote:
Hi i knitted the glacier jumper in soft tweed but when i washed it as per the instructions it ended up really stretched especially the ribbed sections even though i dried it flat, what did i do wrong?
05.02.2024 - 15:09DROPS Design answered:
Dear Trish, you will find all washing instructions on the label and even more advices on the shadecard, do not hesitate to contact your DROPS Store for any further help & assistance, they will be able to help you even per mail or telephone. Happy knitting!
05.02.2024 - 15:54
![]() Sandra Faber wrote:
Sandra Faber wrote:
Beim Stricken des "Rumpfteiles" steht :" Bei einer Länge von 23 cm ab der Teilung 1 Runde rechts stricken und dabei gleichzeitig 40 Maschen gleichmäßig verteilt zunehmen = 208-224-240-260-284-308 Maschen. Zu Rundnadel Nr. 3,5 wechseln und 7 cm in Runden im Rippenmuster stricken." Das würde ja bedeuten, dass der Pulli vorm Bündchen WEITER wird, kann das denn sein??? Normalerweise ist das Bündchen doch enger, als das Rumpfteil mfg Sandra Faber
03.02.2024 - 21:11DROPS Design answered:
Liebe Frau Faber, hier wird das Bündchen nicht enger, so wird man zuerst zunehmen dann das Bündchen mit den kleineren Nadeln stricken. Viel Spaß beim stricken!
05.02.2024 - 08:41
|
|||||||||||||
Glacier Waters#glacierwaters |
|||||||||||||
 |
 |
||||||||||||
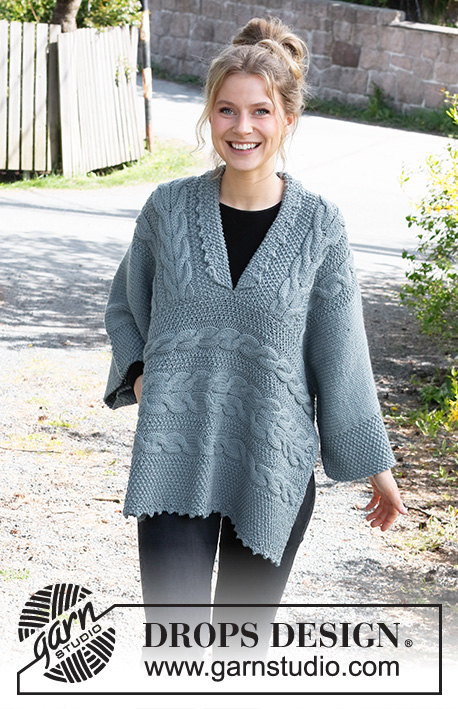
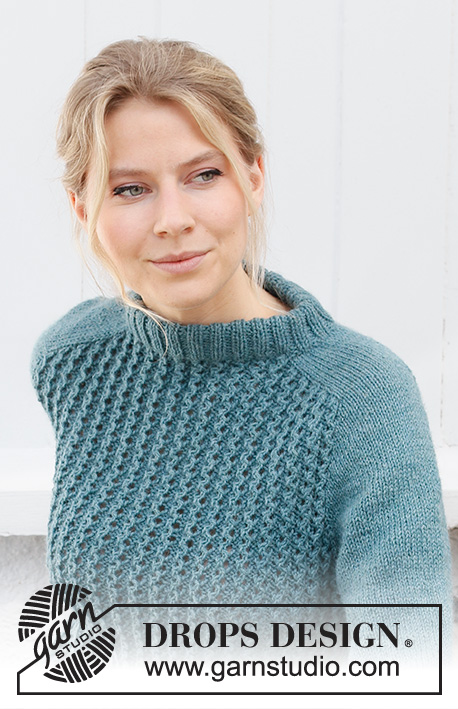
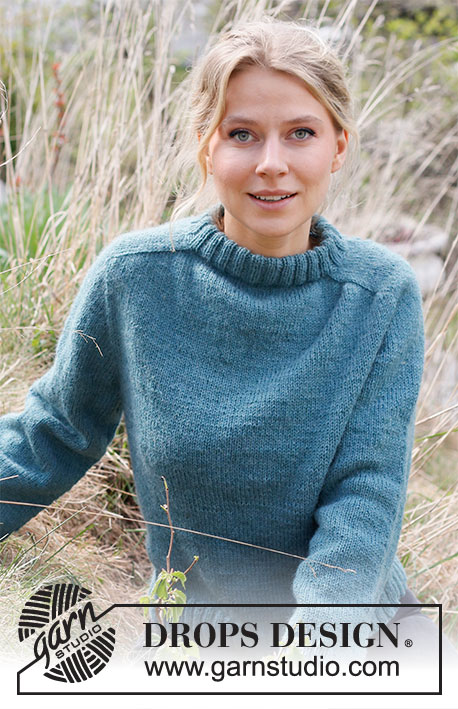
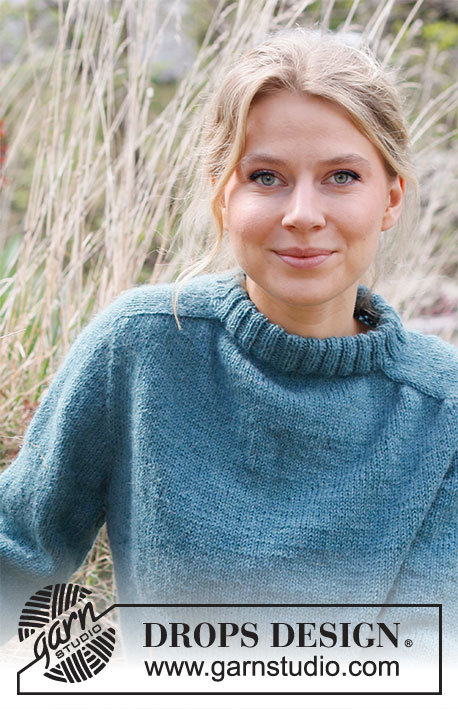
Knitted jumper with saddle shoulders in DROPS Lima or DROPS Soft Tweed. The piece is worked top down. Sizes S - XXXL.
DROPS 216-9 |
|||||||||||||
|
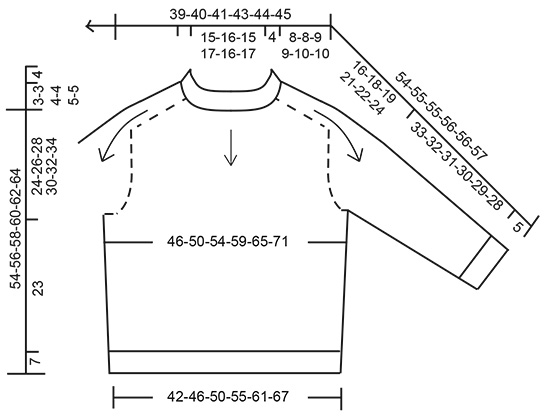
------------------------------------------------------- EXPLANATIONS FOR THE PATTERN: ------------------------------------------------------- INCREASE TIP-1 (evenly spaced): To work out how to increase evenly, count the total number of stitches on the needle (e.g. 96 stitches) and divide by the number of increases to be made (e.g. 12) = 8. In this example, increase by making 1 yarn over after each 8th stitch. On the next round work the yarn overs twisted to avoid holes. INCREASE TIP-2: BEFORE MARKER: The new stitch will be twisted, leaning towards the right. Use left needle to pick up strand between 2 stitches from the row below, pick up strand from behind and knit stitch in front loop. AFTER MARKER: The new stitch will be twisted, leaning towards the left. Use left needle to pick up strand between 2 stitches from the row below, pick up strand from the front and knit stitch in back loop. DECREASE TIP (for body and sleeves): Decrease 1 stitch on either side of the marker thread as follows: Work until there are 3 stitches left before the marker thread, knit 2 together, knit 2 (marker thread sits between these 2 stitches), slip 1 stitch as if to knit, knit 1 and pass the slipped stitch over the knitted stitch. CASTING-OFF TIP: To avoid the cast-off edge being tight you can cast off with a larger size needle. If the edge is still tight, make 1 yarn over after approx. each 4th stitch at the same time as casting off; the yarn overs are cast off as normal stitches. ------------------------------------------------------- START THE PIECE HERE: ------------------------------------------------------- JUMPER – SHORT OVERVIEW OF THE PIECE: The neck and yoke are worked in the round with circular needle, top down. Stiches are increased for the shoulders, then for the sleeves. The yoke is divided for body and sleeves and the body is continued in the round with circular needle. The sleeves are worked with double pointed needles, top down. NECK: Cast on 92-96-100-108-112-116 stitches with circular needle size 3.5 mm and Lima. Knit 1 round. Then work rib (= knit 2. purl 2) in the round for 8½ cm. Knit 1 round where you increase 12-12-20-20-24-28 stitches evenly spaced – read INCREASE TIP-1 = 104-108-120-128-136-144 stitches. Change to circular needle size 4.5 mm. Insert a marker at the beginning of the round (mid-back). THE PIECE IS NOW MEASURED FROM HERE! YOKE: Insert 4 markers in the piece, without working the stitches and between the stitches, as follows: Count 18-19-20-22-22-24 stitches (= half back piece), insert marker 1, count 16-16-20-20-24-24 stitches (= shoulder), insert marker 2, count 36-38-40-44-44-48 stitches (= front piece), insert marker 3, count 16-16-20-20-24-24 stitches (= shoulder), insert marker 4, there are 18-19-20-22-22-24 stitches left after the last marker (= half back piece). SADDLE SHOULDER INCREASE: Continue with stocking stitch and increase on the shoulders as follows: Increase 1 stitch BEFORE markers 1 and 3 and AFTER markers 2 and 4 – read INCREASE TIP-2 (=4 stitches increased); there are increases on back piece and front piece, number of shoulder stitches remain the same. The increased stitches are worked in stocking stitch. Increase like this every round a total of 21-21-24-24-26-26 times = 188-192-216-224-240-248 stitches. The piece measures approx. 8-8-9-9-10-10 cm from the marker on the neck. REMEMBER THE KNITTING TENSION! SLEEVE INCREASES: Now increase for the sleeves as follows: Increase 1 stitch AFTER markers 1 and 3 and BEFORE markers 2 and 4 (= 4 stitches increased). There are only increases on shoulder stitches and number of stitches on front piece and back piece remains the same. Number of shoulder stitches increases. Increase like this every 2nd round a total of 17-18-18-17-17-17 times = 256-264-288-292-308-316 stitches. The piece measures approx. 21-22-23-22-23-23 cm from the neck. If your measurements are shorter, continue with stocking stitch without increasing until the piece measures 21-22-23-22-23-23 cm. YOKE INCREASE: Now increase 1 stitch on each side of all markers as follows: Work until there is 1 stitch left before markers 1 and 3, increase 1 stitch BEFORE these markers, work 1 stitch, move the marker onto the right needle and increase 1 stitch AFTER these markers. Work to markers 2 and 4, increase 1 stitch BEFORE these markers, move the marker onto the right needle, work 1 stitch and increase 1 stitch AFTER these markers – remember INCREASE TIP-2 (= a total of 8 stitches increased). Increase like this every 2nd round a total of 4-5-6-10-11-14 times = 288-304-336-372-396-428 stitches. When all the increases are finished, the piece measures approx. 24-26-28-30-32-34 cm from the neck. Divide the piece for body and sleeves on the next round as follows: Work the first 42-45-49-54-59-65 stitches (half back piece), place the next 60-62-70-78-80-84 stitches on a thread for the sleeve, cast on 8-10-10-10-12-12 stitches under the sleeve, work 84-90-98-108-118-130 stitches (= front piece), place the next 60-62-70-78-80-84 stitches on a thread for the sleeve, cast on 8-10-10-10-12-12 stitches under the sleeve, work the last 42-45-49-54-59-65 stitches (= half back piece). Body and sleeves are finished separately. BODY: = 184-200-216-236-260-284 stitches. Insert 1 marker in the middle of the 8-10-10-10-12-12 stitches cast on under each sleeve; these will be used when decreasing in the sides. Work stocking stitch in the round. When the piece measures 4 cm from the division, decrease 1 stitch on each side of both markers – read DECREASE TIP (= 4 stitches decreased). Decrease like this every 5 cm a total of 4 times = 168-184-200-220-244-268 stitches. When the piece measures 23 cm from the division, knit 1 round where you increase 40 stitches evenly spaced = 208-224-240-260-284-308 stitches. Change to circular needle size 3.5 mm and work rib (= knit 2, purl 2) for 7 cm. Cast off with knit over knit and purl over purl – read CASTING OFF TIP! SLEEVE: Place the 60-62-70-78-80-84 stitches from the thread on the one side of the piece on double pointed needles size 4.5 mm and knit up 1 stitch in each of the 8-10-10-10-12-12 stitches cast on under the sleeve = 68-72-80-88-92-96 stitches. Insert a marker thread in the middle of the 8-10-10-10-12-12 stitches under the sleeve; you will decrease stitches either side of this marker. Work stocking stitch in the round. When the piece measures 3 cm from the division, decrease 1 stitch on each side of the marker thread – remember DECREASE TIP. Decrease like this every 6-5-3-2-2-1½ cm a total of 5-6-9-12-13-14 times = 58-60-62-64-66-68 stitches. Continue working until the sleeve measures 33-32-31-30-29-28 cm from the division. Knit 1 round where you increase 18-16-18-16-18-16 stitches evenly spaced = 76-76-80-80-84-84 stitches. Change to double pointed needles size 3.5 mm and work rib (= knit 2, purl 2) for 5 cm. Cast off with knit over knit and purl over purl – remember CASTING-OFF TIP. Work the other sleeve in the same way. ASSEMBLY: Fold the neck to the inside and sew down. To avoid the neck being tight and rolling outwards, it is important that the seam is elastic. |
|||||||||||||
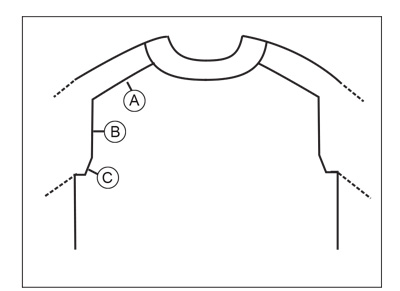
Diagram explanations |
|||||||||||||
|
|||||||||||||
|
|||||||||||||
|
|||||||||||||
Have you finished this pattern?Tag your pictures with #dropspattern #glacierwaters or submit them to the #dropsfan gallery. Do you need help with this pattern?You'll find 23 tutorial videos, a Comments/Questions area and more by visiting the pattern on garnstudio.com. © 1982-2025 DROPS Design A/S. We reserve all rights. This document, including all its sub-sections, has copyrights. Read more about what you can do with our patterns at the bottom of each pattern on our site. |
|||||||||||||


With over 40 years in knitting and crochet design, DROPS Design offers one of the most extensive collections of free patterns on the internet - translated to 17 languages. As of today we count 314 catalogues and 11822 patterns translated into English (UK/cm).
We work hard to bring you the best knitting and crochet have to offer, inspiration and advice as well as great quality yarns at incredible prices! Would you like to use our patterns for other than personal use? You can read what you are allowed to do in the Copyright text at the bottom of all our patterns. Happy crafting!
Post a comment to pattern DROPS 216-9
We would love to hear what you have to say about this pattern!
If you want to leave a question, please make sure you select the correct category in the form below, to speed up the answering process. Required fields are marked *.