
Popular categories
Looking for a yarn?


Comments / Questions (6)
![]() Patricia wrote:
Patricia wrote:
Bonjour, Je ne comprends pas la consigne : tricoter en jersey au-dessus des 5-6-7-9-12-13 mailles suivantes (= devant). Merci de m’éclairer. Cordialement Patricia
09.01.2025 - 10:48DROPS Design answered:
Bonjour Patricia, vous devez simplement tricoter ces 5 à 13 mailles (cf taille) en jersey. Ajoutées aux 4 mailles de bordure devant + A.4, elles forment le devant gauche. Bon tricot!
09.01.2025 - 17:53
![]() Claudie wrote:
Claudie wrote:
Bonjour ! Quand je reprends les mailles pour les manches et que je relève 6 mailles, j'obtiens deux trous sous les bras, cela me désespère et voilà trois fois que je défais mon ouvrage . Je me demande aussi où je dois placer un marqueur avant de faire les diminutions pour les manches. Pouvez-vous m'aider s'il vous plait ? Merci d'avance ! Bien cordialement, Claudie
12.12.2020 - 21:02DROPS Design answered:
Bonjour Claudie, cette leçon montre, avec la photo 18B comment relever les mailles des manches dans celles montées sous les manches - vous pouvez relever une maille avant la 1ère des 6 + 1 après la dernière des 6 et diminuer ces mailles dès le 1er tour - ou bien utilisez la technique de la photo 18A en montant les 6 mailles, vous pourrez ensuite faire la couture sous les manches (cf vidéo). Votre marqueur doit se trouver au milieu de ces 6 mailles = c'est le milieu sous la manche. Bon tricot!
14.12.2020 - 08:32
![]() Claudie wrote:
Claudie wrote:
Bonjour ! Quelle quantité de laine faut-il en drop alpaca et en kid silk pour faire le gilet d'une seule couleur ? D'avance merci beaucoup pour votre réponse ! Claudie
29.10.2020 - 10:51DROPS Design answered:
Bonjour Claudie, nous avons uniquement les quantités correspondantes aux rayures présentées et ne sommes malheureusement pas en mesure de pouvoir adapter chacun de nos modèles à chaque demande individuelle, vous pouvez additionner chaque couleur pour votre taille - vous aurez probablement besoin d'un peu moins - votre magasin DROPS devrait pouvoir vous aider. Bon tricot!
29.10.2020 - 13:42
![]() Hanne wrote:
Hanne wrote:
Jeg har problemer med raglanfellingen og antall masker. Det står under bærestykke at mønster følges hver 2. Linje. Men dette får jeg ikke til å stemme. Det legges jo til masker så antallet stemmer ikke ved å følge oppskriften. Hva er det jeg ikke forstår?
17.11.2019 - 11:56DROPS Design answered:
Hej Hanne, mønsteret du strikker i hver raglanovergang forandres ikke. Du tager ud til raglan på hver side af diagrammerne (8 udtagninger på hver 2. pind). De nye masker strikkes videre i glatstrik. God fornøjelse!
03.12.2019 - 15:13
![]() Christina Rådelius wrote:
Christina Rådelius wrote:
My favourite!
12.08.2019 - 19:56
![]() Sabine Koehler wrote:
Sabine Koehler wrote:
Da ich ein absoluter Jacken-Fan bin, ist die einer meiner Favoriten. Und dann diese schoenen Farben! Bin schon gespannt auf die Anleitung!
23.07.2019 - 11:25
|
||||||||||
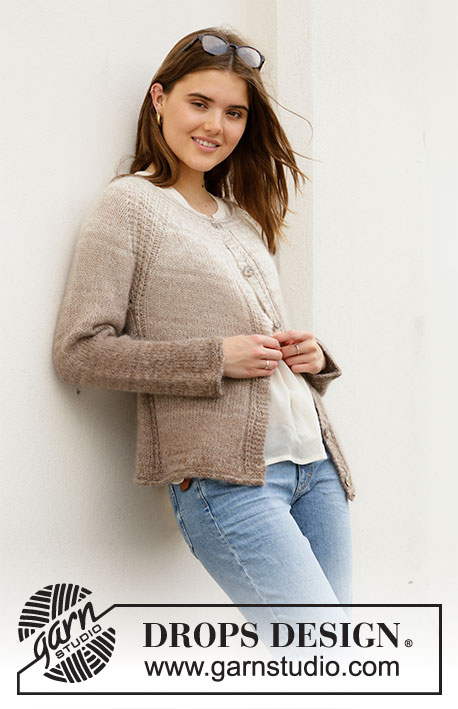
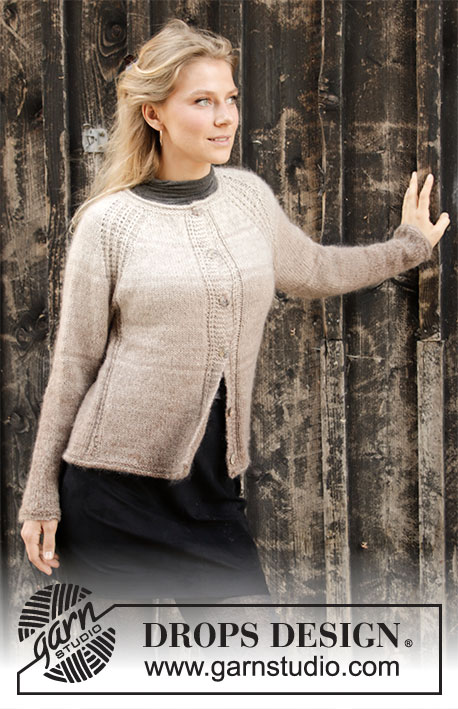
Maple Wood Jacket#maplewoodjacket |
||||||||||
 |
 |
|||||||||
Knitted jacket in DROPS Alpaca and DROPS Kid-Silk. Piece is knitted top down with stripes and false English rib. Size: S - XXXL
DROPS 206-49 |
||||||||||
|
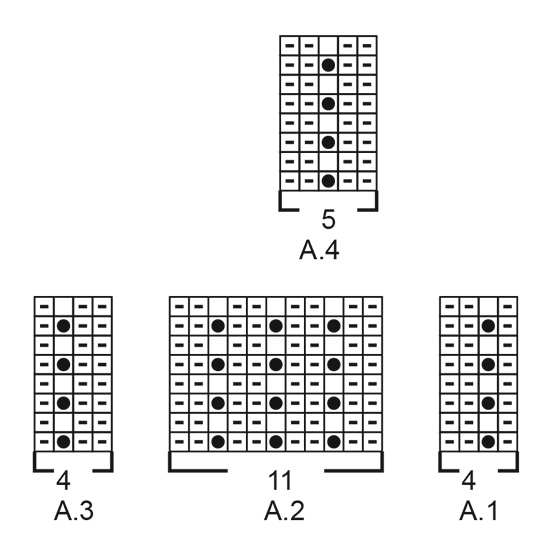
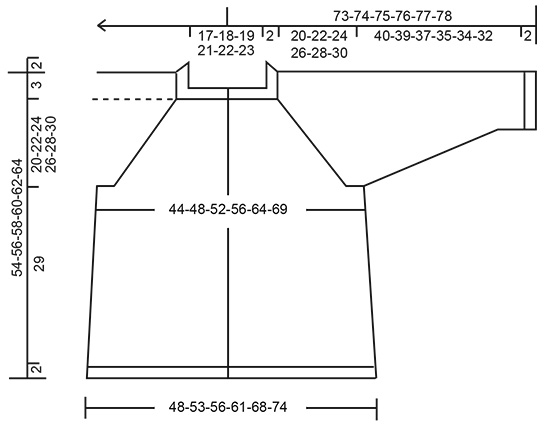
---------------------------------------------------------- EXPLANATION FOR THE PATTERN: ---------------------------------------------------------- GARTER STITCH (back and forth): Knit all rows. 1 ridge vertically = knit 2 rows. GARTER STITCH (worked in the round): 1 ridge vertically = 2 rounds, i.e. knit 1 round and purl 1 round. INCREASE TIP-1 (evenly): To calculate how to increase evenly, use the total number of stitches on row (e.g. 81 stitches), minus bands (e.g. 8 stitches) and divide the remaining 73 stitches by number of increases to be done (e.g. 15) = 4.9. In this example increase by making 1 yarn over after approx. every 5th stitch. On next row work yarn over twisted to avoid holes STRIPES: NOTE! Work all stripes in 1 strand Alpaca (A) and 1 strand Kid-Silk (KS) (= 2 strands. STRIPE 1: 6-6-6½-6½-7-7 cm with off white (A) and light beige (KS). STRIPE 2: 2 rows with light nougat (A) and off white (KS). STRIPE 3: 2 rows with off white (A) and light beige (KS). STRIPE 4: 6-6-6½-6½-7-7 cm with light nougat (A) and off white (KS). STRIPE 5: 2 rows with light nougat (A) and light beige (KS). STRIPE 6: 2 rows with light nougat (A) and off white (KS). STRIPE 7: 6-6-6½-6½-7-7 cm with light nougat (A) and light beige (KS). STRIPE 8: 2 rows with light nougat (A) and beige (KS). STRIPE 9: 2 rows with light nougat (A) and light beige (KS). STRIPE 10: 6-6-6½-6½-7-7 cm with light nougat (A) and beige (KS). STRIPE 11: 2 rows with nougat (A) and light beige (KS). STRIPE 12: 2 rows with light nougat (A) and beige (KS). STRIPE 13: 6-6-6½-6½-7-7 cm with nougat (A) and light beige (KS). STRIPE 14: 2 rows with nougat (A) and beige (KS). STRIPE 15: 2 rows with nougat (A) and light beige (KS). STRIPE 16: 6-6-6½-6½-7-7 cm with nougat (A) and beige (KS). STRIPE 17: 2 rows with light brown (A) and light beige (KS). STRIPE 18: 2 rows with nougat (A) and beige (KS). STRIPE 19: Work with light brown (A) and light beige (KS) until finished measurements. PATTERN: See diagrams A.1 to A.4. RAGLAN: All increases are done from the right side. Increase 1 stitch in each side of A.2 in every transition between front/back piece and sleeves (= 8 stitches increased on every increase row). Increase 1 stitch by making 1 yarn over. On next row (wrong side) purl yarn overs twisted to avoid holes. Then work the new stitches in stocking stitch. INCREASE TIP-2 (applies to sides of body): All increases are done from the right side. Work until 2 stitches remain before marker thread, make 1 yarn over, knit 4 (marker thread is in the middle of these 4 stitches), make 1 yarn over (= 2 stitches increased at marker thread). On next row (wrong side) purl yarn overs twisted to avoid holes. Then work the new stitches in stocking stitch. DECREASE TIP (applies to sleeves): Decrease 1 stitch on each side of marker thread as follows: Work until 3 stitches remain before marker thread, knit 2 together, knit 2 stitches (marker thread is between these 2 stitches), slip 1 stitch knitwise, knit 1, pass slipped stitch over stitch worked (= 2 stitches decreased). BUTTONHOLES: Decrease for buttonholes on right band (when garment is worn). Decrease from right side when 3 stitches remain on row as follows: Make 1 yarn over, knit the next 2 stitches together, knit last stitch. On next row (wrong side) knit the yarn over to make a hole. Decrease first buttonhole when neck edge measures approx. 1½-2 cm. Then decrease the next 5-5-6-6-6-6 buttonholes, approx. 9½-9½-8½-8½-9-9½ cm apart. ---------------------------------------------------------- START THE PIECE HERE: ---------------------------------------------------------- JACKET - SHORT OVERVIEW OF THE PIECE: Work neck edge and yoke back and forth on circular needle from mid front, work top down. Now divide yoke for body and sleeves. Work body back and forth on circular needle from mid front, top down. Work sleeves in the round on double pointed needles/a short circular needle, top down. NECK EDGE: Cast on 81-85-89-95-99-101 stitches (including 4 band stitches in each side towards mid front) on circular needle size 5 mm with 1 strand off white Alpaca + 1 strand light beige Kid-Silk (= 2 strands). Purl 1 row from wrong side. Now work a rolling edge as follows: Knit 1 row from right side and purl 1 row from wrong side. Switch to circular needle size 4 mm and work 2 ridges in GARTER STITCH - see explanation above. Switch back to circular needle size 5 mm. Knit 1 row from right side while increasing 15-15-15-17-25-27 stitches evenly - read INCREASE TIP-1 = 96-100-104-112-124-128 stitches. Remember BUTTONHOLES - read explanation above. Work next row as follows from wrong side: Knit 4, purl until 4 stitches remain on needle, knit 4. Insert 1 marker thread in the middle of row - NOW MEASURE PIECE FROM HERE! YOKE: Now work STRIPES – read explanation above, and pattern as follows: Work 4 band stitches in garter stitches, work A.1 (= 4 stitches), work in stocking stitch over the next 5-6-7-9-12-13 stitches (= front piece), make 1 yarn over (= increase), work A.2 (= 11 stitches), make 1 yarn over (= increase), work 4 stitches in stocking stitch (= sleeve), make 1 yarn over (= increase), work A.2 (= 11 stitches), make 1 yarn over (= increase), work 18-20-22-26-32-34 stitches in stocking stitch (= back piece), make 1 yarn over (= increase), work A.2 (= 11 stitches), make 1 yarn over (= increase), work 4 stitches in stocking stitch (= sleeve), make 1 yarn over (= increase), work A.2 (= 11 stitches), make 1 yarn over (= increase), work in stocking stitch over the next 5-6-7-9-12-13 stitches, work A.3 (= 4 stitches), and finish with 4 band stitches in garter stitch (= front piece). First increase for RAGLAN - read explanation above, is now done. REMEMBER THE KNITTING TENSION! Continue pattern back and forth and increase like this every other row 15-18-21-22-23-24 times in total (including first increase as explained above) = 216-244-272-288-308-320 stitches. Then increase only on front and back piece (= 4 stitches increased) every other row 5-5-3-4-5-7 times = 236-264-284-304-328-348 stitches. Repeat A.1 to A.3 vertically. Work without increases until piece measures 20-22-24-26-28-30 cm from marker thread. Now divide yoke for body and sleeves, i.e. work next row from wrong side as follows: Work the first 38-42-44-48-53-57 stitches as before (= front piece), slip the next 46-52-58-60-62-64 stitches on 1 stitch holder for sleeve, cast on 6-6-8-8-10-12 new stitches on needle (= in the side under sleeve), work the next 68-76-80-88-98-106 stitches as before (= back piece), slip the next 46-52-58-60-62-64 stitches on 1 stitch holder for sleeve, cast on 6-6-8-8-10-12 new stitches on needle (= in the side under sleeve) and work the remaining 38-42-44-48-53-57 stitches as before (= front piece). Then finish body and sleeves separately. NOW MEASURE THE PIECE FROM HERE! BODY: = 156-172-184-200-224-244 stitches. Insert 1 marker thread after 41-45-48-52-58-63 stitches in from each side (= in the side of body). There are now 74-82-88-96-108-118 stitches between marker threads on back piece. Move the marker threads upwards when working; they should be used for increase later in the sides on body. Then work pattern as follows: Work 4 band stitches in garter stitch, work A.1 (= 4 stitches), work in stocking stitch over the next 25-29-31-35-40-44 stitches, work A.4 (= 5 stitches), work 6-6-8-8-10-12 stitches in stocking stitch (= in the side), work A.4 (= 5 stitches), work 58-66-70-78-88-96 stitches in stocking stitch, work A.4 (= 5 stitches), work 6-6-8-8-10-12 stitches in stocking stitch (= in the side), work A.4 (= 5 stitches), work in stocking stitch over the next 25-29-31-35-40-44 stitches, work A.3 (= 4 stitches), and finish with 4 band stitches in garter stitch. When body measures 5 cm from division in all sizes, increase 1 stitch on each side of both markers - READ INCREASE TIP-2 (= 4 stitches increased). Increase like this every 6 cm 4 times in total in each side = 172-188-200-216-240-260 stitches. Work until body measures approx. 29 cm from division in all sizes (approx. 2 cm remain until finished measurements, try the jacket on and work to desired length). Work 1 row from wrong side while increasing 12-12-12-16-16-16 stitches evenly - remember INCREASE TIP-1 = 184-200-212-232-256-276 stitches. Switch to circular needle size 4 mm. Work 2 ridges. Switch back to circular needle size 5 mm. Work 2 rows in stocking stitch over all stitches. Cast off - make sure that the cast-off edge is not too tight. Jacket measures approx. 54-56-58-60-62-64 cm from shoulder and down. SLEEVE: Slip the 46-52-58-60-62-64 stitches from stitch holder in one side of piece on double pointed needles/short circular needle size 5 mm and pick in addition up 1 stitch in each of the 6-6-8-8-10-12 stitches cast on under sleeve = 52-58-66-68-72-76 stitches. Insert 1 marker thread in the middle of the new stitches under sleeve and move the marker thread upwards when working; it should be used for decrease mid under sleeve. Begin round at the marker thread and work stocking stitch and stripes in the round the same way as on body. When sleeve measures 2 cm from division in all sizes, decrease 1 stitch on each side of marker thread - read DECREASE TIP. Decrease like this every 4½-3½-2½-2-1½-1½ cm 8-10-13-14-15-16 times in total = 36-38-40-40-42-44 stitches. Work until sleeve measures 40-39-37-35-34-32 cm from division (approx. 2 cm remain until finished measurements, try the jacket on and work to desired length)- NOTE: Shorter measurements in the larger sizes because of wider neck and longer yoke. Knit 1 round while increasing 6 stitches evenly = 42-44-46-46-48-50 stitches. Switch to double pointed needles size 4 mm. Work 2 ridges in GARTER STITCH - read explanation above. Switch back to double pointed needles size 5 mm. Work 2 rounds in stocking stitch. Cast off - make sure that the cast-off edge is not too tight. Sleeve measures approx. 42-41-39-37-36-34 cm from division. Work the other sleeve the same way. ASSEMBLY: Sew the buttons on to the left band. |
||||||||||
Diagram explanations |
||||||||||
|
||||||||||
 |
||||||||||
 |
||||||||||
Have you finished this pattern?Tag your pictures with #dropspattern #maplewoodjacket or submit them to the #dropsfan gallery. Do you need help with this pattern?You'll find 31 tutorial videos, a Comments/Questions area and more by visiting the pattern on garnstudio.com. © 1982-2026 DROPS Design A/S. We reserve all rights. This document, including all its sub-sections, has copyrights. Read more about what you can do with our patterns at the bottom of each pattern on our site. |
||||||||||


With over 40 years in knitting and crochet design, DROPS Design offers one of the most extensive collections of free patterns on the internet - translated to 17 languages. As of today we count 324 catalogues and 12290 patterns translated into English (UK/cm).
We work hard to bring you the best knitting and crochet have to offer, inspiration and advice as well as great quality yarns at incredible prices! Would you like to use our patterns for other than personal use? You can read what you are allowed to do in the Copyright text at the bottom of all our patterns. Happy crafting!
Post a comment to pattern DROPS 206-49
We would love to hear what you have to say about this pattern!
If you want to leave a question, please make sure you select the correct category in the form below, to speed up the answering process. Required fields are marked *.