
Popular categories
Looking for a yarn?


Comments / Questions (161)
![]() Deirdre Magner wrote:
Deirdre Magner wrote:
This is the most beautiful baby bunting I have seen in a long time. There was a photo posted on Facebook and I went searching for the pattern! So happy to find it. Just stunning.
24.07.2024 - 12:48
![]() Chantal Bilodeau wrote:
Chantal Bilodeau wrote:
Bonjour, lorsqu'on relève les mailles pour former la capuche, est-ce que les 2 bords de la capuche se chevauchent sur les 2 bordures en point mousse (sur les mailles en attente)? Merci
22.05.2024 - 17:19DROPS Design answered:
Bonjour Mme Bilodeau, lorsque vous relevez les mailles de la capuche, tricotez les mailles du devant droit en attente, relevez les mailles tout autour de l'encolure et terminez par tricoter les mailles du devant gauche, tournez et tricotez 1 rang endroit sur l'envers en ajustant le nombre de mailles comme indiqué, puis tricotez au point mousse mais à la fin des 2 rangs suivants, montez 6 mailles (= 6 mailles de chaque côté pour la bordure de la capuche). Bon tricot!
23.05.2024 - 08:17
![]() Petra Möller wrote:
Petra Möller wrote:
Ich stricke dieses Muster für 1/3 Monate. Nun möchte ich nach dem Teilen der Maschen mit dem rechten Vorderteil weiterarbeiten (43 Maschen) und weiß nicht, wie ich die Korrektur vom 26.09.2019 einarbeiten soll.
24.04.2024 - 10:47DROPS Design answered:
Liebe Frau Möller, wenn Sie die Anleitung nach der Korrektur gedruckt haben, dann stimmt die Anleitung so, die Korrektur erfolgen nur wenn die Anleitung davor gedruckt wurde. Viel Spaß beim Stricken!
24.04.2024 - 10:58
![]() Liesbeth Van Koelen wrote:
Liesbeth Van Koelen wrote:
Begrijp niets van dit patroon. ik wil de tweede maat breien dus patroon A3, A4 en A5. Moet ik na elke patroonnaald eeen naald averecht breien? Of de naalden breien zoals patroon aangeeft, maw geeft patroon heen en terug naald aan?
30.03.2024 - 10:14DROPS Design answered:
Dag Liesbeth,
In de telpatronen zijn alle naalden weergegeven. Dus zowel de heengaande als de teruggaande naalden. Bij de symboolverklaring staat hoe je de steken aan zowel de goede als de verkeerde kant breit. de oneven naalden van de telpatronen brei je aan de goede kant en de even naalden aan de verkeerde kant (bij heen en weer breien dan).
07.04.2024 - 19:08
![]() Astrid Nordvang wrote:
Astrid Nordvang wrote:
Jeg strikker "Cable snooze" kjörepose. I avsnittet "ALLE STÖRRELSER", der det står "Fortsett arbeidet slik."; gjelder det hele forrige avsnitt? Altså, skal man strikke diagram A2 på nytt? Vil det ikke da bli alt for mange masker? Strikker den störste störrelsen.
25.02.2024 - 19:31DROPS Design answered:
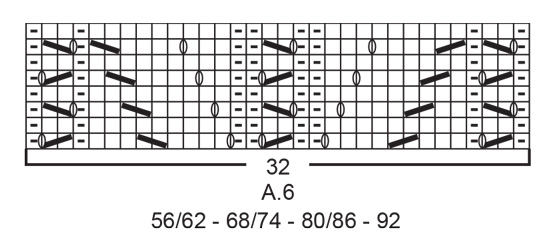
Hei Astrid. Nei, du gjentar kun siste forklaring av mønsteret (1 kantmaske i rille, strikk A.3 over de første 6 maskene, strikk A.6 (= 32 masker), strikk 16 masker vrang, strikk A.6 (= 32 masker), strikk A.3 over de neste 6 maskene og avslutt med 1 kantmaske i rille). Dette gjentar du til arbeidet måler 38 cm. mvh DROPS Design
04.03.2024 - 09:31
![]() Lisbeth Andersen wrote:
Lisbeth Andersen wrote:
De 16 midterste masker skal de strikkes vrang på retsiden og ret på vrang siden?
19.01.2024 - 13:20DROPS Design answered:
Hei Lisbeth. Ja, om du ser på nærbildet av babyposen ser du bedre at de 16 midt maskene er vrangen. mvh DROPS Design
22.01.2024 - 13:37
![]() Petra Kousková wrote:
Petra Kousková wrote:
Dobrý den, skončila jsem před odstavcem všechny velikosti a nevím, jak má vypadat rubový řádek. Resp. u vel. 0 měsíců je rozepsán líc, rub, líc a potom se má ve všech velikostech opakovat sekvence vzorů. Jak má ale před tím opakováním vypadat rubový řádek? Děkuji, PK
29.12.2023 - 21:52DROPS Design answered:
Dobrý den, Petro! Ano, pletete v uvedeném rozvržení vzorů, a to až do výše 16 cm. Rubová řada rozepsaná není, protože rub je dán už každým použitým vzorem (viz viz popis značek ve schématu). V praxi bude rubová řada vypadat tedy takto: 1 krajové oko vroubkovým (= hladce), 1 obrace, 2 hladce, nahození obrace, 1 obrace, 1 hladce, 9 obr., nah. obrace, 1 hladce, nah. obrace, 1 obrace, 16 hladce, 1 obr, nah. obrace, 1 hladce, nah. obrace, 9 obr., 1 hladce, 1 obr, nah. obr., 1 hl, 1 obr, 1 hl, krajové hladce. Možná to vypadá složitě, ale po pár řadách se vzor začne skládat a vše bude pěkně přehledné. Hodně zdaru! Hana
30.12.2023 - 10:08
![]() Monique Menez wrote:
Monique Menez wrote:
T:1/3, devant, sur un total de 56 m comment faites vous pour faire : A2+14m envers+A2
13.10.2023 - 16:58DROPS Design answered:
Bonjour Mme Menez, en taille 1/3 mois vous avez 68 m, tricotez ainsi: 1 m lisière au point mousse, A.2 (on passe de 26 à 32 m), 14 m jersey envers, A.2 (on passe de nouveau de 26 à 32 m) et 1 m lisière au point mousse soit: 1+26+14+26+1=68 mailles. En taille 0/1 mois et 56 mailles tricotez ainsi: 1 m lisière au point mousse, 6 m jersey envers, A.1 (14 m), 14 m jersey envers, A.1 (14 m), 6 m jersey envers et 1 m lisière au point mousse (- 1+6+14+14+14+6+1=56 m. Bon tricot!
16.10.2023 - 08:36
![]() Bente Kongensgaard wrote:
Bente Kongensgaard wrote:
Problemet er løst. Beklager.
03.10.2023 - 21:11
![]() Bente Kongensgaard wrote:
Bente Kongensgaard wrote:
Beklager - nu har jeg slået hjernen til igen. Problemet er løst🥴
03.10.2023 - 21:10DROPS Design answered:
Godt at høre Bente :)
04.10.2023 - 07:15
|
|||||||||||||||||||
Cable Snooze#cablesnoozebuntingbag |
|||||||||||||||||||
 |
 |
||||||||||||||||||
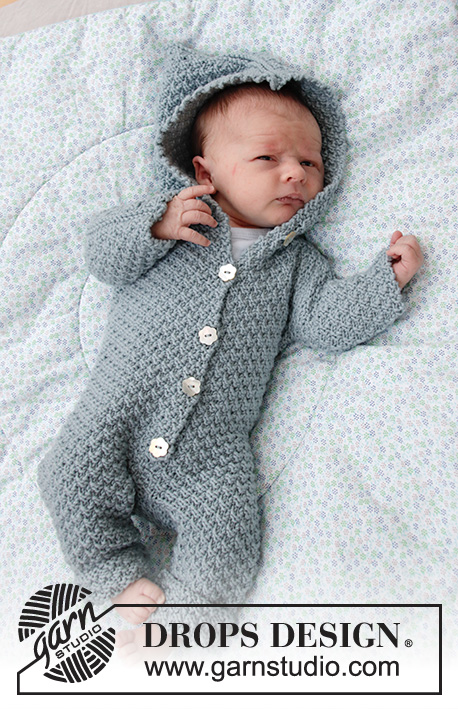
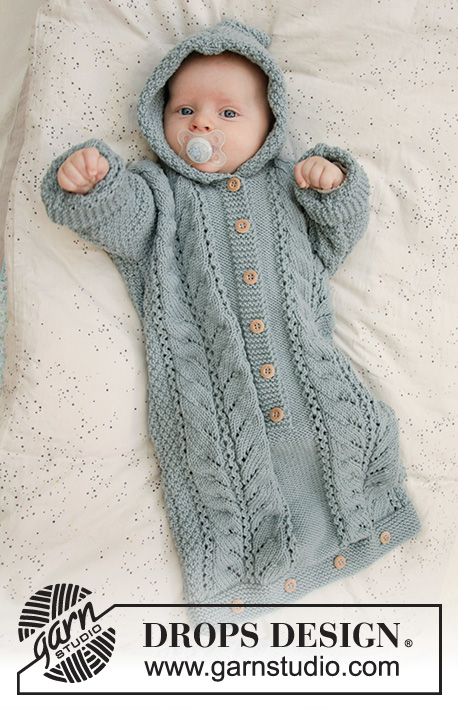
Knitted bag for babies in DROPS Merino Extra Fine. The piece is worked with lace pattern, double moss stitch and hood. Sizes premature – 2 years.
DROPS Baby 33-7 |
|||||||||||||||||||
|
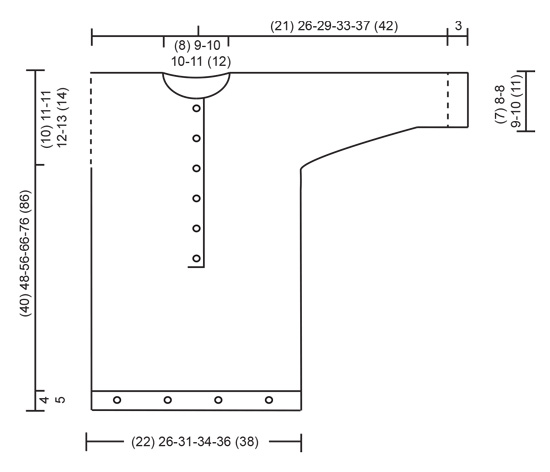
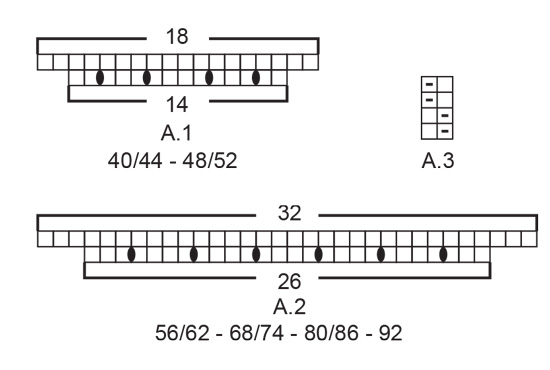
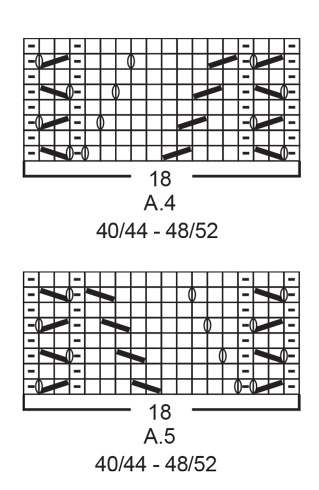
EXPLANATIONS FOR THE PATTERN: ------------------------------------------------------- RIDGE/GARTER STITCH (worked back and forth): 1 ridge = Knit 2 rows. PATTERN: Sizes (<0) 0/1 month: See diagrams A.1, A.3, A.4 and A.5. Sizes 1/3 - 6/9 - 12/18 months (2) years: See diagrams A.2, A.3 and A.6. The diagrams show all the rows in the pattern seen from the right side. BUTTONHOLE-1 (for bottom of bag): 1 BUTTONHOLE = knit 2 together, make 1 yarn over. On the next round knit the yarn over to leave a hole. The other (4) 4-4-5-5 (5) buttonholes are worked evenly spaced with approx. (4½) 5-6-5½-6 (6) cm between each. BUTTONHOLE-2 (for band mid front): Work buttonholes on the right band working from the right side. 1 BUTTONHOLE = knit together the 3rd and 4th stitch from the edge, make 1 yarn over. On the next row (wrong side) knit the yarn over to leave a hole. Work buttonholes when the band measures (measured from the marker): (<0) months: 2, 8, 14 and 20 cm 0/1 month: 2, 8, 14, 20 and 26 cm 1/3 months: 2, 7, 13, 18, 24 and 29 cm 6/9 months: 2, 9, 16, 23, 29 and 35 cm 12/18 months: 2, 8, 14, 20, 26, 32 and 38 cm (2) years: 2, 8, 15, 21, 28, 34 and 41 cm ------------------------------------------------------- START THE PIECE HERE: ------------------------------------------------------- BAG - SHORT OVERVIEW OF THE PIECE: The piece is worked back and forth with circular needle in 2 parts. You cast on stitches in each side for the sleeves. The piece is sewn together on the shoulders/mid top of sleeves and under sleeves. You work a hood to finish. FRONT PIECE: Cast on (48) 56-68-74-78 (82) stitches (including 1 edge stitch in each side) with circular needle size 4 mm and Merino Extra Fine. Work GARTER STITCH – read description above. When the piece measures (2) 2-2-2½-2½ (2½) cm work (4) 4-4-5-5 (5) buttonholes evenly spaced – read BUTTONHOLE-1. Continue with garter stitch until the piece measures (4) 4-4-5-5 (5) cm. The next row is worked as follows from the right side: SIZES (<0) 0/1 MONTH: 1 edge stitch in garter stitch, purl (2) 6 stitches, A.1 (= 14 stitches which increase to 18 stitches), purl (14) 14 stitches, A.1 (= 14 stitches which increase to 18 stitches), purl (2) 6 stitches and finish with 1 edge stitch in garter stitch = (56) 64 stitches on the row. Purl 1 row from the wrong side (edge stitches worked in garter stitch). The next row is worked as follows from the right side: 1 edge stitch in garter stitch, A.3 over the first (2) 6 stitches, A.4 (= 18 stitches), purl (14) 14, A.5 (= 18 stitches), A.3 over the next (2) 6 stitches and finish with 1 edge stitch in garter stitch. Then work as described under ALL SIZES! SIZES 1/3 - 6/9 - 12/18 MONTHS (2) YEARS: 1 edge stitch in garter stitch, purl 0-2-4 (6) stitches, work A.2 (= 26 stitches which increase to 32 stitches), purl 14-16-16 (16) stitches, A.2 (= 26 stitches which increase to 32 stitches), purl 0-2-4 (6) and finish with 1 edge stitch in garter stitch = 80-86-90 (94) stitches. Purl 1 row from the wrong side (edge stitches worked in garter stitch). The next row is worked as follows from the right side: 1 edge stitch in garter stitch, work A.3 over the first 0-2-4 (6) stitches, A.6 (= 32 stitches), purl 14-16-16 (16) stitches, A.6 (= 32 stitches), A.3 over the next 0-2-4 (6) stitches and finish with 1 edge stitch in garter stitch. Then work as described under ALL SIZES! ALL SIZES: Continue this pattern. REMEMBER THE KNITTING TENSION! When the piece measures (16) 18-22-26-32 (38) cm – adjust so that the next row is worked from the right side, divide the piece mid front and each side is finished separately. Cut the strand. Place the first (25) 29-37-40-42 (44) stitches, seen from the right side, on 1 thread (= left front piece). There are now (31) 35-43-46-48 (50) stitches left on needle for right front piece. RIGHT FRONT PIECE: = (31) 35-43-46-48 (50) stitches. Insert 1 marker in the piece - will be used to measure the positions of the buttonholes. Start from the right side and continue pattern as before, but the outermost 6 stitches towards mid front are worked in garter stitch (= band). Work buttonholes on the right band – read BUTTONHOLE-2. AT THE SAME TIME when the piece measures (30) 37-45-54-63 (72) cm from the cast-on edge cast on stitches for the sleeve at the end of each row from the right side (i.e. towards the side) as follows: Cast on (4) 6-6-7-9 (12) stitches a total of 3 times and then (14) 15-16-17-18 (18) stitches 1 time = (57) 68-77-84-93 (104) stitches on the needle (the new stitches are worked into A.3 as you go). When all stitches are cast on continue with pattern as before, but the outermost 12 stitches on the sleeve are worked in garter stitch (= turn-up). Continue working until the piece measures (37) 45-52-62-71 (81) cm. You should now have worked approx. 1 cm after the last buttonhole on the band, but adjust so that the next row is worked from the right side. On the next row (right side) place the outermost (7) 8-9-10-10 (11) stitches towards mid front on 1 thread for neck, but to avoid having to cut the strand, work the stitches before placing them on the thread. Continue the pattern as before. Then cast off for the neck at the beginning of each row from the neck as follows: Cast off 2 stitches 1 time and then 1 stitch (2) 2-2-2-3 (3) times = (46) 56-64-70-78 (88) stitches left on needle for shoulder/sleeve. Continue the pattern as before until the piece measures (39) 47-55-65-75 (85) cm, but adjust so that the next row is worked from the right side. Knit 1 row from the right side and at the same time decrease (4) 4-6-6-6 (6) stitches evenly over A.5/A.6 = (42) 52-58-64-72 (82) stitches on the row. Knit 1 row from the wrong side. Cast off with knit from the right side, but make sure that the cast-off edge is not tight. The piece measures approx. (40) 48-56-66-76 (86) cm from the cast-on edge. Work the left front piece as described below. LEFT FRONT PIECE: Place the (25) 29-37-40-42 (44) stitches from the strand back on the circular needle. Start from the right side and continue pattern as before. AT THE SAME TIME, at the end of the first row, knit up 6 new stitches behind the right band, i.e. knit up 1 stitch in each of the 6 band stitches = (31) 35-43-46-48 (50) stitches on needle. Continue pattern as before, but the outermost 6 stitches towards mid front are worked in garter stitch (= band – NOTE: do not work buttonholes on left band). AT THE SAME TIME when the piece measures (30) 37-45-54-63 (72) cm cast on new stitches for the sleeve at the end of each row from the wrong side (i.e. towards the side) as follows: Cast on (4) 6-6-7-9 (12) stitches a total of 3 times and then (14) 15-16-17-18 (18) stitches 1 time = (57) 68-77-84-93 (104) stitches on the needle (the new stitches are worked into A.3 as you go). When all stitches are cast on continue pattern as before, but the outermost 12 stitches on the sleeve are worked in garter stitch = turn up). Continue until the piece measures approx. (37) 45-52-62-71 (81) cm - adjust to match the right front piece and so that the next row is worked from the wrong side. On the next row (wrong side) place the outermost (7) 8-9-10-10 (11) stitches towards mid front on a thread for the neck, but to avoid having to cut the strand, work the stitches before placing them on the thread. Continue the pattern as before. Then cast off for the neck at the beginning of each row from the neck as follows: Cast off 2 stitches 1 time and then 1 stitch (2) 2-2-2-3 (3) times = (46) 56-64-70-78 (88) stitches left on shoulder/sleeve. Continue pattern as before until the piece measures (39) 47-55-65-75 (85) cm, but adjust so that the next row is from the right side. Knit 1 row from the right side and decrease at the same time (4) 4-6-6-6 (6) stitches evenly over A.4/A.6 = (42) 52-58-64-72 (82) stitches on needle. Knit 1 row from the wrong side. Cast off with knit from the right side, but make sure that the cast-off edge is not tight. The piece measures approx. (40) 48-56-66-76 (86) cm. Work the back piece as described below. BACK PIECE: Cast on (48) 56-68-74-78 (82) stitches and work garter stitch for (4) 4-4-5-5 (5) cm. Work 2 rows stocking stitch with 1 edge stitch in garter stitch in each side. The next row is worked as follows from the right side: 1 edge stitch in garter stitch, work A.3 until there is 1 stitch left on the row and finish with 1 edge stitch in garter stitch. Continue this pattern. When the piece measures (30) 37-45-54-63 (72) cm cast on new stitches for the sleeves at the end of each row on each side as follows: Cast on (4) 6-6-7-9 (12) stitches a total of 3 times on each side and then (14) 15-16-17-18 (18) stitches 1 time on each side = (100) 122-136-150-168 (190) stitches on the row (the new stitches are worked into A.3 as you go). When all stitches are cast on continue with A.3 as before, but the outermost 12 stitches on both sleeves are worked in garter stitch (= turn up). When the piece measures (38) 46-54-64-74 (84) cm cast off the middle (12) 14-16-18-20 (22) stitches for neck. Then cast off 2 stitches on the next row from the neck = (42) 52-58-64-72 (82) stitches left on needle for shoulder/sleeve. Continue pattern as before until there is 1 cm left before the piece measures (40) 48-56-66-76 (86) cm, but adjust so that the next row is worked from the right side. Knit 1 row from the right side and knit 1 row from the wrong side. Cast off with knit from the right side, but make sure that the cast-off edge is not tight. Work the other shoulder in the same way. ASSEMBLY: Sew shoulder/top of sleeve seams inside the cast-off edge. Sew under-sleeve seams and side seams inside the 1 edge stitch. Turn up the bottom 3 cm on each sleeve and fasten with a couple of small stitches on each side. Sew buttons onto bottom of bag (the buttons are sewn along the middle of the garter stitch edge on the back piece but on the wrong side so that they are buttoned through the buttonholes on the front piece). Sew the remaining buttons to the left band. HOOD: Knit up from the right side approx. 52 to 72 stitches around the neck (including the stitches from the threads in front) with circular needle size 4 mm and Merino Extra Fine. Knit 1 row from the wrong side. Then knit 1 row from the right side, where you increase evenly on row until you have a total of (68) 76-84-88-92 (96) stitches. Work A.3 back and forth over all stitches - AT THE SAME TIME cast on 6 new stitches at the end of the next 2 rows for the folding edge = (80) 88-96-100-104 (108) stitches. Continue with A.3 over all stitches until the hood measures approx. (18) 19-20-21-22 (23) cm. Knit 1 row from the right side and knit 1 row from the wrong side. Cast off with knit from the right side. Fold the hood double and sew together at the top, inside the cast-off edge. Fold the 6 outermost stitches on each side to the right side and sew down to the neck with small, neat stitches. |
|||||||||||||||||||
Diagram explanations |
|||||||||||||||||||
|
|||||||||||||||||||
 |
|||||||||||||||||||
 |
|||||||||||||||||||
 |
|||||||||||||||||||
 |
|||||||||||||||||||
Have you finished this pattern?Tag your pictures with #dropspattern #cablesnoozebuntingbag or submit them to the #dropsfan gallery. Do you need help with this pattern?You'll find 27 tutorial videos, a Comments/Questions area and more by visiting the pattern on garnstudio.com. © 1982-2026 DROPS Design A/S. We reserve all rights. This document, including all its sub-sections, has copyrights. Read more about what you can do with our patterns at the bottom of each pattern on our site. |
|||||||||||||||||||


With over 40 years in knitting and crochet design, DROPS Design offers one of the most extensive collections of free patterns on the internet - translated to 17 languages. As of today we count 324 catalogues and 12284 patterns translated into English (UK/cm).
We work hard to bring you the best knitting and crochet have to offer, inspiration and advice as well as great quality yarns at incredible prices! Would you like to use our patterns for other than personal use? You can read what you are allowed to do in the Copyright text at the bottom of all our patterns. Happy crafting!
Post a comment to pattern DROPS Baby 33-7
We would love to hear what you have to say about this pattern!
If you want to leave a question, please make sure you select the correct category in the form below, to speed up the answering process. Required fields are marked *.