
Popular categories
Looking for a yarn?


Comments / Questions (36)
![]() Mercedes wrote:
Mercedes wrote:
Ho del mohair che vorrei utilizzare per questo modello, mi sapere dire quanto me en servirá ? Grazie
05.10.2018 - 16:11DROPS Design answered:
Buongiorno Mercedes, dovrebbe conoscere prima di tutto il metraggio del suo filato, poi provare a fare un campione e calcolare le dovute proporzioni con quello indicato. Purtroppo non possiamo fornire un aiuto così personalizzato. Buon lavoro!
07.10.2018 - 17:13
![]() Marijke wrote:
Marijke wrote:
Erg leuk patroon, wil ik graag breien maar begrijp niet goed aan welke kant de kabel nu komt. Als ik de trui voor me heb zit de kabel toch rechts? En als ik de trui draag links? Uit het patroon begrijp ik dat niet en denk eerder dat het omgekeerd is in verband met de markeerdraden van de pas?
21.09.2018 - 00:54DROPS Design answered:
Dag Marijke, Als ik het zo lees, zou het moeten kloppen en worden de markeerdraden op de juiste plek geplaatst, zodat de kabel aan de linkerkant van het voorpand zit als het kledingstuk gedragen wordt. Je breit van boven naar beneden en het begin van de naald is midden achter.
21.09.2018 - 08:33Martina wrote:
Hallo, dieser Pullover gefällt mir sehr gut. Wird er mit Coton Merino auch so schön?
19.09.2018 - 18:47DROPS Design answered:
Liebe Martina, da die beide Garne unterschiedlichen Strukturen haben, wird der Pullover auch untershiedlich aussehen - hier lesen Sie mehr über Garnalternativen. Viel Spaß beim stricken!
20.09.2018 - 09:16
![]() Mathilda K wrote:
Mathilda K wrote:
Fijn dat het patroon online is! Is het ook mogelijk om de trui zonder rondbreinaald (ikzelf ben er geen echte liefhebber van om ermee te breien) te breien?
07.08.2018 - 13:16DROPS Design answered:
Dag Mathilde, Omdat het patroon aan een stuk wordt gebreid en je erg veel steken op de naald hebt als je met de pas bezig bent, is het niet mogelijk om met rechte (sokken)breinaalden te breien.
08.08.2018 - 08:33
![]() Ewa wrote:
Ewa wrote:
Hallo, kann man den Pullover auch ohne Löcher stricken oder sind sie wichtig für die Weite? Ich glaube für mich fände ich es ohne Löcher an den Zunahmen schöner - also doch verschränkte Maschen in dem Fall? Danke für die Antwort und viele Grüße!!! Ewa
04.08.2018 - 00:40DROPS Design answered:
Liebe Ewa, wenn Sie keine Löcher bein den Zunahmen (Raglan) möchten, können Sie die Umschläge verschränkt bei der nächsten Runde stricken. Viel Spaß beim stricken!
06.08.2018 - 08:45Tatjana wrote:
This is so beautiful, simple but elegant, I love it
31.07.2018 - 12:22
![]() Mathilda K wrote:
Mathilda K wrote:
Mooie trui en hoop het patroon binnenkort te mogen aantreffen op de site.
16.07.2018 - 10:24
![]() Kristina wrote:
Kristina wrote:
Vacker! En klar favorit
08.07.2018 - 14:02
![]() Aurore_SorelunaAtelier wrote:
Aurore_SorelunaAtelier wrote:
Un pull plein de personnalité : mon top one !
19.06.2018 - 14:33
![]() Natacha wrote:
Natacha wrote:
Je n'ai pas encore tricoté la sky,se sera une très jolie occasion de la tester !
14.06.2018 - 10:33
|
||||||||||
Malmö#malmosweater |
||||||||||
 |
 |
|||||||||
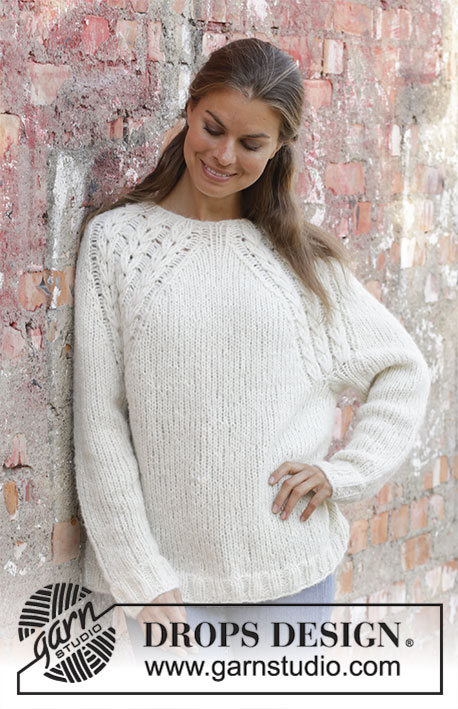
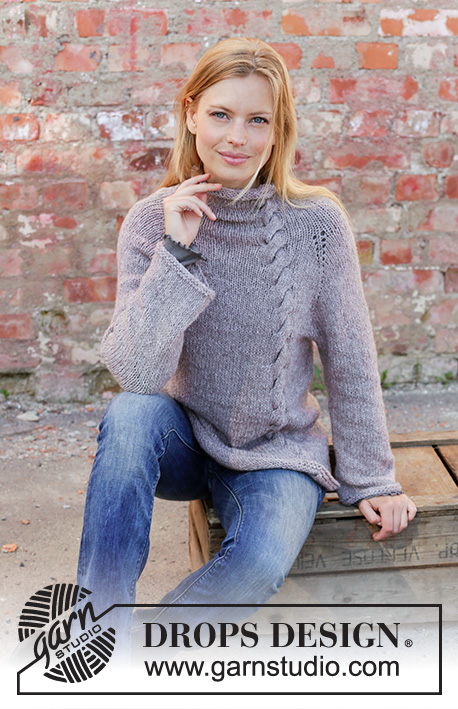
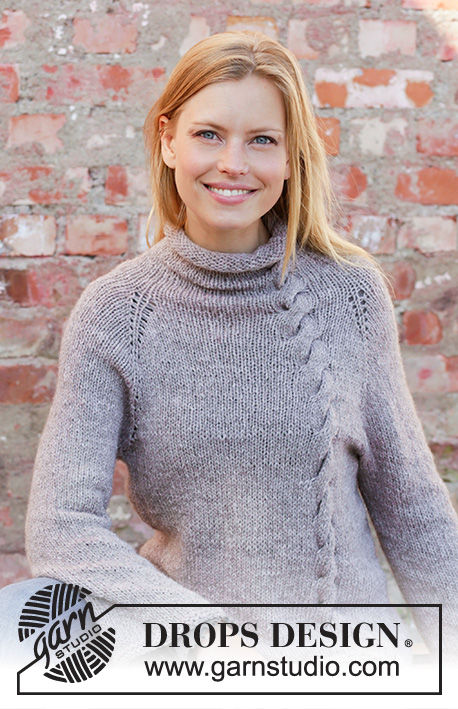
Knitted jumper with raglan in DROPS Sky. The piece is worked top down with cable, high neck and rolled edge. Sizes S - XXXL.
DROPS 194-8 |
||||||||||
|
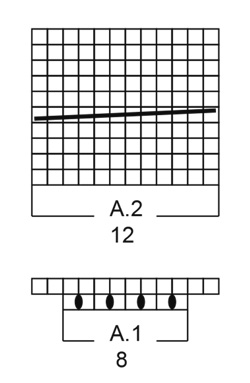
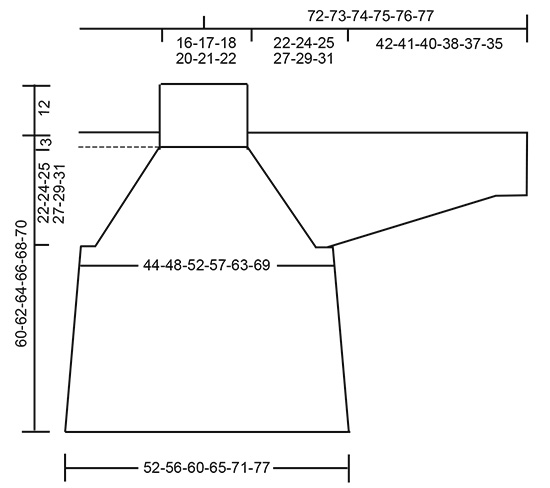
EXPLANATIONS FOR THE PATTERN: ------------------------------------------------------- RIDGE/GARTER STITCH (worked in the round): 1 ridge = 2 rounds. Knit 1 round and purl 1 round. PATTERN: See diagrams A.1 and A.2. CABLE: The next time you work the cable (i.e. on round 5 in A.2), it is displaced by 1 stitch to the left as follows: Work as before as far as A.2, knit 1, place the next 6 stitches on cable needle behind the piece, knit 6, knit 6 from the cable needle. Displace the cable like this (i.e. 1 stitch to the left) each time you work it until the piece measures 22-24-25-27-29-31 cm from the marker thread (i.e. to end of yoke). INCREASE TIP-1 (for raglan): Work until there is 1 stitch left before the marker, make 1 yarn over (= 1 stitch increased), knit 1, 1 yarn over (= 1 stitch increased). Increase like this by each of the 4 marker threads (= a total of 8 stitches increased). The yarn overs are not worked twisted on the next round so you will have holes! INCREASE TIP-2 (for sides of body): Work until there are 2 stitches left before the marker thread, 1 yarn over, knit 4 (the marker thread sits in the middle of these 4 stitches) 1 yarn over (= a total of 4 stitches increased on the round as there are 2 marker threads). On the next round knit the yarn overs twisted to avoid holes. Then knit the new stitches. DECREASE TIP (for sleeves): Decrease 1 stitch on each side of the marker thread as follows: Work until there are 3 stitches left before the marker thread, knit 2 together, knit 2 (the marker thread sits in the middle of these 2 stitches), slip 1 stitch as if to knit, knit 1, pass the slipped stitch over the knitted stitch. ------------------------------------------------------- START THE PIECE HERE: ------------------------------------------------------- JUMPER - SHORT OVERVIEW OF THE PIECE: The piece is worked in the round with circular needle, top down. First you work a high neck, then the yoke. The yoke is divided for body and sleeves. The body is worked in the round with circular needle and the sleeves in the round with double pointed needles HIGH NECK: Cast on 84-88-92-96-104-112 stitches with circular needle size 5 mm and Sky. Work stocking stitch for 3 cm (= rolled edge). Then work rib (= knit 1 / purl 1) over all stitches. Work a total of 3 rounds of rib. Then continue as follows (the round starts mid back): Knit 44-47-50-53-59-65 stitches, A.1 (= 8 stitches) and finish with knit 32-33-34-35-37-39 stitches. When A.1 has been worked 1 time in height there are 88-92-96-100-108-116 stitches on the needle. Work A.2 (= 12 stitches) over A.1. REMEMBER THE KNITTING TENSION! When the piece measures 12 cm, insert 1 marker thread in the piece; THE PIECE IS NOW MEASURED FROM HERE! YOKE: On the next round insert 4 markers for raglan as follows: Knit 15-16-17-18-20-22 stitches (= half back piece), insert 1 marker, knit 12 stitches (= right sleeve), insert 1 marker, knit 17-19-21-23-27-31 stitches, A.2 as before (= 12 stitches), knit 5 stitches (= front piece), insert 1 marker, knit 12 stitches (= left sleeve), insert 1 marker and finish with knit 15-16-17-18-20-22 stitches (= half back piece). Now increase to raglan and displace the cable in A.2 by 1 stitch to the left each time it is worked – read CABLE. On the next round increase 1 stitch on each side of each marker – read INCREASE TIP-1! Increase like this every 2nd round a total of 23-26-28-31-33-36 times = 272-300-320-348-372-404 stitches. Continue working knit and A.2 as before until the piece measures 22-24-25-27-29-31 cm from the marker thread. Now divide the piece for body and sleeves as follows: Knit 38-42-44-49-54-60 stitches (= half back piece), place the next 58-64-70-74-76-80 stitches on a thread for sleeve, cast on 8-8-10-10-12-12 stitches under the sleeve, knit and work A.2 over the next 80-88-92-102-112-124 stitches as before (= front piece), place the next 58-64-70-74-76-80 stitches on a thread for sleeve, cast on 8-8-10-10-12-12 stitches under the sleeve and finish with knit 38-42-44-49-54-60 stitches (= half back piece) = 172-188-200-220-244-268 stitches. BODY: Insert 1 marker thread in the middle of the 8-8-10-10-12-12 stitches under each sleeve. Continue in the round with knit and A.2 (A.2 is now worked over the same stitches to finished length, i.e. displacing is now finished). When the piece measures 3 cm from where the body was divided from the sleeves, increase 1 stitch on each side of each marker thread – read INCREASE TIP-2! Increase like this every 4th row a total of 7-7-8-8-7-7 times = 200-216-232-252-272-296 stitches. Continue with knit until the piece measures 34-34-35-35-35-35 cm from where the body was divided from the sleeves. Change to circular needle size 4 mm. Work 2 RIDGES – read description above. Cast off with knit. The piece measures approx. 60-62-64-66-68-70 cm from the shoulder down. SLEEVE: Place the 58-64-70-74-76-80 stitches from the thread on the one side of the piece on double pointed needles size 5 mm and knit up 1 stitch in each of the 8-8-10-10-12-12 stitches cast on under the sleeve = 66-72-80-84-88-92 stitches. Insert 1 marker thread in the middle of the 8-8-10-10-12-12 stitches under the sleeve. Knit. When the piece measures 3 cm from where the sleeve was divided from the body, decrease 1 stitch on each side of the marker thread – read DECREASE TIP! Decrease like this every 6-3½-2½-2-2-1½ cm a total of 6-9-12-13-14-16 times = 54-54-56-58-60-60 stitches. When the piece measures 41-40-39-37-36-34 cm from where the sleeve was divided from the body, change to double pointed needles size 4 mm and work 2 ridges. Cast off with knit. The sleeve measures approx. 64-65-65-65-66-67 cm from the cast-on edge. Work the other sleeve in the same way. |
||||||||||
Diagram explanations |
||||||||||
|
||||||||||
 |
||||||||||
 |
||||||||||
Have you finished this pattern?Tag your pictures with #dropspattern #malmosweater or submit them to the #dropsfan gallery. Do you need help with this pattern?You'll find 29 tutorial videos, a Comments/Questions area and more by visiting the pattern on garnstudio.com. © 1982-2026 DROPS Design A/S. We reserve all rights. This document, including all its sub-sections, has copyrights. Read more about what you can do with our patterns at the bottom of each pattern on our site. |
||||||||||


With over 40 years in knitting and crochet design, DROPS Design offers one of the most extensive collections of free patterns on the internet - translated to 17 languages. As of today we count 324 catalogues and 12290 patterns translated into English (UK/cm).
We work hard to bring you the best knitting and crochet have to offer, inspiration and advice as well as great quality yarns at incredible prices! Would you like to use our patterns for other than personal use? You can read what you are allowed to do in the Copyright text at the bottom of all our patterns. Happy crafting!
Post a comment to pattern DROPS 194-8
We would love to hear what you have to say about this pattern!
If you want to leave a question, please make sure you select the correct category in the form below, to speed up the answering process. Required fields are marked *.