
Popular categories
Looking for a yarn?


Comments / Questions (17)
![]() Ariela Heller wrote:
Ariela Heller wrote:
Hi there, I would like to thank you for this great pattern of Ellie Woof the dog, I had so fun knitting it! I have a small comment, it’s written in a hard way to read and follow, so maybe it will be helpful to think how to light it up a bit, any way, I’ll sand a picture of the outcome, and thank you again, Ariela Heller
17.04.2026 - 12:09
![]() Ema Mardones wrote:
Ema Mardones wrote:
Me gustaría q compartieras más animalitos te jidos con dos agujas
09.11.2025 - 00:03
![]() Mary wrote:
Mary wrote:
What does "forget-me-not" mean at the beginning of muzzle and head instructions? Thank you.
15.06.2025 - 16:14DROPS Design answered:
Dear Mary, "forget-me-not" is the name of the main colour of DROPS Big Merino used in this pattern, as stated in the Materials section above. Happy knitting!
15.06.2025 - 19:32
![]() Valerie R Evans wrote:
Valerie R Evans wrote:
Umm. Yeah. Who asked you to make \"custom patterns\". I wanted to know if you do or will have loom knit patterns? Why would you think I wanted you to make ME a CUSTOM pattern? Wow, just WOW.
28.07.2024 - 17:58
![]() Valerie R Evans wrote:
Valerie R Evans wrote:
Could you please have LOOM KNIT patterns available for those who are Loom Knitters? Some (knit) patterns are easy to convert, especially those patterns knit in the round. Thank you
28.07.2024 - 15:10DROPS Design answered:
Dear Valerie, we don't make custom patterns, but you can try to convert them to loom knitting if you prefer to work them that way. Happy knitting!
28.07.2024 - 17:53
![]() Dorota wrote:
Dorota wrote:
Super przepisy i poradniki Pozdrawiam
26.08.2022 - 10:03
![]() Soledad wrote:
Soledad wrote:
Muchas gracias por compartir su s patrones
05.02.2022 - 02:41
![]() Sylvia Lipnick wrote:
Sylvia Lipnick wrote:
I don't see how to purl the yarn-overs twisted, as the pattern calls for. I've tried it several ways, and each way there are huge holes!
07.11.2021 - 22:26DROPS Design answered:
Hi Sylvia, To purl a yarn over twisted you purl in the back of the loop (the same applies to knitting twisted). Happy knitting!
08.11.2021 - 07:20
![]() June Schrader wrote:
June Schrader wrote:
I would love to download this pattern (Allie Woof) plus other animal patterns as I am 80years old and do knitting for as many underpriveliged children as possible Can you help Thankimg you JUNE
05.07.2021 - 17:57DROPS Design answered:
Dear June, to download the pattern, click on the "print this pattern" button, then "go to pattern" and then save as PDF. Happy Stitching!
05.07.2021 - 21:42
![]() Sue Burt wrote:
Sue Burt wrote:
I am trying to purchase several patterns from your website , which i have saved to favs.. I go to Purple sheep yarn site and I am transfered back to our website but can find nowhere to purchase the patterns which are available as Don loads. Please advise, Thank you Sue
26.04.2021 - 13:24DROPS Design answered:
Dear Mrs Burt, our patterns are free and can only be printed - by choosing a virtual printer, you will also be able to save them as a .pdf file. Happy knitting!
26.04.2021 - 14:44
|
|||||||
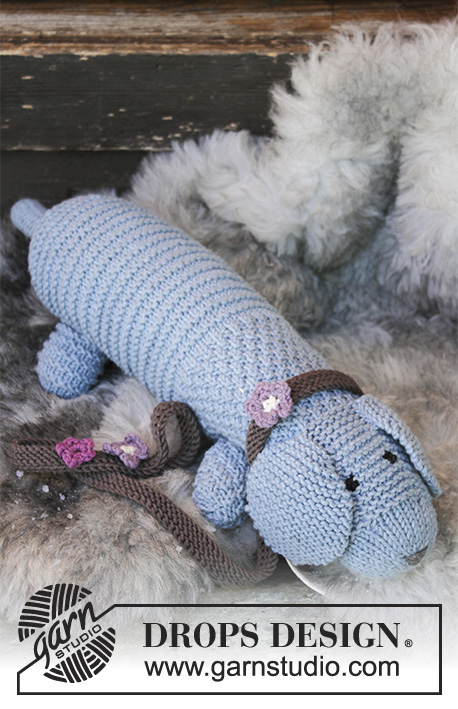
Allie Woof the Dog#dropsalliewoofthedog |
|||||||
 |
 |
||||||
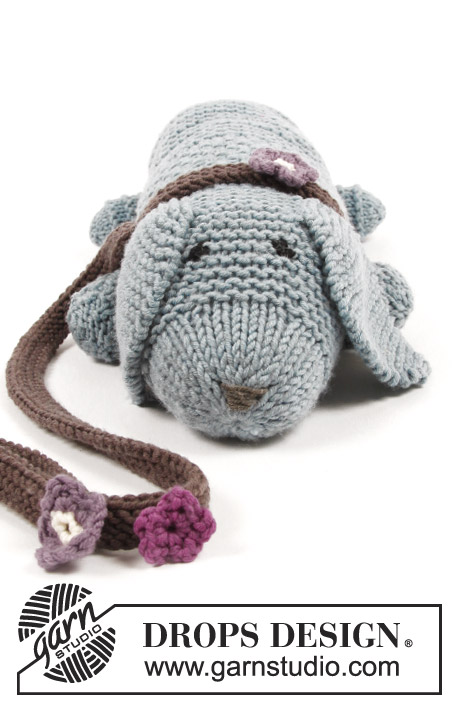
Knitted toy dog in garter stitch and moss stitch, with collar. The piece is worked in DROPS Big Merino.
DROPS Children 30-24 |
|||||||
|
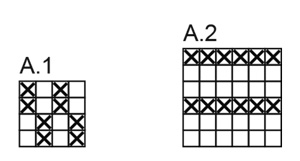
INFORMATION FOR THE PATTERN: RIDGE/GARTER STITCH (worked back and forth): 1 ridge = Knit 2 rows. INCREASE TIP: Increase 1 stitch by making 1 yarn over. On the next row work the yarn over twisted to prevent hole. PATTERN: See diagrams A.1 and A.2. The diagrams show all the rows in the pattern seen from the right side. DECREASE TIP: Start 2 stitches before the marker thread and knit 2 together (= 1 stitch decreased). ---------------------------------------------------------- DOG: All parts are worked back and forth on needle and sewn together to finish. MUZZLE AND HEAD: Cast on 8 stitches with needle size 4.5 mm and forget-me-not and work as follows: ROW 1 (= right side): * Knit 1, 1 yarn over *, work from *-* a total of 7 times and finish with knit 1 = 15 stitches. ROW 2 (= wrong side): Knit 1, purl 13 (yarn overs purled twisted to prevent holes), knit 1. ROW 3 (= right side): * Knit 1, 1 yarn over *, work from *-* a total of 14 times and finish with knit 1 = 29 stitches. ROW 4 (= wrong side): Knit 1, purl 27 (yarn overs purled twisted to prevent holes), knit 1. ROW 5 (= right side): Knit 1, * 1 yarn over, knit 2 *, work from *-* a total of 13 times, 1 yarn over, knit 1, 1 yarn over, knit 1 = 44 stitches. Continue by working stocking stitch with 1 edge stitch in GARTER STITCH – see description above, in each side until the muzzle measures approx. 4 cm from the cast-on edge. Insert 2 markers in the piece, without working the stitches, as follows: The first marker is inserted after the first 19 stitches on the row, 2nd marker inserted after the next 6 stitches on the row (after the last marker, there are 19 stitches on the row). Continue working in garter stitch. AT THE SAME TIME on the first row from the right side increase 1 stitch before the first marker and 1 stitch after the 2nd marker – read INCREASE TIP (= 2 stitches increased). Repeat the increases on the next row from the right side = 48 stitches on the row. Continue with garter stitch until the head measures 11 cm from the cast-on edge. On the next row from the right side decrease 8 stitches evenly on row (knit every 5th and 6th stitch together) = 40 stitches. Knit 5 rows (the last row is from the wrong side). Continue by working the body as described below (without cutting the strand). BODY: Knit 1 row from the right side where you increase 12 stitches evenly on row (increase 1 stitch after approx. every 3rd stitch) = 52 stitches. Purl 1 row from the wrong side with 1 edge stitch knitted in each side Continue by working A.1 back and forth with 1 edge stitch in garter stitch in each side. When A.1 measures 9 cm (the whole piece measures approx. 22 cm), work A.2 back and forth with 1 edge stitch in garter stitch in each side. When A.2 measures 15 cm (the whole piece measures approx. 37 cm), insert 6 marker threads as follows from the right side (do this without working the stitches): First marker thread inserted after the first 10 stitches on the row, then insert the next 5 marker threads with 8 stitches between each (after the last marker thread there are 2 stitches left on the row). Continue A.2. AT THE SAME TIME on the first row from the right side decrease 1 stitch before each marker thread – read DECREASE TIP (= 6 stitches decreased). Decrease in this way every 2nd row (i.e. every row from the right side) a total of 5 times = 22 stitches. On the next row from the right side knit all stitches together, 2 and 2 = 11 stitches left on needle. The dog measures approx. 41 cm from the cast-on edge. Continue by working tail as described below (without cutting the strand). TAIL: Work garter stitch back and forth over the 11 stitches until the tail measures approx. 8 cm. Now decrease 1 stitch at the end of every row by knitting the last 2 stitches together until there are 4 stitches left on the needle (the tail measures approx. 11 cm). Cut the strand, pull it through the stitches, tighten and fasten well. The whole dog measures approx. 52 cm including the tail. EAR: Cast on 7 stitches with needle size 4.5 mm and forget-me-not and work garter stitch. AT THE SAME TIME after 1 ridge increase 1 stitch in each side on the inside of the 1 edge stitch in each side – read INCREASE TIP (= 2 stitches increased). Increase in this way every 2nd row (i.e. every row from the right side) a total of 4 times = 15 stitches. Continue with garter stitch until the ear measures 6 cm. Now decrease 1 stitch at the beginning of the row and 1 stitch at the end of the row by knitting the 2 first and 2 last stitches on the row together (= 2 stitches decreased). Repeat the decreases when you have worked 3 rows. Then decrease in the same way every 2nd row (i.e. every row from the right side) a total of 2 times = 7 stitches left on needle. Cast off. Cut the strand long enough to be able to use it to sew on the ear. Work the other ear in the same way. LEG: Cast on 12 stitches with needle size 4.5 mm and forget-me-not. ROW 1 (= right side): Knit 1, * 1 yarn over, knit 2 *, work from *-* a total of 5 times, 1 yarn over, knit 1 = 18 stitches. ROW 2 (= wrong side): Knit 1, purl 16 (yarn overs purled twisted to prevent holes), knit 1. Continue by working A.1 back and forth with 1 edge stitch in garter stitch in each side. Cast off when the leg measures approx. 6 cm. Cut the strand long enough to be able to use it to sew on the leg. Tack a strand up and down through the stitches along the cast-on edge at the bottom of the leg, tighten the strand so that the opening is closed and fasten the strand well. Work one more leg in the same way. Then work 2 more legs in the same way but working A.2 instead of A.1 (= a total of 4 legs, 2 with A.1 and 2 with A.2). ASSEMBLY: Sew the dog together all the way from the tip of the muzzle, along the body to the end of the tail - sew in the outermost loop of the outermost stitch so that the seam is flat, but leave an opening in the middle underneath to be able to fill with padding. Fill the dog with padding and sew the opening shut. Embroider 2 eyes with black in the middle of the head and a nose with mocca at the tip of the muzzle – see photo. Sew on the ears on each side of the head (there should be approx. 5 cm between the ears on top of the head). Fill each leg with padding and sew the legs onto the underneath of the body – see photo for positions. COLLAR AND LEASH: NOTE: Due to the length of the leash, it should only be made for children over the age of 3 years: Cast on 160 stitches with needle size 4.5 mm and mocca. Work 3 ridges and cast off with knit over knit and purl over purl. To avoid the cast-off edge being tight, you can make 1 yarn over after every 8th stitch at the same time as you cast off (yarn overs cast off as normal stitches). Fold the one end double so that you make a small loop (large enough for the hand which will hold the leash) and fasten down with small stitches. Lay the other end around the neck of the dog and fasten with a couple of small stitches to make the collar. SMALL CROCHET FLOWER: Work 4 chain stitches with hook size 4 mm and plum and form them into a ring with 1 slip stitch in the first chain stitch worked. ROUND 1: * Work 3 chain stitches, 1 double crochet around the ring *, work from *-* a total of 4 times, work 3 chain stitches and finish with 1 slip stitch around the ring = 5 petals. Cut the strand and pull it through the stitch on the hook. Sew the flower onto the leash as decoration, by the hand loop. LARGE CROCHET FLOWER: Work 4 chain stitches with hook size 4 mm and off white and form them into a ring with 1 slip stitch in the first chain stitch worked. ROUND 1: Work 1 chain stitch, work 5 double crochets around the ring, change to amethyst and finish the round with 1 slip stitch in the first chain stitch worked at the beginning of the round. ROUND 2: Work with amethyst in each double crochet from the previous round as follows: 1 double crochet, 1 chain stitch, 1 treble crochet, 1 chain stitch and 1 double crochet, finish the round with 1 slip stitch in the first chain stitch worked at the beginning of the round = 5 petals. Cut the strand and pull it through the stitch on the hook. Sew the flower onto the leash as decoration by the hand loop. Work one more flower in the same way and fasten to the collar mid front of dog’s neck. |
|||||||
Diagram explanations |
|||||||
|
|||||||
 |
|||||||
Have you finished this pattern?Tag your pictures with #dropspattern #dropsalliewoofthedog or submit them to the #dropsfan gallery. Do you need help with this pattern?You'll find 27 tutorial videos, a Comments/Questions area and more by visiting the pattern on garnstudio.com. © 1982-2026 DROPS Design A/S. We reserve all rights. This document, including all its sub-sections, has copyrights. Read more about what you can do with our patterns at the bottom of each pattern on our site. |
|||||||


With over 40 years in knitting and crochet design, DROPS Design offers one of the most extensive collections of free patterns on the internet - translated to 17 languages. As of today we count 324 catalogues and 12290 patterns translated into English (UK/cm).
We work hard to bring you the best knitting and crochet have to offer, inspiration and advice as well as great quality yarns at incredible prices! Would you like to use our patterns for other than personal use? You can read what you are allowed to do in the Copyright text at the bottom of all our patterns. Happy crafting!
Post a comment to pattern DROPS Children 30-24
We would love to hear what you have to say about this pattern!
If you want to leave a question, please make sure you select the correct category in the form below, to speed up the answering process. Required fields are marked *.