
Popular categories
Looking for a yarn?


Comments / Questions (24)
![]() Patricia wrote:
Patricia wrote:
J'aime ce modèle seulement en France on utilise peu les aiguilles circulaires c'est dommage la plupart de vos modèles sont faits avec des aiguilles circulaires...
22.02.2021 - 18:15DROPS Design answered:
Bonjour Patricia, la plupart de nos modèles tricotés sur aiguille circulaire sont facilement adaptables sur aiguilles droites - cette leçon vous en dira plus. Pour les autres modèles, n'hésitez pas à essayer les aiguilles circulaires, beaucoup les ont finalement adoptées après avoir osé essayer. Bon tricot!
23.02.2021 - 09:22
![]() Monica wrote:
Monica wrote:
Är det verkligen meningen att man ska växla mellan stickor nr 3 och 4 när man stickar kanten? Med vänlig hälsning, Monica
17.02.2021 - 17:33DROPS Design answered:
Hej Monica, du starter med pind nr 3 og skifter til nr 4 efter de 4 pinde retstrik. God fornøjelse!
18.02.2021 - 08:40
![]() Kaddy wrote:
Kaddy wrote:
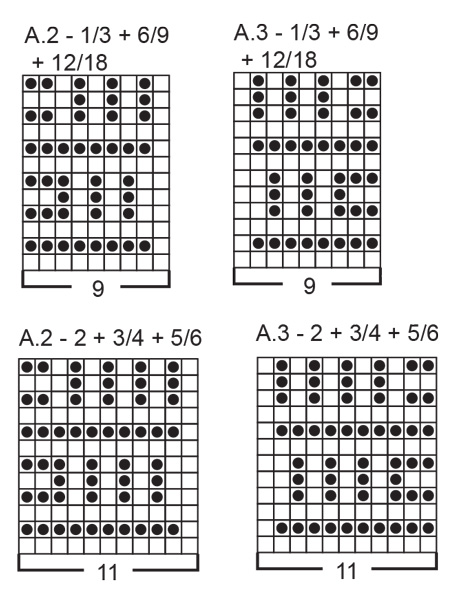
Da ist ein Fehler im Schema A2 für 2jährige. Fünfte Reihe von unten. Hat mich sehr verwirrt. There is an error in pattern A2 for 2years old. Fifth line from the bottom. Very confusing.
01.07.2020 - 13:13
![]() Judy wrote:
Judy wrote:
Thanks for the quick reply. But... 110cm? For a child? That's an adult M/L. If you look at the schematic 35x 2=70. That's reasonable. Now to start! 😛
26.01.2020 - 21:59DROPS Design answered:
Dear Judy, 110 cm is the height of the child. The measurements in Kids' patterns are based on the height of the children (up to 170 cm). For example, 110 is for 5 years and 140 for 10 years old. Happy knitting!
26.01.2020 - 22:54
![]() Judy wrote:
Judy wrote:
The measurements given in sizing don't seem right. 110 for a size 5? Could you confirm please? Sizes in cm: 56/62 - 68/74 - 80/86 (92 - 98/104 - 110/116)
25.01.2020 - 20:58DROPS Design answered:
Dear Judy. the measurements are correct, 110 cm is for size 5. The size name may vary depending on the country; to pick the right size you should compare the measurements of the person to the measurements below the pattern in the diagram.
26.01.2020 - 20:36
![]() Eileen Popplewell wrote:
Eileen Popplewell wrote:
In the english version of the pattern, directions say to bind off middle 13 stitches when piece measures 12.25 inches. Continue to bind off 1 stitch at neck edge every row until pie measures 12 inches. How can I continue to knit binding off and stop shorter than the original middle bind off? Please help.
02.10.2019 - 21:18DROPS Design answered:
Dear Mrs Popplewell, when piece measures 12.20" (= 31 cm) you bind off the middle 13 stitches = 20 sts remain for each shoulder, work each shoulder separately binding off 1 stitch towards neck = 19 sts remain and continue over these 19 sts until piece measures 12.99 " (= 33 cm) US-measurement will be here eidted. Happy knitting!
03.10.2019 - 09:16
![]() Nanou57 wrote:
Nanou57 wrote:
Merci de votre réponse - je n'avais pas pensé à me servir du traducteur…. je le ferai !
18.02.2019 - 20:14
![]() Nanou57 wrote:
Nanou57 wrote:
Bonsoir, quel dommage que les commentaires ne soient pas traduits en Français également ! ils paraissent forts intéressants et je ne comprends pas…. serait-il possible qu'ils y soient un jour ? merci de votre réponse et belle soirée !
16.02.2019 - 21:09DROPS Design answered:
Bonjour Nanou57, vous pouvez volontiers utiliser un traducteur en ligne, même si les traductions paraissent parfois fantaisistes, on arrive ainsi à saisir le sens de la question/réponse. Si vous avez vous même une question, n'hésitez pas à utiliser cet espace pour la poser. Bon tricot!
18.02.2019 - 09:49
![]() Jeanine Stevens wrote:
Jeanine Stevens wrote:
Waar kan ik de correcties vinden? Al ik op de rode letters klik gebeurt er niets
18.02.2018 - 12:40DROPS Design answered:
Hoi Jeanine, Misschien is het nodig om even je browser te verversen met F5 (of de cache te legen met Ctrl + F5) Dit zijn de correcties: Correcties op zowel voor- als achterpand. Gewijzigd online: 31.10.2017 De correcties zijn reeds doorgevoerd op de online versie van het patroon.
18.02.2018 - 13:54
![]() Linda wrote:
Linda wrote:
Voor dit patroon (maat 2 jaar) heb ik minder dan 4 bollen gebruikt. Niet de aanbevolen 5.
23.01.2018 - 13:20
|
|||||||
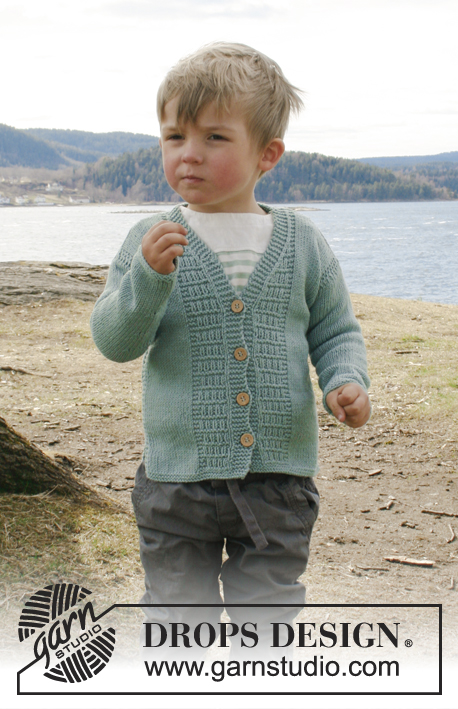
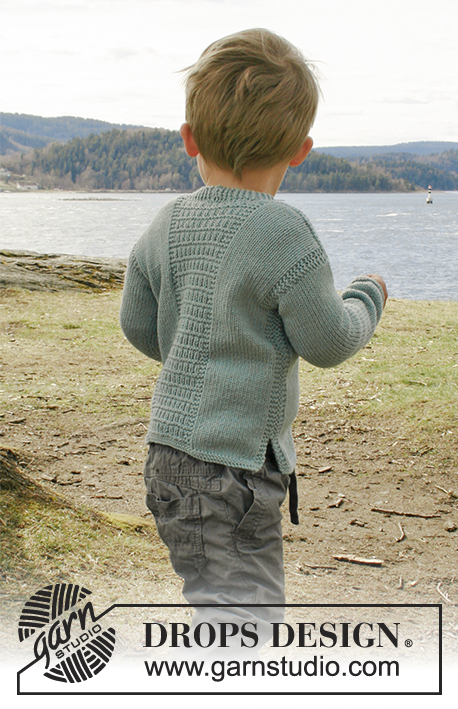
Adrien#adriencardigan |
|||||||
 |
 |
||||||
Knitted cardigan with structured pattern, v-neck and split in the sides in DROPS Cotton Merino. For baby and children in sizes 0 - 6 years.
DROPS Children 28-4 |
|||||||
|
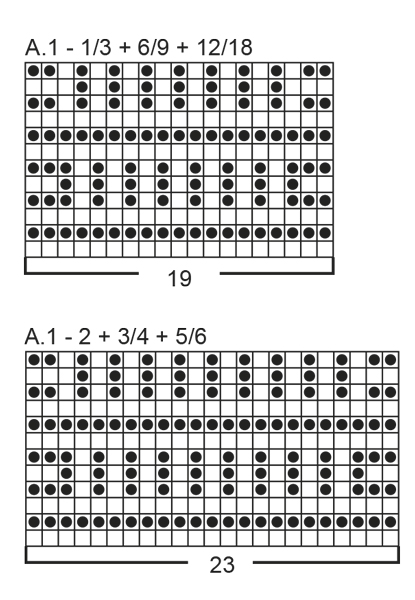
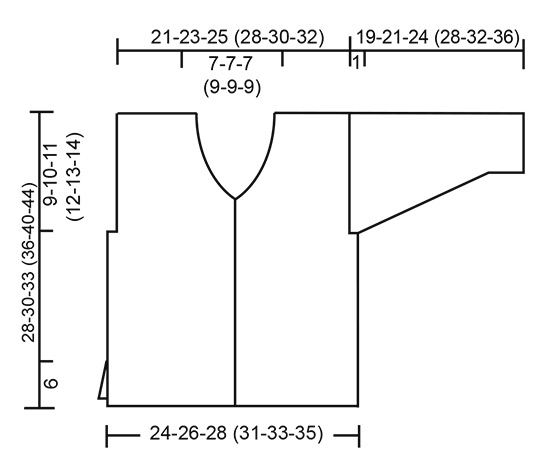
RIDGE/GARTER STITCH (worked back and forth): 1 ridge = Knit 2 rows. RIDGE/GARTER STITCH (worked in the round): 1 ridge = 2 rounds. Knit 1 round and purl 1 round. PATTERN: See diagrams A.1 to A.3 – choose the right diagram for your size. The diagrams show all the rows in the pattern seen from the right side. INCREASE TIP (for mid under the sleeve): Start 1 stitch before the marker thread, make 1 yarn over, knit 2 (the marker thread sits between these 2 stitches), make 1 yarn over (= 2 stitches increased). On the next round knit the yarn overs twisted to prevent holes. BUTTONHOLES: Decrease for the buttonholes on the right band (when the garment is worn). 1 buttonhole = start from the right side, knit 1, knit 2 together and make 1 yarn over. On the next row knit the yarn overs so that there are holes. Decrease for the buttonholes when the piece measures: 1/3 months: 4, 9, 14 and 19 cm. 6/9 months: 5, 10, 15 and 20 cm. 12/18 months: 5, 11, 17 and 23 cm. 2 years: 5, 10, 15, 20 and 25 cm. 3/4 years: 5, 11, 17, 23 and 29 cm. 5/6 years: 5, 12, 19, 26 and 33 cm. DECREASE TIP (for the neckline): Decrease for the v-neck on the inside of the 5 band stitches in garter stitch towards mid front. All decreases are worked from the right side! Decrease as follows after the 5 band stitches: Slip 1 stitch as if to knit, knit 1, pass the slipped stitch over the knitted stitch (= 1 stitch decreased). Decrease as follows before the 5 band stitches: Work until there are 7 stitches left on the needle, knit 2 together and work the 5 band stitches in garter stitches (= 1 stitch decreased). ---------------------------------------------------------- JACKET: Front and back pieces are worked back and forth with circular needle in separate sections. The sleeves are worked in the round with double pointed needles. BACK PIECE: Cast on 51-55-59 (65-69-73) stitches with circular needle size 3 mm and Cotton Merino. Work 2 RIDGES back and forth – see description above. Change to circular needle size 4 mm and work the next row as follows from the right side: 3 edge stitches in garter stitch, 13-15-17 (18-20-22) stitches stocking stitch, A.1 (= 19-19-19 (23-23-23) stitches), 13-15-17 (18-20-22) stitches stocking stitch and 3 edge stitches in garter stitch. Continue the pattern in this way. REMEMBER THE KNITTING TENSION! When the piece measures 18-19-21 (23-26-29) cm work 2 ridges over the outermost 6 stitches in each side (the other stitches are worked as before). When you have worked 2 ridges in each side, cast off 3 stitches at the beginning of the next 2 rows for the armholes = 45-49-53 (59-63-67) stitches on the needle. The next row is worked as follows from the right side: 3 edge stitches in garter stitch towards the armhole, 10-12-14 (15-17-19) stitches stocking stitch, continue with A.1 over the next 19-19-19 (23-23-23) stitches, 10-12-14 (15-17-19) stitches stocking stitch and 3 edge stitches in garter stitch towards the armhole. Continue the pattern in this way. When the piece measures 26-28-31 (34-38-42) cm cast off the middle 13-13-13 (17-17-17) stitches for the neck and each shoulder is finished separately. Continue by casting off 1 stitch on the next row from the neck = 15-17-19 (20-22-24) stitches left on the shoulder. Continue working until there is 1 row left before the piece measures 28-30-33 (36-40-44) cm – adjust so that the next row is worked from the wrong side. Knit 1 row from the wrong side and loosely cast off in knit from the right side! Work the other shoulder in the same way. RIGHT FRONT PIECE: Cast on 30-32-34 (37-39-41) stitches with circular needle size 3 mm (including 5 band stitches towards mid front). Work 2 ridges. Change to circular needle size 4 mm and work the next row as follows from the right side: 5 band stitches in garter stitch, A.2 (= 9-9-9 (11-11-11) stitches), 13-15-17 (18-20-22) stitches stocking stitch and 3 edge stitches in garter stitch towards the side. Continue the pattern in this way – remember BUTTONHOLES on the band – see description above. When the piece measures 18-19-21 (23-26-29) cm, work 2 ridges over the outermost 6 stitches towards the side (the other stitches are worked as before). When you have worked 2 ridges in the side cast off 3 stitches at the beginning of the next row from the side for the armhole = 27-29-31 (34-36-38) stitches. The next row is worked as follows from the right side: 5 band stitches in garter stitch, continue with A.2 over the next 9-9-9 (11-11-11) stitches, 10-12-14 (15-17-19) stitches stocking stitch and 3 edge stitches in garter stitch towards the armhole. Continue the pattern in this way. AT THE SAME TIME when you have worked 1 row from the wrong side after the last buttonhole (the piece measures approx. 20-21-24 (26-30-34) cm), knit the 5 band stitches, turn the piece, tighten the strand and knit back over the 5 band stitches (in other words, the other stitches on the needle are not worked). Then work as before across all the stitches again (this is done to insure that the band lies neatly around the neck). AT THE SAME TIME on the next row from the right side, begin decreasing for the v-neck. Decrease 1 stitch on the inside of the 5 band stitches in garter stitch – READ DECREASE TIP. Decrease in this way every 4th row (i.e. every other row from the right side) a total of 4 times in all sizes, then on every 2nd row (i.e. on every row from the right side) a total of 3-3-3 (5-5-5) times = 20-22-24 (25-27-29) stitches left on the shoulder. Continue working until there is 1 row left before the piece measures 28-30-33 (36-40-44) cm – adjust so that the next row is worked from the wrong side. Knit 1 row from the wrong side, turn the piece, knit the 5 band stitches and cast off the remaining 15-17-19 (20-22-24) stitches on the shoulder. Cut the strand. NECKLINE: Work garter stitch back and forth over the 5 band stitches for the neckline until the it measures approx. 5-5-5 (6-6-6) cm from the shoulder, cast off. LEFT FRONT PIECE: Work as for the right, but reversed. In other words, work A.3 instead of A.2 (do not decrease for buttonholes on the left band). On the first row from the wrong side when the piece measures 20-21-24 (26-30-34) cm) knit the 5 band stitches, turn the piece, tighten the strand and knit back over the 5 band stitches (i.e. the other stitches on the needle are not worked). Then work as before over all the stitches again (this is done to insure that the band will lie neatly around the neck). AT THE SAME TIME on the next row from the right side begin decreasing for the v-neck – READ DECREASE TIP. Continue working until there is one row left before finished length – adjust so that the next row is worked from the wrong side. Knit 1 row from the wrong side, turn the piece, cast off the first 15-17-19(20-22-24) stitches and knit the 5 band stitches. Continue working garter stitch back and forth over the 5 band stitches until the neckline measures 5-5-5 (6-6-6) cm from the shoulder, cast off. SLEEVE: Cast on 32-32-34 (36-38-38) stitches with double pointed needles size 3 mm. Work 2 RIDGES in the round – see description above. Change to double pointed needles size 4 mm and work stocking stitch. When the piece measures 4-4-5 (6-7-8) cm insert 1 marker thread at the beginning of the round (= mid under the sleeve). On the next round increase 2 stitches mid under the sleeve – READ INCREASE TIP. Increase in this way every 5½-3½-3 (3-3-3) cm a total of 3-5-6 (7-8-10) times = 38-42-46 (50-54-58) stitches. When the piece measures 18-20-23 (27-31-35) cm divide the piece mid under the sleeve. Insert 1 marker, work 3 rows stocking stitch back and forth over all the stitches and loosely cast off. ASSEMBLY: Sew the shoulder seams inside the cast-off edge. Sew together the neckline mid back - the seam turns in towards the wrong side. Sew the neckline to the neck edge at the back of the neck. Sew the side seams edge to edge in the outermost loop of the outermost stitch from the armhole and down, but stop when there is still approx. 6 cm at the bottom in each side (= split). Sew in the sleeves – the marker mid under the sleeve should fit to the side of the body. Sew the buttons on to the left band. |
|||||||
Diagram explanations |
|||||||
|
|||||||
 |
|||||||
 |
|||||||
 |
|||||||
Have you finished this pattern?Tag your pictures with #dropspattern #adriencardigan or submit them to the #dropsfan gallery. Do you need help with this pattern?You'll find 27 tutorial videos, a Comments/Questions area and more by visiting the pattern on garnstudio.com. © 1982-2026 DROPS Design A/S. We reserve all rights. This document, including all its sub-sections, has copyrights. Read more about what you can do with our patterns at the bottom of each pattern on our site. |
|||||||


With over 40 years in knitting and crochet design, DROPS Design offers one of the most extensive collections of free patterns on the internet - translated to 17 languages. As of today we count 324 catalogues and 12290 patterns translated into English (UK/cm).
We work hard to bring you the best knitting and crochet have to offer, inspiration and advice as well as great quality yarns at incredible prices! Would you like to use our patterns for other than personal use? You can read what you are allowed to do in the Copyright text at the bottom of all our patterns. Happy crafting!
Post a comment to pattern DROPS Children 28-4
We would love to hear what you have to say about this pattern!
If you want to leave a question, please make sure you select the correct category in the form below, to speed up the answering process. Required fields are marked *.