
Popular categories
Looking for a yarn?


Comments / Questions (27)
![]() Camilla wrote:
Camilla wrote:
Hej! På bilden ser det ut att vara stickat med mönster A.2 även i sidorna under armarna (fram/bakstycke), men om detta nämns inget i mönstret. Där nämns bara att man ska öka i sidorna. Och med A.2 mitt under i ärmarna. Hur är mönstret tänkt att vara? Hälsningar, Camilla
03.03.2017 - 07:43DROPS Design answered:
Hej Camilla. Det er ikke A.2 i siderne. Her tager du ud med omslag som der staar i ÖKNINGSTIPS - og du strikker omslagene saa der bliver hul = det er det du kan se paa billedet. Du strikker kun A.2 midt under aermet.
06.03.2017 - 14:55
![]() Judith Müller wrote:
Judith Müller wrote:
Hallo, nur zur Sicherheit: sind die beiden Muster A1 und A2 hier nur mit der Hinreihe dargestellt, so dass die Rückreihe noch dazu gedacht/gestrickt werden muss? Oder sind das jeweils Hin- und Rückreihen? Viele Grüße, Judith
09.02.2017 - 10:13DROPS Design answered:
Liebe Frau Müller, alle Reihen sind im Diagramme dargestellt, dh die Hin- sowie die Rückreihen. Hier können sie mehr lesen. Viel Spaß beim stricken!
09.02.2017 - 12:06
![]() Hege E wrote:
Hege E wrote:
Denne jakken er så skjønn! Gleder meg vilt til å strikke den :-)
05.02.2017 - 19:57
![]() Dorothy Storm wrote:
Dorothy Storm wrote:
Hvad betyder de sorte prikker i A1?
02.02.2017 - 22:33DROPS Design answered:
Hej Dorothy. = vrang fra retsiden, ret fra vrangen. Se symbolforklaring nederst.
06.02.2017 - 13:56
![]() Joan wrote:
Joan wrote:
Can you publish a crochet version of this lovely cardigan?
18.01.2017 - 17:36
![]() Fran Cosgrove wrote:
Fran Cosgrove wrote:
I am from Australia. I love DROPS designs. This is lovely it looks like the eyelets decorate the back. Love it!
11.01.2017 - 22:16
![]() Hege Engevold wrote:
Hege Engevold wrote:
Denne er jo klassisk og anvendelig i tillegg til at den også er kjempesøt!
14.12.2016 - 20:50
|
||||||||||||||||
Vanilla Cream#vanillacreamcardigan |
||||||||||||||||
 |
 |
|||||||||||||||
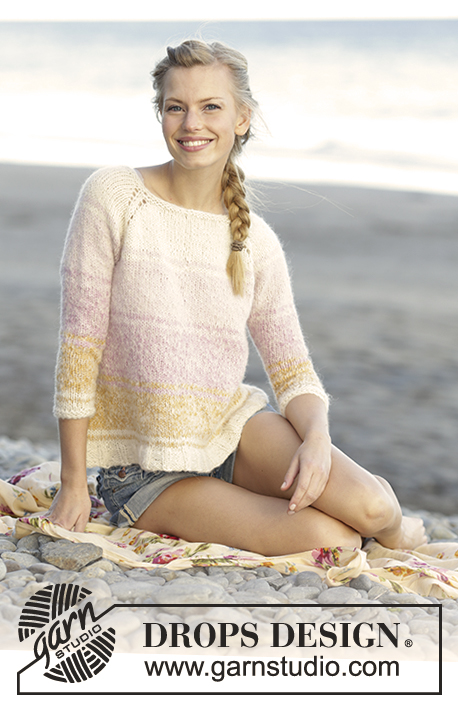
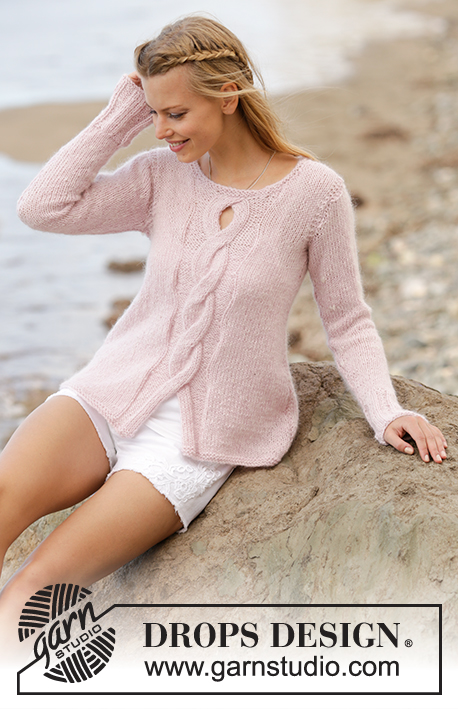
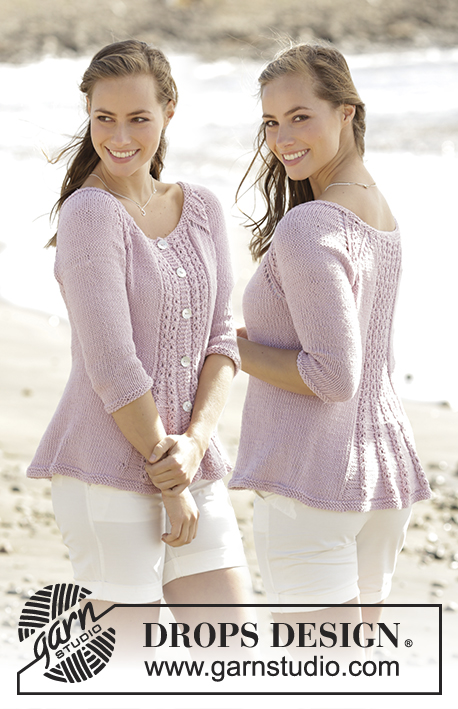
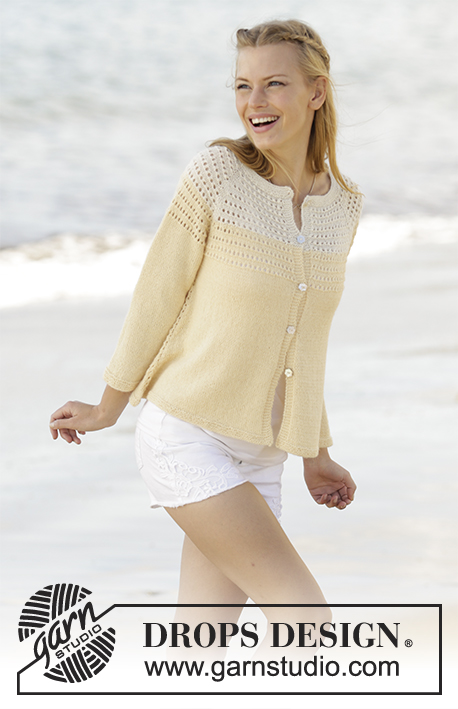
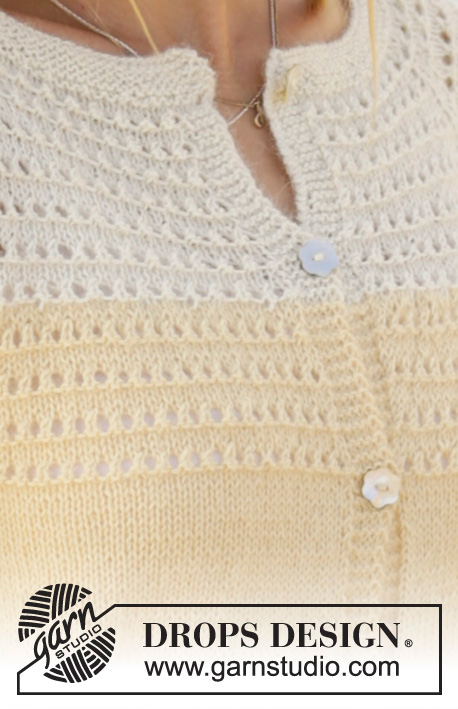
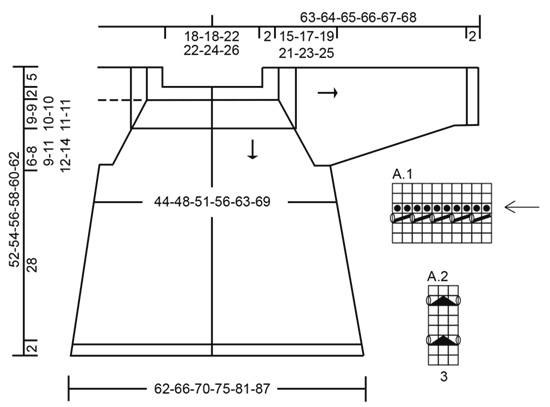
Jacket with lace pattern on the yoke, raglan, ¾-length sleeves and A-shape, worked top down in DROPS Alpaca. Sizes S - XXXL.
DROPS 176-7 |
||||||||||||||||
|
RIDGE/GARTER STITCH (worked back and forth): 1 ridge = Knit 2 rows. RIDGE/GARTER STITCH (worked in the round): 1 ridge = 2 rounds. Knit 1 round and purl 1 round. INCREASE/DECREASE TIP (for the neckline): To work out how to increase/decrease evenly count the total number of stitches on the needle (e.g. 124 stitches), minus the bands (e.g. 10 stitches) and divide the remaining stitches with the number of increases/decreases to be made (e.g. 10) = 11.4. In this example, increase after alternately every approx. 11th and 12th stitch. Increase 1 stitch by making 1 yarn over, on the next row knit the yarn overs twisted to prevent holes. If you are decreasing, knit alternately every approx.10th and 11th stitch together. Do not increase/decrease over the bands. ELEVATION: Start from the right side and knit the first 72-74-79-82-87-91 stitches, insert a marker (= mid back), knit the next 7-7-7-8-8-9 stitches, turn, tighten the strand and purl 14-14-14-16-16-18 stitches from the wrong side. Turn, tighten the strand and knit 21-21-21-24-24-27 stitches, turn, tighten the strand and purl 28-28-28-32-32-36 stitches. Continue back and forth in stocking stitch in this way, working 7-7-7-8-8-9 more stitches each time until you have worked over the middle 70-70-70-80-80-90 stitches, purl to end of row. PATTERN: See diagrams A.1 and A.2. The diagrams show all rows in the pattern from the right side. RAGLAN: Increase to raglan in each transition between body and sleeves. All increases are from the right side. The increases are different on body and sleeves as described in the text. Increase as follows before the marker: Start 1 stitch before the marker, make 1 yarn over (= 1 stitch increased), knit 1. Increase as follows after the marker: Knit 1, make 1 yarn over (= 1 stitch increased). On the next row (wrong side) work the yarn overs twisted to prevent holes, work the new stitches into pattern A.1 as you go. BUTTONHOLES: Decrease for the buttonholes on the right band (when the garment is worn). Work from the right side until there are 3 stitches left on the needle, make 1 yarn over, knit 2 together and knit 1. On the next row knit the yarn over to allow a hole. The first buttonhole is made on the first row from the right side after the garter stitch border in the neck. The 4 others are made with approx. 8-8-9-9-10-10 cm between each. INCREASE TIP (for the sides in the body): Increase on each side of the stitch with the marker thread as follows: make 1 yarn over, knit the stitch with the marker thread, make 1 yarn over (= 2 stitches increased). On the next row (wrong side) purl the yarn overs to allow holes. DECREASE TIP (for mid under the sleeve): Start 3 stitches before the stitch with the marker thread, knit 2 together, work A.2 (= 3 stitches), slip 1 stitch as if to knit, knit 1, pass the slipped stitch over the knitted stitch (= 2 stitches decreased). ---------------------------------------------------------- JACKET: The piece is worked back and forth with circular needle from mid front and top down. The sleeves are worked in the round with short circular/double pointed needles. YOKE: Cast on 124-128-136-140-146-152 stitches (including 5 band stitches in each side towards mid front) with circular needle size 2.5 mm and white. Work 5 RIDGES – see description above. On the 7th row (= right side) increase 10-10-11-12-14-15 stitches evenly along the row – READ INCREASE/DECREASE TIP = 134-138-147-152-160-167 stitches. Increase in the same way on the 9th row = 144-148-158-164-174-182 stitches. Change to circular needle size 3 mm. To get a better shape you can now work a small ELEVATION at the back of the neck – see description above. When the elevation is finished, knit 1 row from the right side where you decrease 22-22-24-26-28-28 stitches evenly along the row – READ INCREASE/DECREASE TIP = 122-126-134-138-146-154 stitches – remember the BUTTONHOLES on the right band – see description above. Work back from the wrong side with 5 band stitches in garter stitch and purl over purl. Insert 4 markers in the piece as follows (without working the stitches): 1st marker inserted after the first 23-24-26-27-29-31 stitches (= left front piece), 2nd marker inserted after the next 20 stitches (= left sleeve), 3rd marker inserted after the next 36-38-42-44-48-52 stitches (= back piece) and 4th marker inserted after the next 20 stitches (= right sleeve), there are now 23-24-26-27-29-31 stitches left after the last marker on the right front piece. READ THE WHOLE OF THE FOLLOWING DESCRIPTION BEFORE CONTINUING! Work A.1 back and forth with 5 band stitches in garter stitch in each side and 4 stitches stocking stitch in each transition between body and sleeves (2 stitches on each side of each marker). REMEMBER THE KNITTING TENSION! AT THE SAME TIME on the first row from the right side in A.1 increase to RAGLAN – see description above. The increases are different on body and sleeves as follows: FRONT AND BACK PIECES: Increase every 2nd row (i.e. every row from the right side) 15-15-12-14-19-19 times, then every 4th row (i.e. every other row from the right side) 9-12-15-17-16-19 times (= in total 24-27-27-31-35-38 times). SLEEVES: Increase every 2nd row 5-7-12-8-9-5 times, then every 4th row 14-16-15-20-21-26 times (= in total 19-23-27-28-30-31 times). The increased stitches are worked into A.1 as you go, i.e. the 4 stitches in each raglan line are always worked in stocking stitch. AT THE SAME TIME when 7-7-8-8-9-9 repeats in height of A.1 are complete, change to wheat (the row with the arrow in the pattern is the last row with white). The piece now measures approx. 11-11-12-12-13-13 cm from the cast-on edge mid front. Continue A.1 with increases to raglan as before. After the last increase to raglan there are 294-326-350-374-406-430 stitches on the needle. On the next row from the right side after the last increase to raglan work as follows (do not increase on the bands or the 4 stitches in each raglan line): Knit the first 47-51-53-58-64-69 stitches (= left front piece) and at the same time increase 8-9-10-11-12-13 stitches evenly along these stitches, knit the next 58-66-74-76-80-82 stitches (left sleeve) and at the same time increase 12-14-14-16-16-16 stitches evenly along these stitches, knit the next 84-92-96-106-118-128 stitches (= back piece) and at the same time increase 16-18-20-22-24-26 stitches evenly along these stitches, knit the next 58-66-74-76-80-82 stitches (= right sleeve) and at the same time increase 12-14-14-16-16-16 stitches evenly along these stitches, knit the last 47-51-53-58-64-69 stitches (= right front piece) and at the same time increase 8-9-10-11-12-13 stitches evenly along these stitches. There are now 350-390-418-450-486-514 stitches on the needle and the piece measures approx. 17-19-21-23-25-27 cm from the cast-on edge mid front and approx. 22-24-26-28-30-32 cm from the shoulder and down. The next row is worked as follows from the wrong side: Work the 5 band stitches in garter stitch, purl 50-55-58-64-71-77 stitches (= right front piece), place the next 70-80-88-92-96-98 stitches on 1 thread (= right sleeve), cast on 5-5-7-7-9-11 new stitches under the sleeve (= in the side of the body), purl 100-110-116-128-142-154 stitches (= back piece), place the next 70-80-88-92-96-98 stitches on 1 thread (= left sleeve), cast on 5-5-7-7-9-11 new stitches under the sleeve (= in the side of the body), purl 50-55-58-64-71-77 stitches and work the 5 band stitches in garter stitch (= left front piece). Body and sleeves are now worked separately. THE PIECE IS NOW MEASURED FROM HERE! BODY: = 220-240-256-280-312-340 stitches. Insert 1 marker thread in the middle of the 5-5-7-7-9-11 new stitches under each sleeve and allow the marker threads to follow the work downwards. Continue with wheat and work stocking stitch back and forth with 5 band stitches in garter stitch in each side. When the piece measures 2 cm increase 1 stitch on each side of the stitches with the marker threads – READ INCREASE TIP (= 4 stitches increased). Increase in this way every 4th row (i.e. every other row from the right side) in total 22 times = 308-328-344-368-400-428 stitches. The piece now measures approx. 28 cm from the separation (if you want the jacket to be longer you can continue the increases in the sides to desired length). Work 4 ridges back and forth over all the stitches (without changing needles). Cast off – to prevent the cast-off edge being tight make 1 yarn over after every 6th stitch AT THE SAME TIME as you cast off (the yarn overs are cast off as normal stitches). The whole jacket measures approx. 52-54-56-58-60-62 cm from the shoulder and down. SLEEVE: Continue with wheat, place the 70-80-88-92-96-98 stitches from the thread in the one side of the piece on a short circular needle size 3 mm and in addition knit up 1 stitch in each of the 5-5-7-7-9-11 stitches which were cast on under the sleeve = 75-85-95-99-105-109 stitches. Insert 1 marker thread mid under the sleeve (i.e. in the middle of the 5-5-7-7-9-11 new stitches), allow the marker thread to follow the work in the piece. Work stocking stitch in the round and A.2 over the middle 3 stitches under the sleeve. When the piece measures 2 cm from the separation decrease 2 stitches mid under the sleeve – READ DECREASE TIP. Decrease in this way every 2nd round in total 3-4-5-6-7-8 times. Then decrease in total 11-14-17-16-17-17 times in S: Every 8th round, in M: Every 6th round, in L and XL: Every 4th round, in XXL and XXXL: Every 3rd round = 47-49-51-55-57-59 stitches. When the piece measures 35-33-31-30-28-26 cm (shorter measurements in larger sizes due to longer yoke) change to double pointed needles size 2.5 mm. Work 4 RIDGES in the round – See description above. Change back to double pointed needles size 3 mm and cast off. The sleeve measures approx. 37-35-33-32-30-28 cm from the separation. Work the other sleeve in the same way. ASSEMBLY: Sew the buttons on to the left band. |
||||||||||||||||
Diagram explanations |
||||||||||||||||
|
||||||||||||||||
 |
||||||||||||||||
Have you finished this pattern?Tag your pictures with #dropspattern #vanillacreamcardigan or submit them to the #dropsfan gallery. Do you need help with this pattern?You'll find 30 tutorial videos, a Comments/Questions area and more by visiting the pattern on garnstudio.com. © 1982-2026 DROPS Design A/S. We reserve all rights. This document, including all its sub-sections, has copyrights. Read more about what you can do with our patterns at the bottom of each pattern on our site. |
||||||||||||||||


With over 40 years in knitting and crochet design, DROPS Design offers one of the most extensive collections of free patterns on the internet - translated to 17 languages. As of today we count 324 catalogues and 12291 patterns translated into English (UK/cm).
We work hard to bring you the best knitting and crochet have to offer, inspiration and advice as well as great quality yarns at incredible prices! Would you like to use our patterns for other than personal use? You can read what you are allowed to do in the Copyright text at the bottom of all our patterns. Happy crafting!
Post a comment to pattern DROPS 176-7
We would love to hear what you have to say about this pattern!
If you want to leave a question, please make sure you select the correct category in the form below, to speed up the answering process. Required fields are marked *.