
Popular categories
Looking for a yarn?


Comments / Questions (127)
![]() Michelle wrote:
Michelle wrote:
Bonjour j'ai besoin d'aide svp . J'ai suivi a la lettre mais épaule droite est plus grande que l'épaule gauche,est ce normal. Merci de votre réponse
15.01.2025 - 15:55
![]() Michelle wrote:
Michelle wrote:
Bonjour, j'aime beaucoup ce modèle malheureusement compte tenu des explications qui sont vraiment pas simple a comprendre je ne pense pas pouvoir le faire C'est vraiment dommage , j'ai remarqué que les explications Drops sont de plus en plus difficile a comprendre ce qui n'encourage pas les fausses débutantes en tricot a choisir vos modèles.
11.01.2025 - 22:08
![]() Lydia Marcus wrote:
Lydia Marcus wrote:
I am looking for the patteen to knit from bottom up. I cannot work from top down. Is it available for this pattern and if it is where can I find it? Thank you
30.11.2024 - 16:58DROPS Design answered:
Hi Lydia, Click on Free Patterns at the top of the page, then on the magnifying glass (top right) and write "cardigan bottom up" on the line. All our patterns will then be listed. Hope you find one you like. Regards, Drops Team.
03.12.2024 - 06:56
![]() HEIN wrote:
HEIN wrote:
Merci beaucoup pour votre réponse mais quand je fais un pull avec deux aiguilles, je le commence par le bas donc là avec ces explications pas facile à réaliser ;-) Bien cordialement
22.02.2024 - 17:53DROPS Design answered:
Bonjour Mme Hein, si vous préférez tricoter votre pull de bas en haut, retrouvez ici tous les modèles correspondants; n'hésitez pas à ajouter des filtres supplémentaires pour affiner votre recherche. Bon tricot!
23.02.2024 - 08:03
![]() HEIN wrote:
HEIN wrote:
Bonjour, je ne maîtrise pas du tout le tricot avec aiguilles circulaires. Auriez-vous les explications d'un montage normal ? Au secours ! un grand merci ;-) Bien à vous.
22.02.2024 - 10:05
![]() HEIN wrote:
HEIN wrote:
Bonjour, je ne maîtrise pas du tout le tricot avec aiguilles circulaires. Auriez-vous les explications d'un montage normal ? Au secours ! un grand merci ;-) Bien à vous.
22.02.2024 - 10:05DROPS Design answered:
Bonjour Mme Hein, le dos et le devant se tricotent ici en allers et retours sur aiguille circulaire pour avoir suffisamment de place pour y loger toutes les mailles; vous pouvez donc utiliser des aiguilles droites, vos mailles seront juste plus serrées. Pour les manches, cette leçon devrait pouvoir vous aider à faire les ajustements nécessaires. Bon tricot!
22.02.2024 - 14:54
![]() Marianne Jensen wrote:
Marianne Jensen wrote:
Hej, Skal der også slås 3 nye masker op i slutningen af pinden 2 gange på forstykket, som man gør på bagstykket (udtagningen ved 16 cm) , således at man ender med 78 masker på forstykket?
04.01.2024 - 11:38DROPS Design answered:
Hej Marianne, ja, men halsudskæringen skal være dybere, så du slår først de nye masker op efter 3 cm ifølge opskriften :)
09.01.2024 - 15:13
![]() Dorrit wrote:
Dorrit wrote:
Hallo, in der Beschreibung steht bei “LINKE SCHULTER VORNE… Bei einer Länge von 3 cm neue Maschen für den Halsausschnitt…” hingegen für die “ RECHTE SCHULTER VORNE… Bei einer Länge von 4 cm neue Maschen für den Halsausschnitt…” Wird der Halsausschnitt dann nicht schief, wenn einmal nach 3 cm und auf der anderen Seite erst nach 4 cm die Maschen angeschlagen werden? Vielen Dank.
24.11.2023 - 20:50DROPS Design answered:
Liebe Dorrit, damit beide Schulter gleiche Länge am Ende haben, soll man nach 3 cm beim linken Schulter und nach 4 cm beim rechten Schulter zunehmen. Viel Spaß beim stricken!
27.11.2023 - 08:08
![]() Dorrit wrote:
Dorrit wrote:
Hallo, ich würde den Pullover gern mit Drops Belle in Größe M stricken. (entsprechend den Maßen, also natürlich mehr Maschen pro cm). Können Sie mir sagen, wieviel Wolle ich ca. dafür benötige? Vielen lieben Dank.
02.09.2023 - 09:00DROPS Design answered:
Liebe Dorit, leider wird Belle dafür keine Alternative - hier wird entweder 2 Fäden Garngruppe A (Alpaca und Kid-Silk) oder 1 Faden Garngruppe C (siehe Garnumrechnter), dann sollen Sie sich am besten einen Pullover von der Garngruppe B entscheiden. Viel Spaß beim stricken!
04.09.2023 - 09:22
![]() Guylaine Rondeau wrote:
Guylaine Rondeau wrote:
Pour le modèle 176-4 lorsque je tricote la 2e torsade ... les diminutions se font à partir du côté intérieur après les 6 mailles centrales ou bien à l extérieur (côté bordure) soit à partir de la 7e et 8e mailles envers...merci
11.06.2023 - 14:12DROPS Design answered:
Bonjour Mme Rondeau, les diminutions de chaque côté de la torsade se font dans les mailles envers, avant et après la torsade, et se font côté jersey et non pas côté torsade. Bon tricot!
12.06.2023 - 09:00
|
||||||||||||||||
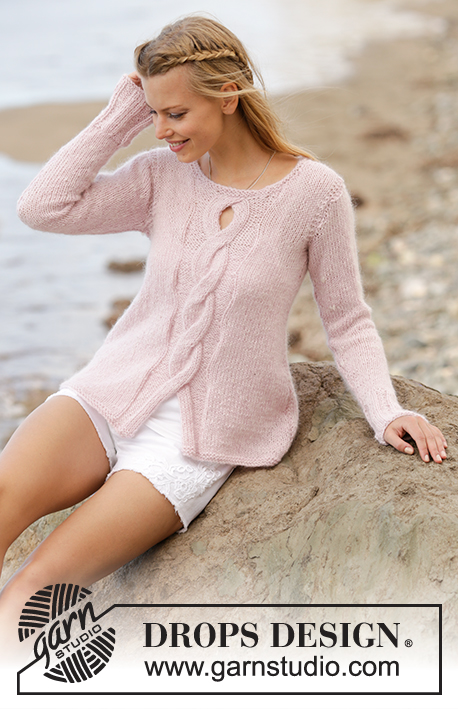
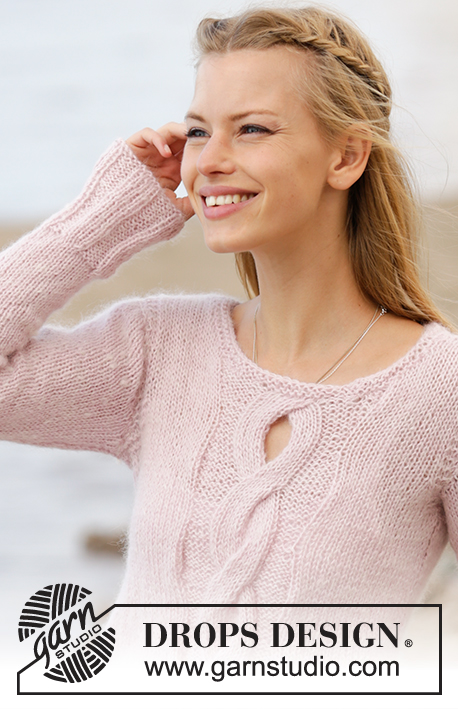
Rose Twist#rosetwistsweater |
||||||||||||||||
 |
 |
|||||||||||||||
Jumper with open cable mid front worked top down in DROPS Alpaca and DROPS Kid-Silk. Sizes S - XXXL.
DROPS 176-4 |
||||||||||||||||
|
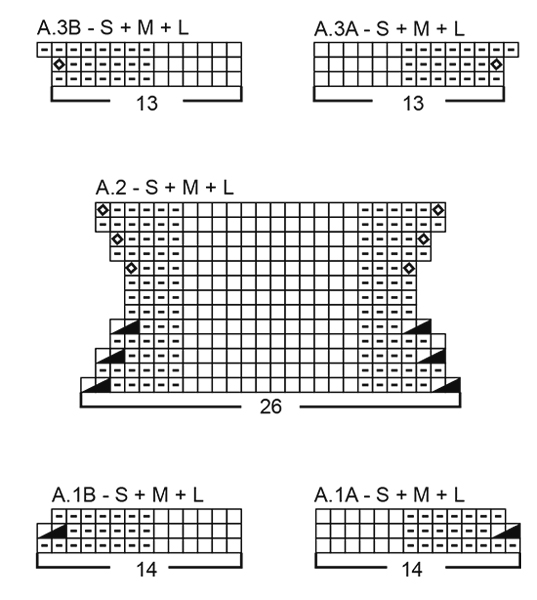
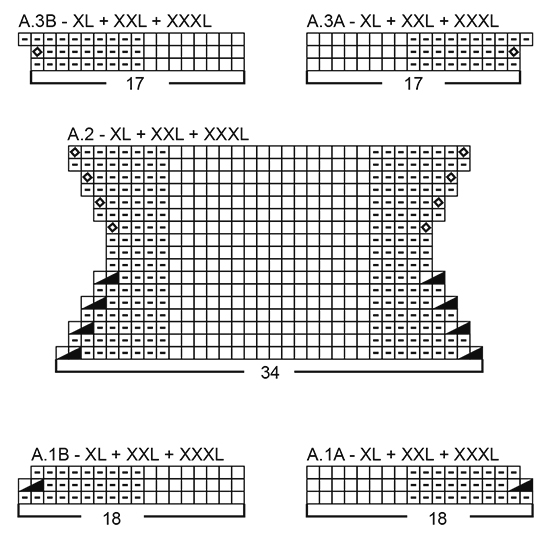
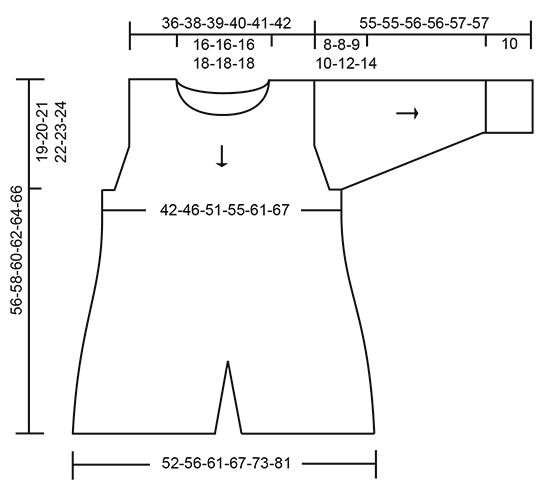
RIDGE/GARTER STITCH (worked in the round): 1 ridge = 2 rounds. Knit 1 round and purl 1 round. RIDGE/GARTER STITCH (worked back and forth): 1 ridge = Knit 2 rows. PATTERN: See diagrams A.1 to A.3. The diagrams show all rows in the pattern from the right side. Choose the diagram for your size. INCREASE TIP-1 (for the armholes): All increases made from the right side. Increase on the inside of 3 edge stitches in garter stitch along the armholes. Increase 1 stitch by making 1 yarn over. On the next row work the yarn overs twisted purl to prevent holes. INCREASE TIP-2 (for the sides on the front and back pieces): All increases made from the right side. Increase on the inside of 1 edge stitch in garter stitch + 2 stitches stocking stitch (= 3 stitches). Increase 1 stitch by making 1 yarn over. On the next row work the yarn overs twisted purl to prevent holes. INCREASE TIP-3 (for the purl section on each side of the cable mid front): All increases made from the right side. Increase 1 stitch in the last purl stitch before the stocking stitch on the left hand side of the piece (seen from the right side) and increase 1 stitch in the first purl stitch after the stocking stitch on the right hand side of the piece (seen from the right side). Increase 1 stitch by making 1 purl both in the front and back of the same stitch. DECREASE TIP-1 (for the purl section on each side of the cable mid front): All decreases made from the right side. Decrease outermost in the purl sections (i.e. out towards the sides). Decrease 1 stitch by purling 2 stitches together. DECREASE TIP-2 (for mid under sleeve): Start 3 stitches before the marker thread, knit 2 together, knit 2 (the marker thread sits between these 2 stitches), slip 1 stitch as if to knit, knit 1, pass the slipped stitch over the knitted stitch (= 2 stitches decreased). ---------------------------------------------------------- JUMPER: Front and back pieces are worked back and forth, with circular needle, in parts. BACK PIECE: Start with the right shoulder (when the garment is worn), then work the left shoulder before casting on stitches for the neck and working across all the stitches. RIGHT SHOULDER BACK (when the garment is worn): Cast on 17-18-19-17-18-19 stitches with circular needle size 5 mm and 1 strand Alpaca + 1 strand Kid-Silk (= 2 strands). Knit 1 row (row 1 = wrong side). The next row is worked as follows from the right side (i.e. from the neck): 14-15-16-14-15-16 stitches stocking stitch, 3 edge stitches in garter stitch towards the armhole. Work back from the wrong side with garter stitch over garter stitch and purl over purl, in addition cast on 1 new stitch at the end of the row towards the neck. Knit 1 row from the right side. Work back from the wrong side with garter stitch over garter stitch and purl over purl, in addition cast on 26-26-26-32-32-32 new stitches at the end of the row = 44-45-46-50-51-52 stitches on the needle. Lay the piece to one side and work the left shoulder back. LEFT SHOULDER BACK (when the garment is worn): Cast on 17-18-19-17-18-19 stitches with circular needle size 5 mm and 1 strand of each quality (= 2 strands). Knit 1 row (row 1 = wrong side). The next row is worked as follows from the right side (i.e. from the armhole): 3 edge stitches in garter stitch, work 14-15-16-14-15-16 stitches stocking stitch, in addition cast on 1 new stitch at the end of the row towards the neck = 18-19-20-18-19-20 stitches on the needle. Work back from the wrong side with purl over purl and garter stitch over garter stitch. On the next row from the right side work the left and right shoulders together to the back piece as follows: BACK PIECE: Start with the stitches from the left shoulder, work 3 edge stitches in garter stitch towards the armhole, work stocking stitch across the remaining stitches on the left shoulder, continue with stocking stitch across the stitches from the right shoulder until there are 3 stitches left, finish with 3 edge stitches in garter stitch towards the armhole = 62-64-66-68-70-72 stitches on the needle. Continue back and forth with stocking stitch and 3 edge stitches in garter stitch in each side. REMEMBER THE KNITTING TENSION! When the piece measures 16-16-16-15-13-11 cm increase 1 stitch in each side for the armhole – READ INCREASE TIP-1. Increase in this way every 2nd row (i.e. every row from the right side) in total 2-3-5-7-10-13 times, then cast on 3-4-5-6-7-8 new stitches at the end of the next 2 rows = 72-78-86-94-104-114 stitches on the needle. Work stocking stitch with 6-7-8-9-10-11 edge stitches in garter stitch in each side. When you have worked 1 ridge over the outermost 6-7-8-9-10-11 stitches in each side continue with stocking stitch and 1 edge stitch in garter stitch in each side. When the piece measures 28-30-31-32-33-34 cm from the shoulder increase 1 stitch in each side – READ INCREASE TIP-2. Increase in this way every 2½-2½-2½-2-2-2 cm in total 8-9-9-10-10-12 times in each side = 88-96-104-114-124-138 stitches. Continue until the piece measures 54-56-58-60-62-64 cm from the shoulder and down (adjust so that the next row is worked from the right side). Change to circular needle size 4 mm and work 2 ridges back and forth across all stitches. Change back to circular needle size 5 mm and cast off (make sure the cast-off edge is not tight). FRONT PIECE: Start with the left shoulder, cast on stitches for the neck, then work the right shoulder before working across all the stitches. LEFT SHOULDER FRONT (when the garment is worn): Cast on 17-18-19-17-18-19 stitches with circular needle size 5 mm and 1 strand of each quality (= 2 strands). Knit 1 row (row 1 = wrong side). The next row is worked as follows from the right side (i.e. from the neck): 1 edge stitch in garter stitch, 13-14-15-13-14-15 stitches stocking stitch, 3 edge stitches in garter stitch towards the armhole. Continue back and forth with stocking stitch, 3 edge stitches in garter stitch towards the armhole and 1 edge stitch in garter stitch towards the neck. When the piece measures 3 cm cast on new stitches towards the neck at the end of every row from the wrong side as follows: Cast on 1 stitch 3 times, 2 stitches 1 time and 18-18-18-24-24-24 stitches 1 time (the increased stitches are worked in stocking stitch) = 40-41-42-46-47-48 stitches on the needle. After the last stitches have been cast on, lay the piece to one side. Work the right shoulder front. RIGHT SHOULDER FRONT (when the garment is worn): Cast on 17-18-19-17-18-19 stitches with circular needle size 5 mm and 1 strand of each quality (= 2 strands). Knit 1 row (row 1 = wrong side). The next row is worked as follows from the right side (i.e. from the armhole): 3 edge stitches in garter stitch, 13-14-15-13-14-15 stitches stocking stitch, 1 edge stitch in garter stitch towards the neck. Continue back and forth with stocking stitch, 1 edge stitch in garter stitch towards the neck and 3 edge stitches in garter stitch towards the armhole. When the piece measures 4 cm cast on new stitches towards the neck at the end of each row from the right side as follows: Cast on 1 stitch 3 times and 2 stitches 1 time = 22-23-24-22-23-24 stitches. After the last stitches have been cast on, work back from the wrong side with purl over purl and garter stitch over garter stitch. On the next row from the right side work the right and left shoulders together to the front piece as follows: FRONT PIECE: Place the stitches from the right and left shoulders on the same circular needle size 5 mm without working the stitches = 62-64-66-68-70-72 stitches on the needle. Insert 1 marker thread after 31-32-33-34-35-36 stitches and let the marker thread follow in piece (= mid front). READ ALL OF THE NEXT PARAGRAPH BEFORE CONTINUING! The next row is worked from the right side as follows: 3 edge stitches in garter stitch towards the armhole, stocking stitch until there are 11-11-11-14-14-14 stitches left before the marker thread, 8-8-8-10-10-10 stitches purl, knit 2 stitches in each of the next 6-6-6-8-8-8 stitches (= 6-6-6-8-8-8 stitches increased), 8-8-8-10-10-10 stitches purl, stocking stitch until there are 3 stitches left on the needle and finish with 3 edge stitches garter stitch towards the armhole = 68-70-72-76-78-80 stitches on the needle. Work back from the wrong side with garter stitch over garter stitch, purl over purl and knit over knit (the middle 12-12-12-16-16-16 stitches are worked purl). OPEN CABLE: The next row is worked as follows from the right side: 3 edge stitches in garter stitch, stocking stitch until there are 14-14-14-18-18-18 stitches left before the marker thread, 8-8-8-10-10-10 stitches purl, place the next 6-6-6-8-8-8 stitches on the cable needle behind the piece, knit 6-6-6-8-8-8 stitches, knit 6-6-6-8-8-8 stitches from the cable needle, purl 8-8-8-10-10-10 stitches, stocking stitch until there are 3 stitches left on the needle 3 edge stitches in garter stitch. Now divide the piece mid front as follows: Place half of the stitches (i.e. 34-35-36-38-39-40 stitches) in the right hand side of the piece (seen from the right side) on a thread = 34-35-36-38-39-40 stitches left on the needle. Continue back and forth across all the stitches in the left side of the piece with garter stitch over garter stitch, purl over purl and knit over knit – the outermost stitch towards mid front is now worked in garter stitch. AT THE SAME TIME every 2nd row (i.e. each row from the right side) decrease 1 stitch in the purl section – READ DECREASE TIP-1 until there are 4-4-4-5-5-5 purl stitches left. Work 3 rows back and forth without decreases in the purl section. Then increase 1 stitch in the purl section every 2nd row (i.e. every row from the right side) – READ INCREASE TIP-3 until there are 8-8-8-10-10-10 purl stitches. ARMHOLE: AT THE SAME TIME when the piece measures 16-16-16-15-13-11 cm increase for the armhole in the side in the same way as for the back piece. When 1 row is worked back from the wrong side after the last stitch has been increased in the purl section, leave the stitches on the left side of the piece. Place the stitches from the thread in the right side of the piece back on the circular needle size 5 mm and work in the same way but with decreases and increases in the purl section in the opposite side. When 1 row has been worked back from the wrong side after all the stitches have been increased in the purl section, put the cable together. OPEN CABLE PUT TOGETHER: Work from the right side as before across the stitches in the right side of the piece until there are 6-6-6-8-8-8 stitches left on the needle, place these 6-6-6-8-8-8 stitches on the cable needle behind the piece and knit the 6-6-6-8-8-8 first stitches in the left side of the piece, knit the 6-6-6-8-8-8 stitches from the cable needle and continue as before across the remaining stitches in the left side of the piece. Now divide the piece mid front again and half the stitches, i.e. the stitches in the right hand side of the piece as far as the marker thread (seen from the right side) are placed on 1 thread. READ THE REST OF THE FRONT PIECE BEFORE CONTINUING! CABLE: * Continue across the stitches in the left side of the piece, with garter stitch over garter stitch and purl over purl until there are 14-14-14-18-18-18 stitches left before the marker thread mid front, work A.1B over these stitches – NOTE: row 1 = the wrong side and the diagram is read from left to right. Work 2 more rows of A.1B across the outermost stitches towards mid front, stocking stitch and garter stitch towards the armhole and decrease as shown in the diagram (when working from the right side, read the diagram from right to left). Now place the stitches on 1 thread. Cut the strand and work 3 rows in the same way across the stitches in the right side of the piece – i.e. start mid front, work the first row from the wrong side with A.1A across the outermost 14-14-14-18-18-18 stitches towards mid front (row 1 = the wrong side and the diagram is read from left to right). Place the stitches from the thread in the left side of the piece on the needle (without working the stitches). Work from the right side as before across the stitches in the right side of the piece until there are 13-13-13-17-17-17 stitches left before the marker thread, work A.2 across the next 26-26-26-34-34-34 stitches (the marker thread sits in the middle of A.2) and continue as before across the remaining stitches in the left side of the piece. Continue the pattern as follows, decrease and increase as shown in the diagram. When A.2 has been completed 1 time in height, divide the piece mid front again and half the stitches, i.e. the stitches in the right side of the piece are placed on 1 thread. Work 3 rows across the stitches in the left side of the piece with garter stitch over garter stitch, stocking stitch over stocking stitch and A.3B over the outermost stitches towards mid front, increase as shown in the diagram. Now place the stitches on 1 thread. Cut the strand and work 3 rows in the same way across the stitches in the right side of the piece – i.e. start mid front, work the first row from the wrong side with A.3A over the outermost 13-13-13-17-17-17 stitches towards mid front. Place the stitches from the thread in the left side of the piece back on the needle (without working the stitches). Work from the right side as before across the stitches in the right side of the piece until there are 6-6-6-8-8-8 stitches left before the marker thread, place these 6-6-6-8-8-8 stitches on the cable needle behind the piece, knit the next 6-6-6-8-8-8 stitches. Place the stitches on the right-hand needle on 1 thread. Knit the 6-6-6-8-8-8 stitches on the cable needle and work as before to the end of the needle *. Repeat the whole paragraph from *-* in total 3 times in height. INCREASES IN THE SIDES: AT THE SAME TIME when the piece measures 28-30-31-32-33-34 cm from the shoulder increase 1 stitch in each side – READ INCREASE TIP-2. Increase in this way every 2½-2½-2½-2-2-2 cm in total 8-9-9-10-10-12 times in each side. When the last repetition with the cable is complete and the increases in the sides are finished, the piece is again divided in the middle and the stitches on the right side of the piece are placed on 1 thread. Continue across the stitches in the left side of the piece with knit over knit, purl over purl and 1 edge stitch in garter stitch in each side. AT THE SAME TIME decrease in the purl section in the same way as during the cable, but decrease every 4th row (instead of every 2nd row) in total 6-6-6-7-7-7 times. After all the increases and decreases there are 41-45-49-54-59-66 stitches on the needle in the left side of the piece. Continue working until the piece measures 54-56-58-60-62-64 cm from the shoulder and down (adjust so the next row is worked from the right side). Change to circular needle size 4 mm and work 2 ridges back and forth across all the stitches. Change back to circular needle size 5 mm and cast off (make sure the cast-off edge is not tight). Work in the same way across the stitches in the right side of the piece, but with the decreases in the opposite side. SLEEVE: The sleeve is worked from the top down. Work the sleeve cap back and forth on circular needle, then work the sleeve in the round on a short circular needle/double pointed needles to finished length. Cast on 20-24-24-24-24-24 stitches on a short circular needle size 5 mm with 1 strand of each quality (= 2 strands). Work stocking stitch back and forth and cast on new stitches for the sleeve cap at the end of each row in each side as follows: Cast on 3 stitches 1 time in all sizes, 2 stitches 3-3-2-2-1-1 times, 1 stitch 2-2-3-4-7-9 times, 2 stitches 2-2-3-3-3-3 times and 3-4-5-6-7-8 stitches 1 time = 56-62-66-70-74-80 stitches on the needle. The piece now measures approx. 8-8-9-10-12-14 cm. Insert 1 marker thread at the beginning of the row (= mid under sleeve). Continue to work stocking stitch in the round. When the piece measures 2 cm from the marker thread decrease 2 stitches mid under sleeve – READ DECREASE TIP-2. Decrease in this way every 3-2½-2-2-1½-1½ cm in total 12-14-15-16-17-19 times = 32-34-36-38-40-42 stitches. When the piece measures 37-37-37-36-35-33 cm from the marker thread (the whole sleeve measures approx. 45-45-46-46-47-47 cm from the top down), knit 1 round where you increase 8-6-12-10-8-14 stitches evenly along the round = 40-40-48-48-48-56 stitches. Change to double pointed needles size 4 mm. Work rib in the round (= knit 4 / purl 4). When the rib measures 10 cm cast off with knit over knit and purl over purl – NOTE: It is important that the cast-off edge is not tight. To prevent this you can make 1 yarn over after every 4th stitch (yarn overs cast off as other stitches). The sleeve measures approx. 55-55-56-56-57-57 cm from the cast-on edge and down. Work another sleeve in the same way. ASSEMBLY: Sew the shoulder seams inside the cast-on edge. Sew the side seams from the armhole and down inside 1 edge stitch in each side. Sew in the sleeves – the ridge edge along the armholes should lie out on the sleeve (i.e. let the ridge edge lie a little over the edge of the sleeve cap). NECKLINE: Knit up from the right side approx. 74 to 84 stitches around the neck with a short circular needle size 4 mm and 1 strand of each quality. Purl 1 round, knit 1 round and purl 1 round before loosely casting off in knit. |
||||||||||||||||
Diagram explanations |
||||||||||||||||
|
||||||||||||||||
|
||||||||||||||||
|
||||||||||||||||
|
||||||||||||||||
Have you finished this pattern?Tag your pictures with #dropspattern #rosetwistsweater or submit them to the #dropsfan gallery. Do you need help with this pattern?You'll find 34 tutorial videos, a Comments/Questions area and more by visiting the pattern on garnstudio.com. © 1982-2025 DROPS Design A/S. We reserve all rights. This document, including all its sub-sections, has copyrights. Read more about what you can do with our patterns at the bottom of each pattern on our site. |
||||||||||||||||


With over 40 years in knitting and crochet design, DROPS Design offers one of the most extensive collections of free patterns on the internet - translated to 17 languages. As of today we count 314 catalogues and 11822 patterns translated into English (UK/cm).
We work hard to bring you the best knitting and crochet have to offer, inspiration and advice as well as great quality yarns at incredible prices! Would you like to use our patterns for other than personal use? You can read what you are allowed to do in the Copyright text at the bottom of all our patterns. Happy crafting!
Post a comment to pattern DROPS 176-4
We would love to hear what you have to say about this pattern!
If you want to leave a question, please make sure you select the correct category in the form below, to speed up the answering process. Required fields are marked *.