
Popular categories
Looking for a yarn?


Comments / Questions (29)
![]() Terttu wrote:
Terttu wrote:
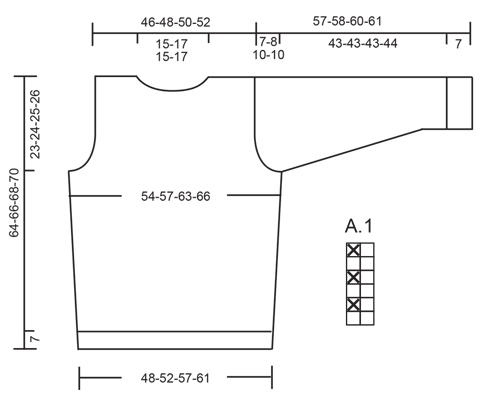
Mistä löydän miesten koot? Eli rinnanympärys on 100cm, mikä on oikea koko?
14.02.2022 - 20:00DROPS Design answered:
Hei, mitat löytyvät ohjeen alapuolella olevasta mittapiirroksesta.
16.02.2022 - 17:52
![]() Gitte Lysgaard wrote:
Gitte Lysgaard wrote:
Kan det være rigtigt at der kun skal slås 59 masker op til ryg til en mand i str L. Det virker som om der kun er til et barn
06.09.2021 - 19:08DROPS Design answered:
Hej Gitte, Strikker du med DROPS Snow, har du 11 masker på 10 cm i bredden, så får du målene du finder i måleskitsen nederst i opskriften :)
08.09.2021 - 15:49
![]() Nyx wrote:
Nyx wrote:
Bonjour, combien de pelotes me faut-il pour chaque taille? Ce n'est indiqué nulle part...
25.03.2021 - 13:51DROPS Design answered:
Bonjour Mme Nyx, vous trouverez toujours la quantité nécessaire pour chaque taille au poids, dans l'en-tête, autrement dit, il faut ici en taille S/M: 950 g DROPS Snow/50g la pelote = 19 pelotes DROPS Snow en taille S/M.Bon tricot!
25.03.2021 - 15:58
![]() Mariarosa wrote:
Mariarosa wrote:
Leggo: Quando la manica misura 50-50-50-51 cm, intrecciare per l’arrotondamento della manica all’inizio del ferro da ciascun lato, come segue: 3 m 1 volta, poi intrecciare 2 m all’inizio del ferro da ciascun lato finché la manica non misura 56-57-59-60 cm; Per lo scalfo delle maniche, la diminuzione di 2 maglie, va eseguita 1 sola volta o su tutti i giri , fino a raggiungere la misura della taglia in questione?
28.02.2021 - 09:30DROPS Design answered:
Buonasera Mariarosa, la diminuzione di 2 maglie va eseguita fino al raggiungimento della misura indicata. Buon lavoro!
28.02.2021 - 21:07
![]() Catalina wrote:
Catalina wrote:
Hola! Para la espalda en la talla L, debo montar 59 puntos, los que incluyen los puntos de borde o 61 puntos? Cómo se realiza un pliegue? Gracias! Catalina
27.06.2020 - 21:26DROPS Design answered:
Hola Catalina. Los puntos de orillo están incluidos en el total de puntos para montar. Cuando trabajamos en punto musgo, dos filas forman un pliegue, como pone en las explicaciones encima del patrón.
29.06.2020 - 21:04
![]() Hanne Salomonsen wrote:
Hanne Salomonsen wrote:
Vil gerne strikke denne sweater i dobbelt garn i Drops Karisma str. XL hvor meget garn skal jeg bruge. Mvh. Hanne Salomonsen
26.01.2020 - 12:08DROPS Design answered:
Hej Hanne, Hvis du klikker på vores omregner så får du alternativer op med dobbelt garn fra garngruppe C (Karisma bliver ikke tyk nok til strikkefastheden) Hvis du alligevel vil bruge Karisma så bliver den løsere, så skal du bruge ca 1200 gr. God fornøjelse!
31.01.2020 - 08:18
![]() Valentina wrote:
Valentina wrote:
Buonasera. Ho provato a riprodurre il modello seguendo il diagramma A.1 come da istruzioni, ma il risultato è diverso dalla foto. Come mai? Per ottenere lo stesso maglione della foto, devo usare il punto costa 1/1 oppure la costa inglese? Grazie!
20.12.2018 - 02:13DROPS Design answered:
Buongiorno Valentina. Il diagramma è corretto e si lavora in questo modo: Ferro 1 (sul diritto del lavoro): tutte le maglie a diritto. Ferro 2 (sul rovescio del lavoro, leggendo da sinistra verso destra): 1 maglia diritto, 1 maglia rovescio. Buon lavoro!
20.12.2018 - 08:24
![]() Petra wrote:
Petra wrote:
Zum Halsausschnitt vorne: Was passiert mit den stillgelegten Maschen, die in der Mitte stillgelegt werden, nachdem ich die Abnahme Halsauschnitt gestrickt habe? Zuerst lege ich ja die besagten M mittig still und stricke am Halsrand die Abnahmen. Aber wann nehme ich die stillgelegten M wieder auf? Das steht in der Anleitung leider nicht. Danke im Voraus!:-)
30.11.2018 - 12:57DROPS Design answered:
Liebe Petra, die stillgelegten Maschen für den Hals am Vorderteil werden beim Kragen aufgefassen - siehe KRAGEN. Viel Spaß beim stricken!
30.11.2018 - 13:42Miriam Aguilar wrote:
Hola buenos días perdón la pregunta pero al final en las mangas cuantos puntos deben de quedar ya que estoy confundida si tengo 56 puntos y voy cerrando cuantos quedarían al final antes de rematar. Mil Gracias Saludos
29.11.2018 - 16:43DROPS Design answered:
Hola Miriam. El número de puntos para rematar la manga no es determinado, depende de la tensíon de cada uno. Lo importante es seguir correctamente las medidas de la manga en cm según el patrón o la medida deseada según la persona.
01.12.2018 - 17:11
![]() Petra wrote:
Petra wrote:
Ich habe eine Frage zu dem Muster: Nach der Anl. A1 sind die ersten M im Muster 2x re zu sehen, aber bedeutet das, dass man dann die ganze R re durchstrickt, Rück R links und dann erst mit dem Muster beginnt? Dann sieht man in der 3 R aber wieder 2M re. Wenn man dann aber wieder durchgehend re stricken würde, passt das Muster ja nicht mehr. Könnten Sie das Muster noch einmal kurz erklären? Vielen Dank!:-)
22.11.2018 - 09:31DROPS Design answered:
Liebe Petra, bei der 1. Reihe in A.1 werden alle Maschen rechts gestrickt (= Hinreihe). Bei der 2. Reihe (= Rückreihe, jetzt wird das Diagram links nach rechts gelesen) in A.1 stricken Sie (1 M li, 1 M re). Wenn Sie mit der 1. M in A.1 enden, stricken Sie von der Rückseite: 1 M lli (= 1. M in A.1), dann (1 M li, 1 M re). Viel Spaß beim stricken!
22.11.2018 - 11:03
|
|||||||
Silverwood#silverwoodsweater |
|||||||
|
|
|||||||
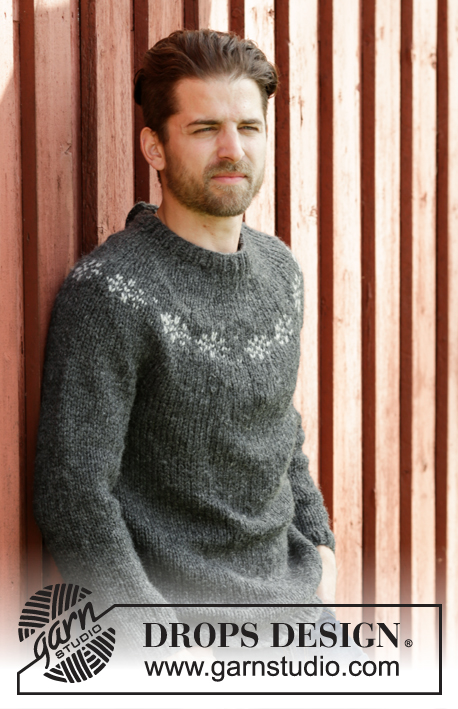
Knitted DROPS men’s jumper with textured pattern and neck in rib in Snow. Size: S - XXL.
DROPS 174-23 |
|||||||
|
GARTER ST (back and forth): K all rows. 1 ridge = 2 rows K. PATTERN: See diagram A.1. The diagram shows all rows in pattern seen from RS. 1st row in diagram = RS. INCREASE TIP: All inc are done from RS. Inc 1 st by making a YO. On next row work YO twisted to avoid holes. DECREASE TIP (applies to armholes): Dec inside 1 edge st in garter st. All dec are done from RS! Dec as follows before 1 edge st: K 2 tog. Dec after 1 edge st as follows: Slip 1 st as if to K, K 1, psso. NOTE: On next row (= from WS) always work st inside edge st P (to get 1 K inside edge st at assembly). ---------------------------------------------------------- BACK PIECE: Worked back and forth on circular needle to make room for all the sts. Cast on 56-59-65-71 sts (incl 1 edge st in each side) on circular needle size 8 mm with Snow. Work rib as follows: 1 edge st in GARTER ST - see explanation above, P 0-3-3-3, * K 3, P 3 *, repeat from *-* until 1 st remains and finish with 1 edge st in garter st. Continue rib like this until piece measures 7 cm. Work 1 ridge AT THE SAME TIME adjust no of sts to 55-59-65-69 on first row. Now work A.1, finish with 1st st in A.1 and 1 edge st in garter st in each side. REMEMBER THE KNITTING TENSION When piece measures 12 cm, inc 1 st inside 1 edge st in each side - READ INCREASE TIP! Inc like this every 11th cm 3 times in total – work the inc sts in pattern = 61-65-71-75 sts. When piece measures 41-42-43-44 cm, cast off 3 sts in each side for armhole. Now dec for armholes as follows - READ DECREASE TIP: Cast off 1 st on every other row a total of 2-3-5-6 times = 51-53-55-57 sts. When piece measures 62-64-66-68 cm, cast off the middle 15-17-15-17 sts for neck and finish each shoulder separately. Then cast off 1 st on next row from neck = 17-17-19-19 sts remain on shoulder. Cast off when piece measures 64-66-68-70 cm. Work the other shoulder. FRONT PIECE: Cast on as on back piece and work rib as follows: 1 edge st in garter st, * K 3, P 3 *, repeat from *-* until 1-4-4-4 sts remain, K 0-3-3-3 and finish with 1 edge st in garter st. Then adjust no of sts as on back piece before continuing with A.1 and inc in each side. Cast off for armholes as on back piece and continue until piece measures 57-59-60-62 cm. Now slip the middle 9-11-9-11 sts on a stitch holder for neck and finish each shoulder separately. Continue to cast off for neck at beg of every row from neck as follows: Cast off 2 sts 1 time and 1 st 2 times = 17-17-19-19 sts remain on shoulder. Cast off when piece measures 64-66-68-70 cm. Work the other shoulder. SLEEVE: Worked back and forth on circular needle. Cast on 26-26-32-32 sts (incl 1 edge st in each side) on circular needle size 8 mm with Snow. Work rib K 3/P 3 with 1 edge st in garter st for 7 cm. Work 1 ridge AT THE SAME TIME adjust no of sts to 28-28-30-30 on first row. Continue with A.1 with 1 edge st in garter st in each side. When piece measures 12-14-14-13 cm, inc 1 st inside 1 edge st in each side. Inc like this every 3½-3-3-3 cm 11-12-12-13 times in total - work the inc sts in pattern = 50-52-54-56 sts. When sleeve measures 50-50-50-51 cm, cast off for sleeve cap at beg of row in each side as follows: 3 sts 1 time, then cast off 2 sts at beg of row in each side until piece measures 56-57-59-60 cm, then cast off 3 sts at beg of the next 2 rows before casting off all sts, piece measures approx. 57-58-60-61 cm. ASSEMBLY: Sew the shoulder seams. NECK: Worked in the round on circular needle. Pick up from RS approx. 60 to 72 sts around the neck (incl sts on stitch holder at the front) on short circular needle size 8 mm. P 1 round while adjusting the no of sts to 60-66-66-72. K 1 round. Then work rib = K 3/P 3. When neck measures 7 cm, inc all P 3 to P 4 = 70-77-77-84 sts. When neck measures 14 cm, dec all P 4 to P 3 = 60-66-66-72 sts. Continue with rib until neck measures 21 cm. LOOSELY cast off sts with K over K and P over P - NOTE: To make the cast-off edge more elastic make 1 YO after approx. every 6th st while casting off (cast off YOs as sts). ASSEMBLY: Sew in the sleeves inside 1 edge st. Sew sleeve and side seams in one inside 1 edge st in garter st. |
|||||||
Diagram explanations |
|||||||
|
|||||||
 |
|||||||
Have you finished this pattern?Tag your pictures with #dropspattern #silverwoodsweater or submit them to the #dropsfan gallery. Do you need help with this pattern?You'll find 29 tutorial videos, a Comments/Questions area and more by visiting the pattern on garnstudio.com. © 1982-2026 DROPS Design A/S. We reserve all rights. This document, including all its sub-sections, has copyrights. Read more about what you can do with our patterns at the bottom of each pattern on our site. |
|||||||


With over 40 years in knitting and crochet design, DROPS Design offers one of the most extensive collections of free patterns on the internet - translated to 17 languages. As of today we count 324 catalogues and 12290 patterns translated into English (UK/cm).
We work hard to bring you the best knitting and crochet have to offer, inspiration and advice as well as great quality yarns at incredible prices! Would you like to use our patterns for other than personal use? You can read what you are allowed to do in the Copyright text at the bottom of all our patterns. Happy crafting!
Post a comment to pattern DROPS 174-23
We would love to hear what you have to say about this pattern!
If you want to leave a question, please make sure you select the correct category in the form below, to speed up the answering process. Required fields are marked *.