
Popular categories
Looking for a yarn?


Comments / Questions (155)
![]() Rose wrote:
Rose wrote:
Je ne tricote que sur 2 aiguilles droites me traduire le nombre de mailles montage pour un 52. Merci
02.11.2025 - 16:37
![]() Rose wrote:
Rose wrote:
Comment faire sur 2 aiguilles
02.11.2025 - 16:35DROPS Design answered:
Bonjour Rose, comme on tricote ici en allers et retours, vous pouvez utiliser des aiguilles droites pour le col, l'empiècement et le dos/les devants; pour les manches, cette leçon pourra vous aider. Bon tricot!
03.11.2025 - 08:09
![]() Aga wrote:
Aga wrote:
Jestem na etapie kończenia tyłu i przodu został mi ściągacz dodałam 14 oczek poprzez narzut zmieniłam druty na 4mm i w kolejnym lewym rzędzie nie wiem czy mam przerabiać narzuty i od razy zaczac sciagacz czy najpierw narzuty a potem sciagacz? Jeżeli wszystko naraz to jak przerobic narzuty, żeby jakos to wyglądało? Dziękuję:)
27.10.2025 - 12:02DROPS Design answered:
Witaj Agnieszko, przerabiasz na lewej stronie robótki następująco: 1 oczko brzegowe ściegiem francuskim, * 2 oczka prawe, 1 oczko lewe*, przerabiać od *-* aż zostaje 3 oczka, przerobić 2 oczka prawe i zakończyć przerabiając 1 oczko brzegowe ściegiem francuskim. Gdy dochodzisz do narzutu to przerabiasz narzut przekręcony na prawo lub lewo (w zależności od oczka w ściągaczu). Wtedy nie będziesz miała dużych dziurek w miejscach narzutów. Pozdrawiamy!
27.10.2025 - 15:43
![]() Gerda Vonk wrote:
Gerda Vonk wrote:
Hallo, ik moet gaan markeren maat XL , 17-14-34-14-17 en ik weet dat ik een kantsteek heb. Maar ik kom er niet uit , heb het op allerlei manieren geprobeerd. Ik kom niet uit met de 100 steken. Aan het einde houd ik meer over. Kunt u mij helpen?
16.10.2025 - 12:58
![]() Cynthia wrote:
Cynthia wrote:
If we knit the stitch marker, how can we keep track of when to increase as we continue in stockingnette ? I just did the first of the increase rounds in the yoke and it seems like the stitch marker just stays where I inserted it unless I’ve misunderstood something ? Thanks !
16.10.2025 - 00:53DROPS Design answered:
Hi Cynthia, Allow the marker to follow the stitch onwards, moving it to the same stitch in the next row. Regards, Drops Team.
16.10.2025 - 06:34
![]() Gunilla Salo wrote:
Gunilla Salo wrote:
Hej! Jag har börjat sticka denna modell, och har gjort den dubbla halskanten samt oket med ökningarna. Då har jag 248 maskor för min storlek är M. Sedan står att jag ska fortsätta tills arbetet mäter 22 cm. Menas verkligen från halskanten, alltså hela arbetet? Det känns orimligt kort. Jag vill absolut inte ha trångt under armarna. Om det menas 22 cm utöver halskanten så blir det bättre. Hur ska jag tänka? Vänliga hälsningar
15.10.2025 - 22:11DROPS Design answered:
Hej Gunilla. Du mäter från markören du satte efter halskanten (se sista meningen under "Dubbel halskant"). Mvh DROPS Design
16.10.2025 - 08:18
![]() Daphne wrote:
Daphne wrote:
How can I download a video of knitting a buttonhole band?
11.10.2025 - 19:24DROPS Design answered:
Dear Daphne, here is the buttonhole band video. We don't offer direct download links for our videos, but you can also watch them on Youtube. Happy knitting!
12.10.2025 - 21:10
![]() Linda wrote:
Linda wrote:
Hi, Ik heb een vraag over de pas. Ik ben bezig met maat xl. Als ik 17+14+34+14+17 optel kom ik op 96 uit. Als ik 17+1+14+1+34+1+14+1+17 optel kom ik inderdaad op 100 uit. Moet ik eerst bij iedere markeersteek. incl. de markering bij de kantsteek een extra steek maken? Dat is 91+5 =96. Of moet ik op de Raglan manier doen? Dus dat ik aan beide kanten een extra steek heb? Hoe kom ik dan aan de 9 steken? Want dan heb ik er toch 8? Ik zou het erg waarderen als jullie mij op weg kunnen helpen.
11.10.2025 - 10:16DROPS Design answered:
Dag Linda,
Je plaatst de markeerdraad steeds in een steek, hierdoor kom je in totaal op 100 steken. Je meerdert steeds voor de raglan aan beide kanten van de markeerdraadsteek. De raglansteek brei je steeds in tricotsteek.
11.10.2025 - 17:59
![]() Maura wrote:
Maura wrote:
Il bordo sinistro l’ho fatto, ma non riesco a capire la spiegazione del bordo destro. Come si deve partire?
04.10.2025 - 10:51DROPS Design answered:
Buonasera Maura, deve partire dal basso e riprendere le maglie sul davanti. Buon lavoro!
05.10.2025 - 21:32
![]() Christine wrote:
Christine wrote:
Hallo, meine Tochter möchte diese Strickjacke gerne aus einem anderen Garn gestrickt haben. Können Sie mich bitte bei der Umrechnung unterstützen? Meine Maschenprobe ergibt bei 12 Maschen und 16 Reihen = 10 x 10 cm. Also 12 Maschen anstatt wie beschrieben 16 Maschen. Über eine kurze Info freue ich mich. Mit freundlichen Grüßen Christine
03.10.2025 - 20:09DROPS Design answered:
Liebe Christine, es ist oft keine gute Idee, die Maschenprobe umzurechnen, da sich nicht nur die Maschenzahlen ändern, sondern auch in diesem Fall der Rhythmus der Raglanzunahmen. Am besten wählen Sie ein Garn, das zu der Maschenprobe passt - oder Sie schauen nach einer Anleitung, die zu Ihrer Maschenprobe passt. Sie können bei der Suche über den Filter links in der Leiste einstellen, nach welcher Maschenprobe gesucht werden soll. Viel Spaß beim Stricken!
21.10.2025 - 23:39
|
|
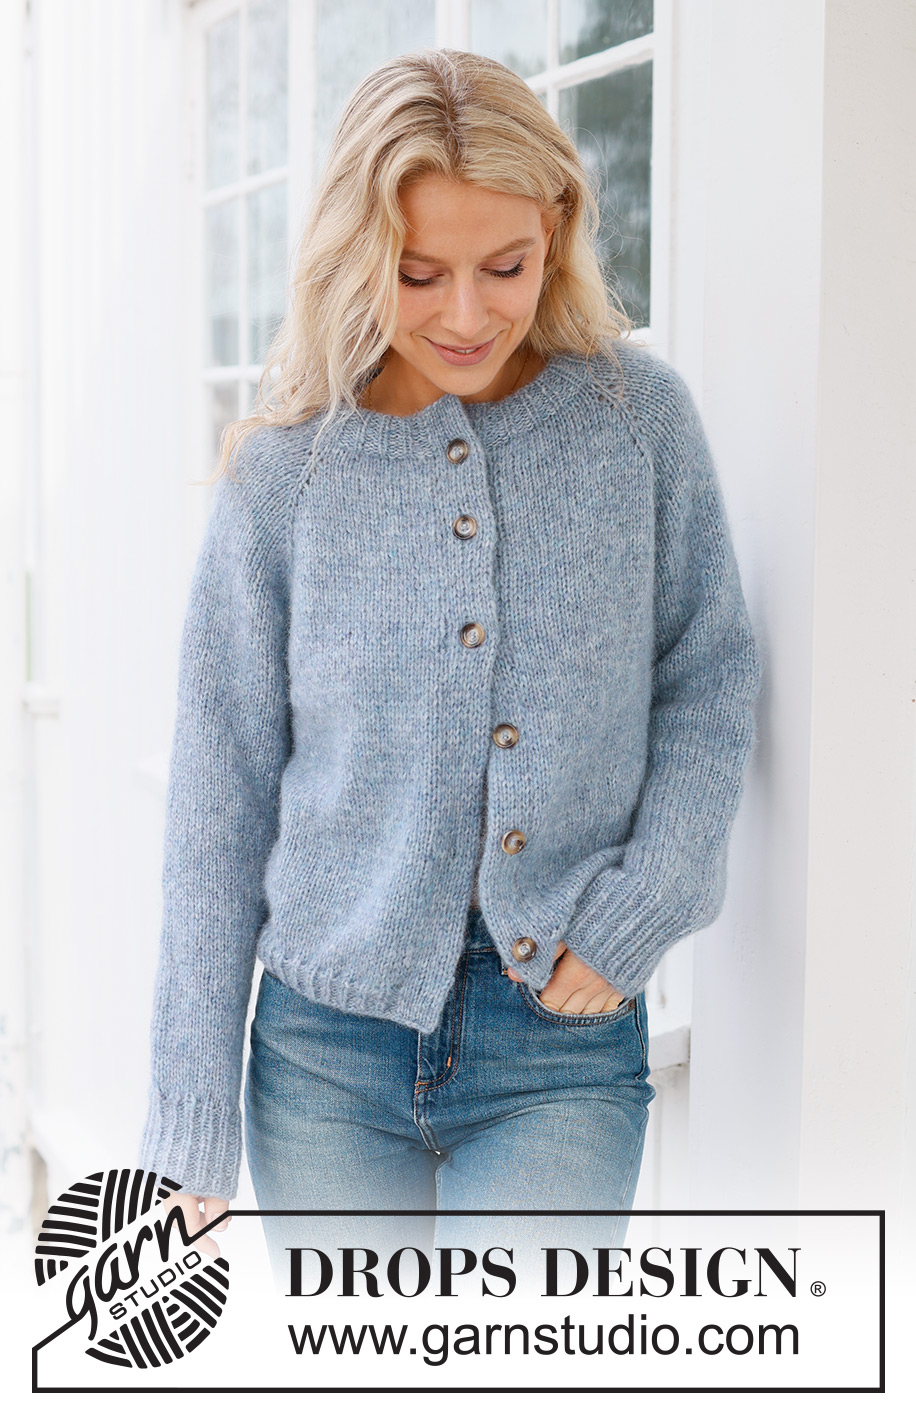
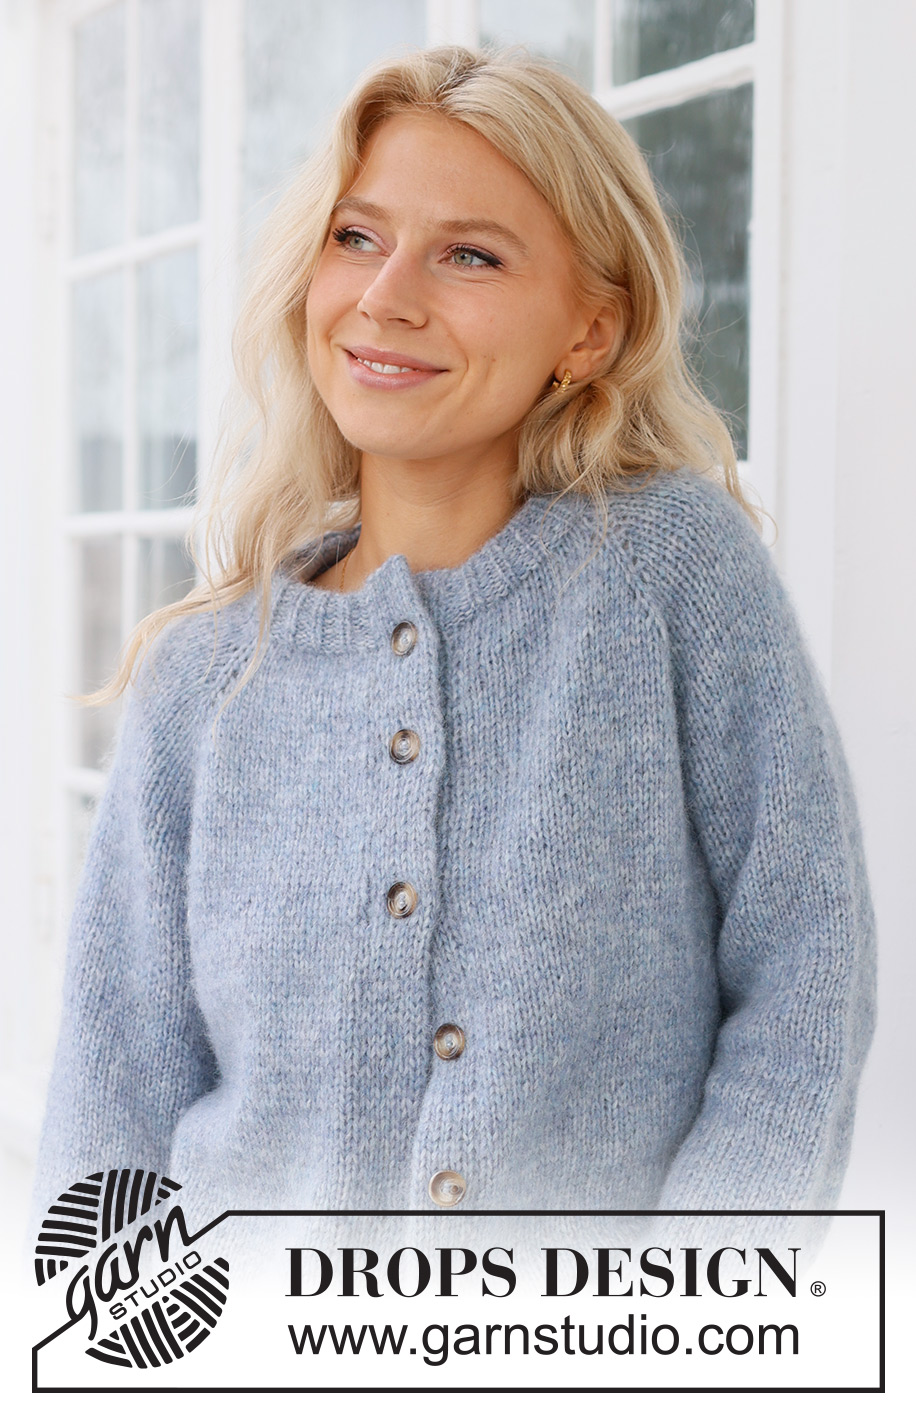
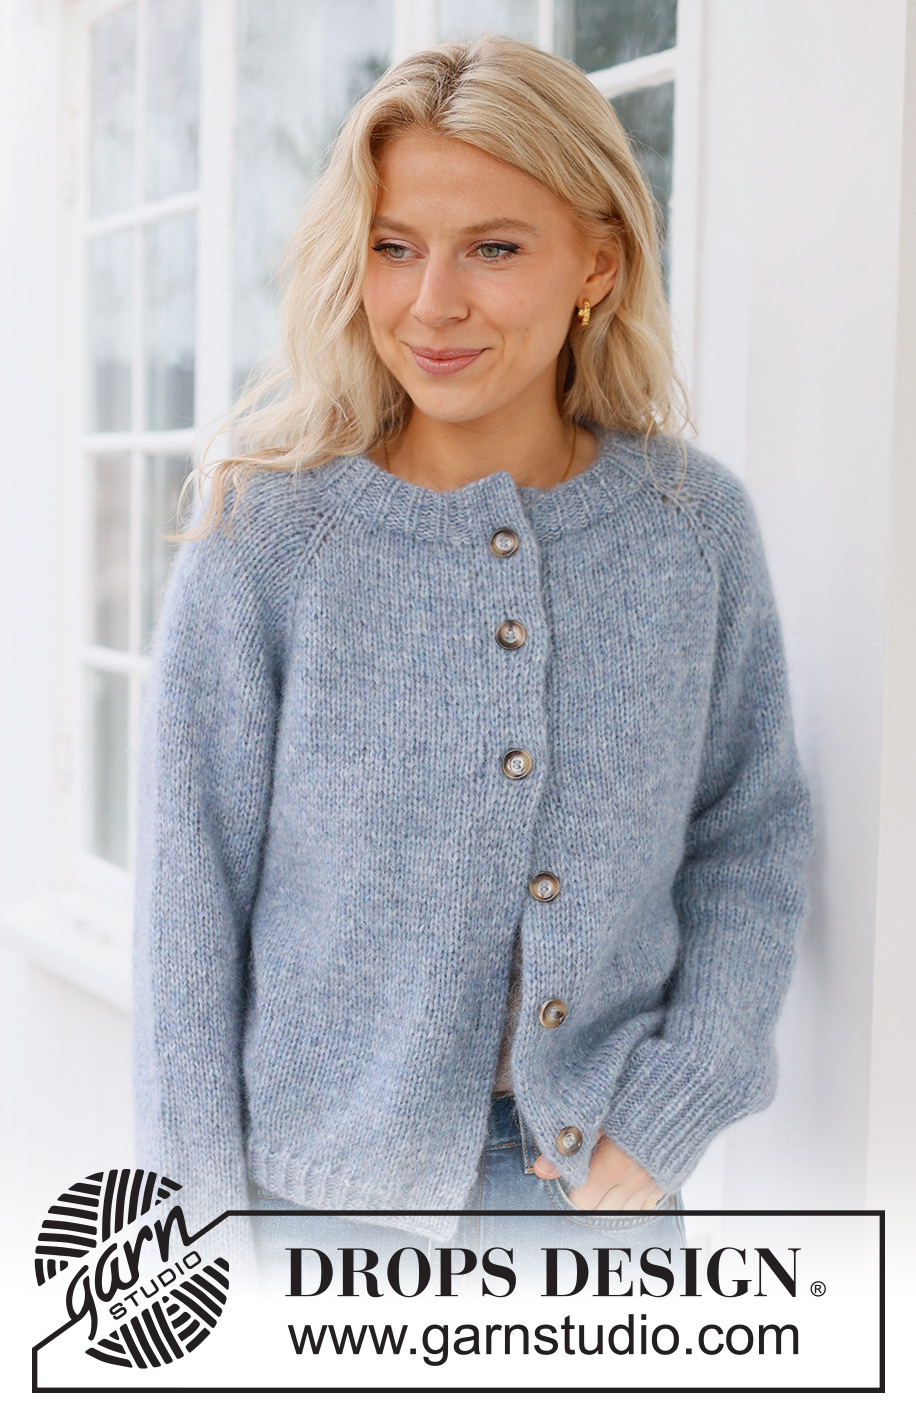
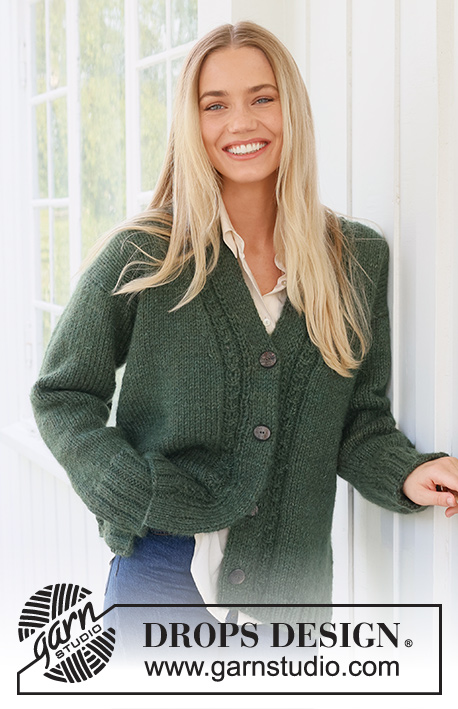
Foggy Autumn Cardigan#foggyautumncardigan |
|
 |
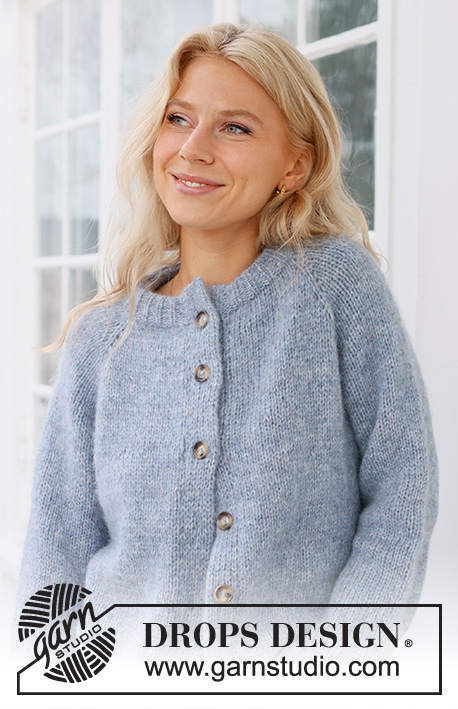 |
Knitted jacket in DROPS Air. The piece is worked top down, with raglan and double bands. Sizes S - XXXL.
DROPS 236-33 |
|
|
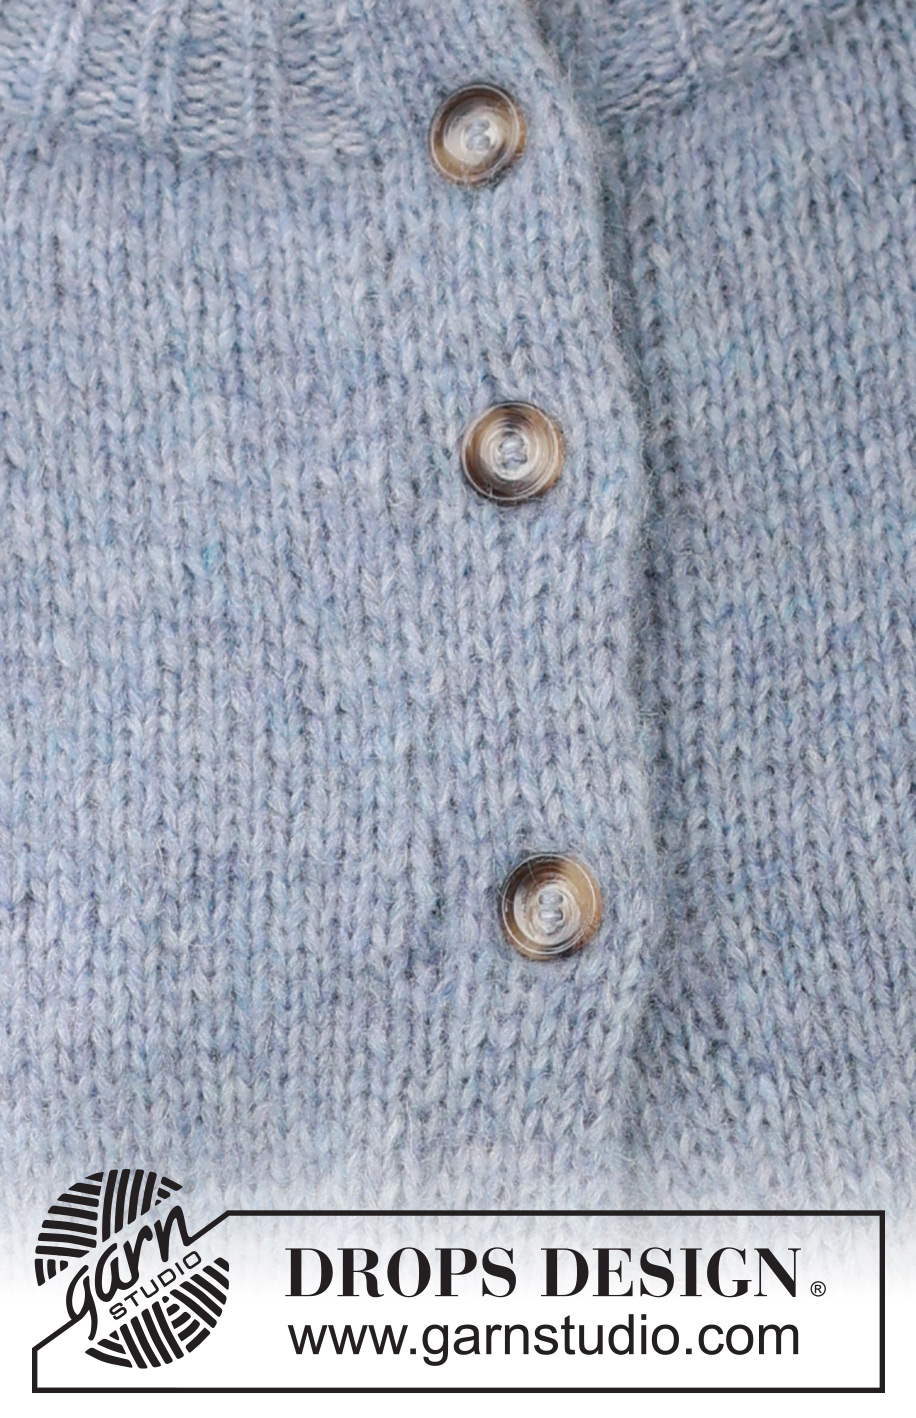
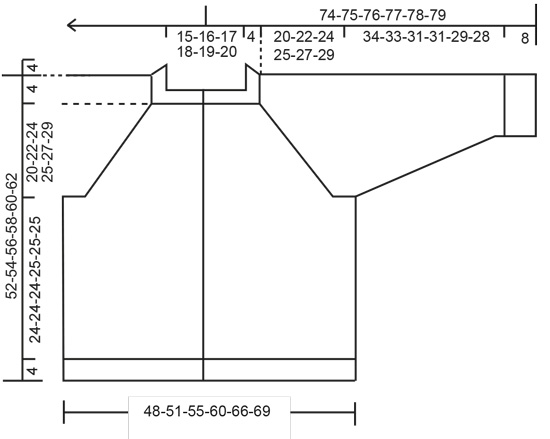
------------------------------------------------------- EXPLANATIONS FOR THE PATTERN: ------------------------------------------------------- RIDGE/GARTER STITCH (worked back and forth): Knit all rows. 1 ridge = knit 2 rows. RAGLAN: All increases are worked from the right side! Increase to raglan on each side of each marker-stitch as follows: Work to the marker-stitch, 1 yarn over, knit the marker-stitch, 1 yarn over (= 8 stitches increased). On the next row (wrong side) work the yarn overs as follows: BEFORE marker-stitch: Purl the yarn over twisted. AFTER marker-stitch: Slip the yarn over onto the right needle as if to knit, place it back onto the left needle the other way round (twisted), purl the yarn over. DECREASE TIP (sleeves): Decrease 1 stitch on either side of the marker as follows: Work until there are 3 stitches left before the marker, knit 2 together, knit 2 (marker sits between these 2 stitches), slip 1 stitch as if to knit, knit 1 and pass the slipped stitch over the knitted stitch (2 stitches decreased). BUTTONHOLES: The buttonholes are worked on the right band: Work the first 6 stitches, turn and work the same stitches back, turn and work these 6 stitches again. Cut the strand. Work 4 rows over the remaining 6 band stitches (first row from the right side) and knit together the last stitch from the right side and the stitch on the edge of the jacket. On the last row from the right side work all the band stitches as before. Work the buttonholes when the band measures: S: 4, 13, 22, 31, 40 and 48 cm. M: 4, 14, 23, 33, 41 and 50 cm. L: 4, 14, 24, 34, 43 and 52 cm. XL: 6, 16, 26, 36, 45 and 54 cm. XXL: 4, 13, 22, 31, 40, 48 and 56 cm. XXXL: 5, 14, 23, 32, 41, 50 and 58 cm. ------------------------------------------------------- START THE PIECE HERE: ------------------------------------------------------- JACKET – SHORT OVERVIEW OF THE PIECE. The neck and yoke are worked back and forth with circular needle, top down. The yoke is divided for body and sleeves and the body continued back and forth with circular needle. The sleeves are worked in the round with double pointed needles. DOUBLE NECK: Cast on 79-82-88-91-94-97 stitches with DROPS Air using 2 circular needles, sizes 4 and 5.5 mm, held together. Pull out the needle size 5.5 mm and work with circular needle size 4 mm (doing this gives you an elastic cast-on edge). Purl 1 row from the wrong side. Work rib from the right side as follows: 1 edge stitch in GARTER STITCH – read description above, * purl 2, knit 1 *, work from *-* until there are 3 stitches left, purl 2, 1 edge stitch in garter stitch. When the rib measures 9 cm, fold the neck double to the inside. On the next row, knit from right side, at the same time work every 2nd stitch together with every 2nd stitch from the cast-on edge. Change to circular needle size 5.5 mm. Insert 1 marker inside the 1 edge stitch; the yoke is measured from this marker! YOKE: Purl 1 row from the wrong side and increase 13-14-16-9-10-13 stitches evenly spaced = 92-96-104-100-104-110 stitches. Insert 4 markers (without working the stitches) as follows: Count 15-16-18-17-18-19 stitches (front piece), insert 1 marker in the next stitch, count 14 stitches (sleeve), insert 1 marker in the next stitch, count 30-32-36-34-36-40 stitches (back piece), insert 1 marker in the next stitch, count 14 stitches (sleeve), insert 1 marker in the next stitch, there are 15-16-18-17-18-19 stitches after the last marker-stitch (front piece). Continue with stocking stitch and 1 edge stitch in garter stitch on each side. On the next row from the right side increase 1 stitch on each side of each marker-stitch – read RAGLAN above. Increase like this, each row from the right side, a total of 17-19-20-24-26-27 times = 228-248-264-292-312-326 stitches. REMEMBER THE KNITTING TENSION! Continue with stocking stitch and 1 edge stitch in garter stitch on each side until the yoke measures 20-22-24-25-27-29 cm. Now divide for the body and sleeves as follows: Work 34-37-39-43-47-49 stitches, place the next 46-50-54-60-62-64 stitches on a thread for the sleeve, cast on 8-8-10-10-12-12 stitches under the sleeve, work 68-74-78-86-94-99 stitches, place the next 46-50-54-60-62-64 stitches on a thread for the sleeve, cast on 8-8-10-10-12-12 stitches under the sleeve, work the last 34-37-39-43-47-50 stitches. BODY: = 152-164-176-192-212-222 stitches. Continue with stocking stitch and 1 edge stitch in garter stitch on each side for a further 24-24-24-25-25-25 cm. Now increase 14-14-17-19-20-22 stitches evenly on the next row from the right side = 166-178-193-211-232-244 stitches. Change to circular needle size 4 mm. Work rib from the wrong side as follows: 1 edge stitch in garter stitch, * knit 2, purl 1 *, work from *-* until there are 3 stitches left, knit 2 and 1 edge stitch in garter stitch. Continue this rib for 4 cm. Cast off. The jacket measures approx. 52-54-56-58-60-62 cm, from the shoulder down. SLEEVES: Place the 46-50-54-60-62-64 stitches from the thread on the one side of the piece on double pointed needles size 5.5 mm and knit up 1 stitch in each of the 8-8-10-10-12-12 stitches cast on under the sleeve = 54-58-64-70-74-76 stitches. Insert a marker in the middle of the new stitches under the sleeve. Work stocking stitch in the round for 2 cm. Now decrease 2 stitches under the sleeve – read DECREASE TIP. Decrease like this every 4½-4-3-2-2-1½ cm a total of 7-8-10-13-14-14 times = 40-42-44-44-46-48 stitches. When the sleeve measures 34-33-31-31-29-28 cm from the division, increase 5-6-7-7-5-6 stitches evenly spaced = 45-48-51-51-51-54 stitches. Change to double pointed needles size 4 mm and work rib (purl 2, knit 1) for 8 cm. Cast off. The sleeve measures approx. 42-41-39-39-37-36 cm from the division. Work the other sleeve in the same way. RIGHT BAND: The band is worked bottom up. Wind out a 90 to 120 cm yarn-end and use it to knit up stitches along the front piece (this means you can continue working without cutting the strand afterwards): Start at the bottom and knit up 1 stitch in each row, inside the 1 edge stitch, with circular needle size 5 mm and DROPS Air. Work from the end of the needle, where the wool-ball is = bottom of the front piece. Cast on 12 stitches from the wrong side, extending the band outwards. Work back and forth over these 12 stitches and work the band together with the front piece as follows: ROW 1 (right side): Slip the first stitch onto the right needle as if to purl, keeping the strand at the front, * knit 1, slip 1 stitch onto the right needle as if to purl, keeping the strand in front *, work from *-* until there is 1 stitch left on the band, slip the last stitch onto the right needle as if to knit, keeping the strand at the back, knit the next stitch and pass the slipped stitch over the knitted stitch, turn. ROW 2 (wrong side): * Slip the first/next stitch onto the right needle as if to purl, keeping the strand in front, knit 1 *, work from *-* over all 12 band-stitches, turn. Repeat rows 1 and 2. NB! If the band becomes too long for the front piece, the band stitches can be worked together with 1 extra stitch from the front piece. Then work every 10th row as follows from the right side: Work until 1 stitch remains of the 12 band stitches, slip the last stitch onto the right needle as if to knit, with the yarn behind the work, knit the next 2 stitches together, pass the slipped stitch over the stitches knitted together, turn. Remember the BUTTONHOLES – read description above. When all the stitches on the front piece are worked together with the band, knit all stitches together 2 and 2, then cast off. LEFT BAND: The band is worked bottom up. Start at the top and knit up 1 stitch down the front piece in each row, working inside the 1 edge stitch, with circular needle size 5 mm and DROPS Air. Cast on 12 stitches at the bottom, extending the band outwards. Work back and forth over these 12 stitches and work the band together with the front piece as follows: ROW 1 (wrong side): Knit 1, * slip 1 stitch onto the right needle as if to purl, keeping the strand in front, knit 1 *, work from *-* until there is 1 stitch left on the band, slip the next 2 stitches onto the right needle as if to purl together, keeping the strand in front, turn. ROW 2 (right side): Knit 2 together, * slip 1 stitch onto the right needle as if to purl, keeping the strand in front, knit 1 *, work from *-* until there is 1 stitch left, slip the last stitch onto the right needle as if to purl, keeping the strand in front, turn. Repeat rows 1 and 2. NB! If the band becomes too long for the front piece, the band stitches can be worked together with 1 extra stitch from the front piece on every 9th and 10th row as follows: slip 3 stitches onto the right needle at the end of the row from the wrong side and knit 3 together from the right side. When all the stitches on the front piece are worked together with the band, work together as follows from the right side: Slip 1 stitch onto the right needle as if to knit, knit 1, pass the slipped stitch over, cast off. ASSEMBLY: Sew the buttons onto the left band. |
|
 |
|
Have you finished this pattern?Tag your pictures with #dropspattern #foggyautumncardigan or submit them to the #dropsfan gallery. Do you need help with this pattern?You'll find 36 tutorial videos, a Comments/Questions area and more by visiting the pattern on garnstudio.com. © 1982-2026 DROPS Design A/S. We reserve all rights. This document, including all its sub-sections, has copyrights. Read more about what you can do with our patterns at the bottom of each pattern on our site. |
|


With over 40 years in knitting and crochet design, DROPS Design offers one of the most extensive collections of free patterns on the internet - translated to 17 languages. As of today we count 324 catalogues and 12290 patterns translated into English (UK/cm).
We work hard to bring you the best knitting and crochet have to offer, inspiration and advice as well as great quality yarns at incredible prices! Would you like to use our patterns for other than personal use? You can read what you are allowed to do in the Copyright text at the bottom of all our patterns. Happy crafting!
Post a comment to pattern DROPS 236-33
We would love to hear what you have to say about this pattern!
If you want to leave a question, please make sure you select the correct category in the form below, to speed up the answering process. Required fields are marked *.