
Popular categories
Looking for a yarn?


Comments / Questions (34)
![]() Dorthe wrote:
Dorthe wrote:
Hej. Jeg strikker meget stramt, og for at få strikkefastheden til at passe skal jeg faktisk 1,5 pinde str op . Det passer slet ikke til dette fine garn. Så jeg vil vælge en større str istedet. Modtageren passer en str M. Hvordan regner jeg ud hvilken str jeg så skal strikke istedet. Venligst Dorthe
19.12.2025 - 20:52DROPS Design answered:
Hei Dorthe. Design avd. har dessverre ikke mulighet til å omregne en allerede publisert oppskrift. mvh DROPS Design
22.12.2025 - 13:22
![]() Karin Pedersen wrote:
Karin Pedersen wrote:
Hvad gøres når der står når arb måler 2 cm på det korteste? Hvor måles fra og hvad er det korteste? Dbh Karin
03.03.2024 - 14:59DROPS Design answered:
Hej Karin, du ser at arbejdet er lidt kortere imellem hulmønsteret, det er her du måler :)
05.03.2024 - 15:01
![]() Patty Walk wrote:
Patty Walk wrote:
Is this pattern written in English?
29.10.2023 - 08:35
![]() Marisol Ramírez wrote:
Marisol Ramírez wrote:
Puede enviar un video explicativo de Punto Nudo, por favor. Muchas Gracias
14.05.2022 - 22:13DROPS Design answered:
Hola Marisol, aquí tienes un vídeo sobre como trabajar un nudo sobre 4 puntos: https://www.garnstudio.com/video.php?id=1328&lang=es y sobre 3 puntos: https://www.garnstudio.com/video.php?id=1327&lang=es
15.05.2022 - 23:50
![]() SYLVIE GRAND-CHIPOT wrote:
SYLVIE GRAND-CHIPOT wrote:
Bonjour, Il est dommage que lorsqu’on attaque l’encolure, à partir des mailles qu’on met en attente pour le devant à partir de 48 cm, les explications de diminution ne soient pas plus détaillées. Il faut penser aux tricoteuses moins expérimentées. C’est le seul reproche que je ferai sur ce modèle.
16.03.2022 - 10:02
![]() Juliette wrote:
Juliette wrote:
Le gilet mesure 77 cm en bas en taille XL ? Cela me paraît anormalement large. N'y a-t-il pas une erreur de côte ?
23.01.2022 - 00:11DROPS Design answered:
Bonjour Juliette, cette mesure a été calculée sur la base de l'échantillon jersey, mais en raison du motif A.1, la base du gilet sera effectivement un peu plus étroite. Bon tricot!
24.01.2022 - 10:41
![]() GRAND-CHIPOT Sylvie wrote:
GRAND-CHIPOT Sylvie wrote:
Modèle fl-025. Bonjour, Je ne comprends pas comment on doit tricoter (diagramme A2 taille M) le noeud de 4 mailles. J’ai beau essayer de relire votre explication du diagramme mais je ne percupe pas. Pouvez-vous me détaillé l’explication. Je vous remercie beaucoup.
08.11.2021 - 14:26DROPS Design answered:
Bonjour Mme Grand-Chipot, pour faire un noeud, vous allez tricoter 4 fois 4 mailles ensemble, sans lâcher ces 4 mailles de l'aiguille gauche tricotez les 1 fois ensemble à l'envers, 1 fois ensemble à l'endroit, 1 fois ensemble à l'envers et encore 1 fois ensemble à l'endroit = vous avez de nouveau 4 mailles sur l'aiguille droite, lâchez les 4 m de l'aiguille gauche. Cette vidéo montre ce même noeud sur 3 mailles (procédez de la même façon mais avec 4 mailles et 4 fois pour qu'il y ait toujours bien 4 mailles. Bon tricot!
08.11.2021 - 15:13
![]() Rosa Klotz wrote:
Rosa Klotz wrote:
Liebes Team! Bei Diagrammbeschreibung kann ich für A4 nicht erkennen wie das gemacht wird. Umschlag und zusammenstricken? Das ist für mich nicht erkennbar nicht erkennbar...Vielen Dank
25.03.2021 - 09:48DROPS Design answered:
Siehe Antwort unten :)
25.03.2021 - 11:18
![]() Rosa Klotz wrote:
Rosa Klotz wrote:
Liebes Team! Ich kann beim Diagramm die Beschreibung von A 4 nicht finden. Auf dem Bild schauts wie ein Lochmuster mit Umschlag aus aber bei dem Diagramm seh ich nicht wies gemacht wird. Danke
25.03.2021 - 09:42DROPS Design answered:
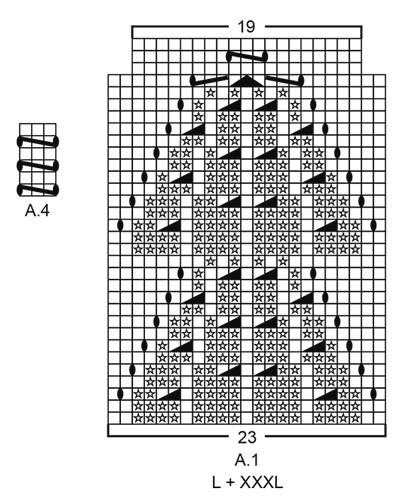
Liebe Frau Klotz, A.4 befindet sich links von A.1 in L+XXXL; bei der 1. (sowie 3. und 5.) Reihe stricken Sie: 1 Umschlag, 1 Masche wie zum Rechtsstricken abheben, 2 Maschen rechts zusammenstricken, die abgehobene Masche über die zusammengestrickten ziehen (2 Abnahmen), 1 Umschlag. Kann das Ihnen helfen? Viel Spaß beim stricken!
25.03.2021 - 11:18
![]() Sanna wrote:
Sanna wrote:
När man stickat 32cm på fram-och bakstycket och ska maska av för ärmhål 12 maskor, får jag inte det att stämma. Är ärmhålsmaskorna inräknade i bakstyckets 110 maskor? Om jag räknar in dessa, så kan jag sticka 63maskor framstycke, 12 avmaskade +bakstyckes maskor(110 minus24)+12 avmaskade, 63 maskor framstycke. Har jag gjort fel någonstans ? 63+12+110+12+63 blir fler maskor än vad jag har efter 32 cm.
01.03.2021 - 13:45DROPS Design answered:
Hej Sanna. Nej ärmhålsmaskorna är inte inräknade i de 110 m till bakstycket. Innan du börjar med avmaskning för ärmhål ska du ha 260 m. 63+12+110+12+63=260 m. Mvh DROPS Design
11.03.2021 - 07:25
|
||||||||||||||||||||||||||||||||||
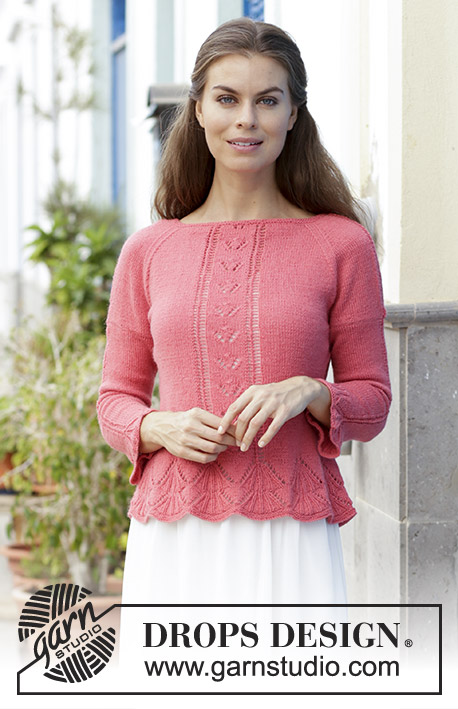
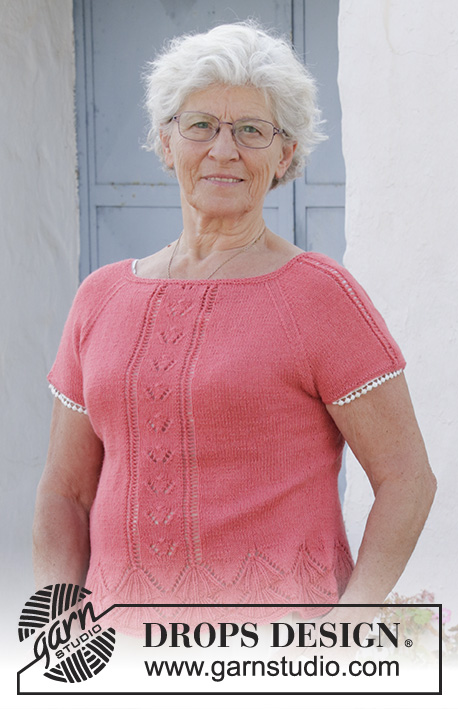
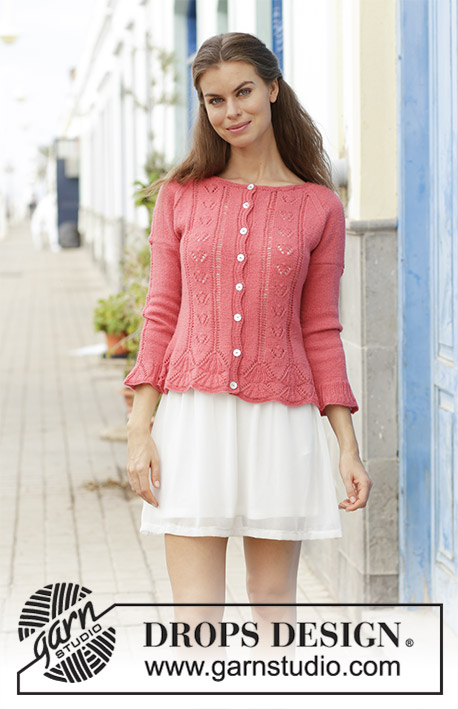
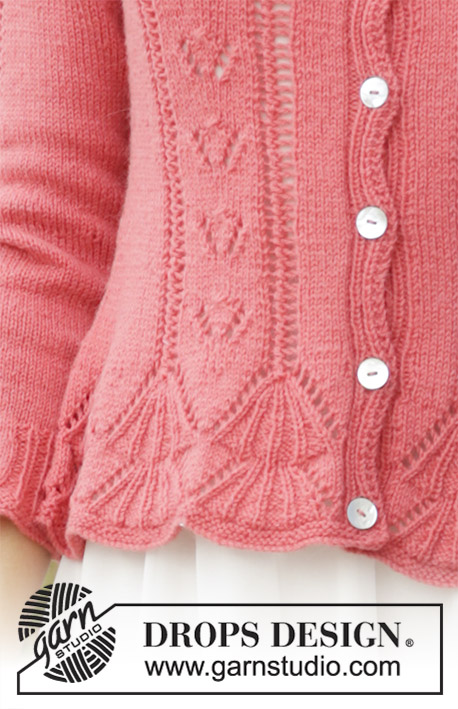
Miss Flora Cardigan#missfloracardigan |
||||||||||||||||||||||||||||||||||
 |
 |
|||||||||||||||||||||||||||||||||
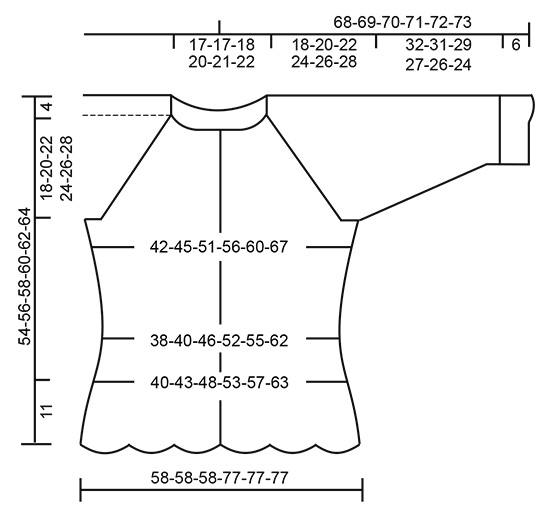
Knitted jacket with lace pattern, raglan and ¾ sleeves. Size: S - XXXL Piece is knitted in DROPS Flora.
DROPS 186-23 |
||||||||||||||||||||||||||||||||||
|
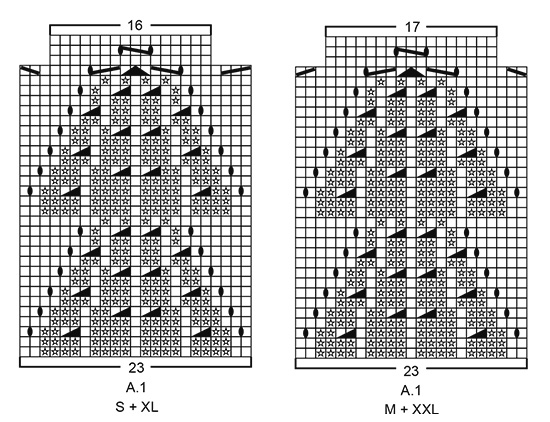
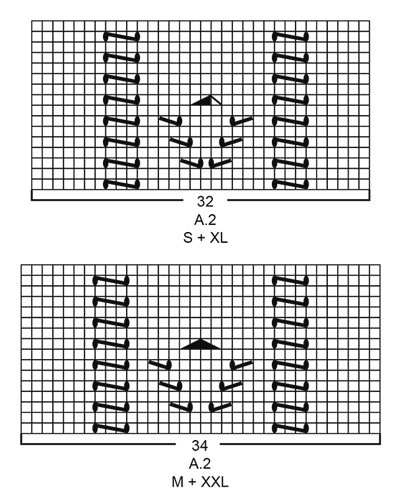
INFORMATION FOR PATTERN: GARTER STITCH (back and forth): 1 ridge = knit 2 rows. GARTER STITCH (worked in the round): 1 ridge = 2 rounds. Knit 1 round and purl 1 round. BAND: Work right band as follows (i.e. the 8 first stitches on needle when working from right side): 2 stitches in garter stitch, knit 1, purl 2, knit 1, purl 2. Work left band as follows (i.e. the 8 last stitches on needle when working from right side): Purl 2, knit 1, purl 2, knit 1, 2 stitches in garter stitch towards mid front. Continue bands with garter stitch over garter stitch, knit over knit and purl over purl. PATTERN: See diagrams A.1 to A.4. Choose diagram for your size (applies to A.1, A.2 and A.3). Diagrams show all rows in pattern seen from the right side. KNITTING TIP: If you do not want lace pattern up along mid back, work in stocking stitch over the 32-34-38-32-34-38 stitches in A.2 mid back. DECREASE TIP-1 (applies to sides of body): All decreases are done from the right side. Begin 4 stitches before marker and knit 2 together, knit 4 (marker thread is in the middle of these 4 stitches), slip 1 stitch knitwise, knit 1, pass slipped stitch over stitch worked (= 2 stitches decreased). DECREASE TIP-2 (evenly): To calculate how to decrease evenly on row count total number of stitches on needle (e.g. 146 stitches) and subtract number of stitches after decrease (e.g. 136 stitches) = 10 stitches decreased evenly. Then calculate total number of stitches on row (e.g. 146 stitches), minus bands (e.g. 16 stitches) and divide the remaining stitches by number of decreases to be done (= e.g. 10) = 13. I.e. in this example knit approx. every 12th and 13th stitch together when decreasing 10 stitches. INCREASE TIP (applies to sides on body and mid under sleeves): Begin 3 stitches before marker thread, make 1 yarn over, knit 6 (marker thread is in the middle of these 6 stitches), make 1 yarn over (= 2 stitches increased). On next row/round work yarn overs twisted to avoid holes. RAGLAN: Decrease for raglan on each side of the 4 marker threads in every transition between body and sleeves (= 8 stitches decreased on every decrease row). All decreases are done from the right side! Begin 3 stitches before marker and knit 2 together, knit 2 (marker thread is in the middle of these 2 stitches), slip 1 stitch knitwise, knit 1, pass slipped stitch over stitch worked (= 2 stitches decreased). BUTTONHOLES: Decrease for buttonholes on right band (when garment is worn): 1 buttonhole = purl fourth and fifth stitch from edge together and make 1 yarn over. On next row (wrong side) knit the yarn over to make a hole. Decrease for buttonholes when piece measures: S: 2, 9, 16, 22, 29, 36, 42 and 48 cm. M: 2, 9, 16, 23, 30, 37, 44 and 50 cm. L: 2, 9, 16, 23, 30, 37, 44 and 52 cm. XL: 2, 9, 16, 24, 31, 38, 46 and 54 cm. XXL: 2, 10, 18, 25, 33, 41, 48 and 56 cm. XXXL: 2, 10, 18, 26, 34, 42, 50 and 58 cm. NOTE! The last of these 8 buttonholes is decreased on first row from right side after picking up stitches for neck edge as explained in pattern. ---------------------------------------------------------- JACKET: Body is worked back and forth on circular needle from mid front, bottom up. Sleeves are worked in the round on double pointed needles/a short circular needle, bottom up. Then slip body and sleeves together and finish yoke back and forth on circular needle from mid front. BODY: Cast somewhat loosely on 292-292-292-384-384-384 stitches (including 8 band stitches in each side towards mid front) on circular needle size 3 mm with Flora. Work 2 ridges in GARTER STITCH - see explanation above. Knit 1 row from right side and purl 1 row from wrong side with 2 edge stitches in garter stitch in each side. Work next row as follows from right side: 8 stitches BAND - see explanation above, work A.1 until 8 stitches remain on row (= 12-12-12-16-16-16 repetitions of 23 stitches), and finish with 8 stitches BAND. Continue pattern like this. REMEMBER THE KNITTING TENSION and remember BUTTONHOLES on right band - see explanation above. When A.1 has been worked, there are 208-220-244-272-288-320 stitches on needle. Insert 1 marker thread 56-59-65-72-76-84 stitches in from each side (= 96-102-114-128-136-152 stitches between marker threads on back piece). Work next row as follows from right side: Work 8 stitches band as before, A.2 (= 32-34-38-32-34-38 stitches), 48-51-57-80-85-95 stitches in stocking stitch, A.2 (= 32-34-38-32-34-38 stitches mid back – read KNITTING TIP), 48-51-57-80-85-95 stitches in stocking stitch, A.2 (= 32-34-38-32-34-38 stitches) and finish with 8 stitches band as before. Continue pattern like this. AT THE SAME TIME when piece measures 12 cm on the shortest, decrease 1 stitch on each side of both marker threads - read DECREASE TIP-1 (= 4 stitches decreased). Decrease like this every 2-2-4-4-4-4 cm a total of 3-3-2-2-2-2 times in each side = 196-208-236-264-280-312 stitches. When piece measures 22-20-20-22-20-20 cm, increase 1 stitch on each side of both marker threads – read INCREASE TIP (= 4 stitches increased). Increase like this every 2 cm 5-6-6-5-6-6 times in total in each side = 216-232-260-284-304-336 stitches. Work until piece measures 32 cm on the shortest in all sizes. Work next row as follows from wrong side: Work 53-57-63-69-73-80 stitches as before (= front piece), cast off 10-10-12-12-14-16 stitches for armhole, work 90-98-110-122-130-144 stitches as before (= back piece), cast off 10-10-12-12-14-16 stitches for armhole and work the remaining 53-57-63-69-73-80 stitches as before (= front piece). Put piece aside and work the sleeves. SLEEVE: Cast on 87-87-87-95-95-95 stitches on double pointed needles or a short circular needle size 3 mm with Flora. Work 2 ridges in GARTER STITCH in the round - see explanation above. Insert 1 marker thread at beginning of round (= mid under sleeve). Work next round as follows: * Knit 1, purl 3 *, work from *-* 8-8-8-9-9-9 times in total, work A.3 (= 23 stitches), * purl 3, knit 1 *, work from *-* 8-8-8-9-9-9 times in total. Continue with rib and pattern like this. When piece measures 2 cm on the shortest, decrease all purl 3 (in the rib) to purl 2 by purling 2 together in every purl section = 71-71-71-77-77-77 stitches. When A.3 has been worked, there are 65-65-65-73-73-73 stitches on needle. Then work in stocking stitch in the round, but continue A.4 over A.3 until finished measurements. AT THE SAME TIME when piece measures 8 cm on the shortest, increase 2 stitches mid under sleeve - read INCREASE TIP. Increase like this 6-10-14-13-15-18 times in total in S: On every 18th round, in M: On every 9th round, in L and XL: On every 6th round, in XXL: On every 5th round, and in XXXL: On alternately every 3rd and every 4th round = 77-85-93-99-103-109 stitches. When sleeve measures 38-37-35-33-32-30 cm (shorter measurements in the larger sizes because of longer yoke), cast off 10-10-12-12-14-16 stitches mid under sleeve (cast off 5-5-6-6-7-8 stitches on each side of marker thread) = 67-75-81-87-89-93 stitches remain on needle. Put piece aside and knit the other sleeve the same way. YOKE: Slip sleeves on to same needle as body where armholes were cast off (without working the stitches first) = 330-362-398-434-454-490 stitches on needle. Remove the marker threads in piece. Insert 1 marker thread in every transition between body and sleeves (= 4 new marker threads). Begin from right side, continue back and forth in stocking stitch and A.2 as before with 8 stitches band in each side as before. Continue in addition A.4 over the middle 3 stitches on each sleeve. When 2 rows have been worked back and forth over all stitches, begin decrease for RAGLAN on next row from the right side - see explanation above. Decrease for raglan every 4th row (i.e. every other row from right side) 6-5-4-4-6-7 times in total and then every other row (i.e. every row from right side) 17-22-27-30-30-31 times in total. AT THE SAME TIME when piece measures 48-50-52-54-56-58 cm, slip the outermost 21-21-23-26-28-33 stitches in each side towards mid front on 1 stitch holder for neck, i.e. this is done at the beginning of the next 2 rows but work them before slipping them on stitch holder to avoid cutting the yarn. Continue back and forth as before and cast off for neck at the beginning of every row in each side as follows: Cast off 3 stitches 1 time and 2 stitches 1 time. Then cast off 1 stitch at the beginning of every row in each side until decreases for raglan are finished. After all decreases for raglan and cast offs for neck, approx. 92-92-92-98-98-108 stitches remain on needle. NECK EDGE: Pick up from right side approx. 146-146-150-162-166-186 stitches around the neck (including stitches on stitch holders at the front) on a circular needle size 2.5 mm. Knit 1 row from wrong side. Then 1 knit row from right side while decreasing evenly to 136-136-140-150-154-160 stitches – read DECREASE TIP-2 and remember to decrease for last buttonhole on this row. Knit 1 row from wrong side, knit 1 row from right side and knit 1 row from wrong side. Cast off knitting from right side. Jacket measures approx. 54-56-58-60-62-64 cm from shoulder and down. ASSEMBLY: Sew the openings under the sleeves. Sew the buttons on to the left band. |
||||||||||||||||||||||||||||||||||
Diagram explanations |
||||||||||||||||||||||||||||||||||
|
||||||||||||||||||||||||||||||||||
 |
||||||||||||||||||||||||||||||||||
 |
||||||||||||||||||||||||||||||||||
 |
||||||||||||||||||||||||||||||||||
 |
||||||||||||||||||||||||||||||||||
 |
||||||||||||||||||||||||||||||||||
Have you finished this pattern?Tag your pictures with #dropspattern #missfloracardigan or submit them to the #dropsfan gallery. Do you need help with this pattern?You'll find 37 tutorial videos, a Comments/Questions area and more by visiting the pattern on garnstudio.com. © 1982-2026 DROPS Design A/S. We reserve all rights. This document, including all its sub-sections, has copyrights. Read more about what you can do with our patterns at the bottom of each pattern on our site. |
||||||||||||||||||||||||||||||||||


With over 40 years in knitting and crochet design, DROPS Design offers one of the most extensive collections of free patterns on the internet - translated to 17 languages. As of today we count 324 catalogues and 12290 patterns translated into English (UK/cm). 12290
We work hard to bring you the best knitting and crochet have to offer, inspiration and advice as well as great quality yarns at incredible prices! Would you like to use our patterns for other than personal use? You can read what you are allowed to do in the Copyright text at the bottom of all our patterns. Happy crafting!
Post a comment to pattern DROPS 186-23
We would love to hear what you have to say about this pattern!
If you want to leave a question, please make sure you select the correct category in the form below, to speed up the answering process. Required fields are marked *.