
Popular categories
Looking for a yarn?


Comments / Questions (29)
![]() Bente Aateigen wrote:
Bente Aateigen wrote:
Hvordan får jeg stolpene rundt nakken til å passe? De er jo altfor korte til å rekke rundt. Jeg måler 42 cm rundt mitt arbeid og stolpene er 28 cm.
07.12.2024 - 21:12DROPS Design answered:
Hei Bente. Stolpene skal være kortere slik at man må strekke godt i stolpene når den skal sys fast. Da vil stolpene legge seg pent inntil nakken. mvh DROPS Design
10.12.2024 - 11:51
![]() Jenny wrote:
Jenny wrote:
Etter endt økning har jeg to ganger endt med 16 masker for mye, 8 for mange per arm. Lurer på om der går feil i andre omgang av øking til raglan (vekselsvis 4 og 8 masker) kan dere forklare hvordan den økingen skal foregå?
01.09.2024 - 22:14DROPS Design answered:
Hej Jenny, jo på hver 2. pind øker du på forstykkerne og bagstykket (= 4 økninger) men de 4 økninger på ærmerne sker kun på hver 4.pind :) Hvilken størrelse strikker du?
06.09.2024 - 08:36
![]() Marianela wrote:
Marianela wrote:
Dónde puedo ver las medidas que usan para la talla XL? Muchas gracias. Me encantan sus patrones
18.08.2024 - 08:16DROPS Design answered:
Hola Marianela, puedes ver las medidas de la prenda para todas las tallas en el diagrama de medidas, al final del patrón. Las medidas están indicadas en cm. Para más información sobre cómo interpretar este esquema, puedes leer la siguiente lección: https://www.garnstudio.com/lesson.php?id=24&cid=23
18.08.2024 - 22:54
![]() Kath wrote:
Kath wrote:
I størrelse small kan jeg ikke få masketallet til at stemme ... Efter at have slået 58 masker op, har jeg i alt 76 masker på pinden. Når jeg så deler maskerne til forstykket, ærmer og bagstykket, stemmer tallet ikke. 10+15+22+15+10=72. Skal mit bagstykke være 26 masker i stedet? På forhånd tak.
23.07.2024 - 10:38DROPS Design answered:
Hej Kath, mærkerne skal sætte i en maske, så husk at tælle maskerne med mærkerne med :)
01.08.2024 - 08:25
![]() Sietske Nicolai wrote:
Sietske Nicolai wrote:
Dankjewel Roos!! Onder het mom van 3x scheepsrecht (pffft) nu op de goeie weg.
10.05.2024 - 08:28
![]() Roos wrote:
Roos wrote:
Sietske, je moet eerst 12× alle 8 steken meerderen voor de raglan. Zie het stukje onder RAGLAN. En daarnà pas 14x de om en om 4 en 8 steken, zoals jij hebt gedaan. Groet van een mede -breister.
06.05.2024 - 22:45
![]() Sietske Nicolai wrote:
Sietske Nicolai wrote:
Ik heb het meerderen van de raglan idd om en om gedaan, op de goede kant. Ik ben als volgt te werk gegeaan: na de markeerdraden (bij PAS) ben ik gestart bij MAAT S M L… (ik brei M), het stukje RAGLAN dus overgeslagen. Elke heengaande naald (goede kant) 4 st gemeerderd, in eke daarop volgende heengaande naald 8 st. Na 14x /7x heb ik dan nog lang geen 25cm. Maak ik een denkfout? Reactie mag ook via mail.
28.04.2024 - 22:19DROPS Design answered:
Dag Sietske,
Een collega breister is zo vriendelijk geweest om je vraag te beantwoorden. Kun je hiermee verder? Veel breiplezier!
09.05.2024 - 10:49
![]() Roos wrote:
Roos wrote:
De maat van de biezen lijkt niet te kloppen. Ik brei maat L, dus 14 cm bies = 28 cm totaal. Op het eind moet de bies dichtgenaaid en aan de achterhals/ bovenkant mouwen genaaid. Dit zijn de 60 steken die tussen de biezen zijn opgezet. Bij mij meet dit stuk 42 cm. Hoe laat ik dit netjes passen ?
27.04.2024 - 14:06DROPS Design answered:
Dag Roos,
De 60 opgezette steken zouden ongeveer 35 cm moeten meten met een stekenverhouding van 17 steken. De stof van de hals moet verdeeld worden over de bies die je er aan naait, maar als je al 42 cm hebt, dan heb je wel veel stof om te verdelen. Je zou een stukje aan de biezen kunnen breien om dit op te lossen.
28.04.2024 - 10:12
![]() Sietske Nicolai wrote:
Sietske Nicolai wrote:
Het breien van de pas is mij niet duidelijk. Er staat: brei zoals uitgelegd hieronder in de andere maten. Ik maak maat M, ben dus hier gestart met raglan (afwisselend 4 en 8 st meerderen) en de V hals. Als ik dit 14x op voorpanden heb gedaan en 7x op mouwen dan meet het werk nog lang geen 25 cm. Zie ik iets over het hoofd?
26.04.2024 - 18:55DROPS Design answered:
Dag Sietske,
Heb je het meerderen van de raglan om en om gedaan? Dus alleen aan de goede kant en niet aan de verkeerde kant?
28.04.2024 - 10:14
![]() Sietske Nicolai wrote:
Sietske Nicolai wrote:
Het patroon geeft niet duidelijk aan of er met 1 of 2 draden wordt gewerkt. Ik heb 2 biezen (2 draden), moeten de extra steken schouders/halslijn (en de rest) met 1 draad?
23.04.2024 - 16:48DROPS Design answered:
Dag Sietske,
Het hele werk, dus ook alle biezen, wordt met 2 draden gebreid; 1 draad van elke kwaliteit.
24.04.2024 - 11:23
|
|||||||||||||
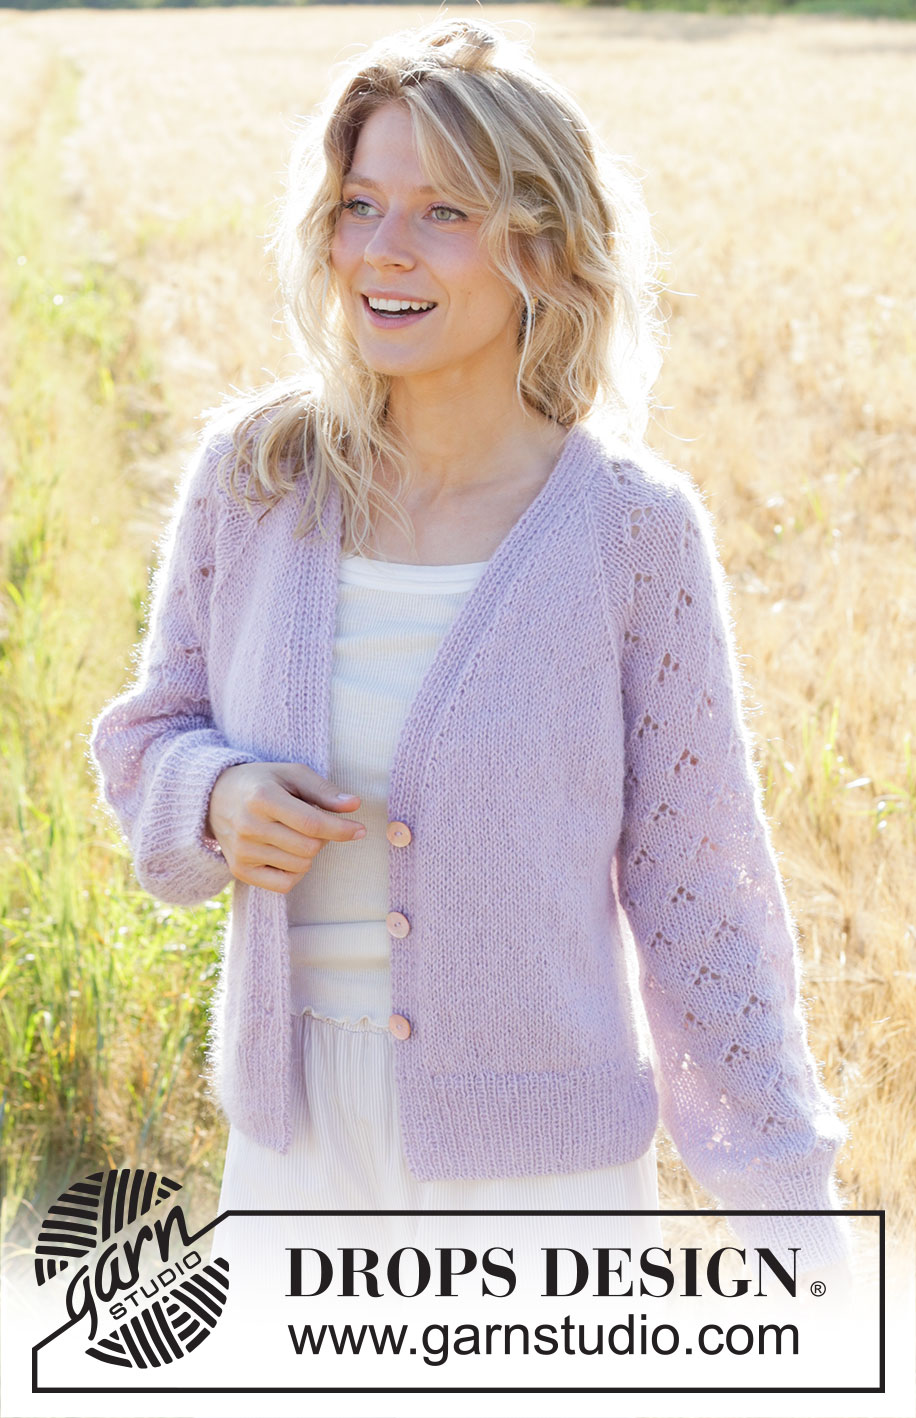
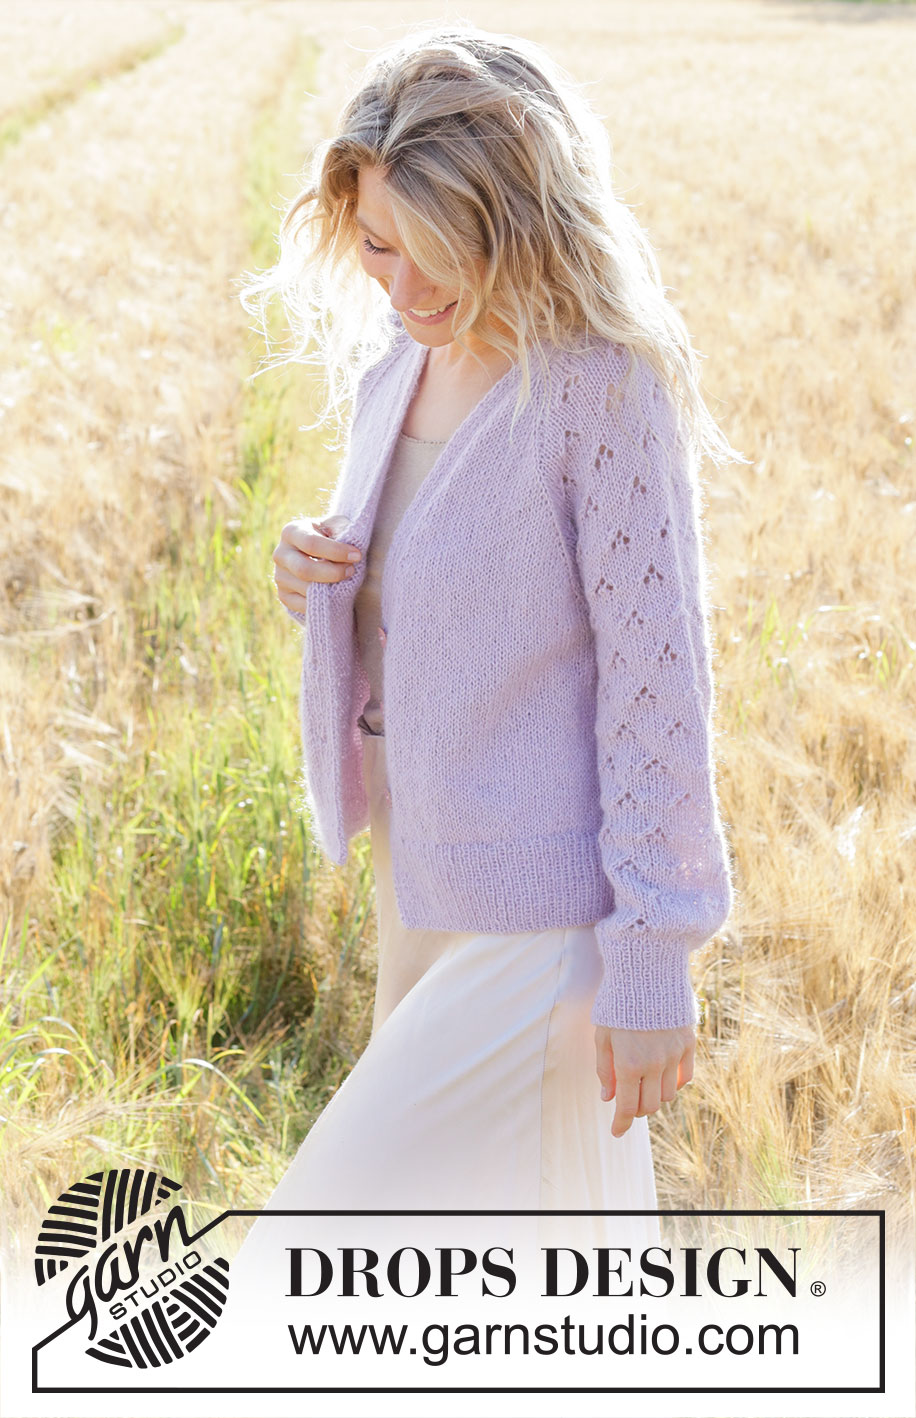
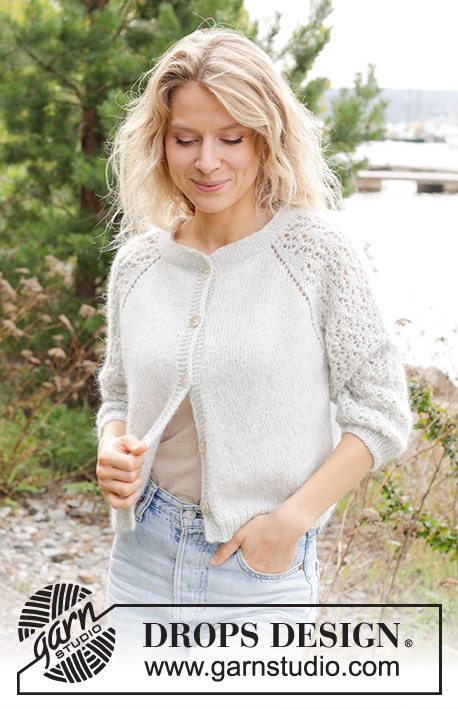
Afternoon in Provence Cardigan#afternooninprovencecardigan |
|||||||||||||
 |
 |
||||||||||||
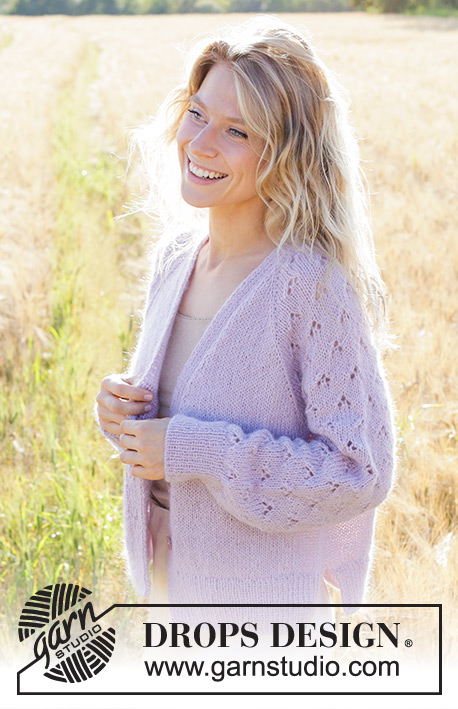
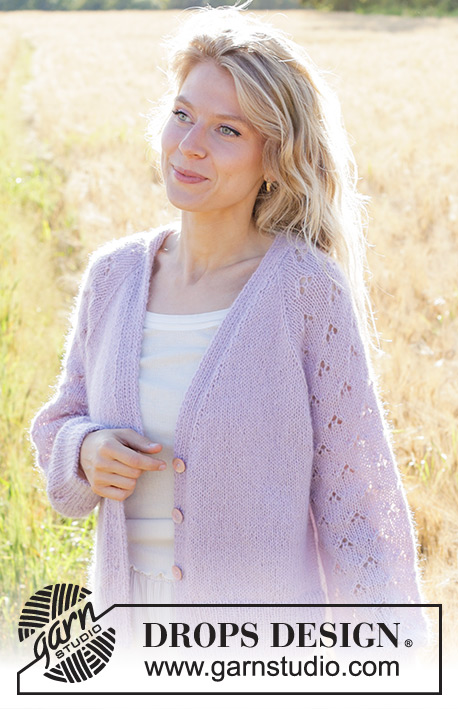
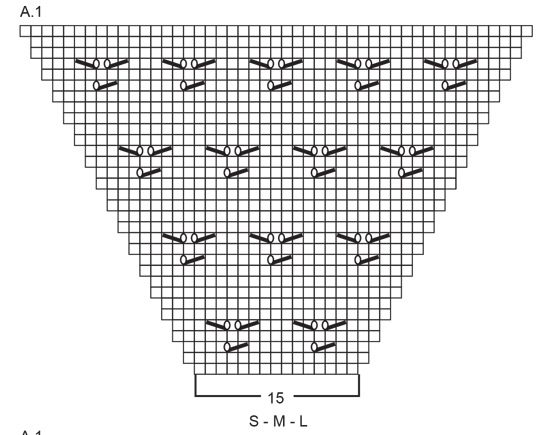
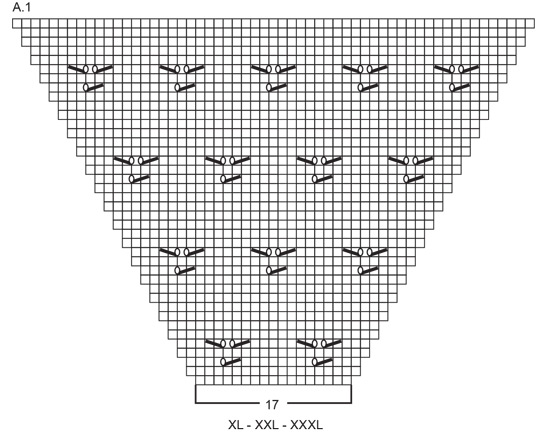
Knitted jacket in DROPS Alpaca or DROPS Nord and DROPS Kid-Silk. Piece is knitted top down with V-neck, raglan, lace pattern, balloon sleeves and vents in the sides. Size: S - XXXL
DROPS 250-6 |
|||||||||||||
|
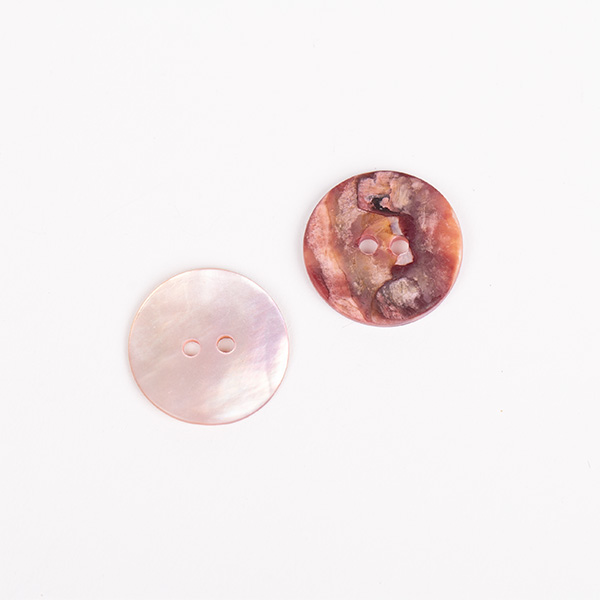
---------------------------------------------------------- EXPLANATION FOR THE PATTERN: ---------------------------------------------------------- GARTER STITCH (when working back and forth): Knit on all rows, i.e. knit from right side and knit from wrong side. 1 ridge vertically = knit 2 rows. PATTERN: See diagram A.1. Choose diagram for your size. Diagrams show all rows in pattern seen from the right side. When increasing stitches for raglan, increase the new stitches on sleeve in pattern as shown in A.1, i.e. work stitches in stocking stitch until there is room for a whole lace pattern. Work stitches that do not fit the pattern in stocking stitch when increasing. NOTE! When increases on sleeves goes from every other to every 4th row, the pattern will no longer follow the diagram. Make sure that the lace pattern continue correctly vertically. RAGLAN: All increases are done from the right side. Increase 1 stitch before/after the 4 stitches with marker in every transition between front pieces/back piece and sleeves (in pattern these stitches are called raglan stitches, and raglan stitches are worked in stocking stitch). Increase 1 stitch by making 1 yarn over. Work yarn overs as follows from wrong side: BEFORE RAGLAN STITCH: Purl yarn over in back loop of stitch. It should not make a hole. AFTER RAGLAN STITCH: Slip stitch off left needle and put it back on left needle but the opposite way (insert left needle in from behind when slipping it back on needle). Purl yarn over in front loop of stitch. It should not make a hole. V-NECK: All increases are done from the right side. Increase 1 stitch after the first 10 stitches at the beginning of row (band + 1 stitch in stocking stitch) / before the last 10 stitches at the end of row (1 stitch in stocking stitch + band). Increase 1 stitch by making 1 yarn over. Work yarn overs as follows from wrong side: BEFORE 10 STITCHES: Purl yarn over in back loop of stitch. It should not make a hole. AFTER 10 STITCHES: Slip stitch off left needle and put it back on left needle but the opposite way (insert left needle in from behind when slipping it back on needle). Purl yarn over in front loop of stitch. It should not make a hole. INCREASE TIP: Increase 1 stitch by making 1 yarn over. On next row work yarn overs twisted to avoid holes. Then work the new stitches in stocking stitch. DECREASE TIP (applies to mid under sleeves): Decrease 1 stitch on each side of marker thread as follows: Work until 3 stitches remain before marker thread and knit 2 together, knit 2 (marker thread is between these 2 stitches), slip 1 stitch knitwise, knit 1, pass slipped stitch over stitch worked (= 2 stitches decreased). BUTTONHOLES: Decrease for buttonholes on right band (when garment is worn). Decrease from right side when 7 stitches remain on row as follows: Knit 2 together, make 1 yarn over, purl 1, knit 1, purl 1, knit 1, 1 stitch in garter stitch. On next row (= wrong side) purl the yarn over to make a hole. Decrease for first buttonhole when 1 cm has been worked after last increase for V-neck. Then decrease the next 2 buttonholes, approx. 10-10½-10½-10-10½-10 cm apart. ---------------------------------------------------------- START THE PIECE HERE: ---------------------------------------------------------- JACKET - SHORT OVERVIEW OF THE PIECE: In this pattern long and short needles have been used, begin with fitting length and switch as needed. Begin by working 2 loose bands in rib. Then cast on stitches between these bands for shoulders and neck line at the back of neck. Then work yoke back and forth on circular needle, top down. When yoke is done, divide stitches for body and sleeves. Work body downwards back and forth on circular needle while putting the sleeves aside. Divide the piece for vents in each side, then finish front piece and back piece back and forth on circular needle separately. Then work sleeves downwards in the round on needle. Sew bands together mid back before sewing them on to neckline at the back of neck. RIGHT BAND (when garment is worn): Cast on 9 stitches on double pointed needle size 3.5 mm with 1 strand in each quality (= 2 strands). Work rib as follows from right side: * Purl 1, knit 1 *, work from *-* until 1 stitch remains, finish with 1 stitch in GARTER STITCH – read explanation above. Continue rib back and forth like this until band measures 14-14-14-17-17-18 cm, finish after 1 row from wrong side. Put piece aside. LEFT BAND (when garment is worn): Cast on 9 stitches on double pointed needle size 3.5 mm with 1 strand in each quality (= 2 strands). Work rib as follows from right side: 1 stitch in garter stitch, * knit 1, purl 1 *, work from *-* the entire row Continue rib back and forth like this until band measures 14-14-14-17-17-18 cm, finish after 1 row from right side, but do not cut the yarn. SHOULDERS AND NECKLINE AT THE BACK OF NECK: Now cast on 58-58-60-66-66-70 new stitches at the end of row, then slip the 9 stitches from right band back on needle and work rib as before over these 9 stitches = 76-76-78-84-84-88 stitches. Switch to circular needle size 5 mm. Purl 1 row from wrong side while working the 9 stitches in each side in rib as before. YOKE: Insert 4 markers in piece as explained below (without working the stitches). Use markers when increasing for raglan. Count 10 stitches (= left front piece), insert 1st marker in next stitch, count 15-15-15-17-17-17 stitches (= sleeve), insert 2nd marker in next stitch, count 22-22-24-26-26-30 stitches (= back piece), insert 3rd marker in next stitch, count 15-15-15-17-17-17 stitches (= sleeve), insert 4th marker in next stitch. 10 stitches remain on row after last marker (= right front piece). Work back and forth with stocking stitch on front pieces and back piece, PATTERN A.1 on sleeves - read explanation above (work A.1 between 1st and 2nd marker and between 3rd and 4th marker) and 9 band stitches in each side as before. REMEMBER THE KNITTING TENSION, AT THE SAME TIME increase for RAGLAN and V-NECK - read explanation above, this is done at the same time, therefore read both sections before continuing. Begin mid front and from right side. RAGLAN: Increase on each side of the 4 raglan stitches every other row (every row from right side) 14-12-14-28-26-30 times in total. Increases for raglan are now done in size XL. Work as explained below in the other sizes. SIZE S, M, L, XXL and XXXL: Continue increase for raglan on every other row but on every other increase, increase only on front pieces/back piece. I.e. increase on front pieces/back piece on every other row and on sleeves every 4th row (increase alternately 4 and 8 stitches). NOTE! When increasing on every 4th row on sleeves, make sure that lace pattern fits vertically. Increase like this 10-14-14-4-2 times on front pieces / back piece (5-7-7-2-1 times on sleeves). V-NECK: Increase for V-neck inside the outermost 10 stitches in each side every 4th row 10-10-11-12-12-14 times in total. Remember BUTTONHOLES on right band when increases for V-neck are done - read explanation above. ALL SIZES: When all increases for raglan and V-neck are done, there are 268-276-296-332-340-368 stitches on needle and piece measures approx. 22-24-25-25-27-29 cm measured from cast-on edge mid back. Now divide the yoke for body and sleeves. DIVIDING FOR BODY AND SLEEVES: Work the first 47-50-52-57-60-64 stitches as before (= front piece), slip the next 49-47-53-61-59-65 stitches on a thread for sleeve, cast on 8-10-12-12-14-16 new stitches on needle (= in the side under sleeve), work 76-82-86-96-102-110 stitches in stocking stitch (= back piece), slip the next 49-47-53-61-59-65 stitches on a thread for sleeve, cast on 8-10-12-12-14-16 new stitches on needle (= in the side under sleeve), and work the last 47-50-52-57-60-64 stitches as before (= front piece). Finish body and sleeves separately. Now measure piece from here! BODY: = 186-202-214-234-250-270 stitches. Insert 1 marker thread in each side on body, in the middle of the 8-10-12-12-14-16 stitches that were cast on under each sleeve. Move the marker threads upwards when working; they should be used for dividing for vents in each side. Work in stocking stitch back and forth with 9 band stitches in each side as before - remember BUTTONHOLES. Work until piece measures 20-20-21-22-22-22 cm. Now divide the piece at both marker threads to make a vent in each side and finish each part separately. LEFT FRONT PIECE: = 51-55-58-63-67-72 stitches. On next row (= right side) begin rib while AT THE SAME TIME increasing 15-17-18-19-21-22 stitches evenly on row (do not increase over band) = 66-72-76-82-88-94 stitches, work as follows: Switch to circular needle size 3.5 mm, work 1 stitch in garter stitch, work rib (= knit 1/purl 1 - remember increase) until 3 stitches remain, knit 1 and 2 stitches in garter stitch. When rib measures 8 cm, cast off all stitches with Italian cast off or cast off somewhat loosely with knit over knit and purl over purl. Jacket measures approx. 54-56-58-60-62-64 cm from shoulder. RIGHT FRONT PIECE: = 51-55-58-63-67-72 stitches. On next row (= right side) begin rib while AT THE SAME TIME increasing 15-17-18-19-21-22 stitches evenly on row (do not increase over band) = 66-72-76-82-88-94 stitches, work as follows: Switch to circular needle size 3.5 mm, work 2 stitches in garter stitch, work rib (= knit 1/purl 1 - remember increase) until 2 stitches remain, knit 1 and 1 stitch in garter stitch. When rib measures 8 cm, cast off all stitches with Italian cast off or cast off somewhat loosely with knit over knit and purl over purl. BACK PIECE: = 84-92-98-108-116-126 stitches. On next row (= right side) begin rib while AT THE SAME TIME increasing 29-33-35-39-41-45 stitches evenly = 113-125-133-147-157-171 stitches, work as follows: Switch to circular needle size 3.5 mm, work 2 stitches in garter stitch, work rib (= knit 1/purl 1 - remember increase) until 3 stitches remain, knit 1 and 2 stitches in garter stitch. When rib measures 8 cm, cast off the same way as on front pieces. SLEEVES: Slip the 49-47-53-61-59-65 stitches from thread in one side of piece on double pointed needles/a circular needle size 5 mm and pick in addition up 1 stitch in each of the 8-10-12-12-14-16 new stitches cast on under sleeve = 57-57-65-73-73-81 stitches. Insert 1 marker thread in the middle of the 8-10-12-12-14-16 stitches under sleeve. Begin round at the marker thread and continue with A.1 in the round. NOTE! Make sure to continue correctly over stitches from yoke, work the stitches that do not fit the pattern under sleeve in stocking stitch. When sleeve measures 2 cm from division, decrease 2 stitches mid under sleeve - read DECREASE TIP. Decrease like this every 2-2-2-1½-1½-1½ cm 4-3-5-8-6-8 times in total = 49-51-55-57-61-65 stitches. Work until sleeve measures 36-35-34-34-33-31 cm from division. 8 cm remain until finished measurements. Try the jumper and work to desired length before rib. Switch to double pointed needles size 3.5 mm and work rib (= knit 1/purl 1) while AT THE SAME TIME increasing 9-9-7-7-5-3 stitches evenly on 1st round = 58-60-62-64-66-68 stitches. When rib measures 8 cm, cast off all stitches with Italian cast off or cast off somewhat loosely with knit over knit and purl over purl. Sleeve measures approx. 44-43-42-42-41-39 cm from division. ASSEMBLY: Sew bands together mid back, and sew bands to neckline at the back of neck. Sew the buttons on to the left band. |
|||||||||||||
Diagram explanations |
|||||||||||||
|
|||||||||||||
 |
|||||||||||||
 |
|||||||||||||
 |
|||||||||||||
Have you finished this pattern?Tag your pictures with #dropspattern #afternooninprovencecardigan or submit them to the #dropsfan gallery. Do you need help with this pattern?You'll find 34 tutorial videos, a Comments/Questions area and more by visiting the pattern on garnstudio.com. © 1982-2026 DROPS Design A/S. We reserve all rights. This document, including all its sub-sections, has copyrights. Read more about what you can do with our patterns at the bottom of each pattern on our site. |
|||||||||||||


With over 40 years in knitting and crochet design, DROPS Design offers one of the most extensive collections of free patterns on the internet - translated to 17 languages. As of today we count 324 catalogues and 12290 patterns translated into English (UK/cm). 12290
We work hard to bring you the best knitting and crochet have to offer, inspiration and advice as well as great quality yarns at incredible prices! Would you like to use our patterns for other than personal use? You can read what you are allowed to do in the Copyright text at the bottom of all our patterns. Happy crafting!
Post a comment to pattern DROPS 250-6
We would love to hear what you have to say about this pattern!
If you want to leave a question, please make sure you select the correct category in the form below, to speed up the answering process. Required fields are marked *.