
Popular categories
Looking for a yarn?


Comments / Questions (15)
![]() Danix wrote:
Danix wrote:
I just figured out what was the problem that I have 250 sts instead of 266. In the description of how to knit diagram A1, 2 & 3, it says "work A1, A2 until there are 11 stitches left, work A3", so we all think knit (A1, A2, A1, A2...A3), but the real meaning is "A1, A2, A2, A2, A2...A3". Who would think that way when you read the sentence? Now I have to undo all the rows back to 137 sts before the colour work starts.
13.02.2026 - 22:37
![]() Danix wrote:
Danix wrote:
Same as Elizabeth said, I have 250 sts instead of 266 for M size after finishing A1,2&3. I did very detailed calculations to make sure I did not miss anything. The row before diagrams: 137 sts Increased from A1, 2 & 3: 104 + last row 9 sts Total 250 sts Could you please let me what was done wrong. Thanks.
13.02.2026 - 21:28
![]() Elizabeth wrote:
Elizabeth wrote:
I have worked the yoke to the end of the A1, A2 and A3 section including the increase on the last row. I am doing size M. I only have 250 stitches instead of the 266 it says on the pattern. Where have I gone wrong? I really can't work it out. Any help would be much appreciated. Thank you.
27.01.2026 - 10:01DROPS Design answered:
Dear Elizabeth, you work yoke as follows in M: 7 front band sts, A.1 (= 3 sts), then repeat A.2 a total of times (= 4 x 29 times = 116 sts), then work A.3 (= 4 sts) and 7 front band sts = 7+3+116+4+7=137 sts. Increase then just as shown in diagrams so that there are 5 sts in A.1, 8 sts in each A.2 and 6 sts in A.3 =7+5+(8x29)+6+7= 257 sts. Then increase 9 sts evenly on last round in diagrams = 266 sts. Happy knitting!
27.02.2026 - 15:58
![]() Estublier wrote:
Estublier wrote:
Question outrouver le tutoriel de ce modele de tricot jacquard ?????
31.12.2025 - 16:05
![]() Bigna wrote:
Bigna wrote:
Danke, ich hatte es nicht richtig verstanden. Ich dachte A1 und A2 müssen wiederholt werden, zuletzt dann 1xA3. Aber es ist 1xA1, dann (bei M) 29x A2, dann 1xA3. Dasselbe bei A4 und A5, also 1xA4, dann 35xA5. Ich hoffe mein Kommentar hilft (allenfalls könnte man die Anleitung klarer schreiben - es scheinen einige die gleichen Probleme zu haben.)
09.12.2025 - 21:34
![]() Bigna wrote:
Bigna wrote:
Ich stricke Grösse M. Habe also vor Beginn A1, A2, A3 137 Maschen. Am Ende von A1,A2,A3 nehme ich 9 Maschen zu, gibt 227+(2×7)+9=250, nicht 266. Wo habe ich etwas falsch gemacht?
07.12.2025 - 09:50DROPS Design answered:
Hi Bigna, first row (A.1-A.3): 7+3 (A.1)+(4x 29 times)+4 (A.3) +7=137. Last row (A.1-A.3): 7+5+(8x29 times)+6+7+9 additional sts = 12+232+13+9=266. Happy knitting!
07.12.2025 - 11:14
![]() Ute Kotulla wrote:
Ute Kotulla wrote:
Vielen Dank für die letzte Nachricht Entschuldigung. Leider verstehe ich es immer noch nicht ganz. In der Anleitung nehme ich die Masche in A 5 zu. Die A5 stricke ich aber in jeder Reihe nur einmal, am Schluss, oder? Liebe Grüße Ute
13.01.2025 - 11:42DROPS Design answered:
ooops my bad, Sie sind ja recht, man wird in A.5 zunehmen nicht in A.4 wie meine Antwort, so eher so: 1 M in jedem von den 37 Rapporte A.5 = 37 Zunahmen. Die Zunahme von A.5 entsteht nur am Anfang der 11. Reihe. Hoffentlich ist es ja klarer. Viel Spaß beim Stricken!
13.01.2025 - 16:47
![]() Ute Kotulla wrote:
Ute Kotulla wrote:
Guten Tag, ich habe die Passe gestrickt. Laut Anleitung sind vor A4 und A5 280 Maschen auf der Nadel und danach 317… Aber laut Diagrammen nehme ich nicht 37 Maschen auf. Es wird ja nur in einer Reihe aufgenommen. Mir fehlen jetzt fast 30 Maschen. Habt ihr euch verrechnet. Liebe Grüße Ute
12.01.2025 - 19:45DROPS Design answered:
Liebe Frau Kotulla, so stricken Sie die 280 Maschen: 7 Blenden-Maschen, die 7 Maschen A.4 insgesamt 37 Mal stricken, dann die 7 Maschen A.5 stricken und 7 Blenden-Maschen (7+(7*37)+7+7=280) - da es 1 Masche im A.4 zugenommen wird, wird man insgesamt 37 Maschen stricken (je 1 M pro A.4) = 317 Maschen wenn die Diagramme fertig sind. Viel Spaß beim Stricken!
13.01.2025 - 10:11
![]() Ulrika wrote:
Ulrika wrote:
När man börjar med oket ska man väl sticka 4 cm innan man börjar med mönstret? Så står det i herrvarianten och det ser så ut på bilden.
25.12.2023 - 15:38DROPS Design answered:
Hej Ulrika, du stickar enligt diagrammet direkt när du har börjat på oket, som vi beskriver i mönstret :)
02.01.2024 - 10:02
![]() Pilar Sanz wrote:
Pilar Sanz wrote:
Buenos días, no consigo encontrar el diagrama A.6 para hacer el canesú. He leído y releído todo el patrón y no encuentro indicaciones para hacerlo. ¿Podéis, por favor, guiarme en esto? Muchas gracias
21.12.2023 - 13:52DROPS Design answered:
Hola Pilar, hay una errata en el patrón, la corregiremos lo antes posible.
28.12.2023 - 23:06
|
||||||||||||||||||||||
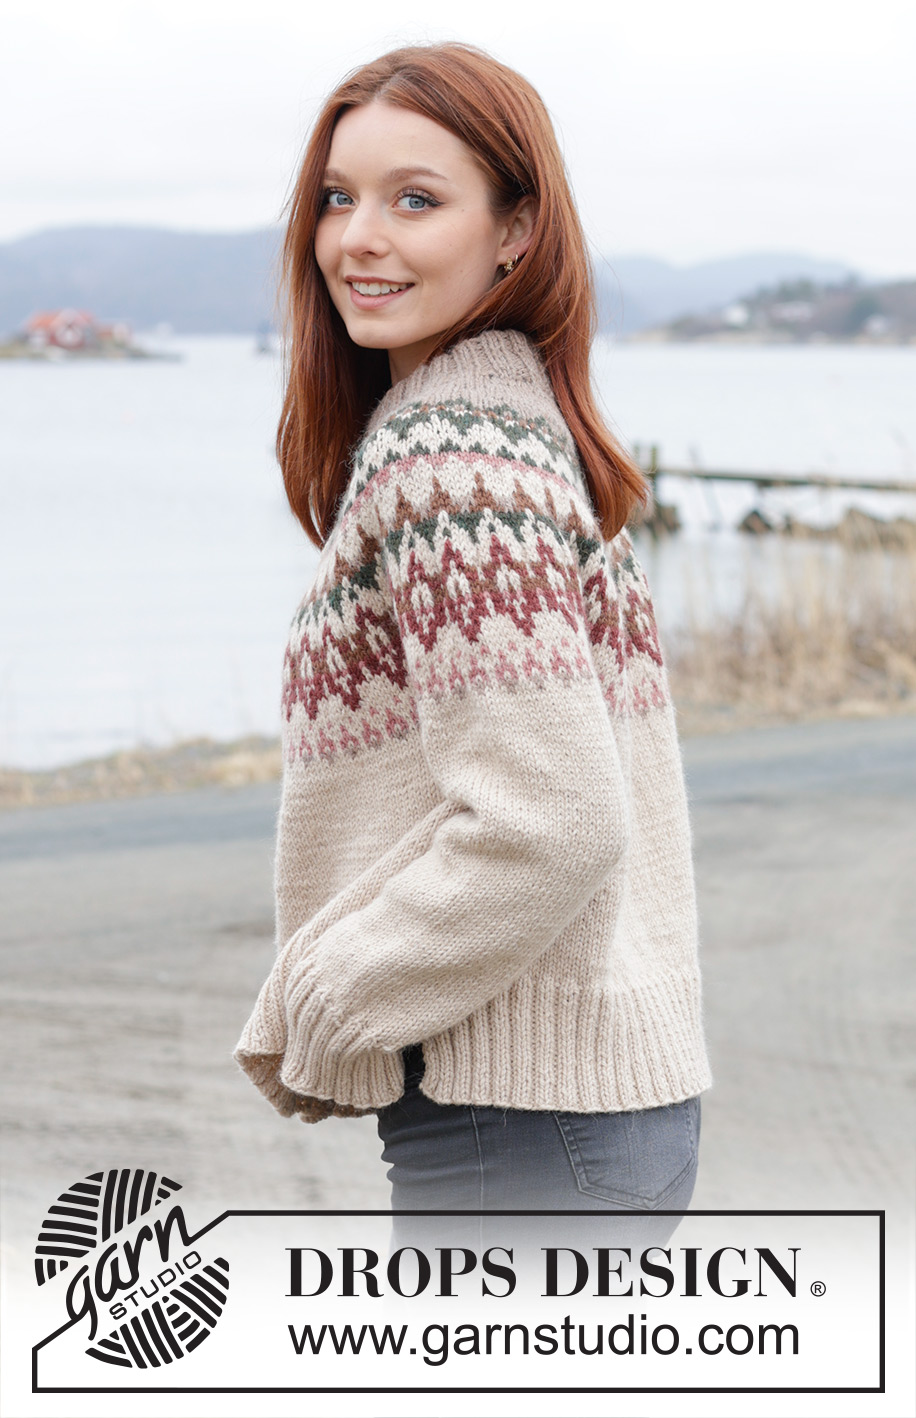
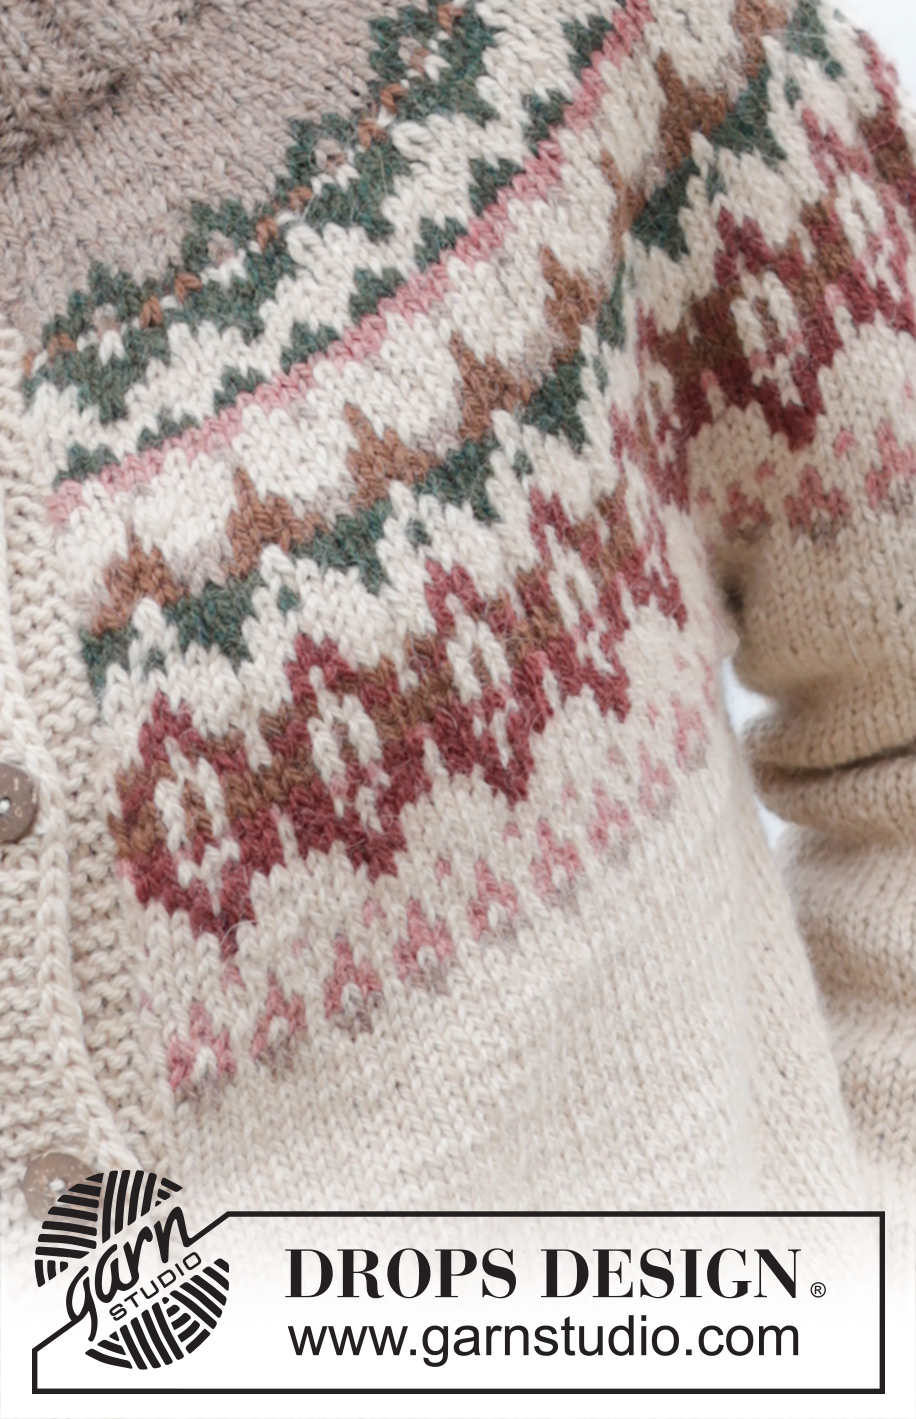
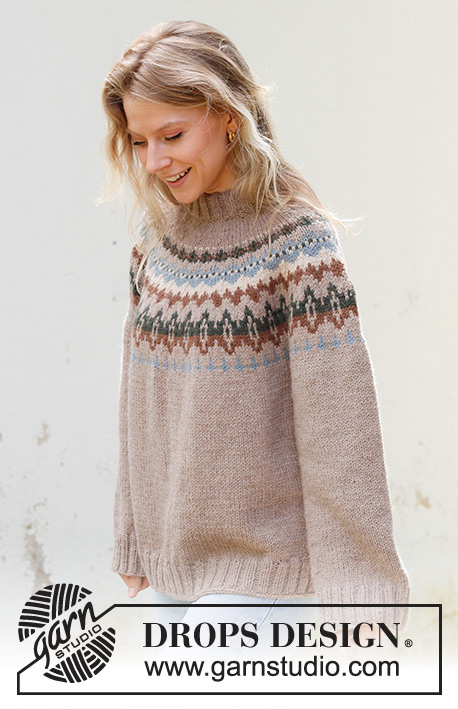
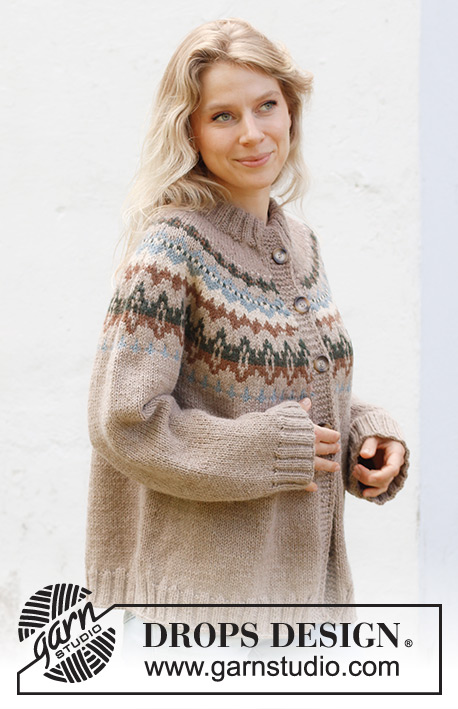
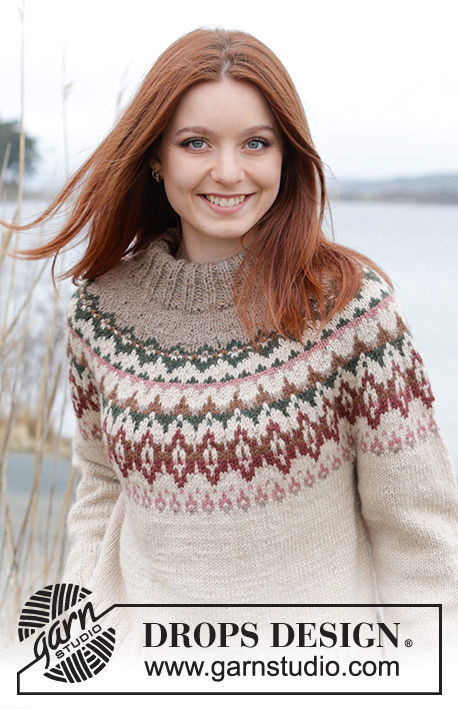
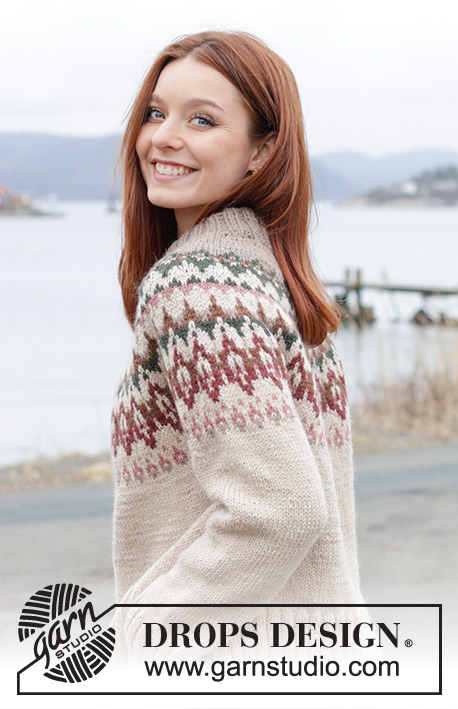
Forest Echo Cardigan#forestechocardigan |
||||||||||||||||||||||
 |
 |
|||||||||||||||||||||
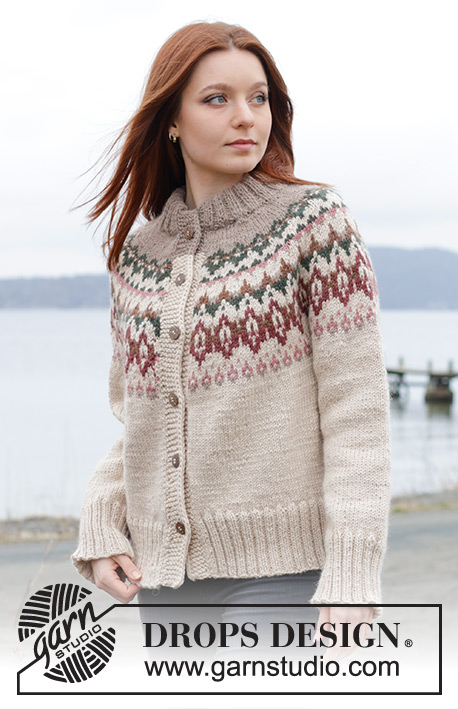
Knitted jacket in DROPS Nepal. The piece is worked top down with round yoke, multi-coloured pattern, double neck and split in sides. Sizes S - XXXL.
DROPS 244-10 |
||||||||||||||||||||||
|
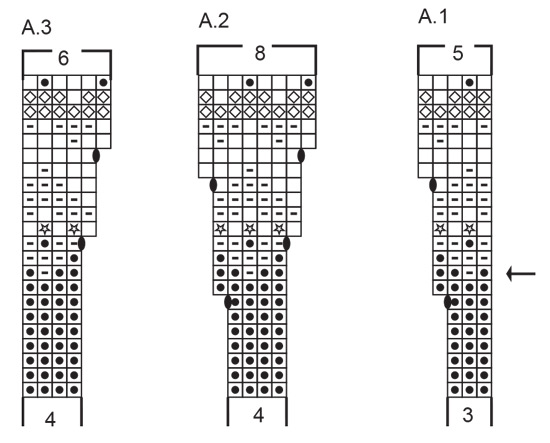
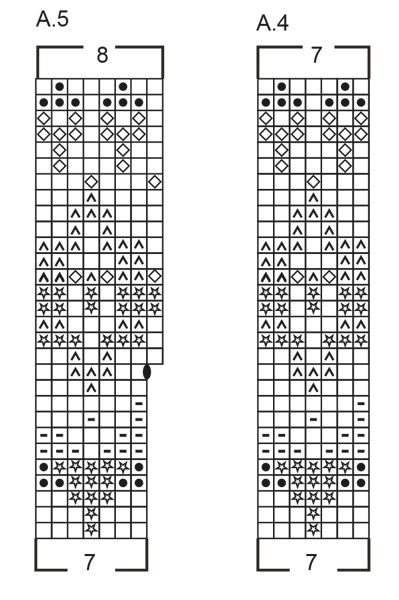
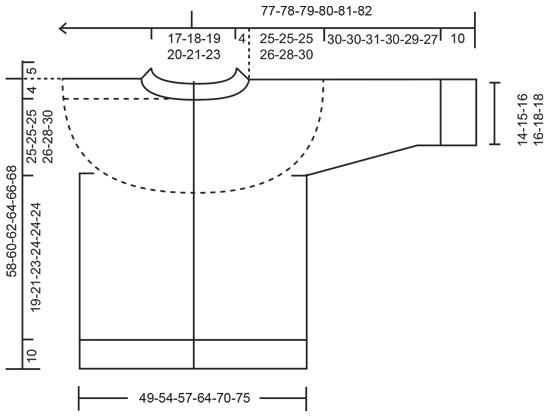
------------------------------------------------------- EXPLANATIONS FOR THE PATTERN: ------------------------------------------------------- GARTER STITCH (worked back and forth): Knit all rows. 1 ridge = knit 2 rows. PATTERN: See diagrams A.1 to A.5. The diagrams show all rows in the pattern from the right side. The whole pattern is worked in stocking stitch. INCREASE TIP-1 (evenly spaced): To work out how to increase evenly, count the total number of stitches on the needle (e.g., 96 stitches) minus bands (e.g., 14 stitches) and divide the remaining stitches by the number of increases to be made (e.g., 14) = 5.8. In this example, increase by making 1 yarn over after alternately each 5th and 6 th stitch. Do not increase on bands. On the next row work the yarn overs twisted to avoid holes. EDGE STITCHES: Work 2 edges at the beginning of the row: Slip 1 stitch purl-wise with the strand in front, knit 1. Work 2 edges at the end of the row: Work until there are 2 stitches left on the row, slip 1 stitch purl-wise with the strand in front, knit 1. Repeat at the beginning and end of each row. BUTTONHOLES: Work buttonholes on the right band (when the garment is worn). Work from the right side when there are 5 stitches left on the row as follows: Make 1 yarn over, knit 2 together and knit 3. On the next row (wrong side), knit the yarn over to leave a hole. The first buttonhole is worked on the first row from the right side after the neck. The other 5-5-6-6-6-6 buttonholes are then worked with approx. 9-9-8-8-9-9 cm between each one. The bottom buttonhole is worked in the transition between the stocking stitch and rib. KNITTING TIP: To avoid the knitting tension losing its elasticity when working pattern, it is important that the strands at the back are not tight. Use a size larger needle when working pattern if the piece becomes tight. DECREASE TIP (for sleeves): Decrease 1 stitch on each side of the marker-thread as follows: Work until there are 3 stitches left before the marker-thread, knit 2 together, knit 2 (marker-thread sits between these 2 stitches), slip 1 stitch knit-wise, knit 1 and pass the slipped stitch over the knitted stitch. ------------------------------------------------------- START THE PIECE HERE: ------------------------------------------------------- JACKET – SHORT OVERVIEW OF THE PIECE. The neck and yoke are worked back and forth with circular needle, from mid front and top down. The yoke is divided for body and sleeves and the body continued back and forth with circular needle. The sleeves are worked in the round with double pointed needles/short circular needle. DOUBLE NECK: Cast on 84-88-92-96-100-104 stitches with circular needle size 4 mm and colour camel DROPS Nepal. Purl 1 row (= wrong side). Work as follows from the right side: 1 GARTER STITCH – read description above, * knit 2, purl 2 *, work from *-* until there are 3 stitches left, knit 2 and 1 garter stitch. Continue this rib for 5 cm. Cast on 6 stitches at the end of the next 2 rows = 96-100-104-108-112-116 stitches. Work as follows from the right side: 2 EDGE STITCHES – read description above, 5 garter stitches (7 band stitches), * knit 2, purl 2 *, work from *-* until there are 9 stitches left, knit 2, 5 garter stitches and 2 EDGE STITCHES (7 band stitches). Continue this rib for 5 cm (10 cm rib in total). Work as follows from the right side: 7 band stitches as before, knit 82-86-90-94-98-102 and increase 29-37-41-49-53-57 stitches evenly over these stitches – read INCREASE TIP, work 7 band stitches as before = 125-137-145-157-165-173 stitches. YOKE: Change to circular needle size 5 mm. Purl 1 row from the wrong side (band stitches worked as before). Read KNITTING TIP and BUTTONHOLES and work as follows from the right side: 7 band stitches as before, work A.1, A.2 until there are 11 stitches left, work A.3 and 7 band stitches as before. The bands are worked with colour camel as far as the row with an arrow in A.1, then continued with colour light beige, (if light beige is not used in the pattern, twist the strand together with the pattern strand to avoid a hole; to avoid carrying the strand along the row you can work with 1 small ball for each band). On the last row in A.1/ A.2/ A.3 increase 5-9-7-11-9-7 stitches evenly spaced = 238-266-280-308-322-336 stitches. Now work as follows: 7 band stitches as before, A.4, A.5 until there are 7 stitches left, work 7 band stitches as before. When A.4 and A.5 are finished in height, there are 269-301-317-349-365-381 stitches. Continue with stocking stitch and band stitches as before, using colour light beige and decrease 4 stitches evenly on the first row = 265-297-313-345-361-377 stitches. When the yoke measures 25-25-25-26-28-30 cm (from the neck), divide for the body and sleeves on the next row as follows: Work 46-50-52-58-62-65 stitches as before (front piece), place the next 48-56-60-64-64-66 stitches on 1 thread for the sleeve, cast on 6-6-8-8-10-12 stitches (in side under sleeve), work 77-85-89-101-109-115 stitches (back piece), place the next 48-56-60-64-64-66 stitches on 1 thread for the sleeve, cast on 6-6-8-8-10-12 stitches (in side under sleeve), work the remaining 46-50-52-58-62-65 stitches as before (front piece). The body and sleeves are finished separately. The piece is now measured from here! BODY: = 181-197-209-233-253-269 stitches. Insert 1 marker-thread in the middle of the 6-6-8-8-10-12 cast-on stitches under each sleeve. Allow the threads to follow your work onwards; they are used when dividing for the split in each side. Work stocking stitch back and forth (and the band stitches as before) until the body measures 19-21-23-24-24-24 cm from the division – finish after a row from the wrong side. Now divide for the split in each side and finish each piece separately. Place the right front and back piece on separate threads = 49-53-56-62-67-71 stitches on the needle (left front piece). LEFT FRONT PIECE: Change to circular needle size 4 mm. Knit 1 row from the right side and increase 10-10-11-13-12-16 stitches evenly spaced – remember INCREASE TIP (do not increase over the band) = 59-63-67-75-79-87 stitches. Work as follows from the wrong side: 2 garter stitches, * purl 2, knit 2 *, work from *-* until there are 9 stitches left, purl 2 and 7 band stitches as before. Continue this rib for 10 cm. Cast off. The jacket measures approx. 58-60-62-64-66-68 cm from the shoulder. BACK PIECE: Place the 83-91-97-109-119-127 stitches on circular needle size 4 mm. Knit 1 row from the right side and increase 19-19-21-21-23-27 stitches evenly spaced – remember INCREASE TIP = 102-110-118-130-142-154 stitches. Work as follows from the wrong side: 2 garter stitches, * purl 2, knit 2 *, work from *-* until there are 4 stitches left, purl 2 and 2 garter stitches. Continue this rib for 10 cm. Cast off. RIGHT FRONT PIECE: Place the 49-53-56-62-67-71 stitches on circular needle size 4 mm. Knit 1 row from the right side and increase 10-10-11-13-12-16 stitches evenly spaced – remember INCREASE TIP (do not increase over the band) = 59-63-67-75-79-87 stitches. Work as follows from the wrong side: 7 band stitches as before, * purl 2, knit 2 *, work from *-* until there are 4 stitches left, purl 2 and 2 garter stitches. Continue this rib for 10 cm. Cast off. SLEEVES: Place the 48-56-60-64-64-66 stitches from the thread on the one side of the piece on short circular needle/double pointed needles size 5 mm and knit up 1 stitch in each of the 6-6-8-8-10-12 stitches cast on under the sleeve = 54-62-68-72-74-78 stitches. Insert a marker-thread in the middle of the new stitches under the sleeve. Start at the marker-thread and work stocking stitch in the round with colour light beige. When the sleeve measures 3 cm, decrease 2 stitches under the sleeve – read DECREASE TIP. Decrease like this every 12-6-5-3½-3½-2½ cm a total of 3-5-6-8-7-9 times = 48-52-56-56-60-60 stitches. Continue working until the sleeve measures 30-30-31-30-29-27 cm from the division (or to desired length. There is approx. 10 cm left). Knit 1 round and increase 12-12-12-12-12-12 stitches evenly spaced = 60-64-68-68-72-72 stitches. Change to double pointed needles size 4 mm and work rib (knit 2, purl 2) for 10 cm. Cast off a little loosely. The sleeve measures approx. 40-40-41-40-39-37 cm. Work the other sleeve in the same way. ASSEMBLY: Fold the neck double to the inside and sew down. To avoid the neck being tight and rolling outwards, it is important that the seam is elastic. Sew together the openings on each band with small stitches. Sew the buttons onto the left band. |
||||||||||||||||||||||
Diagram explanations |
||||||||||||||||||||||
|
||||||||||||||||||||||
 |
||||||||||||||||||||||
 |
||||||||||||||||||||||
 |
||||||||||||||||||||||
Have you finished this pattern?Tag your pictures with #dropspattern #forestechocardigan or submit them to the #dropsfan gallery. Do you need help with this pattern?You'll find 34 tutorial videos, a Comments/Questions area and more by visiting the pattern on garnstudio.com. © 1982-2026 DROPS Design A/S. We reserve all rights. This document, including all its sub-sections, has copyrights. Read more about what you can do with our patterns at the bottom of each pattern on our site. |
||||||||||||||||||||||


With over 40 years in knitting and crochet design, DROPS Design offers one of the most extensive collections of free patterns on the internet - translated to 17 languages. As of today we count 325 catalogues and 12291 patterns translated into English (UK/cm). 12291
We work hard to bring you the best knitting and crochet have to offer, inspiration and advice as well as great quality yarns at incredible prices! Would you like to use our patterns for other than personal use? You can read what you are allowed to do in the Copyright text at the bottom of all our patterns. Happy crafting!
Post a comment to pattern DROPS 244-10
We would love to hear what you have to say about this pattern!
If you want to leave a question, please make sure you select the correct category in the form below, to speed up the answering process. Required fields are marked *.