


Komentáře / Otázky (9)
![]() Ute Kotulla napsala:
Ute Kotulla napsala:
Vielen Dank für die letzte Nachricht Entschuldigung. Leider verstehe ich es immer noch nicht ganz. In der Anleitung nehme ich die Masche in A 5 zu. Die A5 stricke ich aber in jeder Reihe nur einmal, am Schluss, oder? Liebe Grüße Ute
13.01.2025 - 11:42Odpověď DROPS Design :
ooops my bad, Sie sind ja recht, man wird in A.5 zunehmen nicht in A.4 wie meine Antwort, so eher so: 1 M in jedem von den 37 Rapporte A.5 = 37 Zunahmen. Die Zunahme von A.5 entsteht nur am Anfang der 11. Reihe. Hoffentlich ist es ja klarer. Viel Spaß beim Stricken!
13.01.2025 - 16:47
![]() Ute Kotulla napsala:
Ute Kotulla napsala:
Guten Tag, ich habe die Passe gestrickt. Laut Anleitung sind vor A4 und A5 280 Maschen auf der Nadel und danach 317…\r\nAber laut Diagrammen nehme ich nicht 37 Maschen auf. Es wird ja nur in einer Reihe aufgenommen.\r\nMir fehlen jetzt fast 30 Maschen.\r\nHabt ihr euch verrechnet.\r\nLiebe Grüße Ute
12.01.2025 - 19:45Odpověď DROPS Design :
Liebe Frau Kotulla, so stricken Sie die 280 Maschen: 7 Blenden-Maschen, die 7 Maschen A.4 insgesamt 37 Mal stricken, dann die 7 Maschen A.5 stricken und 7 Blenden-Maschen (7+(7*37)+7+7=280) - da es 1 Masche im A.4 zugenommen wird, wird man insgesamt 37 Maschen stricken (je 1 M pro A.4) = 317 Maschen wenn die Diagramme fertig sind. Viel Spaß beim Stricken!
13.01.2025 - 10:11
![]() Ulrika napsala:
Ulrika napsala:
När man börjar med oket ska man väl sticka 4 cm innan man börjar med mönstret? Så står det i herrvarianten och det ser så ut på bilden.
25.12.2023 - 15:38Odpověď DROPS Design :
Hej Ulrika, du stickar enligt diagrammet direkt när du har börjat på oket, som vi beskriver i mönstret :)
02.01.2024 - 10:02
![]() Pilar Sanz napsala:
Pilar Sanz napsala:
Buenos días, no consigo encontrar el diagrama A.6 para hacer el canesú. He leído y releído todo el patrón y no encuentro indicaciones para hacerlo. ¿Podéis, por favor, guiarme en esto? Muchas gracias
21.12.2023 - 13:52Odpověď DROPS Design :
Hola Pilar, hay una errata en el patrón, la corregiremos lo antes posible.
28.12.2023 - 23:06
![]() Igodt Sandra napsala:
Igodt Sandra napsala:
Goeienavond, is het soms mogelijk dat er meer meerderingen moeten gemaakt worden in de laatste naald van het eerste telpatroon, Ik bekom 255 steken ipv 280, het komt volledig mooi uit maar ik begrijp niet hoe je de meerderingen en waar je ze moet maken om aan 280 steken te komen.Graag jullie hulp aub
23.10.2023 - 17:14
![]() Hanne napsala:
Hanne napsala:
Ser at jeg har tenkt feil, skjønte det når jeg leste oppskriften på annet språk. Her er oversettelsen dårlig til norsk. Burde stått 7 stolpemasker som før, strikk a1, gjenta a2 til det gjenstår 11 masker.
09.10.2023 - 18:33
![]() Hanne napsala:
Hanne napsala:
Det står at når en er ferdig med diagram A.1/A.2/A.3 økes det 9 masker jevnt fordelt til 266 masker. Men hvis en følger diagrammet ender en opp med 241 masker og hvis en øker 9 får en 250 ikke 266.
09.10.2023 - 13:23Odpověď DROPS Design :
Hej Hanne, du har 137 m, tager 2 masker ud i A.1, tager 4 masker ud i A.2 (som strikkes 29 gange) = 116 ud, tager 2 masker ud i A.3 = 257 + 9 jævnt fordelt = 266 masker
17.10.2023 - 12:14
![]() Angelika napsala:
Angelika napsala:
Bei Rücken- und Vorderteile werden laut Beschreibung Nadeln Nr. 3,5 benutzt. Anfangs werden aber nur Nadeln Nr. 4 und Nr. 5 aufgeführt. Was stimmt?
01.10.2023 - 17:54Odpověď DROPS Design :
Liebe Angelika, danke für den Hinweis, Bündchen sollen mit Nadeln Nr 4 gestrickt werden. Viel Spaß beim stricken!
09.11.2023 - 13:25
![]() Birgitte napsala:
Birgitte napsala:
Sweet prism
04.08.2023 - 10:58
|
||||||||||||||||||||||
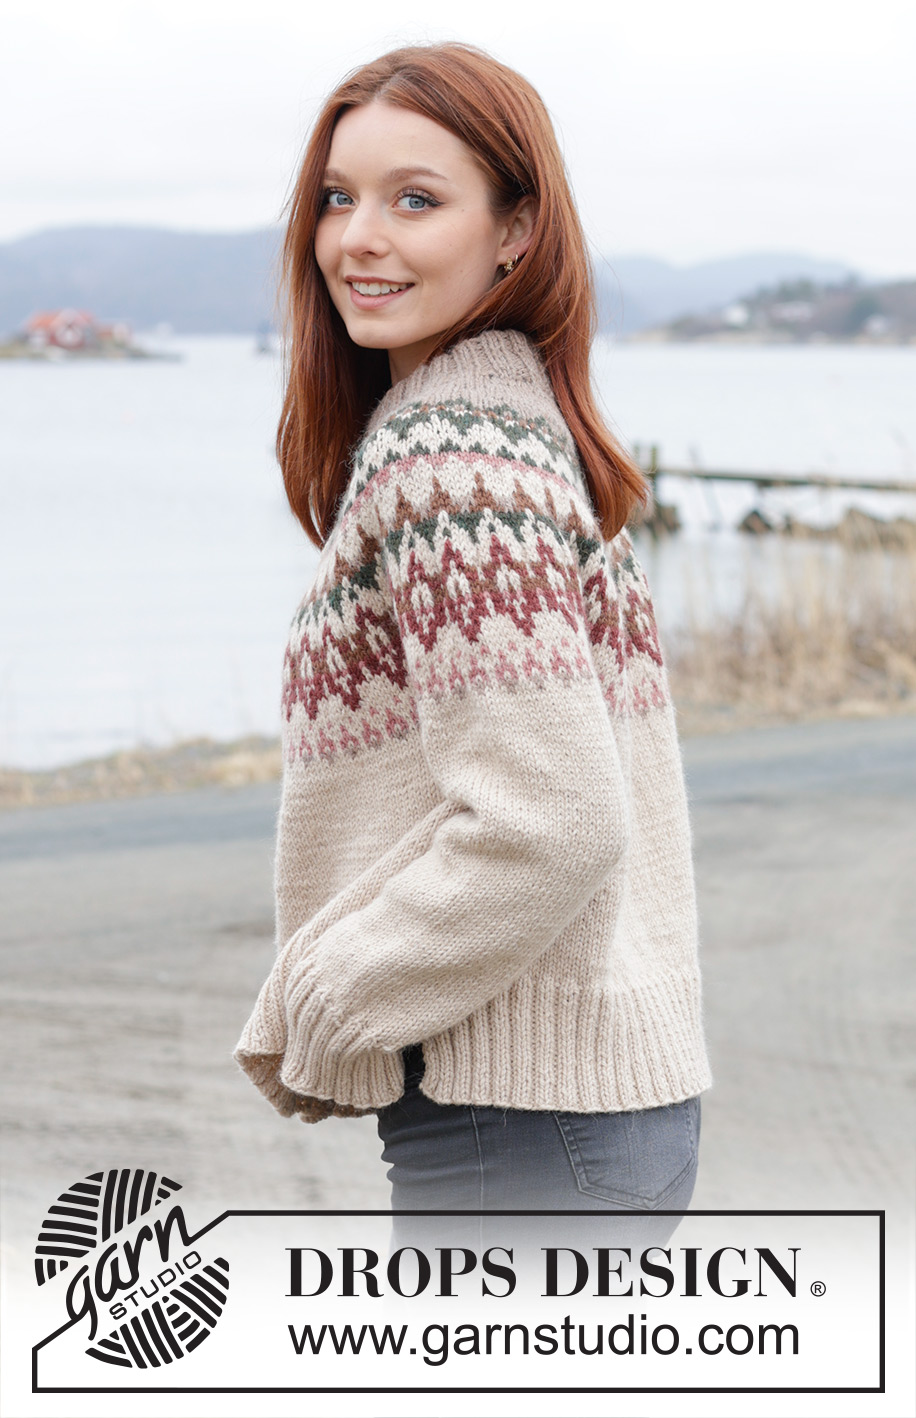
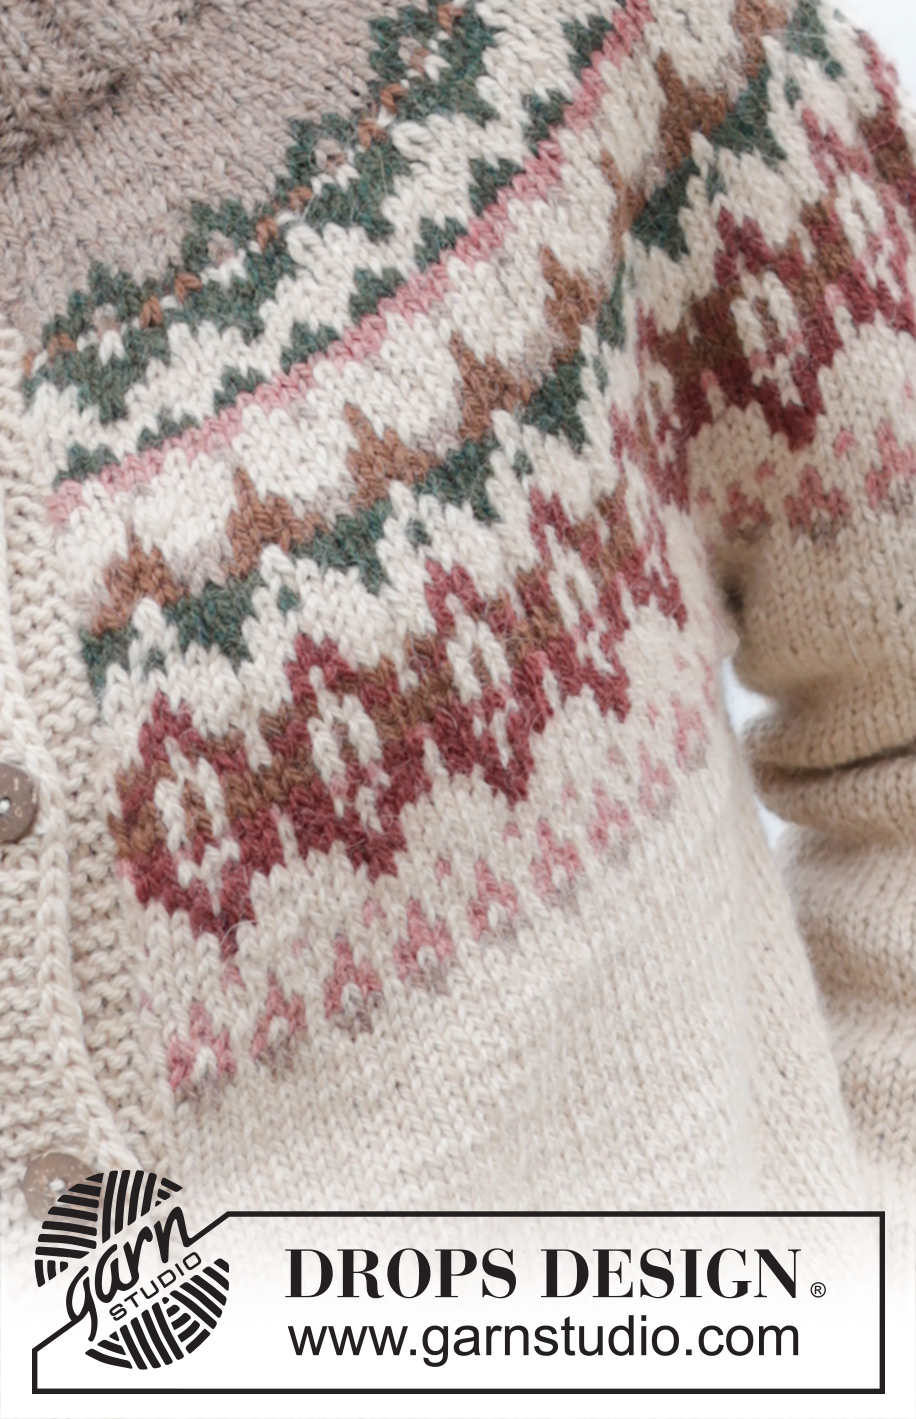
Forest Echo Cardigan#forestechocardigan |
||||||||||||||||||||||
 |
 |
|||||||||||||||||||||
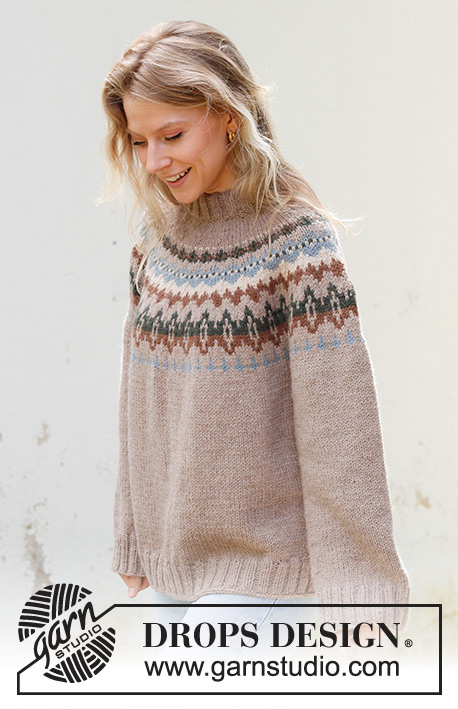
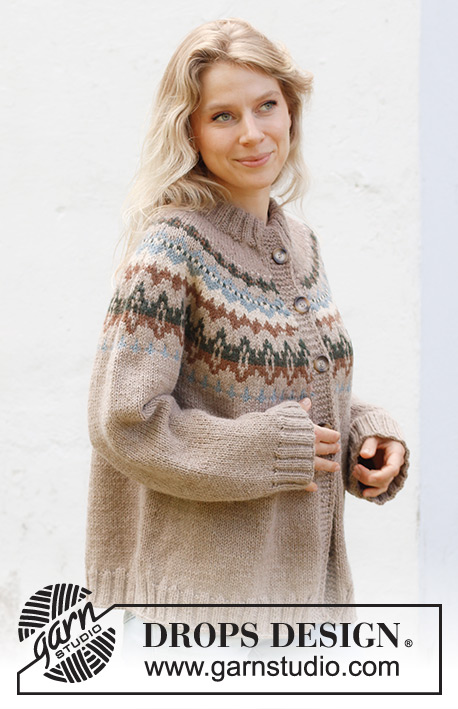
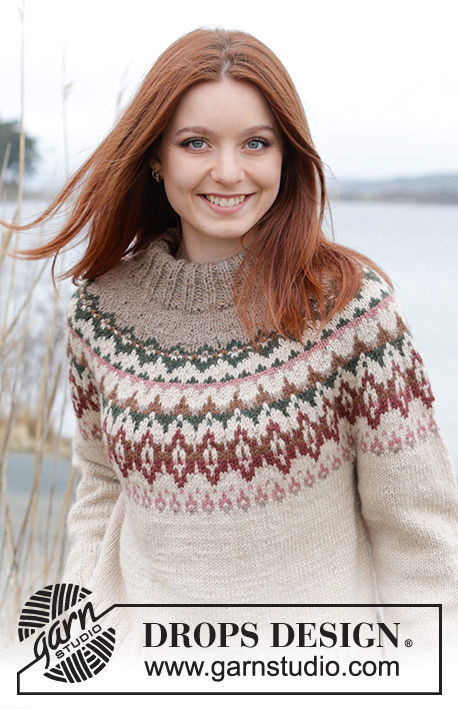
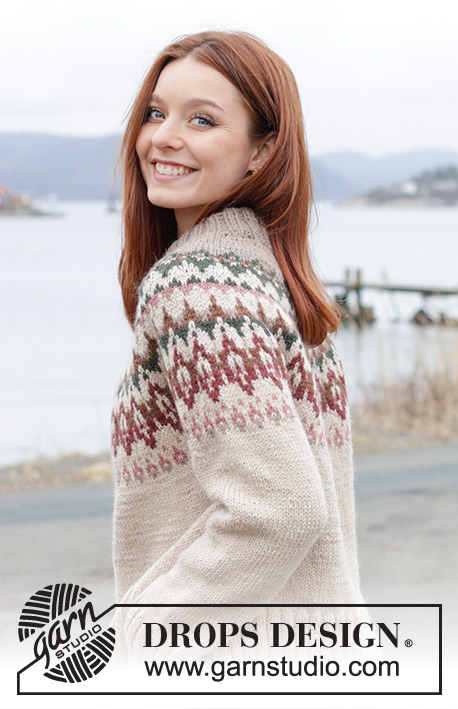
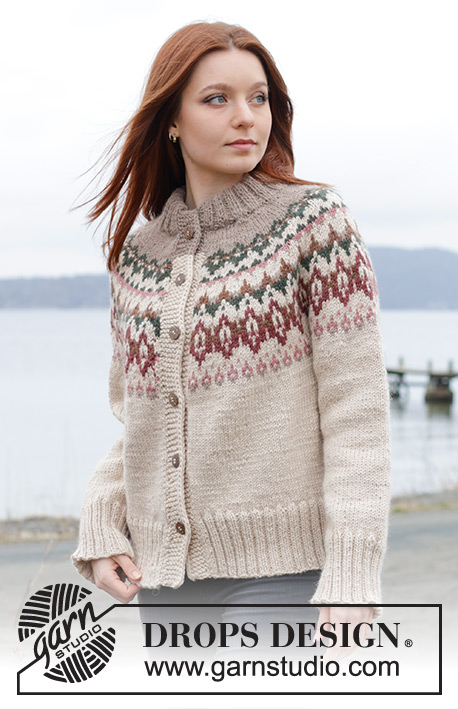
Propínací svetr s kruhovým sedlem, vyplétaným barevným vzorem a postranními rozparky pletený shora dolů z příze DROPS Nepal. Velikost S - XXXL.
DROPS 244-10 |
||||||||||||||||||||||
|
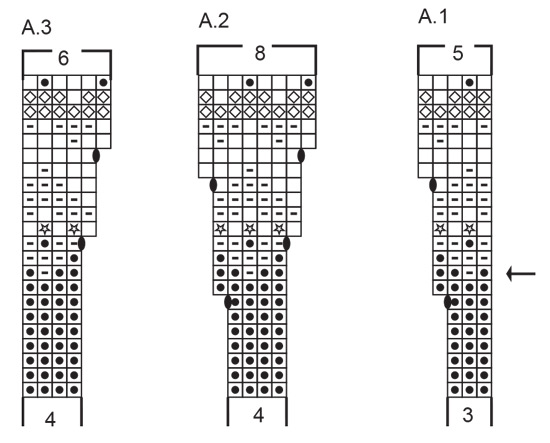
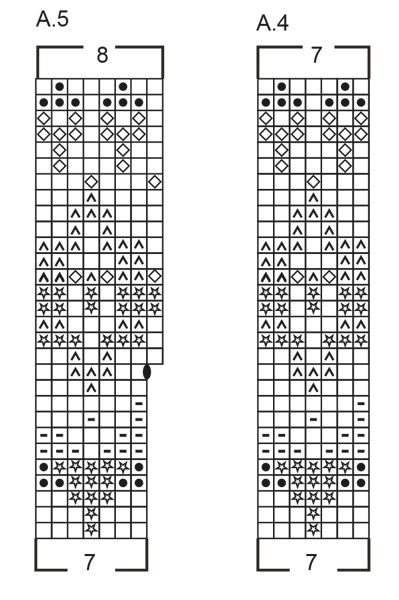
------------------------------------------------------- VYSVĚTLIVKY K NÁVODU: ------------------------------------------------------- VROUBKOVÝ VZOR: Pleteme stále hladce, lícové i rubové řady. 1 vroubek = 2 řady hladce. VZOR: Viz schémata A.1 až A.6. Zobrazeny jsou všechny řady vzoru nahlížené z lícové strany. Celý vzor pleteme lícovým žerzejem. TIP – PŘIDÁVÁNÍ: Abychom vypočítali v jakých rozestupech máme přidávat, odečteme od celkového počtu ok na jehlici (např. 96 ok) oka obou lég (tj. 14 ok) a zbytek vydělíme počtem ok, která potřebujeme přidat (např. 14) = 5,8. V tomto případě budeme nahazovat střídavě za každým 5. a 6. okem. Oka přidáváme vždy mimo obě légy. V následující řadě pleteme nahození za zadní nit, aby se v pletenině netvořily dírky. KRAJOVÁ OKA: 2 KRAJOVÁ OKA NA ZAČÁTKU ŘADY: Sejmeme 1 oko obrace s přízí před prací, upleteme 1 oko hladce. 2 KRAJOVÁ OKA NA KONCI ŘADY: Pleteme po poslední 2 oka v řadě, sejmeme 1 oko obrace s přízí před prací, 1 oko upleteme hladce. Toto opakujeme na začátku a na konci každé řady. KNOFLÍKOVÉ DÍRKY: Knoflíkové dírky vyplétáme v léze pravého předního dílu (na svetr se díváme, jako by byl oblečený). Pleteme lícovou řadu až po posledních 5 ok v řadě, 1 oko nahodíme, 2 oka spleteme hladce a 3 oka upleteme hladce. V následující (rubové) řadě pleteme nahození hladce – tím vznikne dírka. První knoflíkovou dírku vypleteme v první lícové řadě hned po dokončení průkrčníku. Dalších 5-5-6-6-6-6 knoflíkových dírek vyplétáme s rozestupy asi 9-9-8-8-9-9 cm. Spodní knoflíkovou dírku vypleteme v místě, kde lícový žerzej přechází do pružného lemu. TIP: Abychom předešli deformování pleteniny v místech s vyplétaným vzorem, dbáme na to, aby vlákna příze vedená za prací nebyla příliš utažená. Pokud má vzor přece jen tendenci se příliš stahovat, použijeme na vyplétání vzoru silnější jehlice. TIP – UJÍMÁNÍ (platí pro rukávy): Ujímáme 1 oko na každé straně značky takto: Začínáme 3 oka před značkou, spleteme 2 oka hladce, 2 oka upleteme hladce (značka leží mezi nimi), 1 oko sejmeme hladce, 1 oko upleteme hladce a sejmuté přes ně přetáhneme (= ujmuli jsme 2 oka). ------------------------------------------------------- PRÁCE ZAČÍNÁ ZDE: ------------------------------------------------------- SVETR – JAK BUDEME POSTUPOVAT: Pleteme v řadách na kruhové jehlici, shora dolů, od jednoho předního okraje ke druhému. Nejdříve upleteme průkrčník a sedlo. Pak od sedla oddělíme rukávy a trup dopleteme odděleně v řadách. Rukávy pleteme v kruhových řadách na ponožkových jehlicích / krátké kruhové jehlici. DVOJITÝ LEM PRŮKRČNÍKU: Na kruhovou jehlici č. 4 nahodíme přízí DROPS Nepal, barvou camel 84-88-92-96-100-104 ok a upleteme 1 rubovou řadu obrace. Další lícovou řadu pleteme v tomto rozvržení: 1 oko VROUBKOVÝM VZOREM – viz popis výše, * 2 oka hladce, 2 oka obrace *, opakujeme mezi *-* po poslední 3 oka, upleteme 2 hladce a 1 oko vroubkovým vzorem. Když je lem vysoký 5 cm, nahodíme na konci následujících 2 řad 6 nových ok = 96-100-104-108-112-116 ok. Další lícovou řadu pleteme v tomto rozvržení: 2 KRAJOVÁ OKA – viz popis výše, 5 ok vroubkovým vzorem (= 7 ok légy), * 2 oka hladce, 2 oka obrace *, opakujeme mezi *-* po posledních 9 ok, upleteme 2 oka hladce, 5 ok vroubkovým vzorem a 2 KRAJOVÁ OKA (= 7 ok légy). V tomto rozvržení pleteme pružný lem do výše 5 cm (po dokončení měří pružný lem celkem 10 cm). Další lícovou řadu pleteme v tomto rozvržení: 7 ok légy jako dosud, 82-86-90-94-98-102 ok hladce a SOUČASNĚ rovnoměrně přidáme 29-37-41-49-53-57 ok – viz TIP - PŘIDÁVÁNÍ, posledních 7 ok légy jako předtím = 125-137-145-157-165-173 ok. SEDLO: Pleteninu převedeme na kruhovou jehlici č. 5. Upleteme 1 řadu obrace (oka obou lég pleteme jako dosud). Viz TIP a KNOFLÍKOVÉ DÍRKY - následující lícovou řadu pleteme takto: 7 ok légy jako dosud, vzor A.1, vzor A.2 až po posledních 11 ok, vzor A.3 a 7 ok légy jako dosud. Obě légy pleteme barvou camel až k šipce ve schématu A.1, poté pokračujeme světle béžovou barvou - pokud v příslušné řadě béžovou barvou nepleteme, překřížíme na rubové straně obě vlákna mezi légou a vzorem, aby nám v pletenině nevznikaly nehezké dírky. POZN.: Abychom na rubové straně nemuseli táhnout dlouhé nitě, odmotáme si pro každou légu 2 menší klubíčka a každou légu pleteme 1 klubíčkem příze. V poslední řadě vzoru A.1/ A.2/ A.3 přidáme rovnoměrně 5-9-7-11-9-7 ok = 238-266-280-308-322-336 ok. Potom pleteme v tomto rozvržení: 7 ok légy jako dosud, vzor A.4, vzor A.5 až po posledních 12 ok, vzor A.6 a 7 ok légy jako dosud. Po dokončení sekvencí vzoru A.4, A.5 a A.6 na výšku máme na jehlici 269-301-317-349-365-381 ok. Pokračujeme lícovým žerzejem a na každé straně dílu pleteme légy světle béžovou přízí jako dosud a SOUČASNĚ v 1. řadě ujmeme rovnoměrně 4 oka = 265-297-313-345-361-377 ok. Ve výši 25-25-25-26-28-30 cm (měřeno od průkrčníku), rozdělíme pleteninu na trup a rukávy takto: Upleteme 46-50-52-58-62-65 ok jako dosud (= přední díl), odložíme následujících 48-56-60-64-64-66 ok na pomocnou jehlici (= rukáv), nahodíme 6-6-8-8-10-12 nových ok (= podpaží), upleteme 77-85-89-101-109-115 ok (= zadní díl), odložíme následujících 48-56-60-64-64-66 ok na pomocnou jehlici (= rukáv), nahodíme 6-6-8-8-10-12 nových ok (= podpaží), upleteme zbývajících 46-50-52-58-62-65 ok jako dosud (= přední díl). Trup a rukávy dokončíme samostatně. NYNÍ MĚŘÍME OD TOHOTO MÍSTA! TRUP: = 181-197-209-233-253-269 ok. Na každou stranu doprostřed 6-6-8-8-10-12 nahozených ok v podpaží vložíme 1 značku; snímáme je během práce vždy do aktuálně pletené kruhové řady - využijeme je později pro vytvoření postranních rozparků. Pleteme v řadách lícovým žerzejem a na každé straně dílu 7 ok légy jako dosud, až do výše 19-21-23-24-24-24 cm od podpaží – končíme rubovou řadou. Nyní pleteninu na bocích rozdělíme a vytvoříme postranní rozparky. Odložíme pravý přední díl a zadní díl na samostatné jehlice = 49-53-56-62-67-71 ok (= levý přední díl). LEVÝ PŘEDNÍ DÍL: Pleteninu převedeme na kruhovou jehlici č. 4. Upleteme 1 lícovou řadu hladce a SOUČASNĚ rovnoměrně přidáme 10-10-11-13-12-16 ok – viz TIP – PŘIDÁVÁNÍ (oka légy do přidávání nezahrnujeme) = 59-63-67-75-79-87 ok. Další rubovou řadu pleteme takto: 2 oka vroubkovým vzorem, * 2 oka obrace, 2 oka hladce *, opakujeme mezi *-* po posledních 9 ok, upleteme 2 oka obrace a 7 ok légy jako dosud. V tomto rozvržení pleteme v řadách lem do výše 10 cm a potom všechna oka uzavřeme. Svetr měří asi 58-60-62-64-66-68 cm (od ramene). ZADNÍ DÍL: Odložených 83-91-97-109-119-127 ok zadního dílu vrátíme z pomocné jehlice na kruhovou jehlici č. 4. Upleteme 1 lícovou řadu hladce a SOUČASNĚ rovnoměrně přidáme 19-19-21-21-23-27 ok – viz TIP – PŘIDÁVÁNÍ = 102-110-118-130-142-154 ok. Další rubovou řadu pleteme takto: 2 oka vroubkovým vzorem, * 2 oka obrace, 2 oka hladce *, mezi *-* opakujeme po poslední 4 oka, upleteme 2 oka obrace a 2 oka vroubkovým vzorem. V tomto rozvržení pleteme v řadách lem do výše 10 cm a potom všechna oka uzavřeme. PRAVÝ PŘEDNÍ DÍL: Na kruhovou jehlici č. 4 vrátíme odložených 49-53-56-62-67-71 ok. Upleteme 1 lícovou řadu hladce a SOUČASNĚ rovnoměrně přidáme 10-10-11-13-12-16 ok – viz TIP – PŘIDÁVÁNÍ (oka légy do přidávání nezahrnujeme) = 59-63-67-75-79-87 ok. Další rubovou řadu pleteme takto: 7 ok légy jako dosud, * 2 oka obrace, 2 oka hladce *, opakujeme mezi *-* po poslední 4 oka, upleteme 2 obrace a 2 oka vroubkovým vzorem. V tomto rozvržení pleteme v řadách lem do výše 10 cm a potom všechna oka uzavřeme. RUKÁVY: Odložených 48-56-60-64-64-66 ok jednoho rukávu vrátíme z pomocné jehlice na krátkou kruhovou jehlici nebo ponožkové jehlice č. 5 a navíc k nim nabereme po 1 oku z každých 6-6-8-8-10-12 ok nahozených v podpaží = 54-62-68-72-74-78 ok. Doprostřed nových ok v podpaží vložíme značku. Začínáme u značky, pleteme v kruhových řadách lícovým žerzejem a světle béžovou přízí. Ve výši 3 cm od podpaží ujmeme na každé straně značky 1 oko – viz TIP - UJÍMÁNÍ. Tímto způsobem ujímáme každých 12-6-5-3,5-3,5-2,5 cm výšky, celkem 3-5-6-8-7-9x = 48-52-56-56-60-60 ok. Pak pleteme rukáv až do výše 30-30-31-30-29-27 cm od podpaží (nebo do požadované výše) - do ukončení práce zbývá doplést 10 cm. Uleteme 1 kruhovou řadu hladce a SOUČASNĚ rovnoměrně přidáme 12-12-12-12-12-12 ok = 60-64-68-68-72-72 ok. Převedeme pleteninu na ponožkové jehlice č. 4 a pleteme pružný lem (střídáme 2 oka hladce, 2 oka obrace). Když je lem vysoký 10 cm, všechna oka volně uzavřeme. Rukáv měří asi 40-40-41-40-39-37 cm. Stejným způsobem upleteme i druhý rukáv. DOKONČENÍ: Lem průkrčníku přeložíme napolovic do rubu a přišijeme, dbáme na to, aby byl šev pružný - jinak se bude lem kroutit a ohýbat na lícovou stranu. Drobnými stehy sešijeme přední okraje lemu. Na levou légu přišijeme knoflíky. |
||||||||||||||||||||||
Vysvětlivky ke schématu |
||||||||||||||||||||||
|
||||||||||||||||||||||
|
||||||||||||||||||||||
|
||||||||||||||||||||||

|
||||||||||||||||||||||
Dokončili jste tento model?Pak označte své fotky tagem #dropspattern #forestechocardigan nebo je pošlete do galerie #dropsfan. Potřebujete s tímto návodem poradit?Otevřete-li si návod na stránce garnstudio.com, najdete tam 32 výukových video-ukázek, Komentáře/Dotazy a další užitečné informace. © 1982-2025 DROPS Design A/S. Vyhrazujeme si veškerá práva. Tento dokument, včetně všech jeho dílčích částí, podléhá autorským právům. Podrobnější komentář k možnostem užití našich návodů najdete dole pod každým návodem na našich stránkách. |
||||||||||||||||||||||


V oblasti pletené a háčkované módy působí DROPS Design více než 40 let. Díky tomu vám můžeme nabídnout jednu z nejrozsáhlejších kolekcí modelů s bezplatnými návody dostupnými na internetu - navíc v 17 jazycích. K dnešnímu dni máme na 314 katalogů a 11821 návodů celkem - z nich je už 7047 dostupných v [češtině].
Přidejte komentář k návodu DROPS 244-10
Rádi bychom věděli, co si o tomto modelu myslíte!
Pokud se chcete na něco zeptat, dbejte prosím na to, abyste ve formuláři níže vybrali správnou kategorii - díky tomu se dříve dozvíte, co potřebujete vědět. Povinná pole jsou označena *.