
Popular categories
Looking for a yarn?


Comments / Questions (31)
![]() Netty Vogel wrote:
Netty Vogel wrote:
Goedemiddag , Een vraag over patroon nr ..me 062-bn ,het blauwe meisjesvest in ribbelsteek met kabel. Bij de pas, laatste regel: Brei 1 naald aan de verkeerde kant. Moet er bij deze naalden aan de verkeerde kant ook A1 en A2 toegepast worden met de kabelnaald? Of brei ik alleen deze 6 steken in averecht. En moet ik de meerderingen voor de raglan zelf uitrekenen , omdat ik hiervoor geen telpatroon zie. Met vriendelijke groet, Netty Vogel
16.03.2022 - 15:44DROPS Design answered:
Dag Netty,
Als je aan de verkeerde kant breit, brei je inderdaad de 6 steken van A.1 of A.2 averecht. In de beschrijving staat dat je 1 naald aan de verkeerde kant moet breien. Dit is omdat je dan je de volgende naald, waarbij je begint met meerderen voor de raglan, aan de goede kant moet breien.
18.03.2022 - 08:56
![]() Anne Dickson wrote:
Anne Dickson wrote:
Hi there! Buttonholes-it says that buttonholes are worked on the right side, right band. But if they’re done at the end of the row as the instructions suggest (‘Work from the right side when there are 3 stitches left on the row as follows: Make 1 yarn over, k it two together and knit the last stitch’.) Surely this would mean that the buttonhole would be on the left band?Can you help, please?
08.12.2021 - 18:49DROPS Design answered:
Dear Mrs Dickson, the jacket is worked from the top down, this means from RS you start with left front piece and end with right front piece, the buttonholes will be worked at the end of a row from right side. Happy knitting!
09.12.2021 - 07:24
![]() Alice wrote:
Alice wrote:
When you are doing the increases for Raglan, do you have to move along where you will do the increase? I.e., for a 3/4 size, it says the front left is 13 stitches. I then increase. Does that mean I then knit 14 stitches for the next round? Another example: between A1 and A2, I'm to knit 8 stitches initially. Does this increase 2 after each increase? Thank you.
30.09.2021 - 11:25DROPS Design answered:
Dear Alice, yes. You should move the markers in each row, and then you will see that the number od stitches on each "piece" grows, and ypu go ahead with the yoke. The two frins by 1 stitch, the sleeves and the back by two stitch in each round with increases. Happy Stitching!
30.09.2021 - 16:02
![]() A Kar wrote:
A Kar wrote:
When casting on could you please explain what is meant by “(including 4 band stitches on each side towards mid front)”. Thank you.
29.09.2021 - 03:59DROPS Design answered:
Dear A Kar, it means that you don't need to add the band stitches, that they're already included in the amount of stitches. Happy knitting!
03.10.2021 - 23:13
![]() Caroline Beidelman wrote:
Caroline Beidelman wrote:
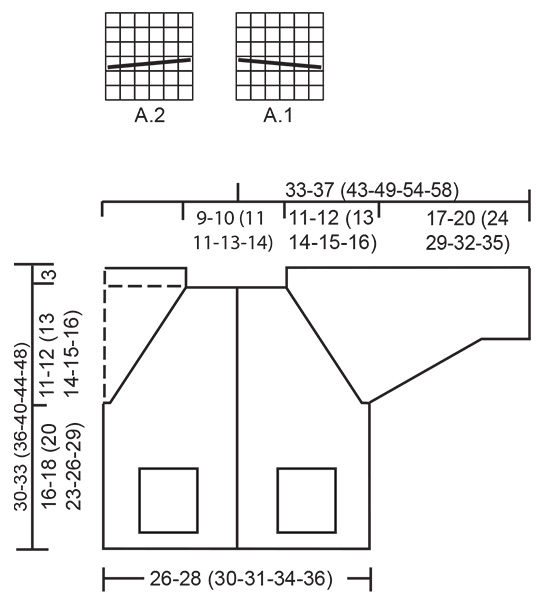
I am having difficulty understanding the increases & cable directions (and I am an experienced knitter!) For the increase to Raglan, I understand the increases. However, I cannot figure out if the cables A1 and A2are supposed to be at a slant, as they appear on the picture, thus offset; or are they supposed to be even from one row to the other, The tutorials do not explain that.
28.08.2021 - 03:26DROPS Design answered:
Dear Caroline, the cables themselves are actually straight, they apper slant only, becase there are increases for shaping the raglans before and after the cables. Happy Stitching!
28.08.2021 - 05:05
![]() Anna Maria Vitulano wrote:
Anna Maria Vitulano wrote:
Ciao. Vorrei farlo per un maschietto. È adatto secondo voi? Grazie 🤗
17.08.2021 - 09:00DROPS Design answered:
Buongiorno Anna Maria, questo modello è stato progettato per bambine, ma se preferisce può adattarlo anche a un maschietto. Ci sono tanti altri modelli di cardigan da bambino: abbiamo pubblicato un nuovo catalogo proprio oggi!Buon lavoro!
17.08.2021 - 11:00
![]() Marlies Hoffmann wrote:
Marlies Hoffmann wrote:
Guten Morgen,bei der Passe heißt es "Nach allen Raglanzunahmen hat die Arbeit eine Länge von ca. 11-12 (13-14-15-16) cm ab dem Anschlagrand. " In der Zeichnung sind für die Halsblende jedoch noch 3 cm zusätzlich angegeben, die ich mit zwei Krausripen unmöglich erreichen kann. Ich stricke in Gr. 98/104 und müßte demnach eine Länge von 14+3 cm = 17 cm ab Anschlagrand haben. Oder sehe ich das falsch? Gruß, Marlies Hoffmann
29.07.2021 - 07:58DROPS Design answered:
Guten Morgen Frau Hoffmann, bei der Maßskizze gelten die 3 cm oben für den Schulter, dh die Passe muss ca 11-12 (13-14-15-16) cm ab dem Anschlagrand aber wenn Sie die Arbeit wie bei der Skizze messen, dann sind es 3 cm mehr für den Schulter = 13-15 (16-17-18-19) cm vom Schulter. Viel Spaß beim stricken!
29.07.2021 - 09:18
![]() Tina Grajek wrote:
Tina Grajek wrote:
Nein, dann stimmt das bei mir nicht. Etwa 30 Reihen statt 42 ergeben bei mir 10 cm kraus rechts. Schade, dass das nicht in der Maschenprobe erwähnt wird. Wie rette ich jetzt mein Projekt am besten innerhalb der nächsten 4 cm? aktuell liegen 172 Macshen auf meinen Nadeln. Wenn ich wie bisher weiter stricke habe ich bei 15 vcm etwa 196M auf der Nadel. Ich würde dann die fehlenden 40M zusätzlich zum Raglan gleichmäßig verteilt in jeder 2.R zunehmen? Also 6/7 pro R.?
26.04.2021 - 09:21DROPS Design answered:
Liebe Frau Grajek, am besten versuchen Sie die richtige Maschenprobe in der Höhe zu haben, Sie müssen hier 21 M x 28 Reihe glatt rechts bzw 42 Reihe kraus rechts = 10 x 10 cm haben - hier lesen Sie mehr über Maschenprobe. Viel Spaß beim stricken!
26.04.2021 - 09:43
![]() Tina Grajek wrote:
Tina Grajek wrote:
Ich habe nach der 5. Raglanzunahme in jeder vierten Reihe bereits eine Höhe des Strickstücks von 11 cm. Es müssten also etwa noch 32 Reihen gestrickt werden um auf 236 Maschen (Größe 110/116) zu kommen. 32 Reihen umfassen etwa 10 cm. Wie komme ich nun am ehesten auf die benötigte Maschenanzahl innerhalb von 4 cm? In jeder 2. Reihe zusätzlich zu den Raglanzunahmen innerhalb der Reihe gleichmäßig verteilt zunehmen? In der Maschenprobe wird auch nur von glatt rechts gesprochen.
25.04.2021 - 22:13DROPS Design answered:
Liebe Frau Grajek, stimmt Ihre Maschenprobe? Sie sollen 28 Reihen glatt rechts oder 42 Reihen kraus rechts gestrickt = 10 cm, so bekommen Sie die 10+(13x4)=62 Reihen = ca 15cm. Viel Spaß beim stricken!
26.04.2021 - 08:32
![]() Laura Rocha wrote:
Laura Rocha wrote:
Buenas tardes, en el diagrama muestran sobre el hombro un rectángulo que mide 3, a qué medida corresponde? Es parte del cuello? Gracias
22.04.2021 - 18:44DROPS Design answered:
Hola Laura. Los 3 cm se corresponden a la parte de la manga en el cuello.
24.04.2021 - 19:33
|
||||||||||
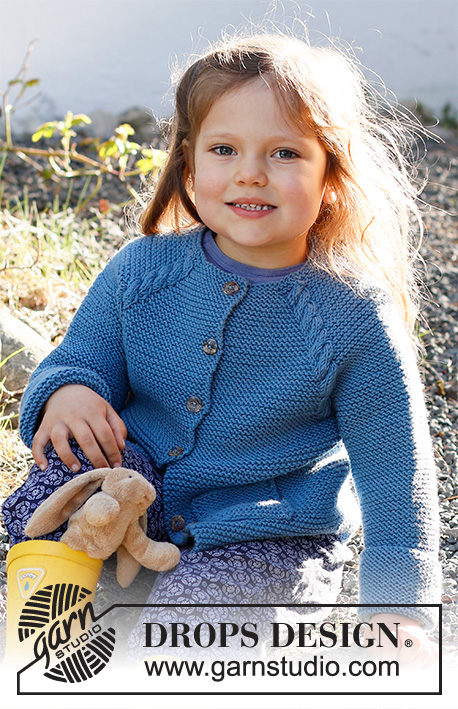
Autumn Smiles Cardigan#autumnsmilescardiganjacket |
||||||||||
 |
 |
|||||||||
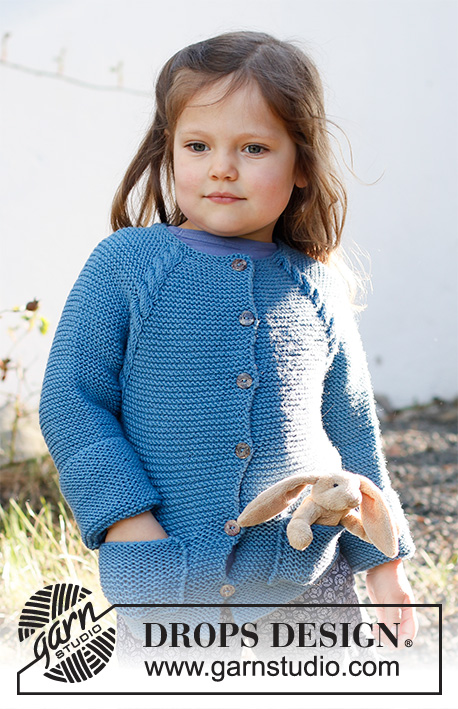
Knitted jacket for babies and children in DROPS Merino Extra Fine. The piece is worked top down with raglan, garter stitch, cables and pockets. Sizes 6 months - 8 years.
DROPS Children 37-15 |
||||||||||
|
------------------------------------------------------- EXPLANATIONS FOR THE PATTERN: ------------------------------------------------------- RIDGE/GARTER STITCH (worked back and forth): Knit all rows. 1 ridge in height = Knit 2 rows. BUTTONHOLES: Work buttonholes on right band (when garment is worn). Work from the right side when there are 3 stitches left on the row as follows: Make 1 yarn over, knit 2 together and knit the last stitch. On the next row (wrong side) knit the yarn over to leave a hole. The first buttonhole is worked when the neck measures 1½-2 cm = ½"-¾". Then work the other 4-5 (5-5-6-6) buttonholes with approx. 5-4½ (5-5½-5½-6) cm = 2"-1⅝" (2"-2⅛"-2⅛"-2⅜") between each one. PATTERN: See diagrams A.1 and A.2. The diagrams show all rows in the pattern from the right side. RAGLAN: All increases are worked from the right side! Increase 1 stitch on each side of each A.1 and A.2 (= 8 stitches increased on the row). Increase 1 stitch by making 1 yarn over. On the next row knit the yarn overs twisted to avoid a hole. DECREASE TIP (for sleeves): All decreases are worked from the right side! Decrease 1 stitch on each side of the piece as follows: Work 1 stitch in garter stitch, slip 1 stitch as if to knit, knit 1 and pass the slipped stitch over the knitted stitch (= 1 stitch decreased), work garter stitch until there are 3 stitches left, knit 2 together (= 1 stitch decreased) and finish with 1 stitch in garter stitch (= a total of 2 stitches decreased). BINDING-OFF TIP: To avoid the bind-off edge being tight you can bind off with a larger size needle. If the edge is still tight, make 1 yarn over after approx. each 4th stitch at the same time as binding off and the yarn overs are bind off as normal stitches. ------------------------------------------------------- START THE PIECE HERE: ------------------------------------------------------- JACKET – SHORT OVERVIEW OF THE PIECE: The jacket is worked top down, back and forth with circular needle and from mid front. The sleeves are worked back and forth with circular needle, then sewn together to finish. The pockets are worked back and forth with circular needle and sewn onto the jacket. NECK: Cast on 68-72 (80-80-88-92) stitches (including 4 band stitches on each side towards mid front) with circular needle size 4 mm = US 6 and Merino Extra Fine. Work 2 RIDGES – read description above and increase 4 stitches evenly spaced on the last row = 72-76 (84-84-92-96) stitches. YOKE: The next row is worked as follows from the right side – remember BUTTONHOLES on the right band – read description above: Work 10-11 (13-13-15-16) stitches in garter stitch (= left front piece), A.1 (= 6 stitches), 8 stitches in garter stitch, A.2 (= 6 stitches) (= left sleeve), 12-14 (18-18-22-24) stitches in garter stitch (= back piece), A.1 over the next 6 stitches, 8 stitches in garter stitch, A.2 over the next 6 stitches (= right sleeve), 10-11 (13-13-15-16) stitches in garter stitch (= right front piece). Work 1 row from the wrong side. Increase to RAGLAN – read description above – on each side of each A.1 and A.2 as follows: Increase every 2nd row a total of 5 times, then every 4th row a total of 9-10 (11-12-13-14) times = 184-196 (212-220-236-248) stitches. REMEMBER THE KNITTING GAUGE! When all the increases to raglan are finished the piece measures approx. 11-12 (13-14-15-16) cm = 4⅜"-4¾" (5⅛"-5½"-6"-6¼") from the cast-on edge. If necessary, continue working with garter stitch and cables but without further increases until the piece measures 11-12 (13-14-15-16) cm = 4⅜"-4¾" (5⅛"-5½"-6"-6¼"). On the next row divide the piece for body and sleeves as follows: Work 28-30 (33-34-37-39) stitches in garter stitch (= front piece), place the next 40-42 (44-46-48-50) stitches on 1 thread for the sleeve, cast on 6 new stitches under the sleeve, work 48-52 (58-60-66-70) stitches in garter stitch (= back piece), place the next 40-42 (44-46-48-50) stitches on 1 thread for the sleeve, cast on 6 new stitches under the sleeve, work 28-30 (33-34-37-39) stitches in garter stitch (= front piece). BODY: = 116-124 (136-140-152-160) stitches. Work garter stitch until the piece measures 16-18 (20-23-26-29) cm = 6¼"-7" (8"-9"-10¼"-11⅜") from where the body and sleeves were divided. Bind off – read BINDING-OFF TIP. SLEEVE: Place the 40-42 (44-46-48-50) stitches from the thread on the one side of the piece on circular needle size 4 mm = US 6. Cast on 4 stitches at the end of the next 2 rows (= 4 new stitches on each side of the piece) = 48-50 (52-54-56-58) stitches (including 1 edge stitch on each side). Work garter stitch back and forth. When the piece measures 2 cm = ¾" from the division, decrease 1 stitch on each side of the piece – read DECREASE TIP. Decrease like this every 8th-10th (12th-14th-14th-14th) row a total of 7-7 (7-7-8-8) times = 34-36 (38-40-40-42) stitches. Continue with garter stitch until the sleeve measures 17-20 (24-29-32-35) cm = 6¾"-8" (9½"-11⅜"-12½"-13¾") from the division. Bind off. Work the other sleeve in the same way. POCKET: Cast on 14-14 (16-16-18-18) stitches with circular needle size 4 mm = US 6 and Merino Extra Fine. Work garter stitch back and forth until the piece measures 7-7 (8-8-9-9) cm = 2¾"-2¾" (3⅛"-3⅛"-3½"-3½"). Bind off. Work one more pocket in the same way. ASSEMBLY: Sew the sleeve seams inside the 1 edge stitch. Sew the openings under the sleeves. Sew buttons onto the left band. Sew on the pockets, approx. 3-3 (3-4-4-4) cm = 1⅛"-1⅛" (1⅛"-1½"-1½"-1½") above the bottom edge and in the middle of each front piece. |
||||||||||
Diagram explanations |
||||||||||
|
||||||||||
 |
||||||||||
Have you finished this pattern?Tag your pictures with #dropspattern #autumnsmilescardiganjacket or submit them to the #dropsfan gallery. Do you need help with this pattern?You'll find 25 tutorial videos, a Comments/Questions area and more by visiting the pattern on garnstudio.com. © 1982-2026 DROPS Design A/S. We reserve all rights. This document, including all its sub-sections, has copyrights. Read more about what you can do with our patterns at the bottom of each pattern on our site. |
||||||||||


With over 40 years in knitting and crochet design, DROPS Design offers one of the most extensive collections of free patterns on the internet - translated to 17 languages. As of today we count 324 catalogs and 12290 patterns - 12280 of which are translated into English (US/in).
We work hard to bring you the best knitting and crochet have to offer, inspiration and advice as well as great quality yarns at incredible prices! Would you like to use our patterns for other than personal use? You can read what you are allowed to do in the Copyright text at the bottom of all our patterns. Happy crafting!
Post a comment to pattern DROPS Children 37-15
We would love to hear what you have to say about this pattern!
If you want to leave a question, please make sure you select the correct category in the form below, to speed up the answering process. Required fields are marked *.