
Popular categories
Looking for a yarn?


Comments / Questions (90)
![]() Ellen Zandijk wrote:
Ellen Zandijk wrote:
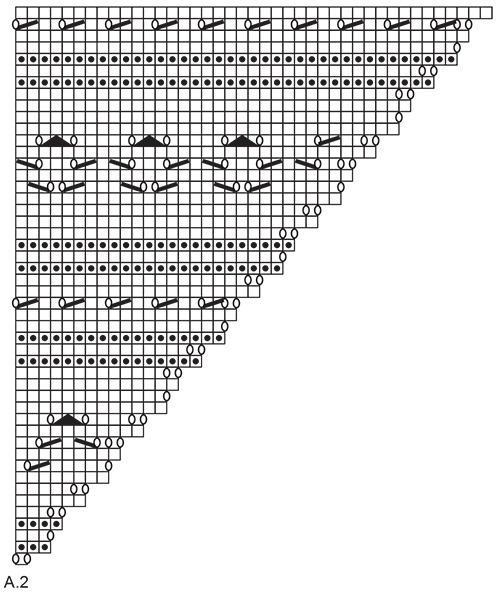
Goedemiddag, Ik heb A1, A2, A3 en A4 1x gebreid. Ik heb 183 steken. Aan beide kanten van de middelste steek heb ik 90 steken + 2 kantsteken. Ik begrijp niet hoe ik verder moet. Ik hoor graag van u.
14.02.2026 - 13:50DROPS Design answered:
Dag Ellen,
Je breit verder op dezelfde manier, alleen brei je nu 10 herhalingen van A.3 in de breedte (in plaats van 1 herhaling in de breedte).
15.02.2026 - 14:16
![]() Janet Mikkelsen wrote:
Janet Mikkelsen wrote:
Jeg vil mene at jeg er en habil strikker men jeg har ikke held med at læse denne opskrift. Jeg fatter den bare ikke. Jeg er nået til række 5 i mønstret og mit maske antal passer med diagrammerne men ikke med teksten i opskriften. Der er ikke masker nok til at gentage A2-A4 samt en midtermaske og 2 kantmasker. Jeg har læst alle kommentar på denne opskrift og kan forstå at der er mange ligesom mig der ikke forstår hvad man skal gøre.
11.01.2026 - 14:39
![]() Pia Lindgreen wrote:
Pia Lindgreen wrote:
Hvis rigtig forstået så strikkes nedefra mønsteret og opad. Ender med masker: 1+41+8+40+1+41+8+40+1 masker så er jeg i toppen af mønsteret. Men hvordan får jeg videre de 8m. A3 ind som repetetion?mangler mønster forklaring hvornår og hvormange og hvor i mønsteret de skal ind Kan du hjælpe? Hilsen pia
20.12.2025 - 15:36DROPS Design answered:
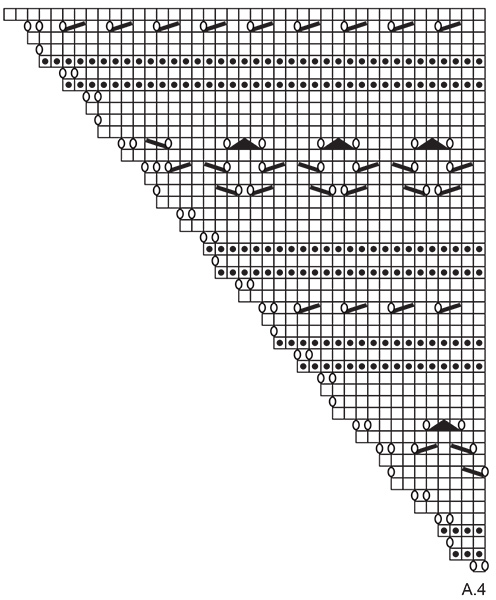
Hei Pia. Når du har strikket diagrammene A.2, A.3 og A.4 1 gang i høyden har du 183 masker (1+41+8+41+1+41+8+41+1 =183). Så starter du på 1. rad i diagrammene igjen, men over A.2 (41 masker) og A.4 (41 masker) strikkes A.3 5 ganger, altså se på diagram A.2. Du strikkes nå A.2 (starten på diagrammet, som består kun av 1 maske) i øverste maske i høyre side på siste pinne, de resterende maskene (40 masker på siste rad av diagram A.2) strikkes nå A.3 (8 masker x 5 = 40). Det samme gjelder også for A.4. Man strikker da A.3 5 ganger over A.2 og 5 ganger over A.4 på hver side av midtmasken = 10 repetisjoner av A.3. mvh DROPS Design
05.01.2026 - 11:42
![]() Lucie Cliche wrote:
Lucie Cliche wrote:
Bonjour a vous je ne comprends vraiment pas comment lire le diagramme A1. Existe t'il une description écrite de la marche à suivre? Est-ce que le diagramme représente tous les rangs à tricoter? Merci
01.12.2025 - 15:59DROPS Design answered:
Bonjour Mme Cliche, les diagrammes se lisent de bas en haut: de droite à gauche sur l'endroit et de gauche à droite sur l'envers. Ainsi, au 1er rang de A.1, on va tricoter: (1 jeté, 2 m end, 1 jeté), au 2ème rang: (4 m endroit) et ainsi de suite. Retrouvez plus d'infos sur les diagrammes ici. Bon tricot!
01.12.2025 - 16:30
![]() Emmy wrote:
Emmy wrote:
Bonjour, j'ai bientot termine l'ouvrage par contre j'ai utilise une pelote "type drop Snow - 100% laine" avec des aiguilles de 5. Je voudrais savoir si à la fin de l'ouvrage je devrais passer par le processus du blocage pour fixer mon ouvrage - Merci
29.11.2025 - 21:09DROPS Design answered:
Bonjour Emmy, consultez la bande/l'étiquette de votre laine pour en savoir plus sur l'entretien, et vous pouvez, si vous le souhaitez, bloquer votre ouvrage, et comment le bloquer; mais pensez à bien respecter les consignes d'entretien. N'hésitez pas à demander conseil auprès du magasin où vous avez acheté votre laine, ils pourront vous aider, même par mail ou téléphone. Bon tricot!
01.12.2025 - 08:49
![]() Veronica wrote:
Veronica wrote:
Ciao ma il modello in foto sono due lavori uniti? Oppure è il risultato di un unico lavoro? Grazie
16.11.2025 - 14:01DROPS Design answered:
Buongiorno Veronica, la foto mostra il lavoro finito. Buon lavoro!
16.11.2025 - 15:30
![]() Emmy wrote:
Emmy wrote:
Si j'ai bien compris: après que j'ai terminé A.2 et A4, je reprend depuis le diagramme depuis le début, en prenant compte les augmentations, jusqu'à qu'à une hauteur de 72 cm.
02.11.2025 - 23:39DROPS Design answered:
Bonjour Emmy, tout à fait. Bon tricot!
03.11.2025 - 08:31
![]() Emmy wrote:
Emmy wrote:
Je n'ai pas compris, cette partie: Répéter le point fantaisie en hauteur, c'est-à-dire qu'à chaque fois que l'on tricote les diagrammes, on a suffisamment de mailles pour tricoter 10 motifs de plus de A.3 de chaque côté de la maille centrale. J'ai tricoté tous les rangs de A.2 à A4 (1 fois) et là je bloque.
24.10.2025 - 11:15DROPS Design answered:
Bonjour Emmy, lorsque vous avez terminé A.2 et A.4 en hauteur, vous avez augmenté 40 mailles de chaque côté, au rang suivant sur l'endroit, vous tricotez ainsi: A.2 = 1 m (la 1ère maille du A.2 précédent) puis 4 fois les 10 mailles de A.3, tricotez A.3 comme avant jusqu'aux mailles de A.4, tricotez 4 x A.3 et terminez par la maille de A.4 (avec les augmentations), vous avez maintenant suffisamment de mailles pour tricoter 20 fois A.3 en plus par rapport au 1er motif en hauteur, entre A.2 et A.4. Bon tricot!
29.10.2025 - 14:47
![]() Anne wrote:
Anne wrote:
Liian hankala ohje, ei tästä ota selvää.
12.10.2025 - 09:42
![]() Anne wrote:
Anne wrote:
Voitteko selittää mitä tämä tarkoittaa: o du tager 8 masker ud i hver A.1. Så du får 1+(2+8)+1+(2+8)+1 = 23 masker ja MITÄ tämä tarkoittaa: Neulo 1 reunasilmukka ainaoikeaa, A.2 (= 1 silmukka), A.3 (= 8 silmukkaa), A.4 (= 1 silmukka), 1 silmukka sileää neuletta??? eli A2 = 1 silmukka?
11.10.2025 - 09:31DROPS Design answered:
Hei, tässä selitetään miten kerroksen silmukat neulotaan, eli neulo: 1 reunasilmukka ainaoikeaa, neulo sitten mallineuletta piirroksen A.2 mukaisesti (= 1 silmukka ensimmäisellä kerroksella, lisäksi piirroksen mukaan tehdään 2 langankiertoa), neulo mallineuletta piirroksen A.3 mukaisesti, neulo mallineuletta piirroksen A.4 mukaisesti, jne.
13.10.2025 - 17:21
|
|||||||||||||||||||
Austrian Spring#austrianspringshawl |
|||||||||||||||||||
 |
 |
||||||||||||||||||
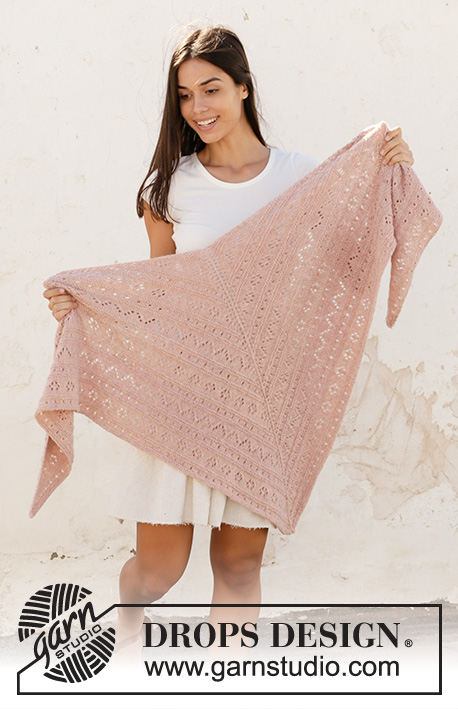
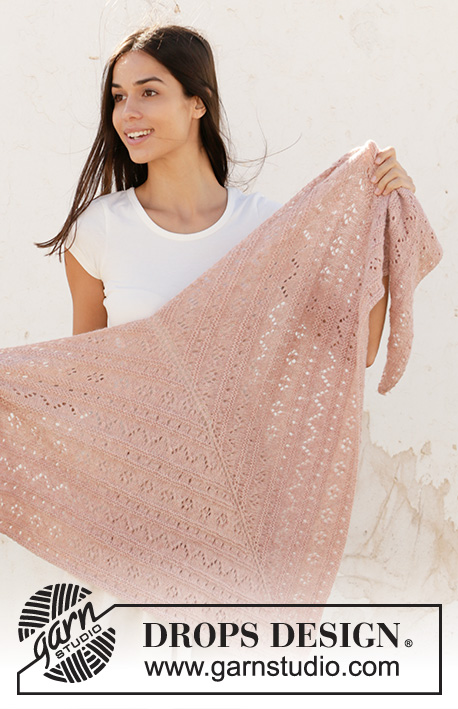
Knitted shawl in DROPS Sky. Piece is knitted top down with lace pattern and garter stitch.
DROPS 212-42 |
|||||||||||||||||||
|
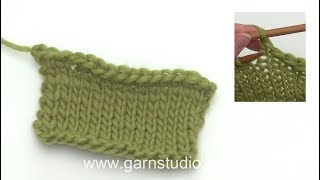
---------------------------------------------------------- EXPLANATION FOR THE PATTERN: ---------------------------------------------------------- GARTER STITCH (back and forth): Knit all rows. 1 ridge vertically = knit 2 rows. PATTERN: See diagrams A.1 to A.4. Diagrams show all rows in pattern seen from the right side. BIND-OFF TIP - elastic bind-off: Bind off by knitting from right side as follows: Knit 2, * insert left needle in the 2 stitches on right needle from left to right and knit stitches together, knit 1 *, work from *-* until 1 stitch remains on right needle. Cut the yarn and pull it through last stitch When binding off like this, the bind-off edge will be elastic. ---------------------------------------------------------- START THE PIECE HERE: ---------------------------------------------------------- SHAWL - SHORT OVERVIEW OF THE PIECE: Work shawl back and forth, top down. SHAWL: Cast on 7 stitches on circular needle size 4 mm = US 6 with Sky. Knit 1 row from wrong side. Work 1 edge stitch in GARTER STITCH - see explanation above, A.1(= 2 stitches), 1 middle stitch in stockinette stitch, A.1 over 2 stitches and finish with 1 edge stitch in garter stitch. When A.1 has been worked 1 time vertically, there are 23 stitches on row. Then work as follows from right side: Work 1 edge stitch in garter stitch, A.2 (= 1 stitch), A.3 (= 8 stitches), A.4 (= 1 stitch), 1 stitch in stockinette stitch, A.2 over 1 stitch, A.3 over 8 stitches, A.4 over 1 stitch and finish with 1 edge stitch in garter stitch. REMEMBER THE KNITTING GAUGE! Work edge stitches in garter stitch and middle stitch in stockinette stitch until finished measurements. When A.2 to A.4 have been worked 1 time vertically, there are 183 stitches on row. Repeat pattern vertically, i.e. for every time it has been worked 1 time vertically, work 10 repetitions more of A.3 on each side of middle stitch. When shawl measures 72 cm = 28⅜", measured along middle stitch (adjust to finish with 1 whole lace pattern vertically), work in garter stitch over all stitches - continue increase inside 1 edge stitch in each side of piece and on each side of middle stitch as before. Bind off by knitting from right side when shawl measures 74 cm = 29⅛", measured along middle stitch - read BIND-OFF TIP! |
|||||||||||||||||||
Diagram explanations |
|||||||||||||||||||
|
|||||||||||||||||||
 |
|||||||||||||||||||
 |
|||||||||||||||||||
 |
|||||||||||||||||||
Have you finished this pattern?Tag your pictures with #dropspattern #austrianspringshawl or submit them to the #dropsfan gallery. Do you need help with this pattern?You'll find 15 tutorial videos, a Comments/Questions area and more by visiting the pattern on garnstudio.com. © 1982-2026 DROPS Design A/S. We reserve all rights. This document, including all its sub-sections, has copyrights. Read more about what you can do with our patterns at the bottom of each pattern on our site. |
|||||||||||||||||||


With over 40 years in knitting and crochet design, DROPS Design offers one of the most extensive collections of free patterns on the internet - translated to 17 languages. As of today we count 324 catalogs and 12290 patterns - 12280 of which are translated into English (US/in).
We work hard to bring you the best knitting and crochet have to offer, inspiration and advice as well as great quality yarns at incredible prices! Would you like to use our patterns for other than personal use? You can read what you are allowed to do in the Copyright text at the bottom of all our patterns. Happy crafting!
Post a comment to pattern DROPS 212-42
We would love to hear what you have to say about this pattern!
If you want to leave a question, please make sure you select the correct category in the form below, to speed up the answering process. Required fields are marked *.