
Popular categories
Looking for a yarn?


Comments / Questions (28)
![]() Sabine wrote:
Sabine wrote:
Ich stecke gerade fest an der Stelle, wo die Arbeit für Rumpf und Ärmel aufgeteilt werden soll. Bis dahin habe ich glatt rechts gestrickt, zuletzt linke M als Rück-Reihe. Wird danach die Arbeit in einer Hin-Reihe aufgeteilt? Danach soll ja wiederum "in der nächsten Hin-Reihe" abgenommen werden. Wo wird denn da eine Rück-Reihe gestrickt? Ich hab gerade ein Brett vor dem Kopf. 🫣
16.08.2025 - 16:49DROPS Design answered:
Liebe Sabine, eine Rückreihe können Sie nach der Aufteilung bei einer Hinreihe stricken, sonnst können Sie auch die Aufteilung bei einer Rückreihe stricken, so wird die nächste Reihe eine Hinreihe. Viel Spaß beim Stricken!
18.08.2025 - 08:50
![]() Sabine wrote:
Sabine wrote:
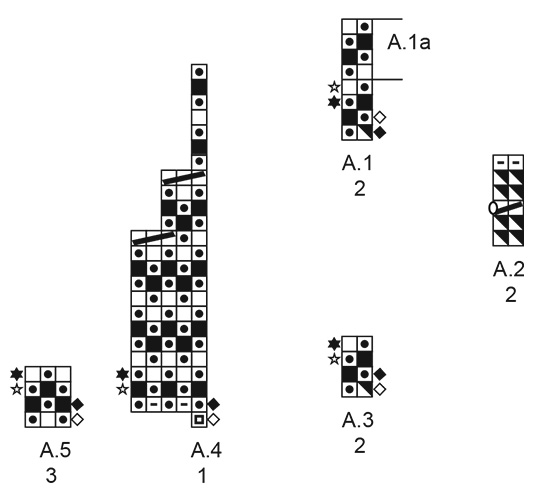
Liebes Drops-Team, ich bin etwas unsicher, wie das Diagramm A. 1a gemeint ist. Werden die vier Reihen ganz normal abwechselnd als Hinreihen und Rückreihen gestrickt? Oder wie bei A. 1 immer zwei Hinreihen und dann zwei Rückreihen? Liebe Grüße Sabine
18.07.2025 - 13:51DROPS Design answered:
Liebe Sabine, die 4 Reihen A.1a stricken Sie mit den 2 Farben, dh wie zuvor 2 Hin-Reihen und dann 2 Rückreihen. Viel Spaß beim Stricken!
24.07.2025 - 15:42
![]() Valerie Weber wrote:
Valerie Weber wrote:
Dear Drops I'm stuck on row 4 of the chart for the 4-8 repeat. In the part of the chart A6, A7 & A8, there is a 'yarn over and stitch knitted together' at the end of A6, then two more for 'yarn over and stitch knitted together' A7 & A8. How many stitches should I have on the needles after doing this part? Thanks
06.04.2025 - 08:10DROPS Design answered:
Dear Valerie, the yarn overs in English rib are not counted as stitches, because they don't form stitches and are only used to be worked together with a stitch in the row right after making the yarn over. So the number of stitches remains the same, because the stitch + yarn over counts as 1 stitch and when worked together they also form 1 stitch. Happy knitting!
06.04.2025 - 22:33
![]() Valerie Weber wrote:
Valerie Weber wrote:
The 'rest of the body section says to increase 59 stitches just before the rib section. Is this correct? Thank you.
03.04.2025 - 10:16DROPS Design answered:
Dear Mrs Weber, sure it is: you need more stitches to work rib on smaller needles than stocking stitch on larger needle, reason why you will have to increase to avoid rib to tighten piece together in width. Happy knitting!
03.04.2025 - 13:18
![]() Zelina Vladi wrote:
Zelina Vladi wrote:
Bonjour, je vis à l'étranger et je commande les laines. Pouvez-vous me dire quel coloris pour le DROPS Fabel qui remplace le Delight?
03.02.2025 - 08:02DROPS Design answered:
Bonjour Mme Vladi, tout dépend de l'effet/de la couleur souhaitée, n'hésitez pas à contacter votre magasin - même par mail - ils pourront vous aider dans le choix des couleurs. Bon tricot!
03.02.2025 - 10:27
![]() Zelina Vladi wrote:
Zelina Vladi wrote:
Je vous remercie
01.02.2025 - 08:42
![]() Zelina Vladi wrote:
Zelina Vladi wrote:
J'aimerais faire ce tricot mais je ne trouve pas le drops delight. Je commande mes laines en France. Que puis-je utiliser à la place et quelle couleur?
31.01.2025 - 10:07DROPS Design answered:
Bonjour Mme Vladi, DROPS Delight n'est désormais plus disponible, utilisez le convertisseur pour voir les alternatives possibles et les nouvelles quantités correspondantes; pour conserver l'effet dégradé, pensez DROPS Fabel. Bon tricot!
31.01.2025 - 15:47
![]() Michaela wrote:
Michaela wrote:
Hallo, Ich finde die Jacke wunderschön und würde sie gerne stricken. Drops Delight ist inzwischen aber nicht mehr erhältlich. Was würden Sie als Alternative empfehlen?
07.10.2024 - 18:11DROPS Design answered:
Liebe Michaela, benutzen Sie den Garnumrechner um die Garnalternative sowie die neue passende Garnmenge zu finden; für ein ähnliches Effekt mit Farben, könnte dann auch Fabel passen. Viel Spaß beim Stricken!
08.10.2024 - 07:27
![]() Barbara Drelicowska wrote:
Barbara Drelicowska wrote:
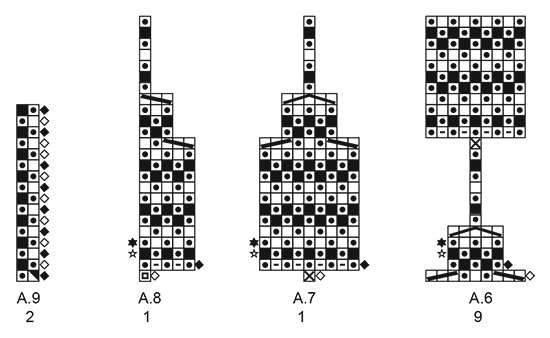
Dobry wieczór Co oznacza A5 ponad 3 następnymi oczkami?. Czy po A3 mam wykonać tylko A.4 (= 1 oczko), A.5 (= 3 oczka), A.6 (= 9 oczek) do końca rzędu kolorem ecru? co z kolejnymi rzędami ? Co oznacza A 5 ponad następnymi 3 oczkami itd? nie rozumiem :/ proszę o pomoc utknęłam :/
25.03.2023 - 20:31DROPS Design answered:
Witaj Basiu, Zaczynasz rząd od: ‘1 oczko brzegowe ściegiem francuskim, schemat A.4 (= 1 oczko), A.5 (= 3 oczka), A.6 (= 9 oczek)’, a następnie powtarzasz sekwencję między gwiazdkami *-* aż zostaje 5 oczek; na końcu rzędu przerabiasz ‘A.5 ponad 3 następnymi oczkami, A.8 (= 1 oczko) i zakończyć przerabiając 1 oczko brzegowe ściegiem francuskim.’ Przerabiać schemat A.5 ponad 3 następnymi oczkami – znaczy przerobić 3 kolejne oczka wg schematu A.5 (będzie to 1 powtórzenie na szerokość, gdyż schemat A.5 liczy właśnie 3 oczka). Serdecznie pozdrawiamy!
27.03.2023 - 13:50
![]() Barbara Drelicowska wrote:
Barbara Drelicowska wrote:
Gdy schemat A.3 zostanie przerobiony 1 raz na wysokość, dalej przerabiać następująco: 1 oczko brzegowe ściegiem francuskim, schemat A.4 (= 1 oczko), A.5 (= 3 oczka), A.6 (= 9 oczek), * A.5 ponad 3 następnymi oczkami, A.7 (= 1 oczko), A.5 ponad 3 następnymi oczkami, A.6 ponad 9 następnymi oczkami *, powtarzać od *-* aż zostaje 5 oczek (= 16-17-18-19-20-22 razy na szerokość), A.5 ponad 3 następnymi oczkami, A.8 (= 1 oczko) Proszę o wyjaśnienie
25.03.2023 - 14:49DROPS Design answered:
Witaj Barbaro, proszę zobacz kurs DROPS TUTAJ, jak czytać schematy w robótce na drutach. W razie dalszych problemów proszę pisać. Pozdrawiamy!
27.03.2023 - 13:43
|
|||||||||||||||||||||||||||||||||||||||||||||||||
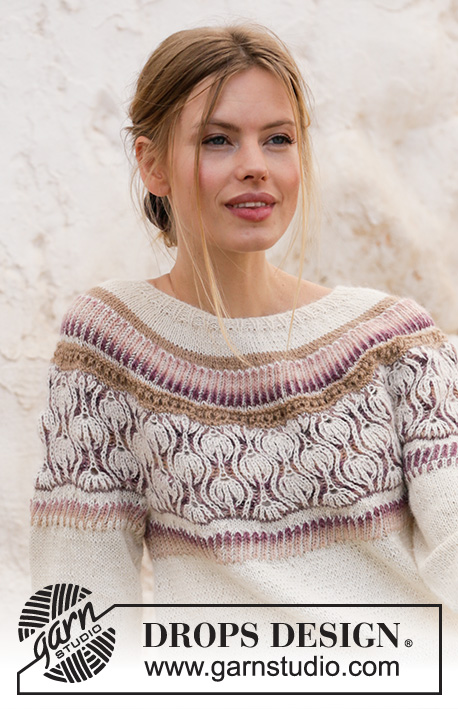
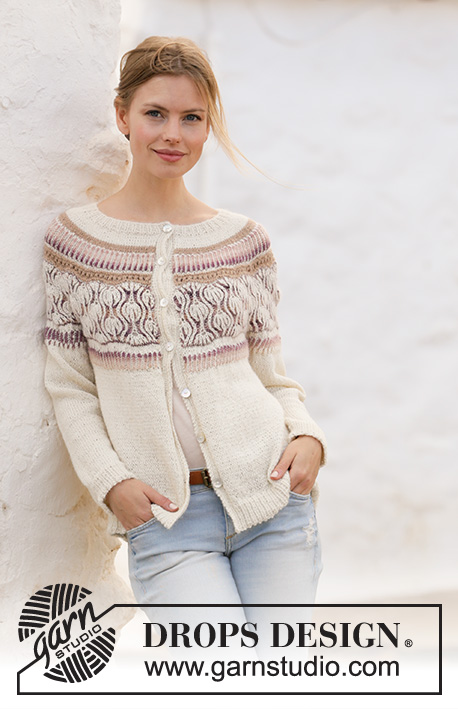
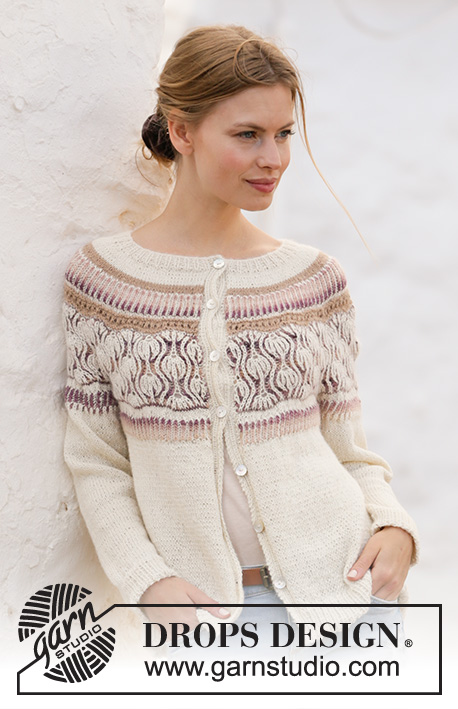
Nature Awakes Jacket#natureawakesjacket |
|||||||||||||||||||||||||||||||||||||||||||||||||
 |
 |
||||||||||||||||||||||||||||||||||||||||||||||||
Knitted jacket with round yoke in DROPS Alpaca and DROPS Delight. The piece is worked top down with 2-colored English rib, stripes and lace pattern. Sizes S - XXXL.
DROPS 213-6 |
|||||||||||||||||||||||||||||||||||||||||||||||||
|
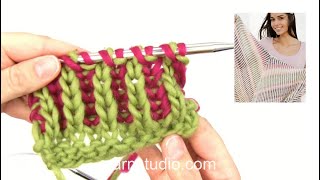
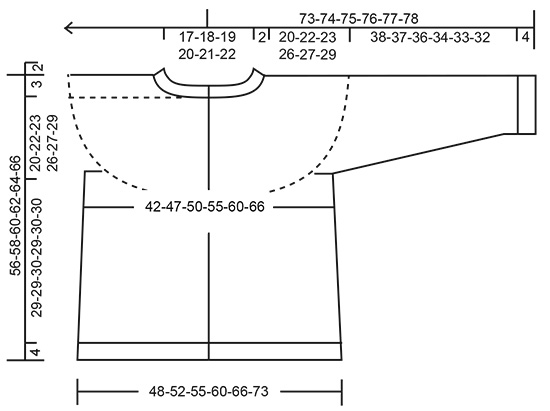
------------------------------------------------------- EXPLANATIONS FOR THE PATTERN: ------------------------------------------------------- RIDGE/GARTER STITCH (worked back and forth): Knit all rows. 1 ridge in height = Knit 2 rows. EDGE STITCH IN GARTER STITCH: Because you work 2 rows from the right side followed by 2 rows from the wrong side, the garter stitches need to be worked as follows: * Knit from right side, purl from right side, purl from wrong side, knit from wrong side *, work from *-*. PATTERN: See diagrams A.1 to A.9. A.2 is the lace pattern. A.1 and A.3 to A.8 are worked back and forth in English rib with off-white and blueberry pie. A.9 is worked in the round in English rib with off-white and blueberry pie. The diagrams show all the rows in the pattern seen from the right side. INCREASE TIP-1 (evenly spaced): To work out how to increase evenly, count the total number of stitches on the needle (e.g. 138 stitches) minus bands (e.g. 14 stitches) and divide the remaining stitches by the number of increases to be made (e.g. 42) = 2.9. In this example, increase by making 1 yarn over after approx. each 3rd stitch. Do not increase on bands. On the next row work the yarn overs twisted to avoid holes. INCREASE TIP-2 (for sides of body): Work until there are 2 stitches left before the marker thread, make 1 yarn over, knit 4 (marker thread sits between these 4 stitches) make 1 yarn over. On the next row work the yarn overs twisted to avoid holes. Then work the new stitches in stockinette stitch. 2-COLORED ENGLISH RIB: The striped pattern is worked back and forth with English rib according to diagrams A.1 and A.3 to A.8. To get the 2-colored effect work alternately 1 row with color-1 and then 1 row with color-2. * Work the row from the right side with color-1, push the stitches back on the circular needle so the next row is also worked from the right side. Then work 1 row with color-2. Work 1 row from the wrong side with color-1, push the stitches back on the circular needle so the next row is also worked from the wrong side. Then work 1 row with color-2 *, work from *-* to finished length. Unfilled square/star and filled square/star (outside the diagrams) show whether the row is worked from the right or wrong side and which color you are using. DECREASE TIP (for sleeves): Decrease 1 stitch on each side of the marker thread as follows: Work until there are 3 stitches left before the marker thread, knit 2 together, knit 2 (marker thread sits between these 2 stitches), slip 1 stitch as if to knit, knit 1 and pass the slipped stitch over the knitted stitch. BINDING-OFF TIP: To avoid the bind-off edge being tight you can bind off with a larger size needle. If the edge is still tight, make 1 yarn over after approx. each 4th stitch at the same time as binding off and the yarn overs are bind off as normal stitches. BUTTONHOLES: Work buttonholes on the right band (when the garment is worn). Work from the right side when there are 4 stitches left on the row as follows: Make 1 yarn over, purl 2 together, knit 1 and work the last stitch in garter stitch. On the next row knit the yarn over to leave a hole. The first buttonhole is worked when the rib on the neck measures approx. 1½-2 cm = ½"-¾". Then work the other 6-6-6-7-7-7 buttonholes with approx. 7½-7½-8-7-7-7½ cm = 2⅞"-2⅞"-3⅛"-2¾"-2¾"-2⅞" between each one. ------------------------------------------------------- START THE PIECE HERE: ------------------------------------------------------- JACKET – SHORT OVERVIEW OF THE PIECE. The neck and yoke are worked back and forth with circular needle, from mid front and top down. The bands and yoke are worked separately and sewn together afterwards. The yoke is divided for body and sleeves and the body (including the bands) continued back and forth with circular needle. The sleeves are worked in the round with double pointed needles, top down. NECK: Cast on 132-138-144-147-156-159 stitches (including 7 band stitches on each side towards mid front) with circular needle size 2.5 mm = US 1,5 and off-white. Purl 1 row (= wrong side). The next row is worked as follows from the right side: Work 1 stitch in GARTER STITCH – read description above, * knit 1, purl 2 *, work from *-* until there are 2 stitches left, knit 1 and finish with 1 stitch in garter stitch. Remember the BUTTONHOLES – read description above! When the piece measures 2 cm = ¾", work as follows from the right side: Work 1 stitch in garter stitch, knit 1, purl 2, knit 1, purl 2 (= band), knit and increase 40-42-44-46-46-52 stitches evenly spaced on the row – read INCREASE TIP-1 – and until there are 7 stitches left, then purl 2 knit 1, purl 2, knit 1 and 1 stitch in garter stitch (band) = 172-180-188-193-202-211 stitches. Change to circular needle size 3 mm = US 2,5. Insert 1 marker after the band at the beginning of the row; the yoke will be measured from this marker! YOKE: Continue with pattern over the bands as before and stockinette stitch over the other stitches until the piece measures 1-2-2-2-3-3 cm = ⅜"-¾"-¾"-¾"-1⅛"-1⅛" from the marker. Now work the next row from the wrong side as follows: Work the band as before, then place these 7 stitches on a thread, work until there are 7 stitches left and place these 7 stitches on a thread without working them, cast on 1 stitch at the end of the row. Knit 1 row from the right side and cast on 1 stitch at the end of the row = 160-168-176-181-190-199 stitches. The bands are continued once the yoke is finished and then sewn to the yoke inside the 1 edge stitch. Cut the off-white strand and change to camel. Work 3 rows stockinette stitch with 1 edge stitch in garter stitch on each side. Knit 1 row from the right side and increase 41-43-45-46-47-52 stitches evenly spaced = 201-211-221-227-237-251 stitches. Purl 1 row from the wrong side with 1 edge stitch in garter stitch. Change to off-white. Knit 1 row from the right side. Cut the off-white strand. ENGLISH RIB: Change to circular needle size 2.5 mm = US 1,5. Now continue with pattern using blueberry pie and off-white as follows (from the right side; i.e. push the stitches back on the needle so you work 2 rows from the right side, one after the other – read 2-COLORED ENGLISH RIB): Work 1 EDGE STITCH IN GARTER STITCH – read description above, A.1 (= 2 stitches) until there is 1 stitch left (i.e. the pattern begins and ends with 1 knitted stitch), finish with 1 edge stitch in garter stitch. Repeat A.1a in height until the piece measures 7-8-9-9-10-10 cm = 2¾"-3⅛"-3½"-3½"-4"-4" from the marker (i.e. approx. 4-4-5-5-5-5 cm = 1½"-1½"-2"-2"-2"-2" English rib), adjust so you finish with 1 row from the wrong side with off-white. Change to circular needle size 3 mm = US 2,5 and continue with off-white as follows: LACE PATTERN: Work 2 rows stockinette stitch with 1 edge stitch in garter stitch on each side (the yarn overs from the English rib are worked together with their respective stitches on the first row). Change to camel. Work 1 ridge and increase 22-24-28-34-38-44 stitches evenly spaced on the first row = 223-235-249-261-275-295 stitches. On the next row from the right side work as follows: Work 1 edge stitch in garter stitch, A.2 (= 2 stitches) until there are 2 stitches left, knit 1 and finish with 1 edge stitch in garter stitch. Change to off-white. Knit 1 row from the right side and increase 52-56-58-62-64-76 stitches evenly spaced = 275-291-307-323-339-371 stitches. Cut the off-white strand. ENGLISH RIB: Change to blueberry pie. Purl 1 row from the wrong side with 1 edge stitch in garter stitch on each side. Change to circular needle size 2.5 mm = US 1,5. Work 1 edge stitch in garter stitch, A.3 until there is 1 stitches left (i.e. A.3 starts and finishes with 1 knitted stitch) and finish with 1 edge stitch in garter stitch. When A.3 has been worked 1 time in height, continue the pattern as follows: 1 edge stitch in garter stitch, A.4 (= 1 stitch), A.5 (= 3 stitches), A.6 (= 9 stitches), * A.5 over 3 stitches, A.7 (= 1 stitch), A.5 over 3 stitches, A.6 over 9 stitches *, work from *-* until there are 5 stitches left (= 16-17-18-19-20-22 times in width), A.5 over 3 stitches, A.8 (= 1 stitch) and finish with 1 edge stitch in garter stitch . Repeat A.4 to A.8 until the piece measures approx. 20-21-22-25-26-28 cm = 8"-8¼"-8¾"-9¾"-10¼"-11" in height, adjust so you finish after a complete or half a repeat in height. Change to circular needle size 3 mm = US 2,5. Knit 1 row from the right side with blueberry pie and increase 47-67-70-80-88-92 stitches evenly spaced (the yarn overs from the English rib are worked together with their stitches) = 322-358-377-403-427-463 stitches. Change to off white. Work 1 row from the right side and increase 0-0-15-29-45-45 stitches evenly spaced = 322-358-392-432-472-508 stitches. Work stockinette stitch until the piece measures 20-22-23-26-27-29 cm = 8"-8¾"-9"-10¼"-10 4/8"-11⅜" from the marker. Now divide the piece for the body and sleeves: Work 47-53-56-62-69-76 stitches (= front piece), place the next 68-74-84-92-98-102 stitches on a thread for the sleeve and cast on 8 stitches under the sleeve, work 92-104-112-124-138-152 stitches (= back piece), place the next 68-74-84-92-98-102 stitches on a thread for the sleeve and cast on 8 stitches under the sleeve and finish by working the remaining 47-53-56-62-69-76 stitches (= front piece). BODY: = 202-226-240-264-292-320 stitches. On the next row from the right side decrease 17-21-21-23-25-27 stitches evenly spaced = 185-205-219-241-267-293 stitches. Purl 1 row from the wrong side with 1 edge stitch in garter stitch on each side. ENGLISH RIB: Change to circular needle size 2.5 mm = US 1,5. Work A.1 with 1 edge stitch in garter stitch on each side (i.e. A.1 starts and ends with a knitted stitch). Repeat A.1a in height until the English rib measures approx. 3 cm = 1⅛" in height. Change to circular needle size 3 mm = US 2,5. REST OF BODY: Now finish the piece in stockinette stitch using off-white. On the next row from the right side increase 17-21-21-23-25-27 stitches evenly spaced (the yarn overs from the English rib are worked together with their respective stitches) = 202-226-240-264-292-320 stitches. Insert 1 marker thread 51-57-60-66-73-80 stitches in from each side (= in sides of body). There are 100-112-120-132-146-160 stitches between marker threads on the back piece. Allow the threads to follow your work onwards; they will be used when increasing in the sides. At the beginning of the next 2 rows decrease 1 stitch on each side of the piece = 200-224-238-262-290-318 stitches. Now work the bands (i.e. the 7 stitches on threads on each side) as follows: RIGHT BAND: Worked with off-white. Continue the pattern as before and cast on 1 edge stitch at the end of the first row from the wrong side = 8 stitches. The edge stitch is worked in garter stitch onwards. Work pattern as before until the band measures the same as the yoke + body; adjust so the band is neither too tight nor too loose in relation to the front piece. Bind off the edge stitch and place the stitches back on the same needle as the body. LEFT BAND: Work as the right band but cast on the 1 edge stitch at the end of the first row from the right side. REST OF BODY (including the band): = 214-238-252-276-304-332 stitches. Continue with pattern as before over the band and stockinette stitch over the other stitches. When the piece measures 2 cm = ¾" from the English rib section, increase 1 stitch on each side of both marker threads – read INCREASE TIP-2 (= 4 stitches increased). Increase like this every 2½ cm = ⅞" a total of 8-6-7-7-7-8 times = 246-262-280-304-332-364 stitches. When the piece measures 29-29-30-29-30-30 cm = 11⅜"-11⅜"-11¾"-11⅜"-11¾"-11¾" from the division increase 57-59-59-59-58-59 stitches evenly spaced = 303-321-339-363-390-423 stitches. Change to circular needle size 2.5 mm = US 1,5 and work rib from the right side as follows: Work 1 stitch in garter stitch, * knit 1, purl 2 *, work from *-* until there are 2 stitches left and finish with knit 1 and 1 stitch in garter stitch. When the rib measures 4 cm = 1½", bind off with knit from the right side – read BINDING-OFF TIP! SLEEVE: Place the 68-74-84-92-98-102 stitches from the thread on the one side of the piece on double pointed needles size 3 mm = US 2,5 and knit up 1 stitch in each of the 8 stitches cast on under the sleeve = 76-82-92-100-106-110 stitches. Insert a marker thread in the middle of the 8 stitches under the sleeve. Allow the thread to follow your work onwards; it will be used when decreasing under the sleeve. Knit 2 rounds with off-white. On the next round decrease 8 stitches evenly spaced = 68-74-84-92-98-102 stitches. Then work pattern as follows: ENGLISH RIB: Change to double pointed needles size 2.5 mm = US 1,5. Continue pattern with blueberry pie and off white as follows: Work A.9 (= 2 stitches) in the round over all stitches. On the first 12 rounds use blueberry pie for the knitted stitches, on the last 4 rounds use off-white – see markers in diagram A.9. REST OF SLEEVE: Change to double pointed needles size 3 mm = US 2,5. Finish the sleeve with off-white. Work stockinette stitch (the yarn overs from the English rib are knitted together with their respective stitches on the first round). On the first round increase 8 stitches evenly spaced = 76-82-92-100-106-110 stitches. On the next round decrease 1 stitch on each side of the marker thread – read DECREASE TIP (= 2 stitches decreased). Decrease like this every 2½-2-1½-1-1-1 cm = ⅞"-¾"-½"-⅜"-⅜"-⅜" a total of 12-14-17-20-22-23 times = 52-54-58-60-62-64 stitches. When the piece measures 38-37-36-34-33-32 cm = 15"-14½"-14¼"-13⅜"-13"-12½" from the division increase 11-12-11-12-10-11 stitches evenly spaced = 63-66-69-72-72-75 stitches. Change to double pointed needles size 2.5 mm = US 1,5 and work rib (= knit 1/ purl 2) for 4 cm = 1½", then bind off with knit. Work the other sleeve in the same way. ASSEMBLY: Sew the bands to the front pieces inside the 1 edge stitch using off-white. Sew the buttons onto the left band. |
|||||||||||||||||||||||||||||||||||||||||||||||||
Diagram explanations |
|||||||||||||||||||||||||||||||||||||||||||||||||
|
|||||||||||||||||||||||||||||||||||||||||||||||||
 |
|||||||||||||||||||||||||||||||||||||||||||||||||
 |
|||||||||||||||||||||||||||||||||||||||||||||||||
 |
|||||||||||||||||||||||||||||||||||||||||||||||||
Have you finished this pattern?Tag your pictures with #dropspattern #natureawakesjacket or submit them to the #dropsfan gallery. Do you need help with this pattern?You'll find 28 tutorial videos, a Comments/Questions area and more by visiting the pattern on garnstudio.com. © 1982-2026 DROPS Design A/S. We reserve all rights. This document, including all its sub-sections, has copyrights. Read more about what you can do with our patterns at the bottom of each pattern on our site. |
|||||||||||||||||||||||||||||||||||||||||||||||||


With over 40 years in knitting and crochet design, DROPS Design offers one of the most extensive collections of free patterns on the internet - translated to 17 languages. As of today we count 324 catalogs and 12290 patterns - 12280 of which are translated into English (US/in).
We work hard to bring you the best knitting and crochet have to offer, inspiration and advice as well as great quality yarns at incredible prices! Would you like to use our patterns for other than personal use? You can read what you are allowed to do in the Copyright text at the bottom of all our patterns. Happy crafting!
Post a comment to pattern DROPS 213-6
We would love to hear what you have to say about this pattern!
If you want to leave a question, please make sure you select the correct category in the form below, to speed up the answering process. Required fields are marked *.