
Popular categories
Looking for a yarn?


Comments / Questions (10)
![]() Anna wrote:
Anna wrote:
Hej! Vill göra denna större. Går det att upprepa några varv för att göra den större? Med vänlig hälsning, Anna
01.03.2026 - 15:35DROPS Design answered:
Hej Anna, du kan prøve at øge med 2 masker for hver rapport, som vi har gjort i diagrammet :)
16.03.2026 - 15:03
![]() Elise wrote:
Elise wrote:
Hey! I was doing this and for 2 days me and my family tried to figure out how to do A.2 round 4! You have written it so complicated that I didn't really understand and we drew the pattern and we tried everything until I scrolled down and saw the diagram that I understood it! Please edit the pattern to an easier version and explain better!
13.08.2024 - 16:54
![]() Juliette wrote:
Juliette wrote:
Ik zou graag deze matjes vergroten naar een badkamer mat van 100 cm diameter. Heeft u een aanbeveling van hoeveel bollen wol ik hiervoor nodig zou hebben? Alvast bedankt!
23.06.2023 - 08:02DROPS Design answered:
Dag Juliette,
Je zou dit uit kunnen rekenen aan de hand van de oppervlakte die je wilt hebben. Als de oppervlakte bijvoorbeeld 3 keer zo groot wordt, dan heb je ook 3 keer zoveel wol nodig.
25.06.2023 - 18:24
![]() Anna wrote:
Anna wrote:
Stämmer mönstret verkligen på A.3 VARV 1, det är omöjligt att få ihop 72 fastmaskor om en bara upprepar 3fm om lmbågen. Jag får det till 42fm men inte fler. Gör jag något fel?
04.10.2022 - 10:02DROPS Design answered:
Hei Anna. Du hekler 6 rapporter av A.2 og når du har heklet 4. omgang av A.2, der det hekles luftmaskebuer vil du ha 4 luftmasker x 6 rapporter = 24 luftmaskebuer. Så når du skal hekle A.3 skal du hekle 3 fastmasker i hver luftmaskebue, altså 3 fastmasker x 24 luftmaskebuer = 72 fastmasker. mvh DROPS Design
10.10.2022 - 08:38
![]() Barbara Stibane wrote:
Barbara Stibane wrote:
Hallo, ein kleiner Fehler hat sich eingeschlichen: A.3 wie folgt häkeln: 4. RUNDE: 3 Luftmaschen, 3 Stäbchen um den ersten Luftmaschenbogen, * 4 Stäbchen um den nächsten Luftmaschenbogen, 2 Luftmaschen * müsste heißen: 4. RUNDE: 3 Luftmaschen, 3 Stäbchen um den ersten Luftmaschenbogen, 2 Luftmaschen, * 4 Stäbchen um den nächsten Luftmaschenbogen, 2 Luftmaschen * Liebe Grüße, Barbara
27.06.2022 - 20:37
![]() Susanne Schenk wrote:
Susanne Schenk wrote:
Hallo liebes Team, bei der Reihe A3 fehlt am Anfang der Hinweis vor dem Sterchen: 4 Luftmaschen.
02.01.2021 - 22:09
![]() Janniche wrote:
Janniche wrote:
Jeg har ikke nok med 100g natur til begge sitteunderlagene. Skal det ikke være mer av den fargen?
29.02.2020 - 19:44DROPS Design answered:
Hei Janniche. Her er det nok en feil ja. Vi skal få lagt til en garnmengde rettelse. Takk for at du gjorde oss oppmerksom på dette. mvh DROPS design
02.03.2020 - 14:31
![]() Lene wrote:
Lene wrote:
Høstblomst
10.02.2020 - 17:08
![]() Ingrid wrote:
Ingrid wrote:
Solsikke
28.01.2020 - 13:48
![]() Maria Cecchinato wrote:
Maria Cecchinato wrote:
Beautiful colour mix!
18.01.2020 - 08:16
|
|||||||||||||||||||||||||
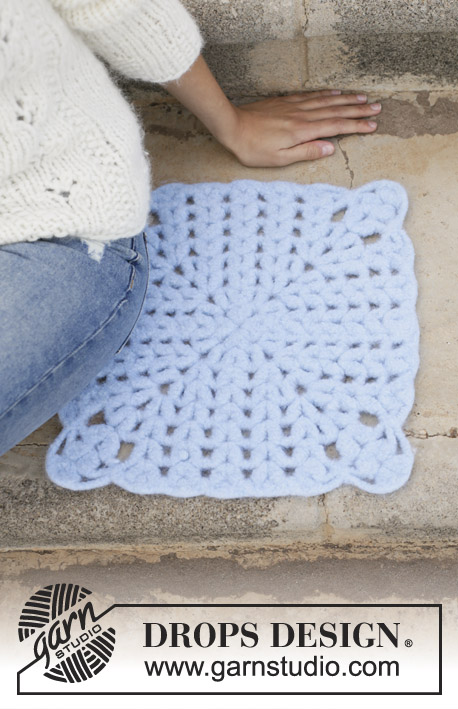
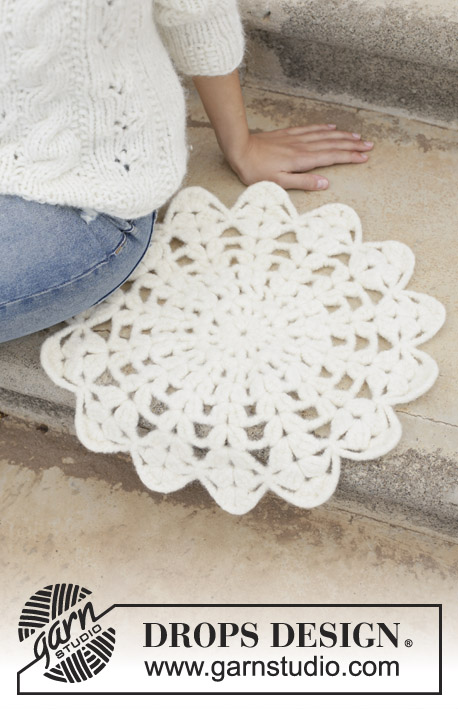
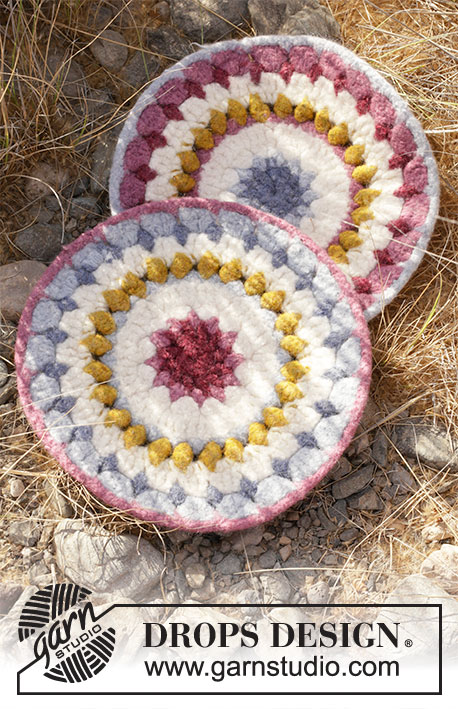
Flowering Frills#floweringfrillsseatpad |
|||||||||||||||||||||||||
 |
 |
||||||||||||||||||||||||
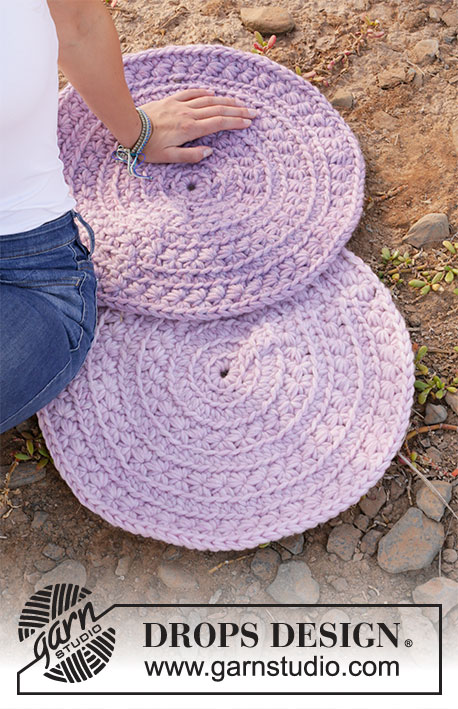
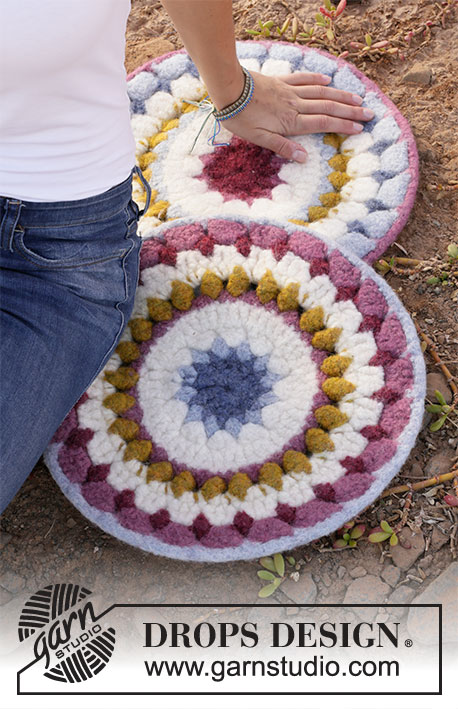
Crocheted and felted sitting mats in DROPS Snow.
DROPS 209-4 |
|||||||||||||||||||||||||
|
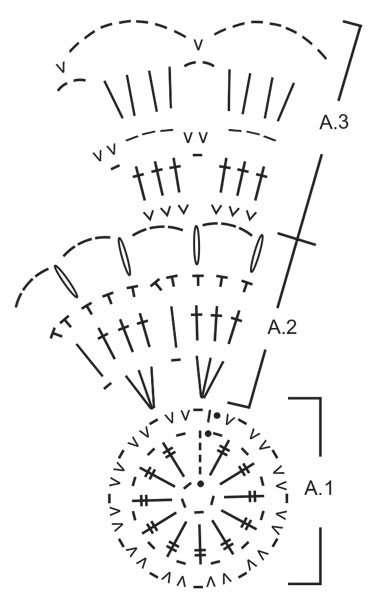
------------------------------------------------------- EXPLANATIONS FOR THE PATTERN: ------------------------------------------------------- PATTERN: See diagrams A.1, A.2 and A.3. COLOR 1: Work with 2 strands of each color. A.1: ROUND 1: blue/violet ROUND 2: fog A.2: ROUNDS 1-2: off white ROUND 3: old pink ROUND 4: curry A.3: ROUNDS 1-2: off white ROUND 3: dark rose ROUND 4: old pink ROUND 5: fog COLOR 2: Work with 2 strands of each color. A.1: ROUND 1: dark rose ROUND 2: old pink A.2: ROUNDS 1-2: off white ROUND 3: fog ROUND 4: curry A.3: ROUNDS 1-2: off white ROUND 3: blue/violet ROUND 4: fog ROUND 5: old pink CROCHET INFO: At the beginning of each round of single crochets, replace the first single crochet with 1 chain stitch. Finish the round with 1 slip stitch in the first chain stitch at the beginning of the round. At the beginning of each round of double crochets, replace the first double crochet with 3 chain stitches. Finish the round with 1 slip stitch in the third chain stitch at the beginning of the round. COLOR-CHANGE: To get a neat color-change work the last slip stitch on the round with the new color. CROCHETING TOGETHER: Working 2 double crochets together in 1 stitch: Work 1 double crochet but wait with the last pull through (= 2 loops on the hook). Work the next double crochet in the same stitch and when working the last pull-through, pull the strand through all the loops on the hook. ------------------------------------------------------- START THE PIECE HERE: ------------------------------------------------------- SITTING MAT – SHORT OVERVIEW OF THE PIECE: The piece is worked in the round with 2 strands Snow. When the piece is finished it should be felted. Work 2 sitting mats, 1 in each color combination. SITTING MAT: Work 4 chain stitches with hook size 8 mm = US L/11 and 2 strands Snow - Read COLOR 1. Form them into a ring with 1 slip stitch in the first chain stitch. Then work according to the diagrams or pattern as follows: Work according to the diagrams: Read CROCHET INFO, COLOR-CHANGE and COLOR 1! Work A.1 (= 1 repeat), A.2 (= 6 repeats on the round) and A.3 (= 12 repeats on the round). Work according to the pattern: A.1 is worked as follows: ROUND 1: Work 5 chain stitches (= 1 treble crochet and 1 chain stitch), * 1 treble crochet around the chain-stitch ring, 1 chain stitch *, work from *-* 10 more times, finish with 1 slip stitch in the 4th chain stitch at the beginning of the round = 12 treble crochets and 12 chain stitches. ROUND 2: 2 chain stitches (= 1 single crochet and 1 chain stitch), 2 single crochets around the next chain stitch, * 1 chain stitch, 2 single crochets around the next chain stitch *, work from *-* 9 more times, work 1 chain stitch, 1 single crochet around the next chain stitch, finish with 1 slip stitch in the first chain stitch at the beginning of the round = 24 single crochets and 12 chain stitches. REMEMBER THE CROCHET GAUGE! A.2 is worked as follows: ROUND 1: Work 3 chain stitches, 2 double crochets around first chain stitch, 1 chain stitch, * 3 double crochets around the next chain stitch, 1 chain stitch *, work from *-* to end of round and finish with 1 slip stitch in 3rd chain stitch at the beginning of the round = 12 double-crochet groups and 12 chain stitches. ROUND 2: Work 3 chain stitches, 1 double in each of the next 2 doubles, 1 double crochet around first chain stitch * 1 double crochet in each of the next 3 double crochets, 1 double crochet around the next chain stitch *, work from *-* to the end of the round and finish with 1 slip stitch in the 3rd chain stitch at the beginning of the round= 48 double crochets. ROUND 3: Work 1 chain stitch, 1 single crochet in the back loop of each of the first 2 single crochets, 2 single crochets in the back loop of the next double crochet, * 1 single crochet in the back loop of each of the next 3 double crochets, 2 single crochets in the back loop of the next double crochet *, work from *-* to the end of the round and finish with 1 slip stitch in the 1st chain stitch at the beginning of the round = 60 single crochets. ROUND 4: Work 3 chain stitches, 1 double crochet in the first stitch, 3 chain stitches and skip 1 single crochet, * 2 double crochets worked together to 1 double crochet in the next single crochet – READ CROCHETING TOGETHER, 3 chain stitches, skip 1 single crochet, 2 double crochets worked together to 1 double crochet in the next single crochet, skip 2 single crochets, 2 double crochets worked together to 1 double crochet in the next single crochet, 3 chain stitches *, work from *-* to the end of the round and finish with 1 slip stitch in the 3rd chain stitch at the beginning of the round = 24 double-crochet groups and 24 chain-spaces. A.3 is worked as follows: ROUND 1: Work 1 chain stitch, 2 single crochets around first chain-space, * 3 single crochets around next chain-space *, work from *-* to the end of the round and finish with 1 slip stitch in 1st chain stitch at the beginning of the round = 72 single crochets. ROUND 2: Work 3 chain stitches, 1 double crochet in each of the first 2 single crochets, * 1 double crochet in each of the next 3 single crochets, 1 chain stitch *, work from *-* to the end of the round and finish with 1 slip stitch in 3rd chain stitch at the beginning of the round = 72 double crochets and 24 chain-spaces. ROUND 3: Work 4 chain stitches, 2 single crochets around the first chain-space, * 3 chain stitches, 2 single crochets around the next chain-space *, work from *-* to the end of the round and finish with 1 slip stitch in the 1st chain stitch on the beginning of the round = 24 chain-spaces and 48 single crochets. ROUND 4: Work 3 chain stitches, 3 double crochets around the first chain-space, 2 chain stiches * 4 double crochets around the next chain-space, 2 chain stitches *, work from *-* to the end of the round and finish with 1 slip stitch in the 3rd chain stitch on the beginning of the round = 24 double-crochet groups and 24 chain-spaces. ROUND 5: Work 8 chain stitches, 1 single crochet around the first chain-space, * 7 chain stitches, 1 single crochet around the next chain-space *, work from *-* to the end of the round and finish with 1 slip stitch in the 1st chain stitch on the beginning of the round = 24 chain-spaces and 24 single crochets. Work 1 more sitting mat using the colors described under COLOR 2. FELTING: The piece can be felted either in the washing machine or the tumble dryer – read description below. Remember: Subsequent washes are as for a normal wool garment. IN WASHING MACHINE: Washing machines will vary when felting. If the piece is not felted enough, it can be felted again. If it is felted too much, it can be stretched to the correct size while still wet. DO THE FOLLOWING: Lay the piece in the washing machine, using a programme of approx. 40 minutes (not a wool programme). Wash at 40 degrees C = 104 degrees F without pre-wash, detergent is optional. After washing, shape the piece while it is still wet. IN TUMBLE DRYER: Felting in a tumble dryer gives good control over the degree of felting. The tumble dryer can be opened during drying to check the size of the piece. If it is not felted enough it can be thoroughly wetted and felted again. If it is felted too much it can be stretched to the correct size while still wet. DO THE FOLLOWING: Lay the piece in water so it becomes completely wet, then place it in the tumble dryer and begin the drying process. Dry to the desired size, checking regularly. |
|||||||||||||||||||||||||
Diagram explanations |
|||||||||||||||||||||||||
|
|||||||||||||||||||||||||
 |
|||||||||||||||||||||||||
Have you finished this pattern?Tag your pictures with #dropspattern #floweringfrillsseatpad or submit them to the #dropsfan gallery. Do you need help with this pattern?You'll find 11 tutorial videos, a Comments/Questions area and more by visiting the pattern on garnstudio.com. © 1982-2026 DROPS Design A/S. We reserve all rights. This document, including all its sub-sections, has copyrights. Read more about what you can do with our patterns at the bottom of each pattern on our site. |
|||||||||||||||||||||||||


With over 40 years in knitting and crochet design, DROPS Design offers one of the most extensive collections of free patterns on the internet - translated to 17 languages. As of today we count 324 catalogs and 12290 patterns - 12280 of which are translated into English (US/in).
We work hard to bring you the best knitting and crochet have to offer, inspiration and advice as well as great quality yarns at incredible prices! Would you like to use our patterns for other than personal use? You can read what you are allowed to do in the Copyright text at the bottom of all our patterns. Happy crafting!
Post a comment to pattern DROPS 209-4
We would love to hear what you have to say about this pattern!
If you want to leave a question, please make sure you select the correct category in the form below, to speed up the answering process. Required fields are marked *.