
Popular categories
Looking for a yarn?


Comments / Questions (26)
![]() Carolina Remmling wrote:
Carolina Remmling wrote:
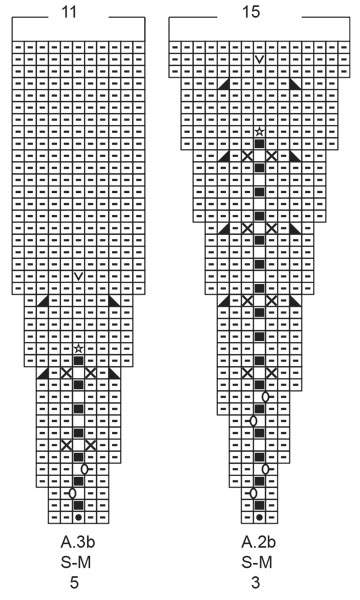
Hi all, I’m struggling a little, when am I supposed to start the A.1C diagram? Should I stitch the A.1b until I finish the A.2B and the A.3B and then go for A.1C?
12.10.2024 - 20:02DROPS Design answered:
Dear Mrs Remmling, when a.1b is done (just 1 row) repeat the 4 rows framed for A.1c - at the same time continue the other diagrams as shown. Happy knitting!
14.10.2024 - 09:59
![]() Monika wrote:
Monika wrote:
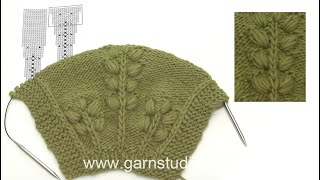
Hoe brei ik de bobbel in dit patroon? Ik maak in de opgehaalde steek in totaal 7 steken. Ik brei in tricosteek 5 nld is dit goed? Mijn bobbel wordt echt rond en op het patroon lijken ze langwerpig.
23.09.2024 - 09:36DROPS Design answered:
Dag Monika,
Het is de bedoeling dat je de naald in de steek steekt die 6 naalden verder naar beneden zit. Dan sla je de draad om de naald aan de achterkant van het werk en haal je de draad aan de voorkant op en deze zetje op de linker naald. Dit herhaal je steeds met omslagen ertussen. Dus wat tussen de sterretjes staat bij de symboolverklaring herhaal je steeds.
25.09.2024 - 08:28
![]() Firideh wrote:
Firideh wrote:
Har et spørsmål angående bærestykke, Strikkes diagram A1b, A1a, A1c, A3a og A2a kun én gang i høyde? Eller skal man fortsette til mønsteret er ferdig/ når A2b og A3b er ferdig? Jeg fortsett med de det blir ikke samme som er på bilde.
06.10.2023 - 17:27DROPS Design answered:
Hei Firideh, På bærestykket skal du strikke A.1b over A.1a (så A.1a er ferdig), og likedan med A.2b og A.3b over A.2a og A.3a. Dvs, på bærestykket strikker du A.1b. A.2b og A.3b. Når A.1b er ferdig i høyden (etter 1 gang), er disse maskene strikket i A.1c videre oppover. Du fortsetter med A.2b og A.3b til de er ferdige. God fornøyelse!
09.10.2023 - 06:51
![]() Julie wrote:
Julie wrote:
The last sentence for Neck, Row 2 states, "Continue this pattern." Does this mean to repeat Rows 1 & 2? Thank you.
09.03.2023 - 19:18DROPS Design answered:
Hi Julie, No, this means to continue the diagrams onwards. Happy knitting!
10.03.2023 - 07:01
![]() Mona wrote:
Mona wrote:
Hvor i allverden foregår økningen på bærestykket? Det blir jo ikke flere masker ved å strikke mønstret. Vanskelig å få hjelp i butikk i disse corona tider. Vennlig hilsen Mona.
07.01.2021 - 08:43DROPS Design answered:
Hej Mona, jo du øker på bærestykket ifølge diagrammet. God fornøjelse!
07.01.2021 - 16:05
![]() Birgitte Meiling Andrup wrote:
Birgitte Meiling Andrup wrote:
I don’t find any explanation in the pattern for when to switch from reverse stockinette (on the yoke +?) to stockinette. Is that done from the point where increases on body and decreases on sleeves begin?? I don’t find it in the sweater version either.... Looking forward to an answer, thanks!
25.05.2020 - 00:02DROPS Design answered:
Dear Mrs Meiling Andrup, you are working reversed stocking stitch on yoke after diagram have been worked (= knit from the wrong side and purl from the right side and then work in stocking stitch on body (and sleeve) after division. Happy knitting!
25.05.2020 - 10:30
![]() Pétronille wrote:
Pétronille wrote:
Bonjour, n y-a-t-il pas une erreur de mesure pour les manches ? D après les explications les manches en S sont plus longues que les L ou XL! Et les intervalles de diminutions pour la taille L me paraît bizarre. Merci !
23.05.2020 - 10:51DROPS Design answered:
Bonjour Pétronille, c'est tout à fait exact, l'empiècement est plus long dans les grandes tailles, les manches seront donc plus courtes et donc l'empiècement étant plus court dans les petites tailles, les manches sont plus longues - vous pouvez ajustez si besoin à vos mesures en vérifiant les mesures du schéma et les comparant à un vêtement similaire que vous avez et dont vous aimez la forme. Bon tricot!
25.05.2020 - 08:28
![]() Maribel wrote:
Maribel wrote:
Por favor dígame si en el diagrama las hileras son solo de ida, o de ida y vuelta. gracias por su pronta respuesta.
01.04.2020 - 23:04DROPS Design answered:
Hola Mirabel, los diagramas muestran todas las hileras del patrón vistas por el lado derecho. Buen trabajo!
04.11.2020 - 17:48
![]() Amel Meziani wrote:
Amel Meziani wrote:
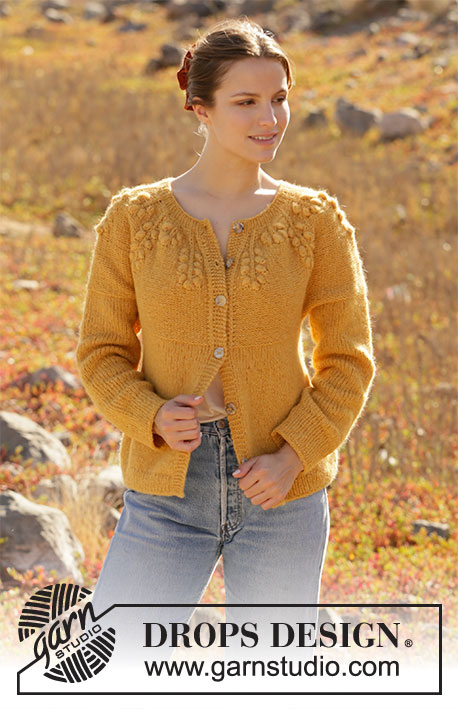
Chic and lovely bobbles
06.02.2020 - 22:00
![]() Antonella wrote:
Antonella wrote:
C\'e\' un video che mostra come fare le noccioline per il September Story?
04.02.2020 - 08:58DROPS Design answered:
Buongiorno Antonella. Purtroppo al momento non è disponibile. Può contattare il suo rivenditore Drops di fiducia per un'assistenza personalizzata. Buon lavoro!
17.02.2020 - 14:49
|
|||||||||||||||||||||||||||||||
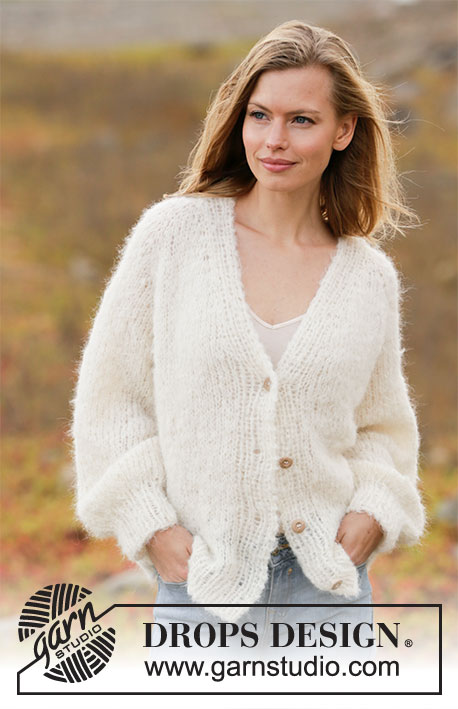
September Story#septemberstorycardigan |
|||||||||||||||||||||||||||||||
 |
 |
||||||||||||||||||||||||||||||
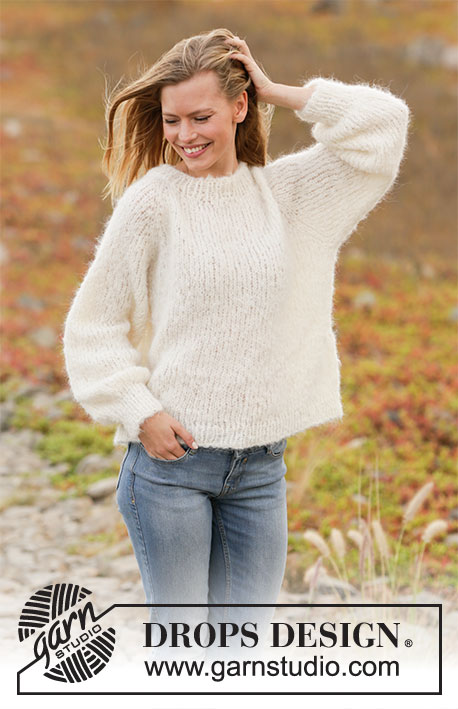
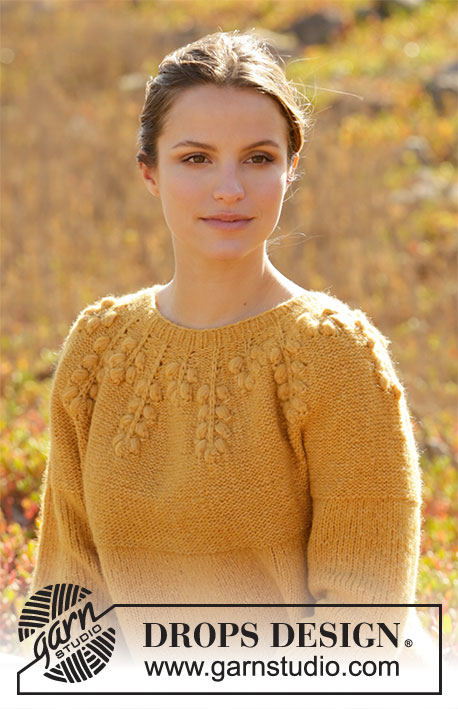
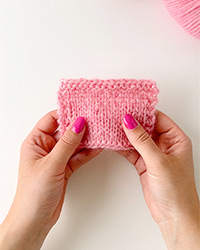
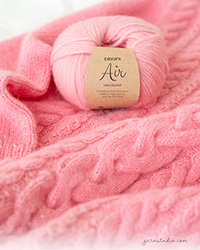
Knitted jacket with round yoke in DROPS Air. The piece is worked top down with bobbles. Sizes S - XXXL.
DROPS 213-26 |
|||||||||||||||||||||||||||||||
|
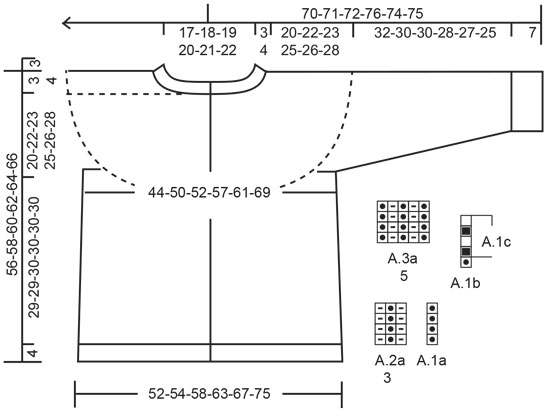
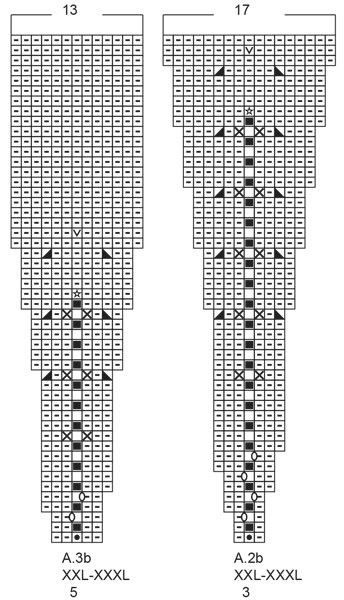
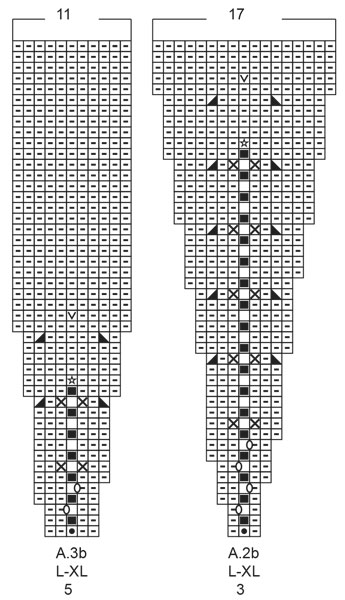
------------------------------------------------------- EXPLANATIONS FOR THE PATTERN: ------------------------------------------------------- RIDGE/GARTER STITCH (worked back and forth): Knit all rows. 1 ridge in height = Knit 2 rows. PATTERN: See diagrams A.1 to A.3. Choose diagram for your size. The diagrams show all rows in the pattern from the right side. INCREASE TIP (for sides of body): Work until there are 2 stitches left before the marker thread, make 1 yarn over, knit 4 (marker thread sits between these 4 stitches) make 1 yarn over (= 2 stitches increased). On the next row work the yarn overs twisted to avoid holes. The new stitches are then worked in stockinette stitch. DECREASE TIP (for sleeves): Decrease 1 stitch on each side of the marker thread as follows: Work until there are 3 stitches left before the marker thread, knit 2 together, knit 2 (marker thread sits between these 2 stitches), slip 1 stitch as if to knit, knit 1 and pass the slipped stitch over the knitted stitch (= 2 stitches decreased). BINDING-OFF TIP: To avoid the bind-off edge being tight you can bind off with a larger size needle. If the edge is still tight, make 1 yarn over after approx. each 4th stitch at the same time as binding off and the yarn overs are bind off as normal stitches. BUTTONHOLES: Work buttonholes on right band (when garment is worn). Work from the right side when there are 3 stitches left on row as follows: Make 1 yarn over, knit 2 together and knit the last stitch. On the next row knit the yarn over to leave a hole. The first buttonhole is worked when the neck measures 1½-2 cm = ½"-¾". Then work the other 5-5-6-6-7-7 buttonholes with approx. 8½-8½-8-8-7-7½ cm = 3¼"-3¼"-3⅛"-3⅛"-2¾"-2⅞" between each one. ------------------------------------------------------- START THE PIECE HERE: ------------------------------------------------------- JACKET – SHORT OVERVIEW OF THE PIECE: The piece is worked back and forth with circular needle from mid front and top down. The sleeves are worked in the round with double pointed needles, top down. NECK: Cast on 79-87-87-95-95-103 stitches (including 5 band stitches on each side) with circular needle size 4.5 mm = US 7 and Air. ROW 1 (= wrong side): Work 5 band stitches in GARTER STITCH – read description above, purl 69-77-77-85-85-93 and work 5 band stitches in garter stitch. ROW 2 (= right side): Work 5 band stitches in garter stitch, A.1a (= 1 stitch), * A.2a (= 3 stitches), A.3a (= 5 stitches) *, work from *-* until there are 9 stitches left (= 8-9-9-10-10-11 times in width), A.2a over 3 stitches, A.1a over 1 stitch and finish with 5 band stitches in garter stitch. Continue this pattern. Remember the BUTTONHOLES on the right band – read description above. When the piece measures 3-3-3-3-4-4 cm = 1⅛"-1⅛"-1⅛"-1⅛"-1½"-1½", adjust so the next row is from the right side, change to circular needle size 5.5 mm = US 9. Insert 1 marker after the band at the beginning of the row; the yoke will be measured from this marker! YOKE: Work A.1b over A.1a, A.2b over A.2a and A.3b over A.3a. The bands are worked in garter stitch to finished length. When A.1b has been worked 1 time in height, repeat A.1c. REMEMBER THE KNITTING GAUGE! When A.2b and A.3b have been completed 1 time in height there are 235-261-281-309-329-359 stitches on the needle. Knit from the wrong side and purl from the right side, with 5 band stitches in garter stitch on each side until the piece measures 20-22-23-25-26-28 cm = 8"-8¾"-9"-9¾"-10¼"-11" from the marker. The yoke is now divided for body and sleeves as follows: Knit 37-42-44-48-51-57, place the next 48-52-58-64-68-70 stitches on 1 thread for the sleeve, cast on 6 new stitches on the needle (= in side under the sleeve), knit 65-73-77-85-91-105 (= back piece), place the next 48-52-58-64-68-70 stitches on 1 thread for the sleeve, cast on 6 new stitches on the needle (= in side under the sleeve) and knit the remaining 37-42-44-48-51-57 stitches. Body and sleeves are finished separately. THE PIECE IS NOW MEASURED FROM HERE! BODY: = 151-169-177-193-205-231 stitches. Insert 1 marker thread 40-45-47-51-54-60 stitches in from each side (= sides of body). There are 71-79-83-91-97-111 stitches between the threads on the back piece. Allow the threads to follow your work onwards; they will be used when increasing in the sides. Work stockinette stitch with 5 band stitches in garter stitch on each side of the piece. When the piece measures 3 cm = 1⅛" from the division, increase 1 stitch on each side of both marker threads – read INCREASE TIP (= 4 stitches increased). Increase like this every 4 cm = 1½" a total of 6-4-5-5-5-5 times = 175-185-197-213-225-251 stitches. When the piece measures 29-29-30-30-30-30 cm = 11⅜"-11⅜"-11¾"-11¾"-11¾"-11¾" from the division, change to circular needle size 4.5 mm = US 9 and work rib as follows from the right side: 5 band stitches in garter stitch, * knit 1, purl 1 *, work from *-* until there are 6 stitches left, knit 1 and 5 band stitches in garter stitch. When the rib measures 4 cm = 1½" bind off with knit from the right side – read BINDING-OFF TIP. SLEEVE: Place the 48-52-58-64-68-70 stitches from the thread on the one side of the piece on short circular needle size 5.5 mm = US 9 and knit up 1 stitch in each of the 6 stitches cast on under the sleeve = 54-58-64-70-74-76 stitches. Insert a marker thread in the middle of the 6 stitches under the sleeve. Allow the thread to follow your work onwards; it will be used when decreasing under the sleeve. Start at the marker thread and knit in the round. When the sleeve measures 3 cm = 1⅛" from the division, decrease 2 stitches mid under the sleeve – read DECREASE TIP. Decrease like this every 6-3-2½-2-1½-1½ cm = 2⅜"-1⅛"-⅞"-¾"-½"-½" a total of 5-7-9-11-12-12 times = 44-44-46-48-50-52 stitches. Continue working until the sleeve measures 32-30-30-28-27-25 cm = 12½"-11¾"-11¾"-11"-10⅝"-9¾" from the division (there is approx. 7 cm = 2¾" left to finished length; you can try the jumper on and work to desired length). Change to double pointed needles size 4.5 mm = US 7 and work rib (= knit 1, purl 1). Bind off when the rib measures 7 cm = 2¾". The sleeve measures approx. 39-37-37-35-34-32 cm = 15¼"-14½"-14½"-13¾"-13⅜"-12½" from the division. Work the other sleeve in the same way. ASSEMBLY: Sew the buttons onto the left band. |
|||||||||||||||||||||||||||||||
Diagram explanations |
|||||||||||||||||||||||||||||||
|
|||||||||||||||||||||||||||||||
 |
|||||||||||||||||||||||||||||||
 |
|||||||||||||||||||||||||||||||
 |
|||||||||||||||||||||||||||||||
 |
|||||||||||||||||||||||||||||||
Have you finished this pattern?Tag your pictures with #dropspattern #septemberstorycardigan or submit them to the #dropsfan gallery. Do you need help with this pattern?You'll find 26 tutorial videos, a Comments/Questions area and more by visiting the pattern on garnstudio.com. © 1982-2026 DROPS Design A/S. We reserve all rights. This document, including all its sub-sections, has copyrights. Read more about what you can do with our patterns at the bottom of each pattern on our site. |
|||||||||||||||||||||||||||||||

With over 40 years in knitting and crochet design, DROPS Design offers one of the most extensive collections of free patterns on the internet - translated to 17 languages. As of today we count 324 catalogs and 12199 patterns - 12189 of which are translated into English (US/in).
We work hard to bring you the best knitting and crochet have to offer, inspiration and advice as well as great quality yarns at incredible prices! Would you like to use our patterns for other than personal use? You can read what you are allowed to do in the Copyright text at the bottom of all our patterns. Happy crafting!
Post a comment to pattern DROPS 213-26
We would love to hear what you have to say about this pattern!
If you want to leave a question, please make sure you select the correct category in the form below, to speed up the answering process. Required fields are marked *.