
Popular categories
Looking for a yarn?


Comments / Questions (15)
![]() Irene wrote:
Irene wrote:
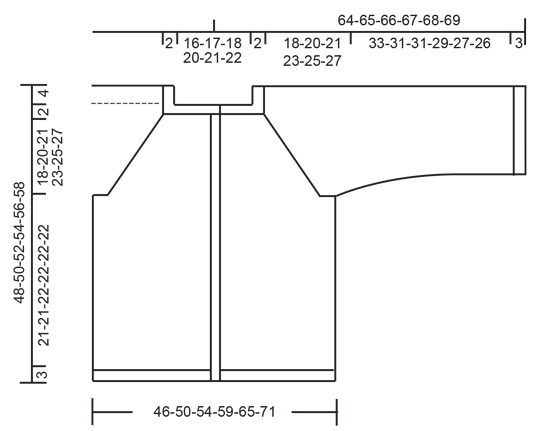
I am stuck where it says that the “the yoke should measure 8” from the cast on edge mid front” and then the body “measures 81/4” from the division”. This is a total of about 16” and pattern says it should measure approx 19” with the rib. I’ve lost 2 inches somewhere and don’t know where? Can you help me please? Thanks, Irene
19.06.2025 - 13:23DROPS Design answered:
Dear Irene, the measurements in the yoke were taken from the mid-front. However, now we measure from the uppermost point of the garment, in the shoulder. As you can check in the size chart, the remaining 4cm/ 2 in would correspond to the height of the shoulder. And you have a 2cm/ 1 in rib for the neck as well. Happy knitting!
22.06.2025 - 20:36
![]() Cristina wrote:
Cristina wrote:
Posso lavorare nn ferri circolari e dal basso verso alto
10.03.2025 - 20:26DROPS Design answered:
Buonasera Cristina, il modello è stato progettato per essere lavorato dall'alto in basso. Buon lavoro!
18.03.2025 - 20:39
![]() Anna wrote:
Anna wrote:
Buona sera come faccio a lavorare il primo ferro a rovescio sul rovescio del Lavoro ? Il mio ferro è a diritto. Inoltre quando si mettono i segnapunti si dice che non si devono lavorare le maniche. Come si fa? Grazie mille. Anna
09.01.2025 - 18:58DROPS Design answered:
Buonasera Anna, dopo l'avvio il primo ferro è dal rovescio del lavoro. Per inserire i segnapunti deve spostare le maglie senza lavorarla. Buon lavoro!
13.01.2025 - 18:39
![]() Gitte Ovesen wrote:
Gitte Ovesen wrote:
Kan jeg bruge Drops Puna til: DROPS Design: Model sk-025
31.10.2023 - 13:50DROPS Design answered:
Hej Gitte, ja du kan bruge DROPS Puna, sørg for at overholde strikkefastheden som står i opskriften, så vil størrelsen stemme med målene i måleskitsen :)
31.10.2023 - 14:36
![]() Agnethe ONeill wrote:
Agnethe ONeill wrote:
Mangler ribkanten i halsen ikke i opskriften? På billedet er er der ribkant.
04.03.2022 - 15:58
![]() Else Lange wrote:
Else Lange wrote:
Der står “strik retstrik, strik ret på alle pinde frem og tilbage. Mener du ikke ‘glatstrik’ skiftevis ret og vrang? Vh Else.
21.10.2021 - 20:37DROPS Design answered:
Hej Else. Hele tøjet strikkes i glatstrik med ribkanter. När vi skriver "RETSTRIK (strikkes frem og tilbage): Strik ret på alle pinde" är det kun en förklaring på hur retstrik strikkes (kanktmasken strikkes i retstrik). Mvh DROPS Design
22.10.2021 - 08:30
![]() Bjørg Monsen wrote:
Bjørg Monsen wrote:
Det må da bli både penere og sterkere om man strikker med dobbel tråd med kid silk i oppskriften Rose Water. Det ser heller skrøpelig med bare en tråd. Mvh Bjørg Monsen
12.10.2021 - 20:01
![]() Bjørg Monsen wrote:
Bjørg Monsen wrote:
Jeg syns feltene med Kid silk m en tråd blir så gjennomsiktig, så tror det vil bli penere og at fargene kommer bedre fram m to tråder. Er Kid silk sterk nok, de feltene ser heller skrøpelige ut.
12.10.2021 - 18:57
![]() Gunhild Auråen wrote:
Gunhild Auråen wrote:
Hei. Strikkes det med to tråder av kid silk i denne oppskriften ?
03.08.2021 - 11:51DROPS Design answered:
Hej Gunhild, nej du stickar med en tråd :)
04.08.2021 - 08:33
![]() Tina wrote:
Tina wrote:
Diese Jacke ist sehr gut im Schnitt und leicht zu stricken, perfekt, um Reste mit einzuarbeiten. Ich habe sie mit 3/4 Arm gemacht und stricke gerade die zweite. Vielen Dank für die tolle Anleitung.
05.05.2020 - 16:57
|
|
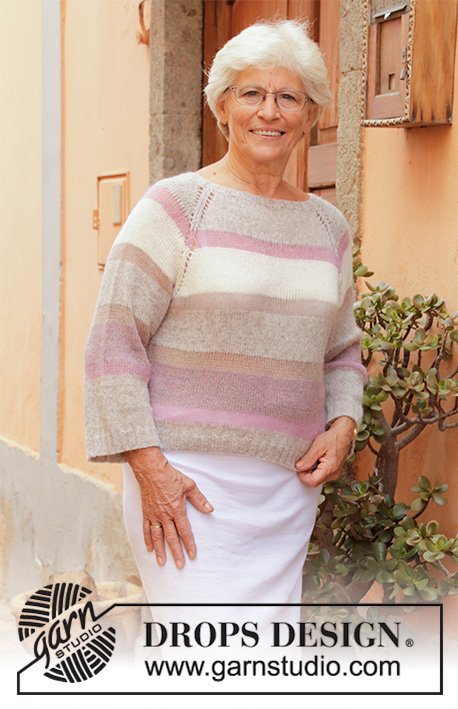
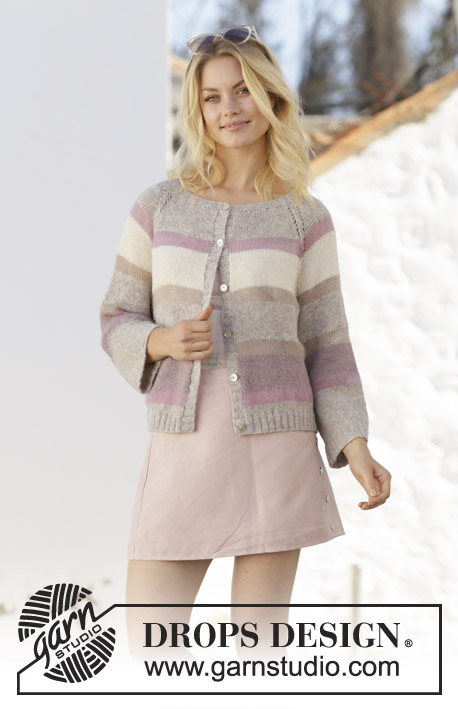
Rose Water Jacket#rosewaterjacket |
|
 |
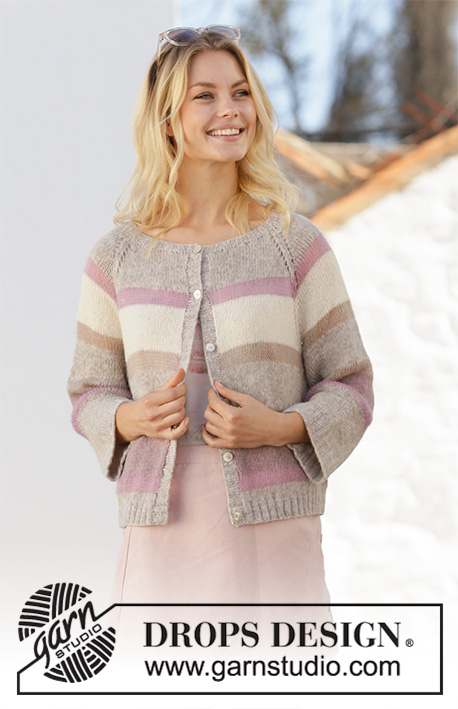 |
Knitted jacket in DROPS Sky and DROPS Kid-Silk. The piece is worked top down with raglan and stripes. Sizes S - XXXL.
DROPS 201-26 |
|
|
------------------------------------------------------- EXPLANATIONS FOR THE PATTERN: ------------------------------------------------------- STRIPES: 6½-7-7-7-7½-8 cm = 2½"-2¾"-2¾"-2¾"-3"-3⅛" with light beige Sky 2½-2½-2½-3-3-3 cm = 1"-1"-1"-1⅛"-1⅛"-1⅛" with old pink Kid-Silk 6½-7-7-7-7½-8 cm = 2½"-2¾"-2¾"-2¾"-3"-3⅛" with white Sky 2½-2½-2½-3-3-3 cm = 1"-1"-1"-1⅛"-1⅛"-1⅛" with light beige Kid-Silk 6½-7-7-7-7½-8 cm = 2½"-2¾"-2¾"-2¾"-3"-3⅛" with light beige Sky 2½-2½-2½-3-3-3 cm = 1"-1"-1"-1⅛"-1⅛"-1⅛" with light beige Kid-Silk 6½-7-7-7-7½-8 cm = 2½"-2¾"-2¾"-2¾"-3"-3⅛" with light lilac Sky 2½-2½-2½-3-3-3 cm = 1"-1"-1"-1⅛"-1⅛"-1⅛" with old pink Kid-Silk Then work with light beige Sky to finished length. RIDGE/GARTER STITCH (worked back and forth): Knit all rows. 1 ridge in height = Knit 2 rows. RAGLAN: All increases are worked from the right side! Increase to raglan in each transition between body and sleeves as follows: Work until there is 1 stitch left before marker thread, 1 yarn over, knit 2 (marker thread sits between these 2 stitches), 1 yarn over (= 2 stitches increased). On the next row (wrong side) purl the yarn overs to leave holes. Then work the new stitches in stockinette stitch. There are a total of 8 stitches increased on each increase-row. INCREASE TIP (evenly spaced): To work out how to increase evenly, count the total number of stitches on the needle (e.g. 186 stitches) minus edge stitches (e.g. 2 stitches) and divide the remaining stitches by the number of increases to be made (e.g. 34) = 5.4. In this example, increase by making 1 yarn over after alternately each 5th and 6th stitch. On the next row work the yarn overs twisted to avoid holes. DECREASE TIP (for sleeve): Decrease 1 stitch on each side of the marker thread as follows: Work until there are 3 stitches left before the marker thread, knit 2 together, knit 2 (marker thread sits between these 2 stitches), slip 1 stitch as if to knit, knit 1 and pass the slipped stitch over the knitted stitch. ------------------------------------------------------- START THE PIECE HERE: ------------------------------------------------------- JACKET - SHORT OVERVIEW OF THE PIECE: The yoke and body are worked back and forth with circular needle from mid front, top down. The sleeves are worked in the round with short circular needle/double pointed needles, top down. The bands are worked mid front and then the neck to finish. The whole piece is worked in stockinette stitch with stripes and ribbed edges. YOKE: Cast on 106-114-122-126-134-142 stitches (including 1 edge stitch on each side towards mid front) with circular needle size 4.5 mm = US 7 and light beige Sky. Purl 1 row from the wrong side. Insert 4 marker threads in the piece (without working the stitches) as follows: First marker thread is inserted after the first 19-21-23-24-26-28 stitches (= front piece), second marker thread after the next 16 stitches (= sleeve), third marker thread is inserted after the next 36-40-44-46-50-54 stitches (= back piece) and fourth marker thread after the next 16 stitches (= sleeve). There are 19-21-23-24-26-28 stitches left after the last marker thread (= front piece). Continue with stockinette stitch and STRIPES with 1 edge stitch in GARTER STITCH – read description above, on each side towards mid front – AT THE SAME TIME on the first row from the right side increase to RAGLAN in each transition between body and sleeves – read description above. Increase to raglan every 2nd row (i.e. each row from the right side) a total of 23-26-27-30-32-35 times on both sides of all 4 marker threads. REMEMBER THE KNITTING GAUGE! After the last increase there are 290-322-338-366-390-422 stitches on the needle and the piece measures approx. 18-20-21-23-25-27 cm = 7"-8"-8¼"-9"-9¾"-10⅝" from the cast-on edge mid front. If the measurement is not right, continue working without further increases to the correct length. The next row is worked as follows from the right side: Knit 43-47-49-54-59-65 stitches (= front piece), place the next 60-68-72-76-78-82 stitches on 1 thread for sleeve, cast on 8-8-12-12-14-14 new stitches on the needle (= in side under sleeve), knit 84-92-96-106-116-128 stitches (= back piece), place the next 60-68-72-76-78-82 stitches on 1 thread for sleeve, cast on 8-8-12-12-14-14 new stitches on the needle (= in side under sleeve) and knit the remaining 43-47-49-54-59-65 stitches (= front piece). Body and sleeves are finished separately. THE PIECE IS NOW MEASURED FROM HERE! BODY: = 186-202-218-238-262-286 stitches. Continue with stockinette stitch and stripes with 1 edge stitch in garter stitch on each side (first row is from wrong side). When the piece measures 21-21-22-22-22-22 cm = 8¼"-8¼"-8¾"-8¾"-8¾"-8¾" from the division, knit 1 row from the right side where you increase 34-38-38-46-50-54 stitches evenly spaced – read INCREASE TIP = 220-240-256-284-312-340 stitches. Change to circular needle size 3.5 mm = US 4. The next row is worked as follows from the wrong side: 1 edge stitch in garter stitch * purl 2, knit 2 * work from *-* until there are 3 stitches left on row, purl 2 and finish with 1 edge stitch in garter stitch. Continue this rib for 3 cm = 1⅛". Loosely bind off with knit over knit and purl over purl, but to avoid the bind-off edge being tight, you can bind off with a needle size 4.5 mm. The jacket measures approx. 46-48-50-52-54-56 cm = 18"-19"-19¾"-20½"-21¼"-22" from the shoulder down. SLEEVE: Place the 60-68-72-76-78-82 stitches from the thread on the one side of the piece on short circular needle/double pointed needles size 4.5 mm = US 7 and knit up 1 stitch in each of the 8-8-12-12-14-14 stitches cast on under the sleeve = 68-76-84-88-92-96 stitches. Insert 1 marker thread in the middle of the 8-8-12-12-14-14 stitches under the sleeve and start the round here. Work stockinette stitch and stripes in the round. When the piece measures 2 cm = ¾" from the division, decrease 2 stitches mid under sleeve – read DECREASE TIP. Decrease like this every 11-4-2½-2-1½-1½ cm = 4⅜"-1½"-1"-¾"-½"-½" a total of 3-6-9-10-11-12 times = 62-64-66-68-70-72 stitches. Continue working until the sleeve measures 33-31-31-29-27-26 cm from the division (shorter measurements in larger sizes due to longer yoke). Knit 1 round where you increase 14-12-14-12-14-12 stitches evenly spaced = 76-76-80-80-84-84 stitches. Change to double pointed needles size 3.5 mm and work rib (= knit 2, purl 2) for 3 cm = 1⅛". Loosely bind off with knit over knit and purl over purl, but to avoid the bind-off edge being tight you can bind off with needle size 4.5 mm = US 7. The sleeve measures approx. 36-34-34-32-30-29 cm = 14¼"-13⅜"-13⅜"-12½"-11¾"-11⅜" from the division. Work the other sleeve in the same way LEFT BAND: Knit up from the right side, inside the 1 edge stitch in garter stitch, approx. 101-105-109-113-117-125 stitches along the left front piece with circular needle size 3.5 mm = US 4 and light beige Sky (the number of stitches needs to be divisible by 4 + 1). The first row is worked as follows from the wrong side: 2 edge stitches in garter stitch, * purl 2, knit 2 *, work from *-* until there are 3 stitches left on row, purl 2 and finish with 1 edge stitch in garter stitch. Continue this rib for 2 cm = ¾". Loosely bind off with garter stitch over garter stitch, knit over knit and purl over purl. RIGHT BAND: Knit up from the right side, inside the 1 edge stitch in garter stitch, approx. 101-105-109-113-117-125 stitches along the right front piece with circular needle size 3.5 mm = US 4 and light beige Sky (the number of stitches needs to be divisible by 4 + 1). The first row is worked as follows from the wrong side: 1 edge stitch in garter stitch, * purl 2, knit 2 *, work from *-* until there are 4 stitches left on row, purl 2 and finish with 2 edge stitches in garter stitch. Continue this rib, but after 1 cm = ⅜" work 5-5-5-6-6-6 buttonholes evenly spaced. The bottom buttonhole should be approx. 2 cm = ¾" from the bottom edge and the top buttonhole approx. 7 cm = 2¾" from the neck edge. 1 buttonhole = knit 2 together and make 1 yarn over – NOTE: It is neatest if the buttonholes are worked in the purled sections (seen from the right side). Continue the rib until it is the same width as the left band. Loosely bind off with garter stitch over garter stitch, knit over knit and purl over purl. NECK: Knit up from the right side approx. 114-122-130-134-142-150 stitches along the whole neck with circular needle size 3.5 mm = US 4 and light beige Sky. Purl 1 row from the wrong side where you decrease the number of stitches evenly spaced to 110-114-118-122-126-134 stitches. The next row is worked as follows from the right side: 2 edge stitches in garter stitch, * knit 2, purl 2 *, work from *-* until there are 4 stitches left on row, knit 2 and finish with 2 edge stitches in garter stitch. Continue this rib, but after approx. 1 cm = ⅜", work 1 buttonhole above the others on the right band. Continue working until the neck measures approx. 2 cm = ¾" and loosely bind off with knit over knit and purl over purl. ASSEMBLY: Sew buttons onto left band. |
|
 |
|
Have you finished this pattern?Tag your pictures with #dropspattern #rosewaterjacket or submit them to the #dropsfan gallery. Do you need help with this pattern?You'll find 24 tutorial videos, a Comments/Questions area and more by visiting the pattern on garnstudio.com. © 1982-2026 DROPS Design A/S. We reserve all rights. This document, including all its sub-sections, has copyrights. Read more about what you can do with our patterns at the bottom of each pattern on our site. |
|


With over 40 years in knitting and crochet design, DROPS Design offers one of the most extensive collections of free patterns on the internet - translated to 17 languages. As of today we count 325 catalogs and 12298 patterns - 12288 of which are translated into English (US/in).
We work hard to bring you the best knitting and crochet have to offer, inspiration and advice as well as great quality yarns at incredible prices! Would you like to use our patterns for other than personal use? You can read what you are allowed to do in the Copyright text at the bottom of all our patterns. Happy crafting!
Post a comment to pattern DROPS 201-26
We would love to hear what you have to say about this pattern!
If you want to leave a question, please make sure you select the correct category in the form below, to speed up the answering process. Required fields are marked *.