
Popular categories
Looking for a yarn?


Comments / Questions (51)
![]() Carmen wrote:
Carmen wrote:
En la realización de la espalda después de trabajar los 26 cm a partir de los cuadrados, no entiendo dónde hay que hacer los arcos cada 2,5 cm
12.10.2019 - 22:26DROPS Design answered:
Hola Carmen. Los arcos cada 2,5 cm se trabajan a los lados de la parte de la chaqueta que acabamos de trabajar de 26 cm de largo. Se trabajan hacia arriba desde el borde inferior del rectángulo hasta la esquina del cuadrado con la estrella ( ver el diagrama).
21.10.2019 - 23:44
![]() Nati wrote:
Nati wrote:
Hola, leí despacio y todo correcto, acabé mi chaqueta, gracias
19.08.2019 - 23:23DROPS Design answered:
Estupendo!
22.08.2019 - 17:28
![]() Nati wrote:
Nati wrote:
Hola, tengo la chaqueta casi terminada, pero no entiendo cómo hacer el cuello. Me parece que lo tengo que hacer por separado pero no entiendo cuánto de ancho y largo, vaya que no entiendo y creo que suelo entender bien los patrones, a la espera de respuesta, gracias anticipadas
19.08.2019 - 19:05DROPS Design answered:
Hola Nati! Nos alegra que acabaste la chaqueta. Muestrala en facebook. Felicitaciones!
22.08.2019 - 17:26
![]() Gonny wrote:
Gonny wrote:
Rechter kant en mouw. Het was moeilijk om het verhaal van de 3-dubbele stokjes, dubbele stokjes onderaan het vest te ontcijferen. De 22 stokjes in het patroon kon en kan ik nog steeds niet plaatsen. Ik begreep ook niet waar de extra lange stokjes voor dienden. Ik neem nu aan dat het bedoelt is om vorm in het vest te krijgen onderin. Klopt dit? Misschien kan dat erbij vermeldt worden, dat verklaart een hoop. Alvast bedankt!
08.08.2019 - 13:31DROPS Design answered:
Dag Gonny,
De eerste en laatste driedubbele stokjes en de dubbele stokjes die daarnaast zitten zijn inderdaad bedoelt om vorm (A-lijn) te creëren in het werk. Van de steken die daar tussenin zitten haak je de stokjes als normale stokjes en dit zijn dus die 22 stokjes.
10.08.2019 - 16:02
![]() Annika Hammer wrote:
Annika Hammer wrote:
Hej! Förstår inte alls hur jag ska virka halskanten. Tycker första meningen under denna rubrik är väldigt svår att förstå: Ska jag börja vid vänste axelsöm, och virka den lilla snutten ner mot framkant på framstycket, eller virkar jag mot nacken (bakstycket)? Ska jag inte virka runt hela halsen? Var ska jag sy? Annika
05.08.2019 - 22:22DROPS Design answered:
Hej Annika, du börjar vid vänster axelsöm, virkar den lilla snutten ner mot framkant på framstycket och fortsätter fram och tillbaka som en lång remsa på 20 varv. Nu syr du kortsidan mot höger halskant och hela långsidan längs nacken. Lycka till :
03.10.2019 - 14:16
![]() Constance Geeve wrote:
Constance Geeve wrote:
Even voor de zekerheid.... dit stukje tekst onder het kopje Rechtervoorpand en mouw gaat over de toer aan de verkeerde kant met grijs toch? "Als A.3a – A.3c helemaal zijn gehaakt in de hoogte, herhaal dan de laatste 2 toeren op dezelfde manier, maar op de 2e toer in de telpatronen haakt u de eerste 8 stokjes als driedubbele stokjes enz." Mvg Constance
11.06.2019 - 00:21DROPS Design answered:
Dag Constance,
Bij de mouw begin je met zomerheide en haak je STREPEN-2, dus om en om zomerheide en grijs. A.3 heeft 3 toeren, dus als je A.3 een keer in de hoogte hebt gebreid, dan zou de laatste toer zomerheide moeten zijn. Dus waar staat Als A.3a – A.3c helemaal zijn gehaakt in de hoogte, zou je dan weer met grijs moeten beginnen.
13.06.2019 - 09:06
![]() Birgit Rittsteiger wrote:
Birgit Rittsteiger wrote:
Hallo, ich würde so gerne diese Jacke häkeln, kenn mich aber bei dieser Anleitung leider gar nicht aus. Gibt es da vielleicht eine genaue Anleitung zu kaufen? Mit freundlichen Grüßen Birgit Rittsteiger
09.05.2019 - 11:17DROPS Design answered:
Liebe Frau Rittsteiger, lesen Sie die Anleitung durch - hier lesen Sie mehr über Diagramme - sollten Sie Fragen haben, stellen Sie sie gerne hier - Ihr DROPS Laden wird Ihnen auch mal gerne weiterhelfen - auch telefonisch oder per E-Mail. Viel Spaß beim häkeln!
09.05.2019 - 13:52
![]() Marie Engblom wrote:
Marie Engblom wrote:
Undrar vad ” v ” på andra varvet betyder i diagrammet A4a? Mvh Marie
11.04.2019 - 21:52DROPS Design answered:
Hei Marie. Det ble gjort en rettelse i A.4a den 19.03.2019 der V-en på 2. rad ble endret til en T = 1 fastmaske. Kan det være denne v-en du sikter til? God fornøyelse
12.04.2019 - 07:45
![]() Mary Ann wrote:
Mary Ann wrote:
Are the numbers at the bottom of the diagram of the entire sweater flat - the number of stitches or clusters? They don’t add up. Please help so I can finish this. Darling sweater but poorly written pattern.
10.04.2019 - 17:03DROPS Design answered:
Dear Mary Ann, the numbers in the measurment chart are matching the measurements of piece in cm taken flat from side to side - read more about sizing here. There might be hundred ways to write and format patterns, you may just try to read it again with new eyes - read more about crochet diagrams here - for any question you are welcome to ask your question here and for any individual assistance, please contact the store where you bought the yarn - even per mail or telephone. Happy crocheting!
11.04.2019 - 09:51
![]() Cheryl Wieger wrote:
Cheryl Wieger wrote:
Could you please explain how to work the collar. The pattern doesn't tell how many repeticions of A4, B4, or C4.What part of the collar do you sew to right side?
04.04.2019 - 02:06DROPS Design answered:
Dear Mrs Wieger, you crochet 21 rows in A.4 a-b-c: the last 2 rows a total of 20 times + 1 more time the row 2. The right side of collar (seen from RS) = A.4a (= the shortest part of collar) will be then sewn along the neckline. Happy crocheting!
04.04.2019 - 09:52
|
|||||||||||||||||||||||||||||||||||||||||||||||||||||||||||||||||||||||||
My Wildflower#mywildflowerjacket |
|||||||||||||||||||||||||||||||||||||||||||||||||||||||||||||||||||||||||
 |
 |
||||||||||||||||||||||||||||||||||||||||||||||||||||||||||||||||||||||||
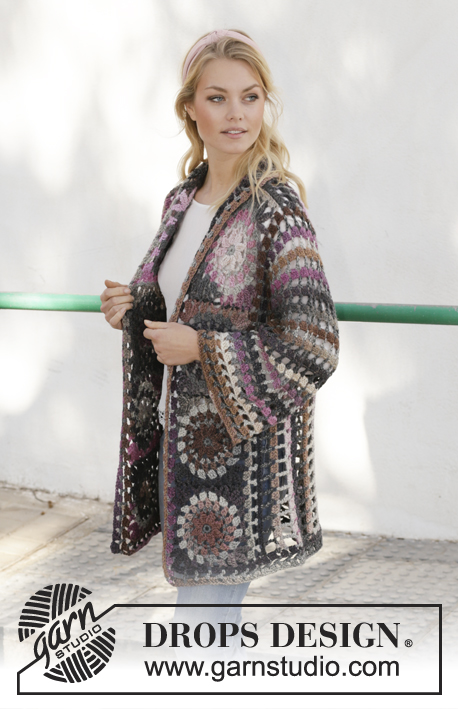
Crocheted long jacket in DROPS Big Delight. Piece is crocheted with stripes and crochet squares. Size: S - XXXL
DROPS 201-28 |
|||||||||||||||||||||||||||||||||||||||||||||||||||||||||||||||||||||||||
|
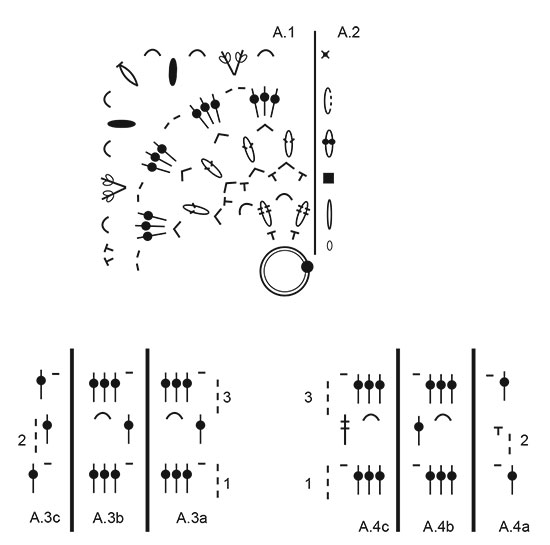
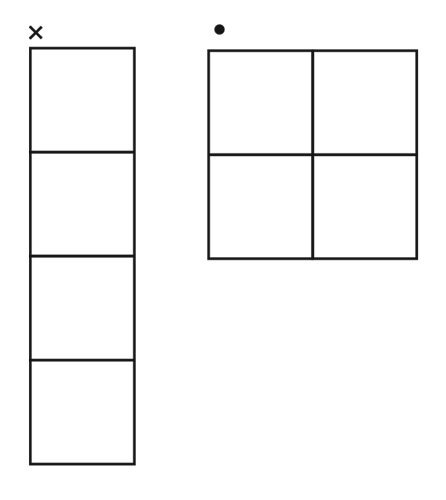
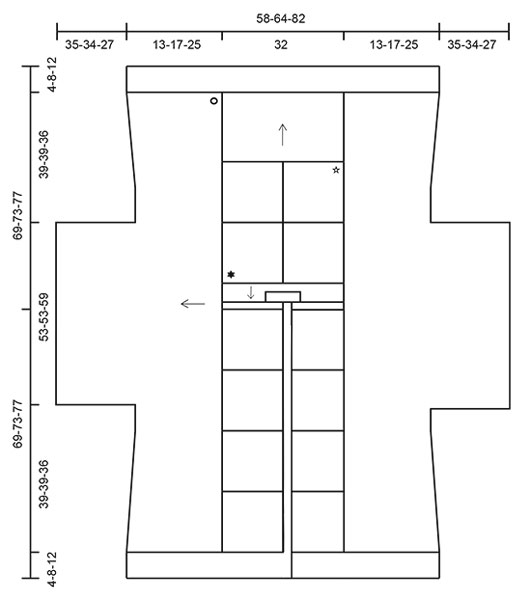
---------------------------------------------------------- EXPLANATION FOR THE PATTERN: ---------------------------------------------------------- PATTERN: See diagrams A.1 to A.4. CROCHET TIP: When working double treble crochets at the beginning of row, work 5 chain stitches instead of 3 chain stitches at the beginning of row. STRIPES-1: * Work 1 round with grey, 1 round with summer meadow *, work from *-*. STRIPES-2: Row from right side (3 double crochets + 1 chain stitch): summer meadow. Row from wrong side (1 double crochet + 4 chain stitches): grey. COLOR CHANGE: When working diagrams A.1 and A.2 you crochet stripes in the round, every other stripe in each color. To avoid having to cut the strand after every round, the strand you’re not currently working with can be pulled along until the next round. When working stripes back and forth the strand needs to be cut and fastened after every row. ---------------------------------------------------------- START THE PIECE HERE: ---------------------------------------------------------- JACKET - SHORT OVERVIEW OF THE GARMENT: Work first 12 crochet squares in total. For front pieces work 4 square together into one long strip. For back piece work 4 squares together into a square, then work down along body and up towards shoulders. When front and back pieces are done, sew shoulder together before working outwards in each side for body and sleeves. Then work collar and band. CROCHET SQUARES: Work 4 chain stitches with grey on hook size 5 mm = US H/8 and form a ring with a slip stitch in first chain stitch. Now work STRIPES-1 - see explanation above, and A.1 4 times in total on round (A.2 shown how round begins and ends). REMEMBER THE CROCHET GAUGE! When A.1 and A.2 have been worked vertically, crochet square measures approx. 16 x 16 cm = 6¼" x 6¼". Work 12 crochet squares in total. SQUARE ASSEMBLY: Back piece: Work 4 crochet squares together into a large square - see illustration with black dot. Place 2 crochet squares with right side against right side and work together from wrong side through both layers with grey as follows: Fasten strand with 1 single crochet in stitch in the corner, 2 chain stitches, 1 single crochet around next chain space, * 4 chain stitches, 1 single crochet around next chain space *, work from *-* 5 times in total, 2 chain stitches, 1 single crochet in stitch in the corner. 2 of the crochet squares are now worked together. Work the other 2 together the same way. Now work the squares together so that there are 2 squares in width and 2 squares vertically: Fasten strand with 1 single crochet in stitch in the corner, 2 chain stitches, 1 single crochet around next chain space, * 4 chain stitches, 1 single crochet around next chain space *, work from *-* 5 times in total, 4 chain stitches, 1 single crochet on next crochet square, * 4 chain stitches, 1 single crochet around next chain space *, work from *-* 5 times in total, 2 chain stitches, 1 single crochet in stitch in the corner. Right and left front piece: Work 4 crochet squares into a strip to get 4 x 1 crochet square - see illustration with cross. Place 2 crochet squares with right side against right side and work together from wrong side through both layers with grey as follows: Fasten strand with 1 single crochet in stitch in the corner, 2 chain stitches, 1 single crochet around next chain space, * 4 chain stitches, 1 single crochet around next chain space *, work from *-* 5 times in total, 2 chain stitches, 1 single crochet in stitch in the corner. 2 of the crochet square are now worked together. Work the other crochet squares together to form a long strip of 1 x 4 crochet squares. Work the other front piece the same way. BACK PIECE: Work down the back as follows: Begin with summer meadow and from right side. Fasten strand with 1 single crochet in the corner with white star - see chart. Work STRIPES-2 and pattern from first row in A.3a to A.3c as follows: Work A.3a around first chain space, A.3b around each of the next 11 chain spaces, finish with A.3c in stitch in the corner. Continue back and forth and repeat the 2 last rows in A.3a - A.3c until piece measures 26 cm = 10¼" from crochet squares – adjust to finish after a row that equals 2nd row in A.3a - A.3c. Now work chain spaces down along the side of rows with A.3a from wrong side and with grey as follows: Work * 3 chain stitches, skip approx. 2½ cm = 1", 1 single crochet *, work from *-* evenly until 10 chain spaces have been worked along the side on back piece up to first crochet square (with white star). Cut the yarn and repeat in the other side. Work shoulder in opposite side of the 4 crochet squares as follows: Begin with summer meadow and from right side. Fasten strand with 1 single crochet in the corner with black star - see chart. Work STRIPES-2 and pattern from first row in A.3a - A.3c as follows: Work A.3a around first chain space, work A.3b around each of the next 11 chain spaces, finish with A.3c in the corner. Continue back and forth until entire diagram has been worked vertically 1 time. Now work left shoulder from 2nd row in diagrams as follows: A.3c, A.3b 3 times in total, A.3a. Turn and work last row from right side. Cut the strand and work right shoulder from 2nd row in diagrams as follows: Skip 4 double crochet groups for neck and fasten yarn (grey) with 1 single crochet around next chain stitch. Work A.3c, A.3b 3 times in total, A.3a. Turn and work last row from right side. Cut the yarn. The back piece is finished. RIGHT AND LEFT FRONT PIECE: Now work 1 row upwards towards the shoulder, along one square at the end of strip with 4 crochet squares. Begin with summer meadow and work from right side. Fasten strand with 1 single crochet in corner, work A.3a around first chain space, A.3b around each of the next 5 chain spaces, finish with A.3c in the corner. Cut and fasten the yarn. Work left front piece the same way as on right front piece. SHOULDER ASSEMBLY: Sew shoulder seams. Start the seam on the outermost end of the shoulder and sew towards the neck, one stitch at a time. RIGHT SIDE AND SLEEVE: Begin with summer meadow and from right side. Fasten strand with a single crochet in the corner with circle - see chart. Work STRIPES-2 and pattern from first row in A.3a - A.3c as follows: Work A.3a around first chain space, A.3b around each of the next 9 chain spaces, continue with A.3b around each chain space along each of the next 2 crochet squares on back piece (= 12 repetitions A.3b), work 3 repetitions A.3b evenly up to shoulder seam and 1 repetition A.3b in last row on front piece, continue with A.3b in every chain space along each crochet square on front piece (= 24 repetitions A.3b), finish with A.3c in the corner at the bottom of front piece. There are now 1 repetition A.3a, 49 repetitions A.3b and 1 repetition A.3c along the side of piece. When entire A.3a – A.3c have been worked vertically, repeat the last 2 rows the same way, but on 2nd row in diagrams work the first 8 double crochets as double treble crochets – read CROCHET TIP, work the next 6 double crochets as treble crochets, work the next 22 double crochets as double crochets as before, work the next 6 double crochets as treble crochets, work the last 8 double crochets as double treble crochets (work 3rd row as shown in diagram). Continue back and forth the same way (ie: on row 2 in the diagram you work double treble crochets and treble crochets in the beginning and end of row as explained, and row 3 is worked as before) until piece measures 13-17-25 cm = 5⅛"-6¾"-9¾" at the bottom of front and back piece - adjust to finish after 3rd row in diagram. Cut the yarn. Now work sleeve, begin from wrong side: Skip the first 15-15-14 double crochet groups (= A.3a/A.3b). Fasten strand (grey) with 1 single crochet around next chain stitch, work 3 chain stitches, 1 double crochet around the same chain stitch (= A.3c), A.3b 19 times in total, A.3c. Turn and work 3rd row back from right side - continue STRIPES-2 as before. Continue back and forth like this until piece measures approx. 48-50-52 cm = 19"-19¾"-20½" from crochet squares – adjust to finish after a row from right side. Cut the yarn. LEFT SIDE AND SLEEVE: Work left side and sleeve the same way as on right side and sleeve but begin from right side in the corner at the bottom of front piece instead of back piece - adjust measurements according to right side and sleeve. ASSEMBLY: Fold the jacket so that right side is against right side and work through both layer from wrong side with summer meadow as follows: Begin at the bottom of sleeve with a single crochet, * work 4 chain stitches, skip approx. 1 cm = ⅜", work 1 single crochet *, work from *-* under sleeve and down along the side. Cut the yarn. Repeat in the other side. EDGE AT THE BOTTOM OF BODY: Begin from right side at the bottom of front piece towards mid front and work with summer meadow as follows: Fasten strand with 1 single crochet in stitch in the corner, work A.3a around first chain space, A.3b around each of the next 5 chain spaces, work A.3b evenly 11-14-20 times along the piece until part on back piece worked down on the 4 crochet squares at the back, work A.3b 12 times in total as before over the next 12 repetitions on back piece, work A.3b 11-14-20 times along the side of piece until crochet square on front piece, work A.3b 6 times in total along crochet square and finish with A.3c around stitches in the corner. There are now 1 repetition A.3a, 45-51-63 repetitions A.3b and 1 repetition A.3c on row. Continue back and forth with the 2 last rows in diagram (continue STRIPES-2 as before) until edge measures 4-8-12 cm = 1½"-3⅛"-4¾" from crochet squares on front piece - adjust to finish after last row in diagrams. Cut the yarn. COLLAR: Work collar back and forth in 1 part from left front piece and sew to neck and right front piece when finished. Work entire collar in summer meadow. Begin from right side with 1 single crochet on the inside at left shoulder seam (towards the neck) on left front piece and work from 2nd row in diagrams as follows: A.4a, A.4b, A.4c (work 2nd row from right side and 3rd row from wrong side). Continue back and forth like this and repeat the last 2 rows until 20 rows have been worked vertically. Then work the next to last row in diagram one more time. Cut the yarn. Sew the last row worked to the edge at the top on right front piece and sew collar along the back of neck (sew with small stitches to avoid a chunky seam). BAND: Begin from right side with summer meadow in the corner at the bottom of front piece. Work 1 single crochet around bottom row on the edge, work 4 chain stitches, 3 double crochets around next row along the edge (= A.3a), work 0-1-2 repetitions A.3b evenly up to first crochet square, continue with A.3b around every chain space along each of the 4 crochet squares on right front piece (= 6 repetitions A.3b along each of the crochet squares), continue with 1 repetition A.3b around every row along the collar (= 20 repetitions), continue down along left band the same way as on right band. When entire A.3a to A.3b have worked vertically, the band is done. Cut and fasten the yarn. |
|||||||||||||||||||||||||||||||||||||||||||||||||||||||||||||||||||||||||
Diagram explanations |
|||||||||||||||||||||||||||||||||||||||||||||||||||||||||||||||||||||||||
|
|||||||||||||||||||||||||||||||||||||||||||||||||||||||||||||||||||||||||
 |
|||||||||||||||||||||||||||||||||||||||||||||||||||||||||||||||||||||||||
 |
|||||||||||||||||||||||||||||||||||||||||||||||||||||||||||||||||||||||||
 |
|||||||||||||||||||||||||||||||||||||||||||||||||||||||||||||||||||||||||
Have you finished this pattern?Tag your pictures with #dropspattern #mywildflowerjacket or submit them to the #dropsfan gallery. Do you need help with this pattern?You'll find 13 tutorial videos, a Comments/Questions area and more by visiting the pattern on garnstudio.com. © 1982-2026 DROPS Design A/S. We reserve all rights. This document, including all its sub-sections, has copyrights. Read more about what you can do with our patterns at the bottom of each pattern on our site. |
|||||||||||||||||||||||||||||||||||||||||||||||||||||||||||||||||||||||||


With over 40 years in knitting and crochet design, DROPS Design offers one of the most extensive collections of free patterns on the internet - translated to 17 languages. As of today we count 324 catalogs and 12290 patterns - 12280 of which are translated into English (US/in).
We work hard to bring you the best knitting and crochet have to offer, inspiration and advice as well as great quality yarns at incredible prices! Would you like to use our patterns for other than personal use? You can read what you are allowed to do in the Copyright text at the bottom of all our patterns. Happy crafting!
Post a comment to pattern DROPS 201-28
We would love to hear what you have to say about this pattern!
If you want to leave a question, please make sure you select the correct category in the form below, to speed up the answering process. Required fields are marked *.